Sue Recipe

  • Recipe Index
  • Chicken
  • Desserts
  • About
  • Contact
menu icon
go to homepage
  • Recipe Index
  • Chicken
  • Desserts
  • About
  • Contact

search icon
Homepage link
  • Recipe Index
  • Chicken
  • Desserts
  • About
  • Contact

×

Old-Fashioned Peanut Butter Cookies

June 15, 2025 by Sue Leave a Comment

Why You’ll Love This Recipe

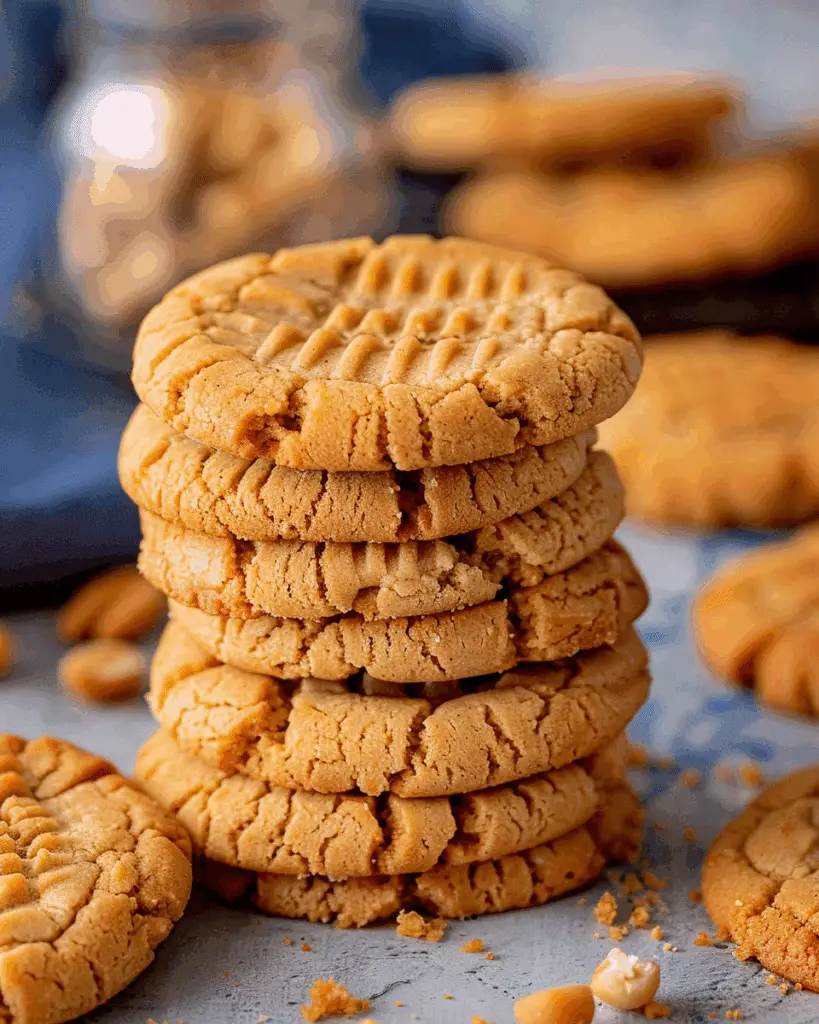
I adore these Old-Fashioned Peanut Butter Cookies for their delightful combination of a crisp, golden exterior and a soft, chewy center. They bring back memories of the large, comforting cookies often found in school cafeterias, affectionately known as "Lunch Lady Peanut Butter Cookies." The criss-cross fork marks on top add a nostalgic touch, reminiscent of the classic treats my grandmother used to bake. With just a few simple ingredients and minimal preparation time, these cookies are perfect for satisfying sweet cravings or sharing with loved ones. Old-Fashioned Peanut Butter Cookies
Ingredients

  • 1 ¼ cups creamy peanut butter
  • 1 cup salted butter, room temperature
  • 1 ¼ cups light brown sugar, packed
  • ¾ cup granulated sugar
  • 2 large eggs, room temperature
  • 1 ½ teaspoons vanilla extract
  • 2 cups all-purpose flour
  • 1 teaspoon baking soda

(Hint: For the complete list of ingredients and measurements, refer to the recipe card below.)

Directions

  1. Preheat the oven to 350°F (175°C). Line baking sheets with parchment paper or silicone liners.
  2. In a large bowl, use an electric hand mixer or stand mixer to beat the peanut butter and butter until smooth.
  3. Add the brown sugar and granulated sugar, beating until fluffy.
  4. Mix in the eggs one at a time, followed by the vanilla extract.
  5. In a separate bowl, whisk together the flour and baking soda. Gradually add the dry ingredients to the wet mixture, stirring until just combined.
  6. Scoop dough into 2-tablespoon-sized balls and place them about 3 inches apart on the prepared baking sheets.
  7. Using a fork, gently press down on each dough ball to create a cross-hatch pattern.
  8. Bake for 12–13 minutes, or until the cookies are golden brown and no longer glossy on top.
  9. Allow the cookies to cool on the baking sheet for about 5 minutes before transferring them to a wire rack to cool completely.

Servings and Timing

  • Servings: Approximately 24 cookies
  • Preparation time: 10 minutes
  • Baking time: 12–13 minutes
  • Total time: Approximately 22 minutes

Variations

  • Crunchy Peanut Butter: Substitute creamy peanut butter with crunchy for added texture and a more pronounced peanut flavor.
  • Add-ins: Incorporate ½ cup of peanut butter chips, chocolate chips, or chopped peanuts into the dough for extra flavor and crunch.
  • Mini Cookies: Roll dough into 1-tablespoon-sized balls and bake for about 10 minutes for smaller, bite-sized treats.

Storage/Reheating

  • Room Temperature: Store cookies in an airtight container at room temperature for up to 4–5 days.
  • Freezing: Freeze baked cookies or unbaked dough for up to 3 months. To freeze dough, scoop into balls, place on a baking sheet to freeze individually, then transfer to a freezer-safe container. Bake from frozen, adding a couple of extra minutes to the baking time.

FAQs

Can I make the dough ahead of time?

Yes, you can prepare the dough in advance and store it in the refrigerator for up to 24 hours before baking.

Why are my cookies tough?

Overbaking can lead to tough cookies. Remove them from the oven just before they look finished, as they will continue to cook slightly while cooling on the baking sheet.

Can I use natural peanut butter?

Natural peanut butter can cause the cookies to over-spread during baking. If you choose to use it, ensure it's well-stirred and consider adding a bit more flour to the dough.

How do I achieve the classic criss-cross pattern?

Use a fork to gently press down on each dough ball twice, once in each direction, to create the traditional lattice pattern.

Can I make these cookies smaller?

Absolutely! Roll the dough into 1-tablespoon-sized balls and bake for about 10 minutes for smaller cookies.

Conclusion

These Old-Fashioned Peanut Butter Cookies are a delightful treat that combines simplicity with nostalgic flavors. Whether enjoyed with a glass of milk or shared with friends and family, they offer a comforting taste of tradition. I hope you enjoy baking and savoring these classic cookies as much as I do.

Print

clock clock iconcutlery cutlery iconflag flag iconfolder folder iconinstagram instagram iconpinterest pinterest iconfacebook facebook iconprint print iconsquares squares iconheart heart iconheart solid heart solid icon
Old-Fashioned Peanut Butter Cookies

Old-Fashioned Peanut Butter Cookies

5 Stars 4 Stars 3 Stars 2 Stars 1 Star No reviews
  • Author: Sue
  • Prep Time: 10 minutes
  • Cook Time: 13 minutes
  • Total Time: 23 minutes
  • Yield: 24 cookies
  • Category: Dessert
  • Method: Baking
  • Cuisine: American
  • Diet: Vegetarian
Print Recipe
Pin Recipe

Description

These Old-Fashioned Peanut Butter Cookies offer a nostalgic blend of a crisp exterior and chewy center, perfect for satisfying sweet cravings or sharing with loved ones.


Ingredients

  • 1 ¼ cups creamy peanut butter
  • 1 cup salted butter, room temperature
  • 1 ¼ cups light brown sugar, packed
  • ¾ cup granulated sugar
  • 2 large eggs, room temperature
  • 1 ½ teaspoons vanilla extract
  • 2 cups all-purpose flour
  • 1 teaspoon baking soda

Instructions

  1. Preheat the oven to 350°F (175°C). Line baking sheets with parchment paper or silicone liners.
  2. In a large bowl, use an electric hand mixer or stand mixer to beat the peanut butter and butter until smooth.
  3. Add the brown sugar and granulated sugar, beating until fluffy.
  4. Mix in the eggs one at a time, followed by the vanilla extract.
  5. In a separate bowl, whisk together the flour and baking soda. Gradually add the dry ingredients to the wet mixture, stirring until just combined.
  6. Scoop dough into 2-tablespoon-sized balls and place them about 3 inches apart on the prepared baking sheets.
  7. Using a fork, gently press down on each dough ball to create a cross-hatch pattern.
  8. Bake for 12–13 minutes, or until the cookies are golden brown and no longer glossy on top.
  9. Allow the cookies to cool on the baking sheet for about 5 minutes before transferring them to a wire rack to cool completely.

Notes

  • Store cookies in an airtight container at room temperature for up to 4–5 days.
  • Freeze baked cookies or unbaked dough for up to 3 months.
  • Use well-stirred natural peanut butter with extra flour to prevent over-spreading.
  • For smaller cookies, use 1-tablespoon-sized dough balls and bake for about 10 minutes.

Nutrition

  • Serving Size: 1 cookie
  • Calories: 210
  • Sugar: 13g
  • Sodium: 150mg
  • Fat: 13g
  • Saturated Fat: 5g
  • Unsaturated Fat: 6g
  • Trans Fat: 0g
  • Carbohydrates: 20g
  • Fiber: 1g
  • Protein: 4g
  • Cholesterol: 25mg

Have you made this recipe? I'd love to see it!

Click here to Follow me on Pinterest

Homemade Peach Jam (No Pectin)

June 15, 2025 by Sue Leave a Comment

Why You’ll Love This Recipe

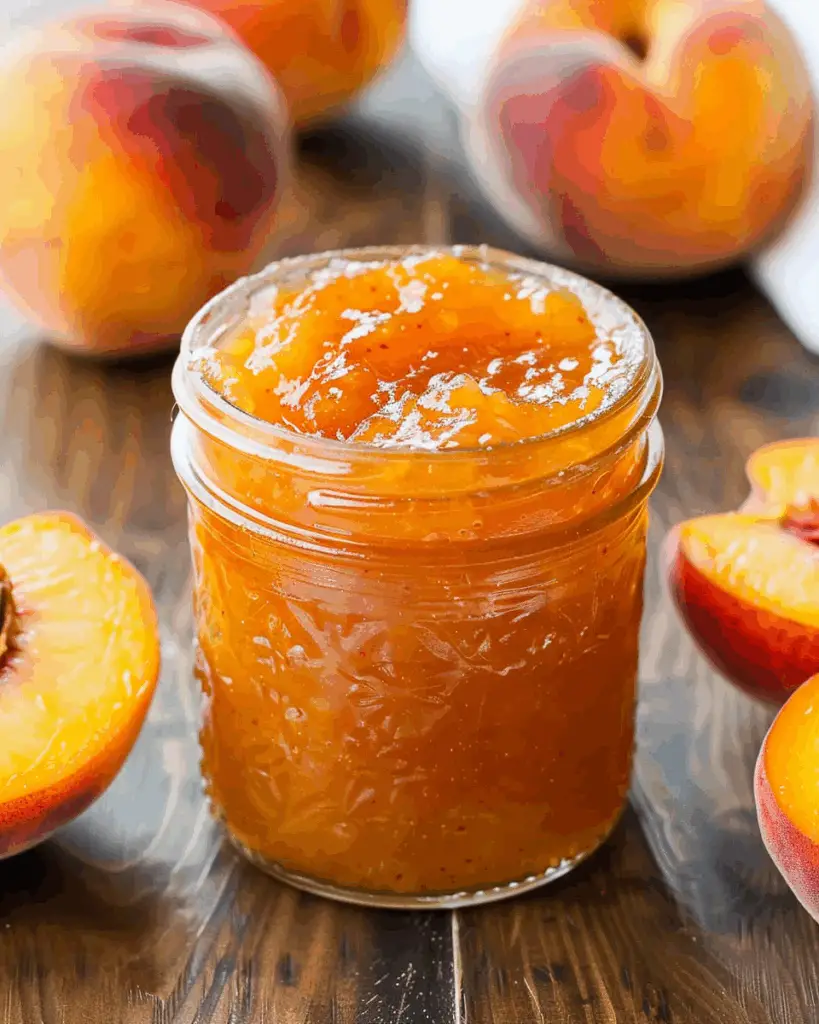
I absolutely adore this homemade peach jam recipe for its simplicity and the authentic peach flavor it delivers. With just three ingredients—ripe peaches, sugar, and lemon juice—this jam captures the essence of summer in every spoonful. I find it perfect for spreading on toast, pairing with biscuits, or even dolloping over ice cream. The best part? No pectin or canning equipment is required, making it ideal for beginners or anyone seeking a quick and delicious homemade treat. Homemade Peach Jam (No Pectin)

Ingredients

  • 1½ lbs ripe peaches (about 5 medium)
  • 1 cup granulated sugar
  • 1 tablespoon fresh lemon juice

(Hint: For detailed measurements and instructions, refer to the recipe card below.)

Directions

  1. Prepare the Peaches: I start by peeling, pitting, and finely dicing the peaches. This yields about 2 cups of chopped fruit. If I prefer a rustic texture, I leave the skins on.
  2. Combine Ingredients: In a medium saucepan, I mix the chopped peaches, sugar, and lemon juice. I let this sit for about 10 minutes to allow the sugar to draw out the juices from the peaches.
  3. Cook the Mixture: Over medium heat, I bring the mixture to a boil, stirring frequently. Once boiling, I reduce the heat and let it simmer for about 30–40 minutes, stirring occasionally, until the jam thickens to my desired consistency.
  4. Test the Jam: To check if the jam is ready, I place a small spoonful on a chilled plate and run my finger through it. If it wrinkles and holds its shape, it's done. If not, I continue simmering for a few more minutes and test again.
  5. Cool and Store: Once the jam has reached the right consistency, I remove it from heat and let it cool slightly before transferring it into sterilized jars. After it cools completely, I store it in the refrigerator for up to 2 weeks.

Servings and Timing

  • Servings: Approximately 2 cups
  • Prep Time: 20 minutes
  • Cook Time: 40 minutes
  • Total Time: 1 hour

Variations

  • Spiced Peach Jam: I can add a pinch of cinnamon or nutmeg during the simmering process for a warm, spiced flavor.
  • Peach Vanilla Jam: Adding a teaspoon of vanilla extract enhances the sweetness and depth of the jam.
  • Peach Ginger Jam: Incorporating a small amount of freshly grated ginger adds a zesty kick to the jam.

Storage/Reheating

I store the peach jam in an airtight container in the refrigerator, where it keeps for up to 2 weeks. For longer storage, I can freeze the jam in freezer-safe containers for up to 6 months. To enjoy, I simply thaw it in the refrigerator overnight before using.

FAQs

How do I peel peaches easily?

To peel peaches, I blanch them by placing them in boiling water for about 30 seconds, then transferring them to an ice bath. The skins should slip off effortlessly.

Can I use frozen peaches?

Yes, I can use frozen peaches. I thaw them completely and drain any excess liquid before proceeding with the recipe.

Why does my jam seem runny?

If the jam is runny, it might not have cooked long enough to reach the desired consistency. I can continue simmering it, stirring frequently, until it thickens.

Can I reduce the sugar in this recipe?

I can reduce the sugar slightly, but since sugar helps with the setting process and preservation, I prefer to use the full amount for the best results.

Is it necessary to sterilize jars?

Sterilizing jars is important if I plan to store the jam for an extended period. For short-term refrigeration, it's not strictly necessary, but I still prefer to use clean, sterilized jars to ensure freshness.

Conclusion

Making this homemade peach jam has become a delightful tradition for me, especially during peach season. The simplicity of the recipe, combined with the rich, fruity flavor, makes it a staple in my kitchen. Whether I spread it on warm biscuits, swirl it into yogurt, or enjoy it by the spoonful, this jam brings a taste of summer to my table year-round.

Print

clock clock iconcutlery cutlery iconflag flag iconfolder folder iconinstagram instagram iconpinterest pinterest iconfacebook facebook iconprint print iconsquares squares iconheart heart iconheart solid heart solid icon
Homemade Peach Jam (No Pectin)

Homemade Peach Jam (No Pectin)

5 Stars 4 Stars 3 Stars 2 Stars 1 Star No reviews
  • Author: Sue
  • Prep Time: 20 minutes
  • Cook Time: 40 minutes
  • Total Time: 1 hour
  • Yield: Approximately 2 cups
  • Category: Jam & Jellies
  • Method: Stovetop
  • Cuisine: American
  • Diet: Vegan
Print Recipe
Pin Recipe

Description

This easy homemade peach jam requires just three ingredients—ripe peaches, sugar, and lemon juice—and no pectin. It's a delicious way to preserve the flavor of summer with minimal effort.


Ingredients

  • 1½ lbs ripe peaches (about 5 medium)
  • 1 cup granulated sugar
  • 1 tablespoon fresh lemon juice

Instructions

  1. Peel, pit, and finely dice the peaches to yield about 2 cups. Optionally, leave the skins on for a rustic texture.
  2. In a medium saucepan, combine the chopped peaches, sugar, and lemon juice. Let sit for 10 minutes to release the juices.
  3. Bring the mixture to a boil over medium heat, stirring frequently. Reduce heat and simmer for 30–40 minutes until thickened, stirring occasionally.
  4. Test for doneness by placing a small spoonful on a chilled plate. If it wrinkles when pushed, the jam is ready. Otherwise, continue simmering and test again.
  5. Remove from heat and let cool slightly. Transfer to sterilized jars and cool completely. Store in the refrigerator for up to 2 weeks.

Notes

  • Use the blanching method to easily peel peaches.
  • Frozen peaches can be used after thawing and draining.
  • If the jam is too runny, simmer it longer to thicken.
  • Reducing sugar may affect the jam’s texture and preservation.
  • Clean, sterilized jars help ensure freshness, even for short-term storage.

Nutrition

  • Serving Size: 1 tablespoon
  • Calories: 50
  • Sugar: 12g
  • Sodium: 0mg
  • Fat: 0g
  • Saturated Fat: 0g
  • Unsaturated Fat: 0g
  • Trans Fat: 0g
  • Carbohydrates: 13g
  • Fiber: 0.5g
  • Protein: 0g
  • Cholesterol: 0mg

Have you made this recipe? I'd love to see it!

Click here to Follow me on Pinterest

Boston Cream Poke Cake

June 15, 2025 by Sue Leave a Comment

I adore this Boston Cream Poke Cake because it’s a laid-back twist on the classic New England Boston Cream Pie, but without all the fuss of custard and layers. The moist yellow sheet cake is poked with holes, filled with creamy French vanilla pudding, then topped with homemade chocolate ganache. Every bite is a perfect bite of cake, pudding, and chocolate.

Boston Cream Poke Cake

Why You’ll Love This Recipe

I love this recipe because:

  • It’s incredibly quick and easy, using a boxed cake mix with pudding infusion
  • The texture is divine—moist cake sprinkled with creamy pockets of pudding and silky ganache in each bite
  • It’s versatile: perfect for parties, potlucks, birthdays, or an everyday treat
  • I can make it ahead; it keeps well in the fridge, and the flavors meld and improve overnight

Ingredients

(Here's a tip: Check out the full list of ingredients and measurements in the recipe card below.)

For the cake:

  • Yellow cake mix
  • 1 cup half-and-half
  • 3 large eggs
  • ½ cup (1 stick) salted butter, melted

For the pudding filling:

  • 4 cups half-and-half
  • 2 (3.4 oz) boxes instant French vanilla pudding

For the ganache topping:

  • 1¼ cups heavy cream
  • 10 oz dark chocolate chips

Directions

  1. Preheat oven to 350°F and spray a 9×13-inch pan with non-stick spray.
  2. Beat together cake mix, 1 cup half-and-half, eggs, and melted butter until smooth, about 2 minutes.
  3. Pour batter into the prepared pan and bake for 25–30 minutes or until a toothpick comes out with a few crumbs.
  4. Immediately poke large holes all over the warm cake using the back of a wooden spoon handle.
  5. Whisk 4 cups of half-and-half with the pudding mix; pour over the cake, filling the holes. Refrigerate for 20 minutes.
  6. For the ganache: heat the heavy cream until hot but not boiling. Pour over chocolate chips and let sit for 1 minute. Stir until smooth, then pour over the chilled cake and spread evenly.
  7. Refrigerate the cake for at least 2 hours or overnight before serving.

Servings and timing

  • Makes about 15 servings
  • Prep time: 20 minutes
  • Bake time: 25–30 minutes
  • Chill time: at least 2 hours (preferably overnight)

Variations

  • Swap French vanilla pudding for instant vanilla or white chocolate pudding for a different flavor
  • Use white cake mix instead of yellow for a lighter cake
  • Choose milk or semi-sweet chocolate chips for a sweeter ganache
  • Try heavy cream or whole milk instead of half-and-half for the pudding

Storage/reheating

I store this cake in the fridge, covered, and it keeps well for up to 3 days. Chilling helps the pudding and ganache meld into the cake. I don’t reheat it—I serve it cold for best texture.

FAQs

Can I use a different cake mix flavor?

Yes! I like yellow best for that classic Boston Cream taste, but white cake works, too.

Why poke big holes instead of small ones?

Big holes let more pudding sink in, so every bite has creamy pockets. The wooden spoon handle works best.

Can I make it gluten-free?

Absolutely—just use a gluten-free yellow cake mix and ensure the pudding mix is also gluten-free.

How do I know when to stop baking?

Use a toothpick: a few moist crumbs mean it’s done. If it comes out clean, it’s slightly overbaked.

Can I freeze leftovers?

I don’t recommend freezing it, as the pudding texture changes. It stays best in the fridge for up to 3 days.

Conclusion

I love this Boston Cream Poke Cake because it delivers all the indulgent flavors of classic Boston Cream Pie with a fraction of the fuss. It’s simple, delicious, and always a crowd-pleaser—perfect for potlucks or dessert cravings. I hope you’ll enjoy digging into this rich, creamy, chocolate-topped treat as much as I do!

Print

clock clock iconcutlery cutlery iconflag flag iconfolder folder iconinstagram instagram iconpinterest pinterest iconfacebook facebook iconprint print iconsquares squares iconheart heart iconheart solid heart solid icon
Boston Cream Poke Cake

Boston Cream Poke Cake

5 Stars 4 Stars 3 Stars 2 Stars 1 Star No reviews
  • Author: Sue
  • Prep Time: 20 minutes
  • Cook Time: 25–30 minutes
  • Total Time: 2 hours 50 minutes (including chill time)
  • Yield: 15 servings
  • Category: Dessert
  • Method: Baking
  • Cuisine: American
  • Diet: Vegetarian
Print Recipe
Pin Recipe

Description

This Boston Cream Poke Cake is a simple, indulgent twist on the classic Boston Cream Pie. It features a moist yellow cake filled with creamy French vanilla pudding and topped with homemade chocolate ganache, making it a perfect dessert for any occasion.


Ingredients

  • 1 box yellow cake mix
  • 1 cup half-and-half
  • 3 large eggs
  • ½ cup (1 stick) salted butter, melted
  • 4 cups half-and-half
  • 2 (3.4 oz) boxes instant French vanilla pudding
  • 1¼ cups heavy cream
  • 10 oz dark chocolate chips

Instructions

  1. Preheat oven to 350°F and spray a 9×13-inch pan with non-stick spray.
  2. Beat together cake mix, 1 cup half-and-half, eggs, and melted butter until smooth, about 2 minutes.
  3. Pour batter into the prepared pan and bake for 25–30 minutes or until a toothpick comes out with a few crumbs.
  4. Immediately poke large holes all over the warm cake using the back of a wooden spoon handle.
  5. Whisk 4 cups of half-and-half with the pudding mix; pour over the cake, filling the holes. Refrigerate for 20 minutes.
  6. For the ganache: heat the heavy cream until hot but not boiling. Pour over chocolate chips and let sit for 1 minute. Stir until smooth, then pour over the chilled cake and spread evenly.
  7. Refrigerate the cake for at least 2 hours or overnight before serving.

Notes

  • This cake can be made ahead and stored in the fridge for up to 3 days.
  • For a different flavor, swap the French vanilla pudding for vanilla or white chocolate pudding.
  • You can substitute white cake mix for a lighter texture or adjust the sweetness with different types of chocolate chips for the ganache.
  • The cake is best served cold for optimal texture and flavor.

Nutrition

  • Serving Size: 1 piece
  • Calories: 350
  • Sugar: 28g
  • Sodium: 220mg
  • Fat: 22g
  • Saturated Fat: 11g
  • Unsaturated Fat: 9g
  • Trans Fat: 0g
  • Carbohydrates: 36g
  • Fiber: 1g
  • Protein: 3g
  • Cholesterol: 60mg

Have you made this recipe? I'd love to see it!

Click here to Follow me on Pinterest

Millionaire Peach Salad

June 15, 2025 by Sue Leave a Comment

I love how this Millionaire Peach Salad brings together juicy peaches, fluffy marshmallows, cream cheese, and whipped topping into a rich and refreshing dessert‑style salad.

Millionaire Peach Salad

Why You’ll Love This Recipe

I adore that this salad is both decadent and effortless. It combines fruity brightness with creamy indulgence, and I can make it in about 15 minutes. It’s a no‑bake, no‑fuss crowd‑pleaser that works for potlucks, cookouts, or dessert anytime.

ingredients

(Here's a tip: Check out the full list of ingredients and measurements in the recipe card below.)

  • 1 can (15 oz) sliced peaches, drained and chopped
  • 1 can (8 oz) crushed pineapple, drained
  • 1 cup mini marshmallows
  • 1 package (3.4 oz) instant vanilla pudding mix
  • 1 container (8 oz) whipped topping (like Cool Whip)
  • ½ cup sour cream
  • 1 cup sweetened shredded coconut
  • ½ cup chopped pecans (optional)

directions

  1. Drain and chop the peaches, drain pineapple thoroughly.
  2. In a large bowl, whisk together instant vanilla pudding mix and whipped topping until smooth.
  3. Stir in sour cream until evenly blended.
  4. Gently fold in chopped peaches, crushed pineapple, mini marshmallows, coconut, and pecans.
  5. Cover and refrigerate for at least 1 hour (or up to overnight) to let flavors meld.

Servings and timing

This recipe makes about 8 servings.

  • Prep time: ~15 minutes
  • Chill time: 1–2 hours (I often let it chill overnight for best texture)

Variations

  • Nut-free: Omit pecans or swap them with sunflower seeds or more marshmallows.
  • Tropical twist: Use pineapple-flavored instant pudding instead of vanilla.
  • Use fresh fruit: When in season, substitute fresh diced peaches for canned—just add a tablespoon of sugar to sweeten.

storage/reheating

Store in an airtight container in the fridge for up to 3 days. I find the texture is best within the first two days before marshmallows soften too much. There’s no reheating needed—serve it cold.

FAQs

What can I use instead of whipped topping?

I sometimes use homemade whipped cream—just mix heavy cream, a bit of powdered sugar, and vanilla until stiff peaks form. It’s lighter and fresh-tasting.

Can I make this salad ahead of time?

Absolutely. I usually make it the day before to let the flavors meld. It holds well for up to 2 days in my experience.

How do I prevent the pudding from getting soggy?

Draining the canned fruit thoroughly helps. If needed, I sprinkle a little extra pudding mix before chilling to absorb excess moisture.

Can I freeze Millionaire Peach Salad?

I don’t recommend freezing—it can change texture, making marshmallows chewy and the creamy base grainy.

Is there a lower-sugar version?

Yes! I use sugar-free instant pudding and light whipped topping, and reduce or omit the coconut to cut sugar and calories.

Conclusion

I’m always delighted by how this Millionaire Peach Salad feels luxurious yet stays simple. Its creamy pudding base, fruity burst, and airy marshmallows combine into a treat that’s as easy as it is delicious. Whether it’s a potluck, special occasion, or just a sweet craving, this salad never disappoints—give it a try!

Print

clock clock iconcutlery cutlery iconflag flag iconfolder folder iconinstagram instagram iconpinterest pinterest iconfacebook facebook iconprint print iconsquares squares iconheart heart iconheart solid heart solid icon
Millionaire Peach Salad

Millionaire Peach Salad

5 Stars 4 Stars 3 Stars 2 Stars 1 Star No reviews
  • Author: Sue
  • Prep Time: 15 minutes
  • Cook Time: 0 minutes
  • Total Time: 15 minutes (plus chilling time)
  • Yield: 8 servings
  • Category: Dessert
  • Method: No-bake
  • Cuisine: American
  • Diet: Vegetarian
Print Recipe
Pin Recipe

Description

Millionaire Peach Salad is a creamy, fruity dessert salad made with peaches, pineapple, marshmallows, pudding mix, and whipped topping—an easy and indulgent treat perfect for gatherings or a sweet snack.


Ingredients

  • 1 can (15 oz) sliced peaches, drained and chopped
  • 1 can (8 oz) crushed pineapple, drained
  • 1 cup mini marshmallows
  • 1 package (3.4 oz) instant vanilla pudding mix
  • 1 container (8 oz) whipped topping (like Cool Whip)
  • ½ cup sour cream
  • 1 cup sweetened shredded coconut
  • ½ cup chopped pecans (optional)

Instructions

  1. Drain and chop the peaches, and drain the pineapple thoroughly.
  2. In a large bowl, whisk together the instant vanilla pudding mix and whipped topping until smooth.
  3. Stir in the sour cream until evenly blended.
  4. Gently fold in the chopped peaches, crushed pineapple, mini marshmallows, coconut, and pecans.
  5. Cover and refrigerate for at least 1 hour or overnight to let the flavors meld.

Notes

  • For a nut-free version, omit pecans or replace with sunflower seeds or more marshmallows.
  • Try a tropical twist by using pineapple-flavored pudding instead of vanilla.
  • Use fresh peaches in place of canned for a seasonal touch; add a tablespoon of sugar to sweeten.
  • Store in an airtight container in the fridge for up to 3 days. Best enjoyed within 2 days.
  • Do not freeze, as it affects the texture.

Nutrition

  • Serving Size: 1 cup
  • Calories: 280
  • Sugar: 22g
  • Sodium: 170mg
  • Fat: 14g
  • Saturated Fat: 9g
  • Unsaturated Fat: 4g
  • Trans Fat: 0g
  • Carbohydrates: 36g
  • Fiber: 2g
  • Protein: 2g
  • Cholesterol: 10mg

Have you made this recipe? I'd love to see it!

Click here to Follow me on Pinterest

Cucumber and Sweet Pepper Salad

June 15, 2025 by Sue Leave a Comment

Why You’ll Love This Recipe

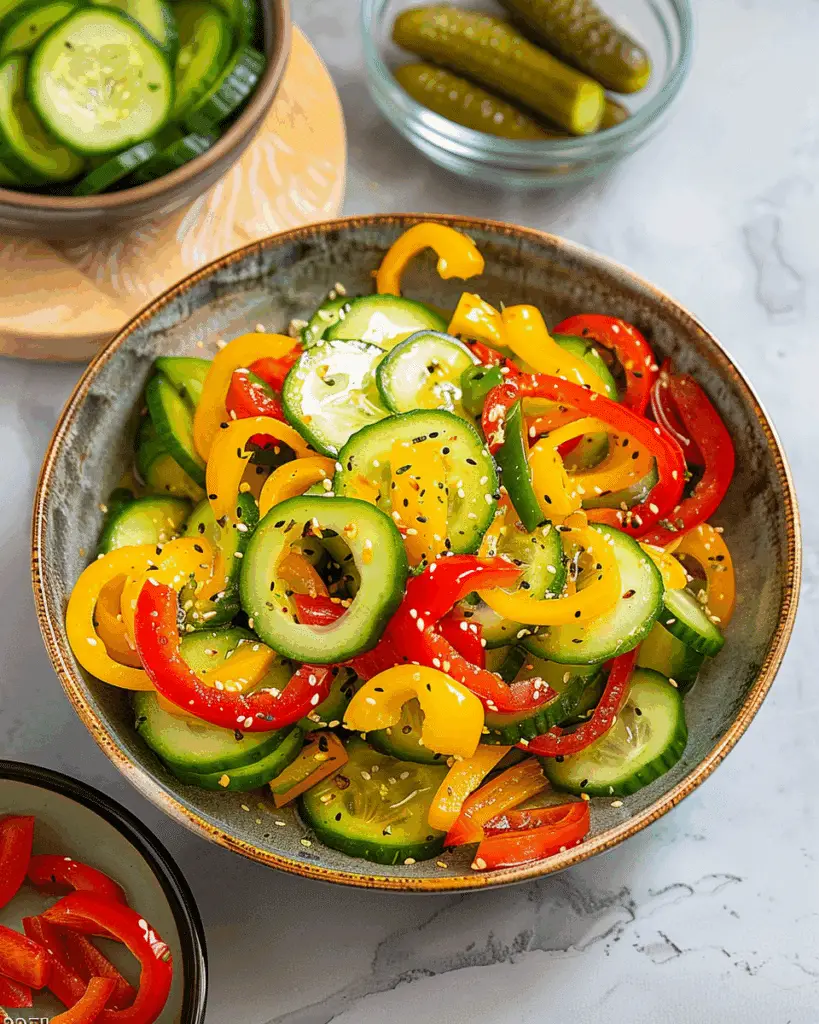
I love how this Cucumber and Sweet Pepper Salad combines the crisp freshness of cucumbers with the vibrant sweetness of bell peppers. It's a light, refreshing dish that pairs perfectly with grilled meats or can be enjoyed on its own as a healthy snack. The simplicity of the ingredients makes it quick to prepare, and the colorful presentation adds a cheerful touch to any meal. Cucumber and Sweet Pepper Salad

Ingredients

  • 1 cucumber
  • 1 red bell pepper
  • 1 yellow bell pepper
  • 1 tablespoon olive oil
  • 1 tablespoon white wine vinegar
  • Salt and pepper to taste

(Hint: Check out the full list of ingredients and measurements in the recipe card below.)

Directions

  1. Begin by washing the cucumber and bell peppers thoroughly.
  2. Slice the cucumber into thin rounds.
  3. Cut the bell peppers in half, remove the seeds, and slice them into thin strips.
  4. In a large bowl, combine the sliced cucumber and bell peppers.
  5. Drizzle the olive oil and white wine vinegar over the vegetables.
  6. Toss gently to coat the vegetables evenly with the dressing.
  7. Season with salt and pepper to taste.
  8. Serve immediately, or refrigerate for 30 minutes to allow the flavors to meld.

Servings and Timing

This recipe serves 4 people. Preparation time is approximately 15 minutes, with an optional 30-minute refrigeration time to enhance the flavors.

Variations

  • Add herbs: Incorporate fresh herbs like dill, parsley, or basil for added flavor.
  • Include other vegetables: Add thinly sliced red onions or cherry tomatoes for more variety.
  • Spicy kick: Toss in some finely chopped jalapeño or red pepper flakes for a spicy twist.
  • Cheese addition: Sprinkle crumbled feta or goat cheese on top for a creamy contrast.

Storage/Reheating

Store any leftovers in an airtight container in the refrigerator for up to 2 days. This salad is best enjoyed fresh, but the flavors can still be appreciated the next day. Avoid freezing, as the texture of the vegetables may change upon thawing.

FAQs

How long can I store this salad?

I recommend consuming this salad within 2 days for the best taste and texture. After that, the vegetables may become soggy.

Can I use a different type of vinegar?

Absolutely! While white wine vinegar is used in this recipe, you can substitute it with apple cider vinegar or red wine vinegar for a different flavor profile.

Is this salad suitable for vegans?

Yes, this salad is entirely plant-based and vegan-friendly.

Can I make this salad ahead of time?

Yes, you can prepare the salad up to 30 minutes in advance. However, it's best to add the dressing just before serving to maintain the crispness of the vegetables.

What can I serve this salad with?

This salad pairs wonderfully with grilled meats, seafood, or as a side dish to a light lunch.

Conclusion

I find this Cucumber and Sweet Pepper Salad to be a delightful addition to any meal. Its simplicity, combined with the fresh and crisp flavors, makes it a go-to recipe for warm days or when I want a light, healthy side dish. The versatility allows for customization to suit my taste preferences, making it a staple in my recipe collection.

Print

clock clock iconcutlery cutlery iconflag flag iconfolder folder iconinstagram instagram iconpinterest pinterest iconfacebook facebook iconprint print iconsquares squares iconheart heart iconheart solid heart solid icon
Cucumber and Sweet Pepper Salad

Cucumber and Sweet Pepper Salad

5 Stars 4 Stars 3 Stars 2 Stars 1 Star No reviews
  • Author: Sue
  • Prep Time: 15 minutes
  • Cook Time: 0 minutes
  • Total Time: 15 minutes (plus optional 30-minute refrigeration)
  • Yield: 4 servings
  • Category: Salad
  • Method: No cook
  • Cuisine: Mediterranean
  • Diet: Vegan
Print Recipe
Pin Recipe

Description

A light and refreshing salad combining the crispness of cucumbers with the sweet flavor of bell peppers, perfect as a side dish or a snack.


Ingredients

  • 1 cucumber
  • 1 red bell pepper
  • 1 yellow bell pepper
  • 1 tablespoon olive oil
  • 1 tablespoon white wine vinegar
  • Salt and pepper to taste

Instructions

  1. Wash the cucumber and bell peppers thoroughly.
  2. Slice the cucumber into thin rounds.
  3. Cut the bell peppers in half, remove the seeds, and slice them into thin strips.
  4. In a large bowl, combine the sliced cucumber and bell peppers.
  5. Drizzle the olive oil and white wine vinegar over the vegetables.
  6. Toss gently to coat the vegetables evenly with the dressing.
  7. Season with salt and pepper to taste.
  8. Serve immediately, or refrigerate for 30 minutes to allow the flavors to meld.

Notes

  • For added flavor, incorporate fresh herbs like dill, parsley, or basil.
  • Thinly sliced red onions or cherry tomatoes can be added for more variety.
  • For a spicy twist, include finely chopped jalapeño or red pepper flakes.
  • Sprinkle crumbled feta or goat cheese for a creamy contrast.
  • Best when served fresh, but leftovers can be stored for up to 2 days in an airtight container in the refrigerator.

Nutrition

  • Serving Size: 1 serving
  • Calories: 50
  • Sugar: 4g
  • Sodium: 50mg
  • Fat: 3g
  • Saturated Fat: 0g
  • Unsaturated Fat: 3g
  • Trans Fat: 0g
  • Carbohydrates: 7g
  • Fiber: 2g
  • Protein: 1g
  • Cholesterol: 0mg

Have you made this recipe? I'd love to see it!

Click here to Follow me on Pinterest

Dill Pickle Pasta Salad

June 14, 2025 by Sue Leave a Comment

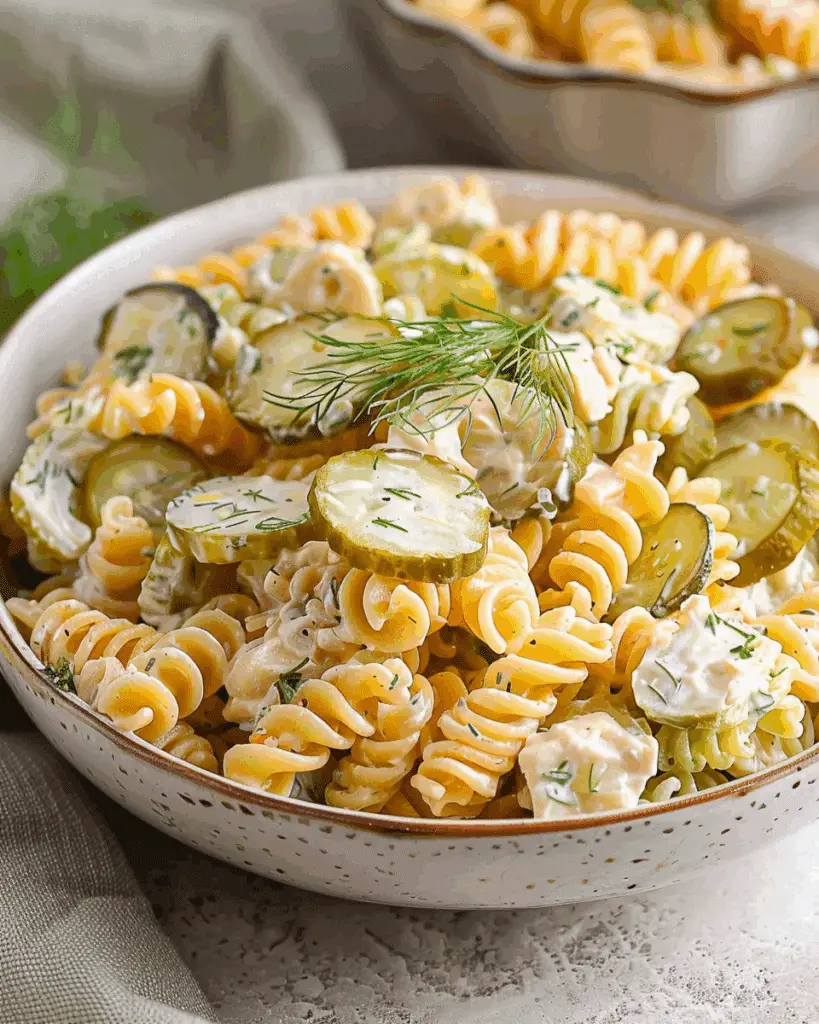
I love how this tangy and creamy Dill Pickle Pasta Salad brings a bright, zesty twist to classic pasta salad. It’s packed with crisp vegetables, crunchy pickles, and fresh dill, making it a fun and bold side dish for picnics, cookouts, or weeknight dinners.

Dill Pickle Pasta Salad

Why You’ll Love This Recipe

I adore this recipe because the dill pickle flavor adds an unexpected punch that elevates the whole dish. It’s versatile, easy to whip up ahead of time, and perfect for gatherings. The creamy dressing coats every bite beautifully, and it stays fresh in the fridge — ideal for meal prep or potluck contributions.

Ingredients

(Here’s a tip: Check out the full list of ingredients and measurements in the recipe card below.)

  • Pasta (like rotini, farfalle, or macaroni)
  • Dill pickles (chopped)
  • Pickle juice
  • Mayonnaise
  • Sour cream or Greek yogurt
  • Fresh dill (chopped)
  • Red onion (finely diced)
  • Bell pepper (finely diced, optional)
  • Celery (chopped)
  • Salt and black pepper to taste

Directions

  1. Cook the pasta according to package instructions until al dente. Drain, rinse under cold water, and let it cool.
  2. In a large bowl, whisk together mayonnaise, sour cream or Greek yogurt, dill pickle juice, chopped fresh dill, salt, and pepper until smooth.
  3. Add the cooled pasta, chopped dill pickles, diced red onion, bell pepper (if using), and celery.
  4. Gently toss everything to coat well with the dressing.
  5. Taste and adjust seasoning, adding more pickle juice, salt, or pepper as desired.
  6. Cover and refrigerate for at least 1 hour to allow the flavors to meld.

Servings and Timing

  • Servings: 6–8
  • Prep Time: 15 minutes
  • Cook Time: 10 minutes
  • Chill Time: 1 hour
  • Total Time: About 1 hour 25 minutes

Variations

  • I sometimes add  cooked chicken for a heartier salad.
  • I’ll swap in elbow macaroni, gemelli, or bow-tie pasta for a fun texture change.
  • I’ve also stirred in a sprinkle of shredded cheddar or Swiss cheese for extra richness.
  • When I want more crunch, I toss in diced carrots or cucumber.
  • For a lighter version, I use Greek yogurt instead of part or all of the mayonnaise.

Storage/Reheating

You can store this salad in an airtight container in the refrigerator for up to 4–5 days. I find the flavor improves with time as it sits. It’s meant to be served cold, so no reheating is needed—just give it a quick stir before serving.

FAQs

How long will this pasta salad stay good in the fridge?

I find it lasts up to 4–5 days when stored properly in an airtight container. Give it a sniff and a stir before serving—if it smells off or looks watery, it’s time to toss it.

Can I make this ahead of time?

Yes! I usually prepare the salad a few hours or even the night before. Chilling it for at least an hour ensures the flavors meld, but overnight makes it even better.

How can I adjust the tanginess?

I taste the dressing and adjust by adding more pickle juice for tang, or more mayonnaise/Greek yogurt to mellow it. If it’s too tangy, a little sugar or honey can help balance it.

Can I use dried dill instead of fresh?

You can—but I recommend using fresh dill for the best flavor. If you must use dried dill, start with about 1 teaspoon, but add more to taste.

Is this salad gluten‑free?

It is if you use a gluten‑free pasta. All other ingredients—pickle, mayo, sour cream, veggies—are naturally gluten‑free, so it’s easy to adapt.

Conclusion

This Dill Pickle Pasta Salad is my go-to side dish when I want something a little different—bright, creamy, and satisfying. The tangy dill pickle dressing makes it unforgettable, and once I make it, it’s always the first thing to disappear. I hope it becomes a favorite in my fridge—and maybe yours, too!

Print

clock clock iconcutlery cutlery iconflag flag iconfolder folder iconinstagram instagram iconpinterest pinterest iconfacebook facebook iconprint print iconsquares squares iconheart heart iconheart solid heart solid icon
Dill Pickle Pasta Salad

Dill Pickle Pasta Salad

5 Stars 4 Stars 3 Stars 2 Stars 1 Star No reviews
  • Author: Sue
  • Prep Time: 15 minutes
  • Cook Time: 10 minutes
  • Total Time: 1 hour 25 minutes
  • Yield: 6–8 servings
  • Category: Side Dish
  • Method: Mixing
  • Cuisine: American
  • Diet: Vegetarian
Print Recipe
Pin Recipe

Description

This tangy and creamy Dill Pickle Pasta Salad is a zesty twist on the classic, packed with crunchy pickles, crisp vegetables, and fresh dill—perfect for gatherings, meal prep, or weeknight dinners.


Ingredients

  • 12 oz pasta (rotini, farfalle, or macaroni)
  • 1 cup dill pickles, chopped
  • ¼ cup pickle juice
  • ½ cup mayonnaise
  • ½ cup sour cream or Greek yogurt
  • 2 tbsp fresh dill, chopped
  • ¼ cup red onion, finely diced
  • ¼ cup bell pepper, finely diced (optional)
  • ¼ cup celery, chopped
  • Salt and black pepper to taste

Instructions

  1. Cook the pasta according to package instructions until al dente. Drain, rinse under cold water, and let it cool.
  2. In a large bowl, whisk together mayonnaise, sour cream or Greek yogurt, pickle juice, chopped fresh dill, salt, and pepper until smooth.
  3. Add the cooled pasta, chopped dill pickles, diced red onion, bell pepper (if using), and celery.
  4. Gently toss everything to coat well with the dressing.
  5. Taste and adjust seasoning, adding more pickle juice, salt, or pepper as desired.
  6. Cover and refrigerate for at least 1 hour to allow the flavors to meld.

Notes

  • Add cooked chicken for a protein boost.
  • Try different pasta shapes for variety.
  • Use Greek yogurt to lighten up the dish.
  • Stir in shredded cheese for extra richness.
  • Salad flavor improves after a few hours in the fridge.

Nutrition

  • Serving Size: 1 cup
  • Calories: 320
  • Sugar: 2g
  • Sodium: 520mg
  • Fat: 22g
  • Saturated Fat: 5g
  • Unsaturated Fat: 15g
  • Trans Fat: 0g
  • Carbohydrates: 25g
  • Fiber: 2g
  • Protein: 6g
  • Cholesterol: 20mg

Have you made this recipe? I'd love to see it!

Click here to Follow me on Pinterest

Ravioli with Tomatoes, Asparagus, Garlic, and Herbs

June 14, 2025 by Sue Leave a Comment

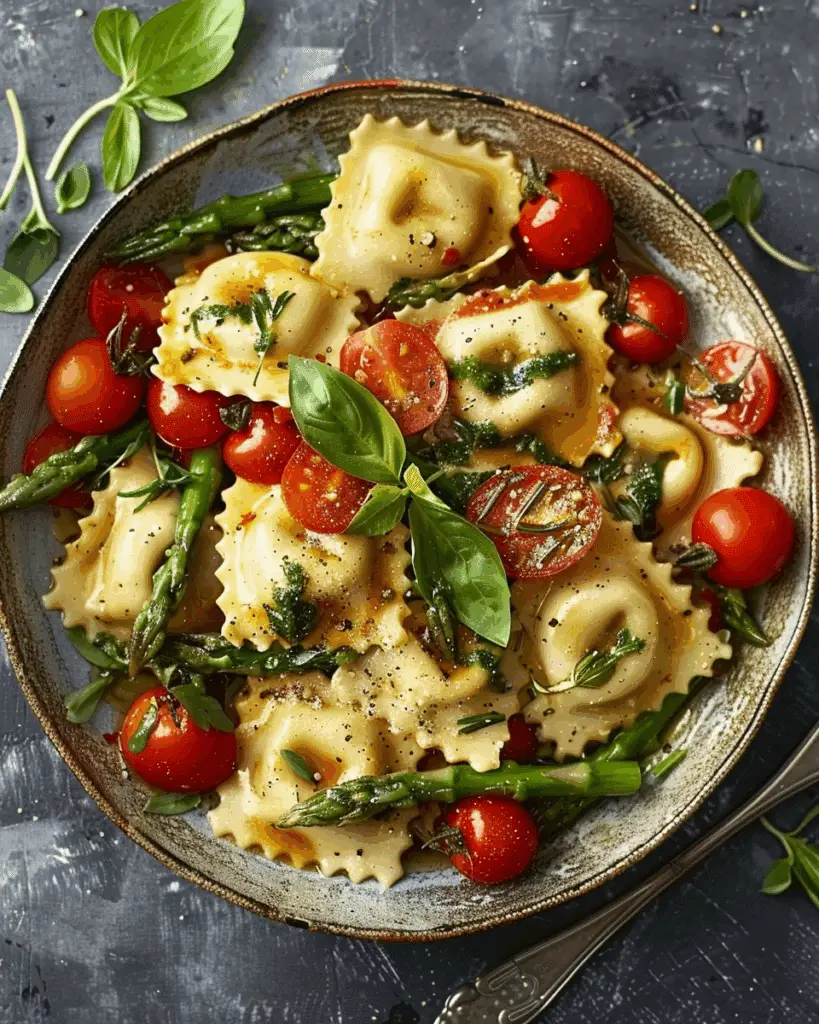
I cook tender cheese ravioli tossed with crisp asparagus, juicy tomatoes, and aromatic garlic and fresh herbs, all coated in a light, flavorful sauce—ready in about 25 minutes for a satisfying weeknight meal. Ravioli with Tomatoes, Asparagus, Garlic, and Herbs


Why You’ll Love This Recipe

I love how this dish transforms store-bought ravioli into something that tastes homemade with vibrant veggies and fresh flavors. It’s light yet filling, comes together quickly, and brings bright colors and textures to the table—great for both a regular dinner or a casual entertaining occasion.

ingredients

(Here's a tip: Check out the full list of ingredients and measurements in the recipe card below.)

  • 1 (20 oz) package refrigerated cheese ravioli
  • 2 tablespoons olive oil
  • 2 tablespoons butter
  • 1 pound asparagus, trimmed and cut into 2-inch pieces
  • 10–12 oz grape or cherry tomatoes, halved
  • 3 cloves garlic, minced
  • 1 tablespoon balsamic vinegar
  • ⅔ cup chopped toasted walnuts (optional)
  • ¼ cup fresh basil, minced
  • ¼ cup fresh parsley, minced
  • Salt and freshly ground black pepper, to taste
  • ⅓ cup shredded Parmesan cheese

directions

  1. I bring a pot of salted water to a boil and cook the ravioli according to package directions until al dente. I drain and set it aside.
  2. While the ravioli cooks, I heat olive oil and butter in a large skillet over medium-high heat.
  3. I add the asparagus and sauté for about 4 minutes, until tender-crisp.
  4. I stir in the tomatoes and garlic and cook for another 1–2 minutes until the tomatoes soften.
  5. I drizzle in the balsamic vinegar and toss the vegetables to coat.
  6. I transfer the drained ravioli to a large bowl and add the veggie mixture, walnuts, basil, and parsley. I season with salt and pepper and gently toss everything together.
  7. I finish by sprinkling Parmesan cheese on top and serve warm.

Servings and timing

  • Servings: 4 to 6
  • Prep time: 10 minutes
  • Cook time: 15 minutes
  • Total time: 25 minutes

Variations

  • Protein boost: I like to add grilled chicken or sautéed shrimp for extra protein.
  • Nut swaps: I sometimes use pine nuts or slivered almonds if I don’t have walnuts on hand.
  • Herb tweaks: I’ve made this with thyme or oregano too, or just used all basil or all parsley depending on what I have.
  • Cheese alternatives: Goat cheese or feta give a nice tangy twist instead of Parmesan.
  • Sauce tweaks: For a lighter sauce, I add a splash of vegetable or chicken broth and a squeeze of lemon juice.

storage/reheating

I keep leftovers in an airtight container in the fridge for up to 3 days. To reheat, I warm it in a skillet with a little olive oil or water to bring back the texture. Microwaving works too, but the vegetables get a bit softer. I don’t recommend freezing, as the asparagus and herbs don’t hold up well after thawing.

FAQs

Can I use frozen ravioli instead of refrigerated?

Yes—I just cook it according to the package instructions and drain it well before tossing with the veggies and sauce.

What other vegetables can I add?

I sometimes toss in zucchini, spinach, bell peppers, or even roasted butternut squash for a seasonal variation.

Can I make this vegan?

Definitely. I use vegan butter or extra olive oil, skip the Parmesan, and go for a plant-based ravioli option.

Is toasting the nuts necessary?

Toasting the walnuts enhances their flavor and adds crunch, but I skip it if I’m in a hurry.

Can I make this ahead for meal prep?

Yes—I prep the vegetables and herbs ahead of time. When ready to eat, I cook the ravioli fresh and quickly toss everything together.

Conclusion

I love how this ravioli recipe takes just 25 minutes yet feels special enough for guests. It’s fresh, colorful, and adaptable, showcasing asparagus and tomatoes in a simple garlic herb sauce. Whether I’m cooking for myself or a crowd, it’s one of my go-to meals that always satisfies.

Print

clock clock iconcutlery cutlery iconflag flag iconfolder folder iconinstagram instagram iconpinterest pinterest iconfacebook facebook iconprint print iconsquares squares iconheart heart iconheart solid heart solid icon
Ravioli with Tomatoes, Asparagus, Garlic, and Herbs

Ravioli with Tomatoes, Asparagus, Garlic, and Herbs

5 Stars 4 Stars 3 Stars 2 Stars 1 Star No reviews
  • Author: Sue
  • Prep Time: 10 minutes
  • Cook Time: 15 minutes
  • Total Time: 25 minutes
  • Yield: 6 servings
  • Category: Main Course
  • Method: Sauté
  • Cuisine: Italian
  • Diet: Vegetarian
Print Recipe
Pin Recipe

Description

Tender cheese ravioli is tossed with crisp asparagus, juicy tomatoes, garlic, and fresh herbs in a light, flavorful sauce—ready in about 25 minutes for a satisfying weeknight meal.


Ingredients

  • 1 (20 oz) pkg refrigerated cheese ravioli
  • 2 Tbsp olive oil
  • 2 Tbsp butter
  • 1 lb asparagus, trimmed & cut into 2-in pieces
  • 10–12 oz grape or cherry tomatoes, halved
  • 3 cloves garlic, minced
  • 1 Tbsp balsamic vinegar
  • ⅔ cup chopped toasted walnuts (optional)
  • ¼ cup fresh basil, minced
  • ¼ cup fresh parsley, minced
  • Salt & freshly ground black pepper, to taste
  • ⅓ cup shredded Parmesan cheese

Instructions

  1. Bring salted water to a boil and cook the ravioli per package directions until al dente (typically 4–7 minutes). Drain and set aside.
  2. Meanwhile, heat olive oil and butter in a large skillet over medium-high heat.
  3. Add asparagus and sauté until tender-crisp, about 4 minutes.
  4. Stir in tomatoes and garlic; cook another 1–2 minutes until tomatoes soften.
  5. Add balsamic vinegar and toss to coat the vegetables.
  6. Transfer drained ravioli to a large bowl, add the veggie mixture, walnuts, basil, parsley; season and toss gently.
  7. Sprinkle Parmesan on top and serve warm.

Notes

  • Add grilled chicken or sautéed shrimp for extra protein.
  • Use pine nuts or slivered almonds instead of walnuts.
  • Mix in other herbs like thyme or oregano as desired.
  • Substitute Parmesan with goat cheese or feta for a different flavor.
  • Add a splash of broth and lemon juice for a lighter sauce version.

Nutrition

  • Serving Size: ⅙ of recipe
  • Calories: 410
  • Sugar: 5g
  • Sodium: 420mg
  • Fat: 22g
  • Saturated Fat: 7g
  • Unsaturated Fat: 13g
  • Trans Fat: 0g
  • Carbohydrates: 40g
  • Fiber: 4g
  • Protein: 14g
  • Cholesterol: 45mg

Have you made this recipe? I'd love to see it!

Click here to Follow me on Pinterest

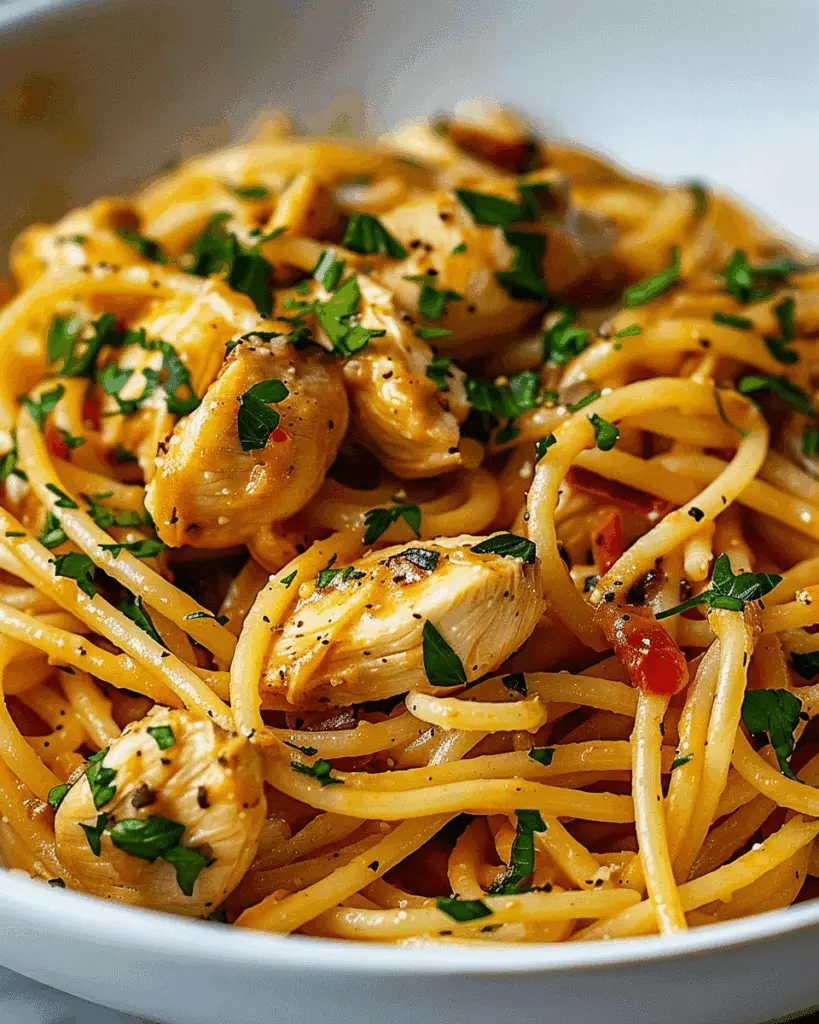
Garlic Butter Chicken Bites with Savory Creamy Parmesan Pasta

June 14, 2025 by Sue Leave a Comment

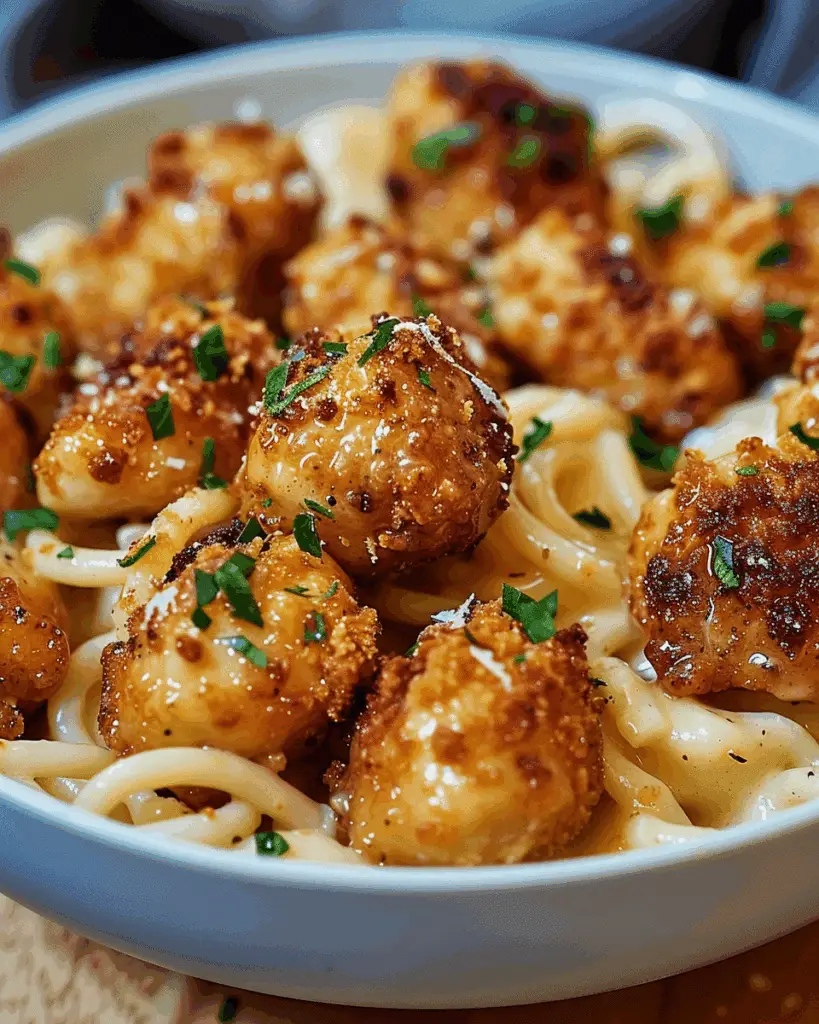
I whip up tender chicken bites drenched in garlic butter and serve them over a bed of rich, creamy Parmesan pasta—comfort food that feels special but comes together in under 40 minutes. Garlic Butter Chicken Bites with Savory Creamy Parmesan Pasta

Why You’ll Love This Recipe

I love how this dish delivers restaurant-quality flavors with minimal effort. The chicken gets golden and juicy, the sauce is indulgently creamy, and it all comes together in one pan. It’s perfect for busy weeknights and even better as leftovers the next day.

ingredients

(Here's a tip: Check out the full list of ingredients and measurements in the recipe card below.)

  • Boneless, skinless chicken breasts, cut into bite-sized pieces
  • Olive oil
  • Unsalted butter, divided
  • Garlic cloves, minced
  • Paprika (and optionally garlic powder, Italian seasoning, and chili flakes)
  • Salt and black pepper
  • Pasta of your choice (penne, fettuccine, spaghetti)
  • Heavy cream (or half‑and‑half for a lighter option)
  • Freshly grated Parmesan cheese
  • Optional nutmeg
  • Fresh parsley, chopped

directions

  1. Cook the pasta. Boil salted water, cook pasta until al dente, drain (reserve some pasta water), and set aside.
  2. Sear the chicken bites. In a skillet over medium-high heat, heat olive oil and some butter. Season chicken with paprika, salt, pepper (plus optional garlic powder or Italian seasoning) and cook for 5–8 minutes until golden. Add garlic in the last minute, then remove chicken.
  3. Make garlic butter sauce. In the skillet, melt more butter and sauté garlic briefly. Return chicken to coat it.
  4. Prepare creamy Parmesan sauce. Melt butter again, sauté garlic, pour in heavy cream, and bring to a gentle simmer. Stir in Parmesan (and a pinch of nutmeg if using) until smooth. Season with salt and pepper.
  5. Combine. Toss the cooked pasta in the sauce, adjusting consistency with reserved pasta water if needed. Plate pasta, top with garlic butter chicken, and garnish with parsley (and extra Parmesan if you like).

Servings and timing

  • Servings: 4
  • Prep time: about 10–15 minutes
  • Cook time: about 20–25 minutes
  • Total time: around 35–40 minutes

Variations

  • Spicy version: add chili flakes or a dash of cayenne.
  • Veggie boost: stir in spinach, mushrooms or sun‑dried tomatoes.
  • Protein swaps: use shrimp, chicken thighs, or tofu.
  • Lighter sauce: swap heavy cream for half‑and‑half and reduce butter.
  • Gluten‑free: use gluten‑free pasta or swap noodles for zucchini noodles.

storage/reheating

I store leftovers in airtight containers in the fridge for up to 3 days. To reheat, I warm it gently on the stove with a splash of milk, cream, or pasta water to revive the sauce—microwaving alone can cause the sauce to separate.

FAQs

How can I prevent the sauce from becoming too thick?

I just stir in a bit of reserved pasta water or milk until it coats the pasta smoothly.

Can I make this ahead of time?

Yes—I sometimes cook the chicken and sauce ahead, then reheat and combine with freshly cooked pasta when ready.

What’s the best pasta to use?

I find penne or fettuccine excellent because they hold onto the sauce well, but any pasta you enjoy works.

Can I use half‑and‑half or milk instead of heavy cream?

Absolutely. The sauce won’t be as rich, but using half‑and‑half or whole milk plus a bit of cornstarch works well.

What protein swaps work well?

Shrimp, chicken thighs, or tofu all work great. Just adjust cook time for each.

Conclusion

This garlic butter chicken bites with creamy Parmesan pasta is one of my go‑to comfort meals. It’s simple, satisfying, and custom‑friendly—you can make it extra spicy, add veggies, lighten it up, or swap proteins. I hope it becomes a favorite in your kitchen too!

Print

clock clock iconcutlery cutlery iconflag flag iconfolder folder iconinstagram instagram iconpinterest pinterest iconfacebook facebook iconprint print iconsquares squares iconheart heart iconheart solid heart solid icon
Garlic Butter Chicken Bites with Savory Creamy Parmesan Pasta

Garlic Butter Chicken Bites with Savory Creamy Parmesan Pasta

5 Stars 4 Stars 3 Stars 2 Stars 1 Star No reviews
  • Author: Sue
  • Prep Time: 15 minutes
  • Cook Time: 25 minutes
  • Total Time: 40 minutes
  • Yield: 4 servings
  • Category: Dinner
  • Method: Stovetop
  • Cuisine: American
  • Diet: Halal
Print Recipe
Pin Recipe

Description

Tender garlic butter chicken bites served over rich, creamy Parmesan pasta—easy comfort food ready in under 40 minutes.


Ingredients

  • 2 boneless, skinless chicken breasts, cut into bite-sized pieces
  • 2 tbsp olive oil
  • 4 tbsp unsalted butter, divided
  • 6 garlic cloves, minced
  • 1 tsp paprika
  • ½ tsp garlic powder (optional)
  • ½ tsp Italian seasoning (optional)
  • ¼ tsp chili flakes (optional)
  • Salt and black pepper, to taste
  • 8 oz pasta of your choice (penne, fettuccine, or spaghetti)
  • 1 cup heavy cream (or 1 cup half-and-half for lighter version)
  • ¾ cup freshly grated Parmesan cheese
  • Pinch of nutmeg (optional)
  • 2 tbsp fresh parsley, chopped

Instructions

  1. Boil salted water in a pot and cook pasta until al dente. Drain, reserving some pasta water, and set aside.
  2. In a large skillet over medium-high heat, heat olive oil and 1 tablespoon butter. Season chicken with paprika, salt, pepper, and optional garlic powder and Italian seasoning. Sear chicken for 5–8 minutes until golden and cooked through. Add half the minced garlic in the last minute, then remove chicken from skillet.
  3. In the same skillet, melt 1 tablespoon butter and briefly sauté the remaining garlic. Return chicken to the skillet to coat in garlic butter. Remove chicken and set aside again.
  4. Melt remaining 2 tablespoon butter in the skillet, sauté remaining garlic if not already used, then pour in heavy cream. Bring to a gentle simmer, then stir in Parmesan cheese and optional nutmeg until smooth. Season with salt and pepper.
  5. Toss cooked pasta in the sauce, adjusting consistency with reserved pasta water as needed.
  6. Serve pasta topped with garlic butter chicken bites. Garnish with chopped parsley and extra Parmesan if desired.

Notes

  • Add chili flakes or cayenne for heat.
  • Incorporate veggies like spinach, mushrooms, or sun-dried tomatoes.
  • Use gluten-free pasta or zucchini noodles for a gluten-free version.
  • Use half-and-half or milk with cornstarch for a lighter sauce.
  • Reheat with a splash of milk or pasta water to maintain sauce consistency.

Nutrition

  • Serving Size: 1 serving
  • Calories: 680
  • Sugar: 2g
  • Sodium: 490mg
  • Fat: 38g
  • Saturated Fat: 21g
  • Unsaturated Fat: 15g
  • Trans Fat: 0.5g
  • Carbohydrates: 50g
  • Fiber: 2g
  • Protein: 35g
  • Cholesterol: 140mg

Have you made this recipe? I'd love to see it!

Click here to Follow me on Pinterest

Sweet Peach Iced Tea

June 14, 2025 by Sue Leave a Comment

I love this Sweet Peach Iced Tea—it’s a refreshing, fruity twist on classic iced tea. Made with real peach syrup and black tea, it’s naturally sweet, full of vibrant peach flavor, and perfect for cooling down in warm weather.

Sweet Peach Iced Tea

Why I’ll Love This Recipe

  • I mix homemade peach syrup and freshly brewed tea for a bright, authentic peach taste.
  • It's easy to adjust sweetness and tea strength depending on my mood.
  • I can make the syrup ahead, chill, and serve quickly—perfect when entertaining.
  • The recipe scales beautifully to serve friends and family.

ingredients

(Here's a tip: Check out the full list of ingredients and measurements in the recipe card below.)

  • 4 cups water
  • 3–4 black tea bags or 2–3 tablespoon loose-leaf black tea
  • 2–3 large ripe peaches, thinly sliced (reserve a few for serving)
  • 1 cup granulated sugar
  • Ice cubes

directions

  1. Make the peach syrup
    • In a saucepan, combine 1 cup sugar, 1 cup water, and sliced peaches.
    • Bring to a boil, then reduce heat and simmer for 5–10 minutes until the peaches soften and the syrup thickens.
    • Remove from heat, cover, and let it steep for about 20–30 minutes.
    • Strain through a fine mesh, pressing the fruit to release all the juice. Cool the syrup.
  2. Brew the tea
    • Boil 3 cups water, remove from heat, add tea, and steep for 4–5 minutes.
    • Discard tea bags or strain loose leaves, then add 1 cup cold water to cool. Refrigerate until chilled.
  3. Combine & serve
    • In a pitcher, mix chilled tea and peach syrup to taste.
    • Fill glasses with ice, pour in tea, and garnish with fresh peach slices (and mint if I like).

Servings and timing

  • Serves: 6–8
  • Prep time: ~15–20 minutes
  • Steep/chill time: ~30 minutes
  • Total time: ~50–60 minutes

Variations

  • I swap sugar with honey, agave, or stevia for different sweetness profiles.
  • I change black tea to green, chamomile, or mint tea when I want a lighter or caffeine-free version.
  • I add lemon or lime juice for a citrus twist.
  • I sometimes infuse the syrup with cinnamon sticks or cloves for a spiced version.
  • I top it with sparkling water for a fizzy finish.

storage/reheating

  • I store leftovers in a sealed pitcher or jar in the fridge for 3–5 days.
  • To serve warm, I gently heat it on low (without boiling) and pour over ice if desired.
  • I like freezing peach syrup in ice‑cube trays to preserve freshness and flavor.

FAQs

Can I make the syrup ahead of time?

Yes—I often prepare peach syrup up to 2 days in advance and keep it refrigerated.

How long will the iced tea stay fresh?

When stored in the fridge, it stays fresh for about 3–5 days.

Can I use frozen peaches instead of fresh?

Absolutely! Frozen peaches work well—just thaw them before using.

My tea turned out bitter—what can I do?

I avoid over-steeping the tea and sometimes add a pinch of baking soda to soften bitterness.

How can I avoid diluting the tea with ice?

I freeze some of the iced tea in ice cube trays so it stays flavorful as it chills.

Conclusion

I always enjoy this Sweet Peach Iced Tea—it's refreshingly fruity, customizable, and simple to make. Whether I’m prepping it ahead for guests or enjoying a glass solo on a sunny afternoon, it brings a taste of summer in every sip.

Print

clock clock iconcutlery cutlery iconflag flag iconfolder folder iconinstagram instagram iconpinterest pinterest iconfacebook facebook iconprint print iconsquares squares iconheart heart iconheart solid heart solid icon
Sweet Peach Iced Tea

Sweet Peach Iced Tea

5 Stars 4 Stars 3 Stars 2 Stars 1 Star No reviews
  • Author: Sue
  • Prep Time: 20 minutes
  • Cook Time: 10 minutes
  • Total Time: 50–60 minutes
  • Yield: 6–8 servings
  • Category: Beverage
  • Method: Stovetop
  • Cuisine: American
  • Diet: Vegan
Print Recipe
Pin Recipe

Description

This Sweet Peach Iced Tea is a fruity, refreshing take on classic iced tea, made with homemade peach syrup and black tea. It's naturally sweet, vibrant in flavor, and perfect for warm weather.


Ingredients

  • 4 cups water
  • 3–4 black tea bags or 2–3 tablespoon loose-leaf black tea
  • 2–3 large ripe peaches, thinly sliced (reserve a few for serving)
  • 1 cup granulated sugar
  • Ice cubes

Instructions

  1. In a saucepan, combine 1 cup sugar, 1 cup water, and sliced peaches. Bring to a boil, then reduce heat and simmer for 5–10 minutes until peaches soften and syrup thickens.
  2. Remove from heat, cover, and let steep for about 20–30 minutes. Strain through a fine mesh, pressing the fruit to release all juice. Cool syrup.
  3. Boil 3 cups water, remove from heat, add tea, and steep for 4–5 minutes. Discard tea bags or strain loose leaves.
  4. Add 1 cup cold water to the tea to help it cool, then refrigerate until chilled.
  5. In a pitcher, mix the chilled tea and peach syrup to taste.
  6. Fill glasses with ice, pour in the tea, and garnish with fresh peach slices (and mint if desired).

Notes

  • Adjust sweetness by altering the amount of syrup used.
  • Make the peach syrup ahead of time for convenience.
  • Use frozen peaches if fresh ones aren’t available—just thaw them first.
  • Freeze leftover syrup in ice cube trays for longer storage.
  • Infuse syrup with spices or citrus for flavor variation.

Nutrition

  • Serving Size: 1 cup
  • Calories: 90
  • Sugar: 22g
  • Sodium: 5mg
  • Fat: 0g
  • Saturated Fat: 0g
  • Unsaturated Fat: 0g
  • Trans Fat: 0g
  • Carbohydrates: 23g
  • Fiber: 1g
  • Protein: 0g
  • Cholesterol: 0mg

Have you made this recipe? I'd love to see it!

Click here to Follow me on Pinterest

Chicken in Basil Cream Sauce

June 14, 2025 by Sue Leave a Comment

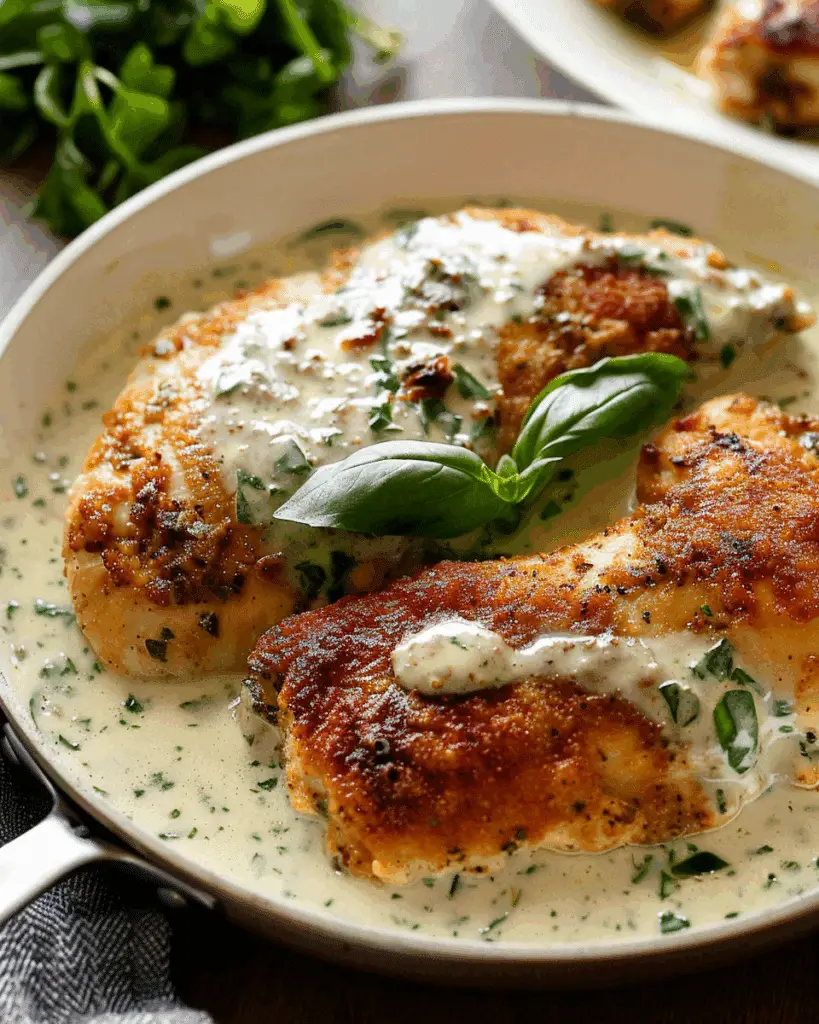
I created a delicious chicken dinner featuring lightly breaded, pan‑fried chicken breasts bathed in a rich basil‑infused cream sauce—perfect for a cozy weeknight or an elegant meal.

Chicken in Basil Cream Sauce

Why You’ll Love This Recipe

I love how this dish balances crisp chicken with a silky, flavorful sauce. It’s both comforting and sophisticated, easy enough for busy evenings yet special enough to serve to guests.

ingredients

(Here's a tip: Check out the full list of ingredients and measurements in the recipe card below.)

  • 4 boneless, skinless chicken breasts (or cutlets)
  • ½ cup milk
  • ¾ cup dried Italian-style breadcrumbs
  • 3 Tbsp butter
  • 2 cloves garlic, minced
  • ½ cup chicken broth
  • 1 cup heavy whipping cream
  • ½ cup freshly grated Parmesan cheese
  • ¼ cup chopped fresh basil
  • ¼ tsp freshly ground black pepper

directions

  1. If needed, slice each breast in half lengthwise and gently pound to around ½″ thickness.
  2. In one shallow bowl place milk, and in another the breadcrumbs. Dip each chicken piece in milk, then coat with breadcrumbs.
  3. Heat butter in a skillet over medium heat. Cook the chicken until golden and juices run clear, about 4–5 minutes per side. Transfer to a plate and tent with foil.
  4. In the same skillet, add garlic and cook 30 seconds. Pour in chicken broth, bringing it to a boil and stirring up any browned bits.
  5. Stir in the heavy cream and simmer briefly. Add Parmesan, basil, and pepper, and cook until the sauce thickens—around 3–5 minutes.
  6. Return chicken to the pan to warm through in the sauce, then serve with sauce spooned generously over the top.

Servings and timing

This recipe makes 4 servings.
Prep time: ~15 minutes
Cook time: ~15–20 minutes
Total time: ~30–35 minutes
(If you slice and pound chicken, add about 5 minutes prep.)

Variations

  • Swap chicken breasts for thighs if preferred—great with the creamy sauce.
  • Stir in sun‑dried tomatoes or sliced pimentos for briny sweetness.
  • Add mushrooms or sautéed onions in the sauce for extra richness.

storage/reheating

Store leftovers in an airtight container in the fridge for up to 3–4 days.
To reheat, gently warm in a saucepan over low heat until heated through, stirring the sauce occasionally. A splash of broth or cream helps if the sauce thickens too much.

FAQs

### What can I serve this with?

I like to pair it with pasta (fettuccine or penne), rice, mashed potatoes, or crusty bread to sop up the sauce. A side of steamed greens or a simple salad keeps things fresh.

### Can I make the sauce ahead of time?

Yes—I prepare the sauce first, let it cool, and store it in the fridge. When ready to serve, gently reheat it and return the chicken to the skillet to warm through.

### How do I get the chicken crispy?

Pound the chicken to even thickness so it cooks uniformly. Don’t crowd the skillet, and wait until the butter is hot before adding chicken. Cook until golden before flipping.

### Can I use dried basil instead of fresh?

Fresh basil is best for flavor and color, but I’ve used about 1 Tbsp dried basil in a pinch. I usually add it early in the sauce and top with fresh just before serving.

### How do I thicken the sauce if it’s too thin?

Let it simmer a bit longer to reduce. Or whisk together 1 tsp cornstarch with a little cold water and stir it in—cook another minute until thickened.

Conclusion

This Chicken in Basil Cream Sauce is a weeknight winner with restaurant-level flavor and minimal fuss. I always appreciate how it transforms simple chicken into something special, and it's become one of my favorite go-to meals when I want to feel like I’m dining well—even on a busy evening.

Print

clock clock iconcutlery cutlery iconflag flag iconfolder folder iconinstagram instagram iconpinterest pinterest iconfacebook facebook iconprint print iconsquares squares iconheart heart iconheart solid heart solid icon
Chicken in Basil Cream Sauce

Chicken in Basil Cream Sauce

5 Stars 4 Stars 3 Stars 2 Stars 1 Star No reviews
  • Author: Sue
  • Prep Time: 15 minutes
  • Cook Time: 20 minutes
  • Total Time: 35 minutes
  • Yield: 4 servings
  • Category: Dinner
  • Method: Pan-Fried
  • Cuisine: American
Print Recipe
Pin Recipe

Description

Lightly breaded chicken breasts are pan-fried and served in a rich, creamy basil-infused sauce, making this dish perfect for both weeknight dinners and special occasions.


Ingredients

  • 4 boneless, skinless chicken breasts (or cutlets)
  • ½ cup milk
  • ¾ cup dried Italian-style breadcrumbs
  • 3 Tbsp butter
  • 2 cloves garlic, minced
  • ½ cup chicken broth
  • 1 cup heavy whipping cream
  • ½ cup freshly grated Parmesan cheese
  • ¼ cup chopped fresh basil
  • ¼ tsp freshly ground black pepper

Instructions

  1. If needed, slice each breast in half lengthwise and gently pound to around ½″ thickness.
  2. In one shallow bowl place milk, and in another the breadcrumbs. Dip each chicken piece in milk, then coat with breadcrumbs.
  3. Heat butter in a skillet over medium heat. Cook the chicken until golden and juices run clear, about 4–5 minutes per side. Transfer to a plate and tent with foil.
  4. In the same skillet, add garlic and cook 30 seconds. Pour in chicken broth, bringing it to a boil and stirring up any browned bits.
  5. Stir in the heavy cream and simmer briefly. Add Parmesan, basil, and pepper, and cook until the sauce thickens—around 3–5 minutes.
  6. Return chicken to the pan to warm through in the sauce, then serve with sauce spooned generously over the top.

Notes

  • Fresh basil is preferred for best flavor and color.
  • Add a splash of broth or cream when reheating to maintain sauce consistency.
  • For a flavor twist, add sun-dried tomatoes or sautéed mushrooms to the sauce.

Nutrition

  • Serving Size: 1 chicken breast with sauce
  • Calories: 520
  • Sugar: 2g
  • Sodium: 480mg
  • Fat: 36g
  • Saturated Fat: 20g
  • Unsaturated Fat: 14g
  • Trans Fat: 0.5g
  • Carbohydrates: 12g
  • Fiber: 1g
  • Protein: 38g
  • Cholesterol: 160mg

Have you made this recipe? I'd love to see it!

Click here to Follow me on Pinterest

BUSTER BAR ICE CREAM CAKE

June 14, 2025 by Sue Leave a Comment

I recreated a homemade no-bake, crowd-pleasing ice cream cake inspired by Dairy Queen's Buster Bar. Layers of chocolate graham crackers (or Oreo crust), creamy vanilla ice cream, hot fudge, crunchy peanuts, and magic shell topping combine for a salty-sweet, texture-rich treat that freezes beautifully.

BUSTER BAR ICE CREAM CAKE

Why I’ll Love This Recipe

I love how easy it is—just a few layers, no baking required. I can prep it in about 15 minutes, then freeze until it's party-ready. It balances creamy ice cream, rich fudge, crunchy peanuts, and a crisp crust. Best of all, I can make it ahead and pull it out when I want, and it still tastes fresh.

Ingredients

(Here's a tip: Check out the full list of ingredients and measurements in the recipe card below.)

  • Chocolate graham crackers or broken fudge-covered graham crackers (to line the bottom)
  • Vanilla ice cream (softened)
  • Hot fudge sauce
  • Red-skin or dry-roasted peanuts
  • Chocolate magic-shell coating

Directions

  1. Line a 9×13-inch baking dish with chocolate graham crackers, fitting to cover the bottom.
  2. Scoop half the softened vanilla ice cream over the crackers. Press it into a smooth, even layer.
  3. Pour hot fudge sauce evenly on top, then sprinkle with half the peanuts.
  4. Spread the remaining ice cream on top and smooth it out.
  5. Sprinkle the rest of the peanuts, then drizzle with magic-shell until peanuts are sealed in.
  6. Freeze the cake for at least 3–4 hours (or overnight) until firm.

Servings and timing

  • Servings: About 24 bars
  • Prep time: 15 minutes
  • Freeze time: At least 3 hours

Variations

  • Swap chocolate graham crackers for Oreo crust or chocolate wafer cookies.
  • Use caramel sauce or peanut-butter swirls instead of hot fudge.
  • Try mint, strawberry, or peanut-butter ice cream for different flavor combos.
  • For a dairy-free twist, substitute coconut-milk ice cream and dairy-free chocolate.

Storage/reheating

I wrap the baking dish tightly in plastic wrap or foil to prevent freezer burn. Stored this way, it lasts for several weeks. Before cutting, I let it sit at room temperature for about 5–10 minutes so it slices cleanly.

FAQs

Can I make this ahead of time?

Absolutely. I assemble it, freeze it solid, then rewrap for storage. It's best served within a few weeks for optimal texture.

Can it go in the fridge before serving?

Yes—a quick 30- to 45-minute chill in the fridge makes cutting easier without melting it too fast.

What if I can't find chocolate graham crackers?

I swap them for chocolate wafer cookies, brownie crisps, or Oreos. I sometimes press crumbs into the bottom—just line with parchment so it lifts easily.

Will crushed cookies work instead of whole crackers?

Yeah! Crushed Oreos or chocolate cookies work well. I press them with butter into a solid base, lining with parchment for easy removal.

What’s the benefit of red-skin peanuts?

I love the slight bitterness and texture the skins add—they balance the sweetness and add authenticity.

Conclusion

This Buster Bar Ice Cream Cake is one of my favorite easy no-bake desserts. It layers creamy, fudgy, crunchy, and crisp textures in a single tray. I appreciate how I can prep it in minutes, keep it frozen, and serve it at any moment. It’s perfect for parties, birthdays, or just a hot-weather treat.

Print

clock clock iconcutlery cutlery iconflag flag iconfolder folder iconinstagram instagram iconpinterest pinterest iconfacebook facebook iconprint print iconsquares squares iconheart heart iconheart solid heart solid icon
BUSTER BAR ICE CREAM CAKE

BUSTER BAR ICE CREAM CAKE

5 Stars 4 Stars 3 Stars 2 Stars 1 Star No reviews
  • Author: Sue
  • Prep Time: 15 minutes
  • Cook Time: 0 minutes
  • Total Time: 3 hours 15 minutes (including freeze time)
  • Yield: 24 bars
  • Category: Dessert
  • Method: Freezing
  • Cuisine: American
  • Diet: Vegetarian
Print Recipe
Pin Recipe

Description

A no-bake ice cream cake inspired by Dairy Queen's Buster Bar, layered with chocolate graham crackers, vanilla ice cream, hot fudge, peanuts, and magic shell for a sweet, crunchy, and creamy frozen treat.


Ingredients

  • Chocolate graham crackers or broken fudge‑covered graham crackers (to line the bottom)
  • 1.5 quarts vanilla ice cream (softened)
  • 1.5 cups hot fudge sauce
  • 1 cup red‑skin or dry‑roasted peanuts
  • 1 cup chocolate magic‑shell coating

Instructions

  1. Line a 9×13‑inch baking dish with chocolate graham crackers, covering the bottom completely.
  2. Scoop half of the softened vanilla ice cream over the crackers and press into an even layer.
  3. Pour hot fudge sauce evenly on top and sprinkle with half the peanuts.
  4. Spread the remaining ice cream on top and smooth it out.
  5. Sprinkle the rest of the peanuts, then drizzle with magic‑shell until peanuts are sealed in.
  6. Freeze for at least 3–4 hours or overnight until firm.

Notes

  • Let the cake sit at room temperature for 5–10 minutes before cutting for clean slices.
  • Can be made ahead and stored for several weeks when tightly wrapped.
  • Swap crust with Oreos or chocolate wafer cookies if chocolate graham crackers aren't available.
  • Dairy-free versions can be made with coconut milk ice cream and dairy-free chocolate.

Nutrition

  • Serving Size: 1 bar
  • Calories: 290
  • Sugar: 20g
  • Sodium: 95mg
  • Fat: 18g
  • Saturated Fat: 8g
  • Unsaturated Fat: 8g
  • Trans Fat: 0g
  • Carbohydrates: 28g
  • Fiber: 2g
  • Protein: 5g
  • Cholesterol: 25mg

Have you made this recipe? I'd love to see it!

Click here to Follow me on Pinterest

Red, White and Blue Jello Shots

June 14, 2025 by Sue Leave a Comment

I crafted these colorful Red, White and Blue Jello Shots as a fun, non-alcoholic treat perfect for patriotic holidays like the 4th of July or Memorial Day. With vibrant layers and sweet flavors, they’re a hit with both kids and adults.

Red, White and Blue Jello Shots

Why You’ll Love This Recipe

I love how eye-catching and festive these jello shots turn out—layered red, white, and blue in little cups, making them ideal for parties. They’re alcohol-free, so everyone can enjoy them, and they come together with basic pantry staples and a bit of fridge time.

Ingredients

(Here’s a tip: Check out the full list of ingredients and measurements in the recipe card below.)

Blue layer

  • 1 (3 oz) box blue Jell‑O (like berry blue)
  • 1 cup boiling water
  • 1 cup cold water

White layer

  • 2 packets unflavored gelatin (about 0.5 oz total)
  • ½ cup cold water (for blooming)
  • 1 cup boiling water
  • 1 (14 oz) can sweetened condensed milk

Red layer

  • 1 (3 oz) box red Jell‑O (like cherry or strawberry)
  • 1 cup boiling water
  • 1 cup cold water

Garnish (optional)

  • Whipped cream or Cool Whip
  • Red, white, and blue sprinkles

Directions

  1. Blue layer – I dissolved the blue Jell‑O in boiling water, stirred in the cold water, then poured it into small cups, filling each one-third full. I chilled them in the refrigerator for about 2 hours until set.
  2. White layer – I bloomed the unflavored gelatin in cold water, added boiling water, then stirred in the sweetened condensed milk. After it cooled to room temperature, I poured it over the blue layer and chilled it another 2 hours.
  3. Red layer – I repeated the same process with the red Jell‑O as I did for the blue. After letting it cool to room temp, I poured it over the white layer and chilled the cups for a final 2–3 hours or until completely set.
  4. Garnish – Just before serving, I topped each shot with whipped cream and festive sprinkles.

Servings and timing

  • Yield: About 24 (1 oz) shots
  • Prep time: 30 minutes
  • Chill time: About 6–8 hours total

Variations

  • I sometimes use different jello flavors for unique color combos—like orange and purple for Halloween.
  • For a dairy-free option, I swap the condensed milk layer with coconut milk and gelatin.
  • To make them layered in a single large dish instead of cups, I use a square pan and cut them into cubes after chilling.

Storage/Reheating

  • I keep the jello shots covered in the refrigerator for up to 3 days.
  • They’re best served chilled and shouldn’t be left out too long, as they’ll soften.

FAQs

How far in advance can I make these jello shots?

I usually make them the day before a party. As long as I keep them covered and chilled, they stay fresh and firm.

Can I skip the white layer?

Yes, I’ve made them with just red and blue layers, and they still look festive—great when I’m short on time.

What type of cups should I use?

I prefer using 1-ounce plastic shot cups because they’re easy to handle and disposable. Mini glass cups also work if I want a fancier presentation.

Can kids eat these?

Absolutely! These are completely alcohol-free and kid-friendly. I always make a batch for family events where everyone can enjoy.

How do I keep the layers from mixing?

I let each layer fully set in the fridge before adding the next. I also cool the next layer to room temperature before pouring it over to avoid melting the previous one.

Conclusion

Making these Red, White and Blue Jello Shots brings a pop of color and sweetness to any party. I love how they’re festive, easy to prepare, and safe for everyone to enjoy. They’ve become a go-to for my holiday spreads, and I always get asked for the recipe!

Print

clock clock iconcutlery cutlery iconflag flag iconfolder folder iconinstagram instagram iconpinterest pinterest iconfacebook facebook iconprint print iconsquares squares iconheart heart iconheart solid heart solid icon
Red, White and Blue Jello Shots

Red, White and Blue Jello Shots

5 Stars 4 Stars 3 Stars 2 Stars 1 Star No reviews
  • Author: Sue
  • Prep Time: 30 minutes
  • Cook Time: 0 minutes
  • Total Time: 8 hours
  • Yield: 24 (1 oz) shots
  • Category: Dessert
  • Method: Refrigeration
  • Cuisine: American
  • Diet: Vegetarian
Print Recipe
Pin Recipe

Description

Festive, non-alcoholic Red, White and Blue Jello Shots with vibrant layers and sweet flavors, perfect for patriotic holidays like the 4th of July or Memorial Day.


Ingredients

  • 1 (3 oz) box blue Jell‑O (like berry blue)
  • 1 cup boiling water (for blue layer)
  • 1 cup cold water (for blue layer)
  • 2 packets unflavored gelatin (about 0.5 oz total)
  • ½ cup cold water (for blooming gelatin)
  • 1 cup boiling water (for white layer)
  • 1 (14 oz) can sweetened condensed milk
  • 1 (3 oz) box red Jell‑O (like cherry or strawberry)
  • 1 cup boiling water (for red layer)
  • 1 cup cold water (for red layer)
  • Whipped cream or Cool Whip (optional garnish)
  • Red, white, and blue sprinkles (optional garnish)

Instructions

  1. Dissolve the blue Jell‑O in 1 cup boiling water, stir in 1 cup cold water, pour into small cups filling one-third full, and chill for about 2 hours until set.
  2. Bloom unflavored gelatin in ½ cup cold water, add 1 cup boiling water, stir in sweetened condensed milk, cool to room temperature, pour over the blue layer, and chill for another 2 hours.
  3. Dissolve the red Jell‑O in 1 cup boiling water, stir in 1 cup cold water, cool to room temperature, pour over the white layer, and chill for 2–3 hours or until completely set.
  4. Before serving, top each shot with whipped cream and red, white, and blue sprinkles if desired.

Notes

  • Use mini glass or 1-ounce plastic shot cups for easy serving.
  • Ensure each layer is fully set before adding the next to avoid mixing colors.
  • Cool each new layer to room temperature before pouring over the set layer.
  • Store in the fridge for up to 3 days.
  • Try other color combinations for different holidays.

Nutrition

  • Serving Size: 1 shot
  • Calories: 60
  • Sugar: 11g
  • Sodium: 35mg
  • Fat: 1g
  • Saturated Fat: 1g
  • Unsaturated Fat: 0g
  • Trans Fat: 0g
  • Carbohydrates: 12g
  • Fiber: 0g
  • Protein: 1g
  • Cholesterol: 2mg
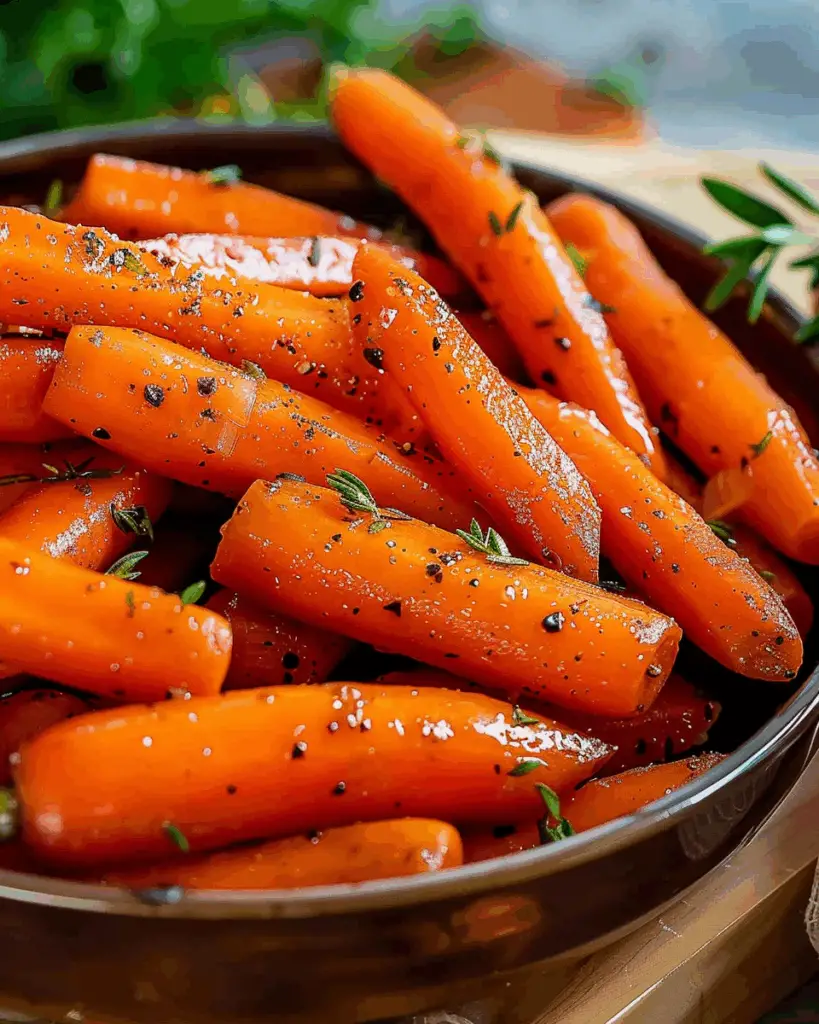
Have you made this recipe? I'd love to see it!

Click here to Follow me on Pinterest

Chicken Foil Packets

June 14, 2025 by Sue Leave a Comment

Chicken foil packets are a delicious and easy way to prepare a flavorful, tender chicken meal with minimal cleanup. Everything you need for a satisfying dinner is sealed up in a foil packet and cooked to perfection. This recipe is great for a quick weeknight meal or for grilling out during the summer. The combination of juicy chicken, vegetables, and seasoning makes this dish a hit at every meal.

Chicken Foil Packets

Why You’ll Love This Recipe

What makes chicken foil packets so great is how convenient and customizable they are. I love how easy they are to prepare—just toss everything together, seal it up, and let the oven or grill do the work. The chicken stays moist and tender, while the veggies soak up all the savory flavors from the seasoning. The best part is that there’s almost no cleanup afterward! Plus, I can mix and match my favorite veggies and spices depending on what I have on hand, so it’s a recipe I can make over and over again.

Ingredients

  • Chicken breasts or thighs (boneless and skinless)
  • Fresh vegetables (such as bell peppers, zucchini, onions, and carrots)
  • Olive oil
  • Garlic powder
  • Onion powder
  • Paprika
  • Salt and pepper (to taste)
  • Fresh herbs (like thyme or rosemary)
  • Aluminum foil

(Hero’s tip: Check out the full list of ingredients and measurements in the recipe card below.)

Directions

  1. Preheat the oven to 375°F (190°C) or prepare the grill for medium-high heat.
  2. Lay out a large sheet of aluminum foil for each packet. If I’m making multiple packets, I make sure to use enough foil to wrap each one tightly.
  3. Place the chicken in the center of each piece of foil. Drizzle a bit of olive oil over the chicken and rub it in.
  4. Season the chicken with garlic powder, onion powder, paprika, salt, and pepper to taste. I also like to add fresh herbs on top for extra flavor.
  5. Add the chopped vegetables around the chicken. Feel free to use whatever veggies I have in my fridge or whatever is in season.
  6. Fold the foil over the chicken and vegetables, crimping the edges to seal the packet.
  7. Place the foil packets on a baking sheet or directly on the grill. Bake in the oven for 25-30 minutes or cook on the grill for about 20-25 minutes, depending on the thickness of the chicken. The chicken should be fully cooked with an internal temperature of 165°F (74°C).
  8. Carefully open the foil packets (watch out for the steam) and serve.

Servings and Timing

This recipe makes about 4 servings, but it’s easy to scale up or down depending on how many people I’m serving. In terms of timing, I usually bake the packets for around 25-30 minutes in the oven, or grill them for 20-25 minutes. The chicken will be perfectly cooked when it reaches 165°F (74°C).

Variations

  • Spicy Kick: Add a pinch of cayenne pepper or some red pepper flakes to the seasoning mix for a little heat.
  • Cheese Lover: Sprinkle shredded cheese over the chicken and veggies before sealing the foil packet. I love a little melted cheese on top of everything.
  • Italian Style: Use Italian seasoning and swap the veggies for tomatoes, spinach, and olives to make an Italian-inspired foil packet.
  • Citrus Twist: Add a few slices of lemon or orange on top of the chicken for a burst of fresh citrus flavor.

Storage/Reheating

If I have leftovers, I store the foil packet contents in an airtight container in the fridge for up to 3 days. For reheating, I prefer to use the oven—just wrap the leftovers in foil and heat them at 350°F (175°C) for about 10-15 minutes, or until they’re warm. You can also reheat them in the microwave if you're in a hurry, but the oven will keep the chicken and veggies from getting too dry.

FAQs

How do I know when the chicken is cooked through?

I use a meat thermometer to check the internal temperature of the chicken. It should reach 165°F (74°C) for safety. You can also cut into the thickest part of the chicken and check that it’s no longer pink inside.

Can I use frozen chicken for foil packets?

I recommend thawing the chicken first to ensure it cooks evenly. If I do use frozen chicken, I might need to adjust the cooking time and check the temperature to make sure it’s fully cooked.

Can I make chicken foil packets ahead of time?

Yes! I love preparing the foil packets in advance and storing them in the fridge for up to 24 hours. When I’m ready to cook, I just pop them in the oven or on the grill.

Can I use different types of meat?

Yes, this recipe works with other proteins like beef or fish. Just adjust the cooking time according to the type of meat you’re using.

How can I make the chicken more flavorful?

Marinating the chicken in your favorite marinade for a few hours before assembling the foil packets is a great way to infuse even more flavor. I also like adding garlic, herbs, or citrus directly on the chicken for extra zing.

Conclusion

Chicken foil packets are a versatile, easy-to-make dish that I keep coming back to. The prep is simple, and the flavors are unbeatable. Whether I’m making them for a weeknight dinner or a weekend BBQ, they’re always a hit. Plus, the minimal cleanup is a bonus! I love how I can customize the vegetables and seasoning based on my preferences, making it a perfect go-to meal that I can adapt over and over again.

Print

clock clock iconcutlery cutlery iconflag flag iconfolder folder iconinstagram instagram iconpinterest pinterest iconfacebook facebook iconprint print iconsquares squares iconheart heart iconheart solid heart solid icon
Chicken Foil Packets

5 Stars 4 Stars 3 Stars 2 Stars 1 Star No reviews
  • Author: Sue
  • Prep Time: 10 minutes
  • Cook Time: 25 minutes
  • Total Time: 35 minutes
  • Yield: 4 servings
  • Category: Dinner
  • Method: Baking or Grilling
  • Cuisine: American
  • Diet: Gluten Free
Print Recipe
Pin Recipe

Description

Chicken foil packets are a simple and flavorful meal made by sealing chicken and vegetables in foil and baking or grilling them to tender perfection with minimal cleanup.


Ingredients

  • 4 boneless, skinless chicken breasts or thighs
  • 2 cups chopped fresh vegetables (e.g., bell peppers, zucchini, onions, carrots)
  • 2 tablespoons olive oil
  • 1 teaspoon garlic powder
  • 1 teaspoon onion powder
  • 1 teaspoon paprika
  • Salt and pepper to taste
  • Fresh herbs like thyme or rosemary
  • Aluminum foil

Instructions

  1. Preheat the oven to 375°F (190°C) or heat the grill to medium-high.
  2. Lay out large sheets of aluminum foil for each serving.
  3. Place a chicken piece in the center of each foil sheet and drizzle with olive oil.
  4. Season with garlic powder, onion powder, paprika, salt, pepper, and top with fresh herbs.
  5. Add chopped vegetables around the chicken.
  6. Fold and seal the foil to form packets.
  7. Bake for 25-30 minutes or grill for 20-25 minutes, until the chicken reaches an internal temperature of 165°F (74°C).
  8. Carefully open foil packets, watch for steam, and serve.

Notes

  • Feel free to swap in your favorite seasonal vegetables.
  • Use a meat thermometer to ensure the chicken is fully cooked.
  • Packets can be prepared a day in advance and refrigerated.
  • Leftovers can be stored in the fridge for up to 3 days.

Nutrition

  • Serving Size: 1 foil packet
  • Calories: 320
  • Sugar: 4g
  • Sodium: 420mg
  • Fat: 14g
  • Saturated Fat: 2.5g
  • Unsaturated Fat: 10g
  • Trans Fat: 0g
  • Carbohydrates: 10g
  • Fiber: 3g
  • Protein: 36g
  • Cholesterol: 90mg

Have you made this recipe? I'd love to see it!

Click here to Follow me on Pinterest

Apple Crisp

June 14, 2025 by Sue Leave a Comment

I adore this classic apple crisp—a warm, comforting dessert featuring tender cinnamon-spiced apples topped with a buttery, oat-streusel crust. It’s simple, rustic, and absolutely delicious.

Apple Crisp

Why You’ll Love This Recipe

I love how quick and no-fuss this recipe is—no pie crust to fuss over, just peel, toss, top, and bake. The combination of tart apples and rich, crunchy topping makes it a favorite any time of year.

ingredients

(Here's a tip: Check out the full list of ingredients and measurements in the recipe card below.)

  • 6 cups peeled and sliced apples (I use a mix—Granny Smith for tartness, Golden Delicious or Fuji for sweetness)
  • 2 tablespoon granulated sugar
  • 1 teaspoon ground cinnamon (divided)
  • 1½ teaspoon lemon juice
  • 1 cup old-fashioned oats
  • ¾ cup all-purpose flour
  • 1 cup packed brown sugar
  • Pinch of salt
  • ½ cup cold unsalted butter, diced into small cubes

directions

  1. Preheat the oven to 350 °F (175 °C). Butter or spray an 8×8 or 9×9-inch baking dish.
  2. In a bowl, toss the apples with granulated sugar, ¾ teaspoon cinnamon, and lemon juice until evenly coated. Layer them in the prepared dish.
  3. In another bowl, combine oats, flour, brown sugar, remaining ¼ teaspoon cinnamon, and salt. Cut in the cold butter using a pastry cutter or fork until the mixture resembles coarse crumbs.
  4. Spread the topping evenly over the apples and gently pat it down.
  5. Bake for 40–50 minutes, until the topping is golden and the filling is bubbling.
  6. Let cool for about 10 minutes before serving. I love it with a scoop of vanilla ice cream.

Servings and timing

  • Servings: 6–8
  • Prep time: ~15 minutes
  • Cook time: 40–50 minutes
  • Total time: ~1 hour 5 minutes

Variations

  • Use a mix of apple varieties—Granny Smith, Fuji, Honeycrisp—for depth.
  • Stir in ½–1 cup chopped nuts (pecans or walnuts) into the topping for extra crunch.
  • Add spices like nutmeg or ginger to the filling for warmth.
  • Make it gluten-free by swapping flour with almond meal or using gluten-free oats.

storage/reheating

I store leftovers covered in the fridge for up to 3–5 days. To reheat, I pop it in the oven at 350 °F until warmed through, or microwave individual servings. I also freeze it for up to 3 months and thaw overnight in the fridge before reheating.

FAQs

What apples work best?

I find firm, tart apples like Granny Smith hold their shape well—mixing them with sweeter varieties adds great flavor.

Can I prep it ahead of time?

Yes. I sometimes assemble it and refrigerate it (up to the baking step) for a day before baking; it bakes just fine.

Is sour cream or yogurt topping a good idea?

Absolutely—crème fraîche, whipped cream, or yogurt is a lovely creamy contrast to the warm filling.

Can I make it in a skillet or on stovetop?

Yes! I can make a no-oven version by cooking apples then serving with a stovetop crisp topping.

Why is it called a crisp?

Because the oat-streusel topping crisps up during baking—this topping distinguishes it from cobbler or crumble.

Conclusion

I love how this apple crisp is easy, comforting, and endlessly flexible. It captures autumn’s essence in every bite, and with just simple pantry ingredients, it’s a dessert I make all year long. I hope it becomes a favorite in your kitchen, too.

Print

clock clock iconcutlery cutlery iconflag flag iconfolder folder iconinstagram instagram iconpinterest pinterest iconfacebook facebook iconprint print iconsquares squares iconheart heart iconheart solid heart solid icon
Apple Crisp

Apple Crisp

5 Stars 4 Stars 3 Stars 2 Stars 1 Star No reviews
  • Author: Sue
  • Prep Time: 15 minutes
  • Cook Time: 40–50 minutes
  • Total Time: 1 hour 5 minutes
  • Yield: 6–8 servings
  • Category: Dessert
  • Method: Baking
  • Cuisine: American
  • Diet: Vegetarian
Print Recipe
Pin Recipe

Description

A warm, comforting dessert featuring tender cinnamon‑spiced apples topped with a buttery oat-streusel crust. This rustic and easy-to-make apple crisp is perfect for any season.


Ingredients

  • 6 cups peeled and sliced apples (mix of Granny Smith, Golden Delicious, or Fuji)
  • 2 tbsp granulated sugar
  • 1 tsp ground cinnamon (divided)
  • 1½ tsp lemon juice
  • 1 cup old‑fashioned oats
  • ¾ cup all‑purpose flour
  • 1 cup packed brown sugar
  • Pinch of salt
  • ½ cup cold unsalted butter, diced into small cubes

Instructions

  1. Preheat the oven to 350 °F (175 °C). Butter or spray an 8×8 or 9×9‑inch baking dish.
  2. In a bowl, toss the apples with granulated sugar, ¾ teaspoon cinnamon, and lemon juice until evenly coated. Layer them in the prepared dish.
  3. In another bowl, combine oats, flour, brown sugar, remaining ¼ teaspoon cinnamon, and salt. Cut in the cold butter using a pastry cutter or fork until the mixture resembles coarse crumbs.
  4. Spread the topping evenly over the apples and gently pat it down.
  5. Bake for 40–50 minutes, until the topping is golden and the filling is bubbling.
  6. Let cool for about 10 minutes before serving. Optional: serve with a scoop of vanilla ice cream.

Notes

  • Use a variety of apples for best flavor and texture.
  • Stir in chopped nuts for added crunch.
  • Add spices like nutmeg or ginger for extra warmth.
  • Make it gluten-free by using almond meal or gluten-free oats.
  • Store leftovers in the fridge for 3–5 days or freeze up to 3 months.

Nutrition

  • Serving Size: ⅛ of dish
  • Calories: 320
  • Sugar: 29g
  • Sodium: 60mg
  • Fat: 14g
  • Saturated Fat: 8g
  • Unsaturated Fat: 5g
  • Trans Fat: 0g
  • Carbohydrates: 49g
  • Fiber: 4g
  • Protein: 2g
  • Cholesterol: 30mg

Have you made this recipe? I'd love to see it!

Click here to Follow me on Pinterest

Fried Green Tomatoes

June 14, 2025 by Sue Leave a Comment

I absolutely adore this classic Southern-style snack: crisp, tangy slices of unripe tomatoes, breaded and fried to golden perfection.

Fried Green Tomatoes

Why You’ll Love This Recipe

I love how the firm green tomatoes give a satisfying crunch, while the tangy flavor offers a refreshing twist. It’s a quick treat that’s perfect for using up end-of-season tomatoes—and it's got that comforting Southern charm.

Ingredients

(Here's a tip: Check out the full list of ingredients and measurements in the recipe card below.)

  • 4 large firm green tomatoes
  • Salt & black pepper to taste
  • ½ cup all-purpose flour
  • ½ cup cornmeal (or cornmeal + breadcrumbs if I like extra crunch)
  • 2 large eggs (or use buttermilk for tangier flavor)
  • 1 cup buttermilk or milk
  • Optional: paprika, cayenne, or Cajun seasoning for a spicy kick
  • Neutral frying oil (vegetable, canola, or peanut oil)

Directions

  1. Slice the tomatoes into about ¼–½ inch thick rounds; sprinkle both sides with salt and pepper.
  2. Set up three shallow bowls: one with flour, one with beaten eggs and milk (or buttermilk), and one with cornmeal (or cornmeal + breadcrumbs and spices).
  3. Dredge each slice first in flour, then dip into the egg mixture, and finally coat thoroughly in the cornmeal mixture.
  4. Heat about ¼–½ inch of oil in a cast-iron skillet to approximately 375 °F.
  5. Fry tomatoes in batches—2–3 minutes per side—until golden and crisp. Remove and drain on paper towels.

Servings and Timing

  • Servings: Yields about 4 servings
  • Timing: Prep time ~10 min, cook time ~15 min, total ~25 min

Variations

  • Spicy twist: I add paprika, cayenne, or Cajun seasoning to the coating bowls for extra flavor.
  • Buttermilk dredge: I use buttermilk instead of eggs for a tangier crust.
  • Breadcrumbs blend: Mixing in breadcrumbs with cornmeal gives a nice added crunch.
  • Dip it: I serve with remoulade, Cajun-ranch sauce, or a creamy buttermilk-chive dip.

Storage/Reheating

I recommend enjoying these fresh and hot. If I have leftovers, I store them in an airtight container in the fridge for 1–2 days. To reheat, I pop them back in a 350 °F oven or warm skillet for a few minutes to restore that crispiness.

FAQs

1. Can I use red tomatoes instead of green?

I prefer green tomatoes—it’s their firm, tart character that makes this dish work so well. Ripe red tomatoes tend to get too mushy.

2. Why dredge in flour, egg, and then cornmeal?

The flour helps the egg stick, and the egg lets the cornmeal coat evenly—resulting in a thicker, crispier crust.

3. What oil should I use for frying?

I usually go with a neutral oil like vegetable, canola, or peanut oil heated to around 375 °F to keep things crisp.

4. Can I prepare these ahead of time?

Definitely. I bread the tomatoes ahead and refrigerate them. They take about 15 minutes to fry once everything’s prepped.

5. What dipping sauces work best?

I love remoulade or Cajun-ranch. But creamy sauces like buttermilk chive, spicy mayo, or hot sauce also match beautifully.

Conclusion

I find fried green tomatoes so satisfying—crispy, tangy, and quick to make. Whether as an appetizer, snack, or side dish, they bring that comforting Southern flair to my table. I hope you enjoy them as much as I do!

Print

clock clock iconcutlery cutlery iconflag flag iconfolder folder iconinstagram instagram iconpinterest pinterest iconfacebook facebook iconprint print iconsquares squares iconheart heart iconheart solid heart solid icon
Fried Green Tomatoes

Fried Green Tomatoes

5 Stars 4 Stars 3 Stars 2 Stars 1 Star No reviews
  • Author: Sue
  • Prep Time: 10 minutes
  • Cook Time: 15 minutes
  • Total Time: 25 minutes
  • Yield: 4 servings
  • Category: Appetizer
  • Method: Frying
  • Cuisine: Southern
  • Diet: Vegetarian
Print Recipe
Pin Recipe

Description

A classic Southern snack featuring firm, tangy green tomatoes that are breaded and fried to golden, crispy perfection.


Ingredients

  • 4 large firm green tomatoes
  • Salt & black pepper to taste
  • ½ cup all-purpose flour
  • ½ cup cornmeal (or cornmeal + breadcrumbs for extra crunch)
  • 2 large eggs (or use buttermilk for tangier flavor)
  • 1 cup buttermilk or milk
  • Optional: paprika, cayenne, or Cajun seasoning for a spicy kick
  • Neutral frying oil (vegetable, canola, or peanut oil)

Instructions

  1. Slice the tomatoes into ¼–½ inch thick rounds; season both sides with salt and pepper.
  2. Prepare three shallow bowls: one with flour, one with beaten eggs and milk (or buttermilk), and one with cornmeal (or cornmeal + breadcrumbs and spices).
  3. Dredge each tomato slice in flour, dip into the egg mixture, then coat in the cornmeal mixture.
  4. Heat ¼–½ inch of oil in a cast-iron skillet to about 375 °F (190 °C).
  5. Fry the tomato slices in batches for 2–3 minutes per side until golden and crisp. Remove and drain on paper towels.

Notes

  • Best served immediately for maximum crispiness.
  • Store leftovers in an airtight container for up to 2 days.
  • Reheat in a 350 °F oven or warm skillet to restore crispiness.
  • Try different spice blends or dipping sauces for variety.

Nutrition

  • Serving Size: 1 serving
  • Calories: 220
  • Sugar: 4g
  • Sodium: 320mg
  • Fat: 12g
  • Saturated Fat: 2g
  • Unsaturated Fat: 9g
  • Trans Fat: 0g
  • Carbohydrates: 22g
  • Fiber: 2g
  • Protein: 6g
  • Cholesterol: 55mg

Have you made this recipe? I'd love to see it!

Click here to Follow me on Pinterest

Greek Chicken Meatballs with Lemon Orzo

June 14, 2025 by Sue Leave a Comment

I created Greek chicken meatballs seasoned with savory herbs and tangy feta, served atop bright, zesty lemon orzo for a Mediterranean-inspired weeknight meal. Greek Chicken Meatballs with Lemon Orzo

Why You’ll Love This Recipe

I love how easy this meal is to prepare—dry spices and simple ingredients make it ideal for busy evenings. The combination packs plenty of protein, and the tangy flavor from feta and lemon orzo makes this dish fresh and satisfying. It also reheats beautifully, so it works well for meal prep and leftovers stay delicious.

Ingredients

(Here's a tip: Check out the full list of ingredients and measurements in the recipe card below.)

Greek Meatballs

  • 1 lb ground chicken
  • 1 large egg
  • ½ cup crumbled feta
  • 1½ tsp dried oregano
  • 1 tsp each dried basil, onion powder, garlic powder, dill, parsley
  • ½ tsp salt
  • ½ tsp black pepper

Lemon Orzo

  • 1 cup dry orzo
  • Zest of 1 lemon
  • 1 tbsp fresh lemon juice
  • 2 tbsp olive oil or melted butter
  • 2 tbsp grated parmesan (optional)
  • ½ tsp each dried oregano, garlic powder, salt, pepper
  • ¼ tsp dill

Directions

  1. In a large bowl, mix together all meatball ingredients until just combined. Shape into about 15 meatballs.
  2. Heat 1 tbsp olive oil in a large skillet over medium heat. Add meatballs in a single layer and pan-sear, turning regularly until browned on all sides, about 5–6 minutes. Cover and cook another 5–6 minutes until internal temperature reaches 165 °F. Remove and set aside.
  3. While the meatballs cook, prepare the orzo according to package directions, then drain.
  4. In a mixing bowl, combine cooked orzo with lemon zest, lemon juice, olive oil or butter, parmesan (if using), and seasonings. Stir until well coated.
  5. Serve meatballs over the warm lemon orzo, spooning extra sauce from the pan over the top.

Servings and timing

  • Servings: Makes approximately 5 servings (about 3 meatballs per person)
  • Prep time: 10 minutes
  • Cook time: 15 minutes
  • Total time: 25 minutes

Variations

  • Swap ground chicken with ground turkey or lean beef.
  • Stir in chopped spinach or kale into the orzo for added veggies.
  • Add a sprinkle of red pepper flakes for a bit of heat.
  • Replace dried herbs with equal amounts of fresh herbs like parsley and oregano.

storage/reheating

I store any leftovers in an airtight container in the fridge for up to 4 days. To reheat, I microwave the meatballs and orzo for 1–2 minutes or warm them in a skillet over medium heat with a splash of water or olive oil to retain moisture.

FAQs

What can I substitute for feta if I don’t like it?

I sometimes replace feta with ricotta or omit it entirely. The meatballs still stay moist and flavorful.

Can I freeze these meatballs?

Yes—I freeze cooked meatballs in a freezer-safe container or bag for up to 3 months. To reheat, I thaw in the fridge overnight and warm gently on the stove or in the oven.

Is orzo gluten-free?

Orzo is usually made from wheat, so it’s not gluten-free. Look for gluten-free orzo or use rice or quinoa as alternatives.

How do I ensure the meatballs stay moist?

Avoid overmixing the meatball mixture and don’t overcook them—145 °F to 165 °F internal is perfect. Feta helps retain moisture too.

Can I make this recipe dairy-free?

Yes—use dairy-free cheese instead of feta and skip the parmesan. The flavors are still bright and satisfying.

Conclusion

I find these Greek chicken meatballs with lemon orzo to be one of my favorite quick dinners—they're easy, flavorful, and perfect for meal prep. I hope you enjoy this bright, Mediterranean-inspired dish as much as I do!

Print

clock clock iconcutlery cutlery iconflag flag iconfolder folder iconinstagram instagram iconpinterest pinterest iconfacebook facebook iconprint print iconsquares squares iconheart heart iconheart solid heart solid icon
Greek Chicken Meatballs with Lemon Orzo

Greek Chicken Meatballs with Lemon Orzo

5 Stars 4 Stars 3 Stars 2 Stars 1 Star No reviews
  • Author: Sue
  • Prep Time: 10 minutes
  • Cook Time: 15 minutes
  • Total Time: 25 minutes
  • Yield: 5 servings
  • Category: Dinner
  • Method: Stovetop
  • Cuisine: Mediterranean
  • Diet: Low Fat
Print Recipe
Pin Recipe

Description

Greek chicken meatballs seasoned with herbs and tangy feta, served over zesty lemon orzo—a flavorful, Mediterranean-inspired meal perfect for weeknights.


Ingredients

  • 1 lb ground chicken
  • 1 large egg
  • ½ cup crumbled feta
  • 1½ tsp dried oregano
  • 1 tsp dried basil
  • 1 tsp onion powder
  • 1 tsp garlic powder
  • 1 tsp dried dill
  • 1 tsp dried parsley
  • ½ tsp salt
  • ½ tsp black pepper
  • 1 tbsp olive oil (for cooking meatballs)
  • 1 cup dry orzo
  • Zest of 1 lemon
  • 1 tbsp fresh lemon juice
  • 2 tbsp olive oil or melted butter
  • 2 tbsp grated parmesan (optional)
  • ½ tsp dried oregano
  • ½ tsp garlic powder
  • ½ tsp salt
  • ½ tsp black pepper
  • ¼ tsp dill

Instructions

  1. In a large bowl, mix together all meatball ingredients until just combined. Shape into about 15 meatballs.
  2. Heat 1 tablespoon olive oil in a large skillet over medium heat. Add meatballs in a single layer and pan-sear, turning regularly until browned on all sides, about 5–6 minutes. Cover and cook another 5–6 minutes until internal temperature reaches 165°F. Remove and set aside.
  3. While the meatballs cook, prepare the orzo according to package directions, then drain.
  4. In a mixing bowl, combine cooked orzo with lemon zest, lemon juice, olive oil or butter, parmesan (if using), and seasonings. Stir until well coated.
  5. Serve meatballs over the warm lemon orzo, spooning extra sauce from the pan over the top.

Notes

  • Swap ground chicken with turkey or lean beef for variation.
  • Stir in greens like spinach or kale for added veggies.
  • Add red pepper flakes for heat.
  • Use fresh herbs in place of dried ones for a fresher flavor.
  • Store leftovers in the fridge for up to 4 days or freeze meatballs for up to 3 months.

Nutrition

  • Serving Size: 1 serving (3 meatballs with orzo)
  • Calories: 410
  • Sugar: 2g
  • Sodium: 640mg
  • Fat: 22g
  • Saturated Fat: 6g
  • Unsaturated Fat: 14g
  • Trans Fat: 0g
  • Carbohydrates: 28g
  • Fiber: 2g
  • Protein: 27g
  • Cholesterol: 115mg

Have you made this recipe? I'd love to see it!

Click here to Follow me on Pinterest

Monterey Chicken Spaghetti

June 14, 2025 by Sue Leave a Comment

I serve up a creamy, cheesy pasta bake packed with chicken, spinach, and topped with crispy fried onions—this dish always disappears fast in my house. Monterey Chicken Spaghetti

Why You’ll Love This Recipe

I love this because it comes together in under an hour, delivers comforting flavors with minimal fuss, and easily adapts to what I have on hand—plus, leftovers are just as delicious.

Ingredients

(Here's a tip: Check out the full list of ingredients and measurements in the recipe card below.)

  • 12 oz spaghetti
  • 4 cups cooked, shredded chicken (rotisserie works great)
  • 1 (10.5 oz) can cream of chicken soup
  • 1 cup sour cream
  • 1 (10 oz) bag frozen spinach, thawed and drained
  • 2 cups shredded Monterey Jack cheese (divided)
  • 2 garlic cloves, minced
  • 1 (6 oz) can French’s French fried onions (½ for the mix, ½ for topping)
  • Salt & pepper to taste

Directions

  1. Preheat the oven to 350°F (175°C). Spray a 9×13‑inch dish with cooking spray.
  2. Cook spaghetti according to package directions; drain and set aside.
  3. In a large bowl, stir together chicken, soup, sour cream, spinach, 1 cup cheese, garlic, and half the onions.
  4. Fold in the spaghetti until well coated. Transfer the mix to the prepared baking dish.
  5. Sprinkle the remaining cheese and fried onions over the top.
  6. Bake uncovered for about 40–50 minutes, until bubbly and golden.

Servings and Timing

  • Servings: 8
  • Prep Time: 15 minutes
  • Cook Time: 40–50 minutes
  • Total Time: 55–65 minutes

Variations

  • Swap in pepper jack or cheddar cheese for a different flavor.
  • Add a can of Rotel or diced jalapeño to spice things up.
  • Make it vegetarian by replacing chicken with sautéed mushrooms or extra spinach.
  • Use gluten-free pasta and soup to accommodate dietary needs.

Storage/Reheating

I store leftovers in an airtight container in the fridge for up to 3–4 days. To reheat, I add a splash of milk or broth and warm it in the microwave or oven at 350°F until heated through. For freezing, I bake the casserole first, then cool, portion, and freeze in airtight containers for up to 2 months. I thaw overnight in the fridge and reheat as needed.

FAQs

Can I prepare this ahead of time?

Yes—I often assemble it in the morning, refrigerate, and bake later. It may need an extra 5–10 minutes in the oven.

What type of chicken is best?

I typically use rotisserie chicken for convenience, but any cooked chicken—poached, grilled, or leftover—works well.

Can I freeze this dish?

Absolutely. After baking and cooling, I freeze it in portions. To reheat, I add a bit of broth, cover, and bake at 350°F until heated.

How can I add more veggies?

I like to chop and sauté bell peppers, mushrooms, or onions with the garlic—or add extra spinach for a veggie boost.

Is there a gluten-free version?

Yes—just use gluten-free pasta and make sure the cream of chicken soup is also gluten-free.

Conclusion

Monterey Chicken Spaghetti is my go-to comfort pasta bake—creamy, cheesy, and loaded with flavor, yet simple enough for busy weeknights. With prep I can do ahead, versatile mix-ins, and reliable leftovers, this dish has earned a permanent place in my meal rotation.

Print

clock clock iconcutlery cutlery iconflag flag iconfolder folder iconinstagram instagram iconpinterest pinterest iconfacebook facebook iconprint print iconsquares squares iconheart heart iconheart solid heart solid icon
Monterey Chicken Spaghetti

5 Stars 4 Stars 3 Stars 2 Stars 1 Star No reviews
  • Author: Sue
  • Prep Time: 15 minutes
  • Cook Time: 40–50 minutes
  • Total Time: 55 minutes
  • Yield: 8 servings
  • Category: Dinner
  • Method: Baking
  • Cuisine: American
  • Diet: Halal
Print Recipe
Pin Recipe

Description

A creamy and cheesy pasta bake loaded with shredded chicken, spinach, and topped with crispy fried onions. It's a comforting, flavorful dish that's perfect for busy weeknights and makes excellent leftovers.


Ingredients

  • 12 oz spaghetti
  • 4 cups cooked, shredded chicken (rotisserie works great)
  • 1 (10.5 oz) can cream of chicken soup
  • 1 cup sour cream
  • 1 (10 oz) bag frozen spinach, thawed and drained
  • 2 cups shredded Monterey Jack cheese (divided)
  • 2 garlic cloves, minced
  • 1 (6 oz) can French’s French fried onions (½ for the mix, ½ for topping)
  • Salt & pepper to taste

Instructions

  1. Preheat the oven to 350 °F (175 °C). Spray a 9×13‑inch dish with cooking spray.
  2. Cook spaghetti according to package directions; drain and set aside.
  3. In a large bowl, stir together chicken, soup, sour cream, spinach, 1 cup cheese, garlic, and half the onions.
  4. Fold in the spaghetti until well coated. Transfer the mix to the prepared baking dish.
  5. Sprinkle the remaining cheese and fried onions over the top.
  6. Bake uncovered for about 40–50 minutes, until bubbly and golden.

Notes

  • Rotisserie chicken adds great flavor and saves time.
  • Thoroughly drain the spinach to prevent excess moisture.
  • Add a splash of milk or broth when reheating to maintain creaminess.
  • Use gluten-free ingredients to make this dish suitable for dietary needs.

Nutrition

  • Serving Size: ⅛ of casserole
  • Calories: 450
  • Sugar: 3g
  • Sodium: 720mg
  • Fat: 25g
  • Saturated Fat: 10g
  • Unsaturated Fat: 12g
  • Trans Fat: 0g
  • Carbohydrates: 32g
  • Fiber: 3g
  • Protein: 25g
  • Cholesterol: 85mg

Have you made this recipe? I'd love to see it!

Click here to Follow me on Pinterest

Sweet Chili Chicken

June 13, 2025 by Sue Leave a Comment

I love how this Sweet Chili Chicken combines tender, bite‑sized pieces of chicken with a vibrant sweet‑spicy glaze—perfect for a quick, flavorful weeknight meal.

Sweet Chili Chicken

Why You’ll Love This Recipe

I’ll tell you why this dish always wins at my table:

  • Quick & Easy – Prepping takes about 10 minutes and baking around 20–35 minutes.
  • One‑pan convenience – Everything bakes together, which means minimal cleanup.
  • Customizable – I swap in chicken thighs or extra veggies anytime.
  • Perfect balance – Sweet chili sauce, garlic, and ginger make the glaze sticky and irresistible.

ingredients

(Here's a tip: Check out the full list of ingredients and measurements in the recipe card below.)

  • 0.75–1 lb chicken breasts, cubed
  • 1 Tbsp corn starch
  • ¼ tsp black pepper
  • ¼ tsp salt
  • ½ tsp red pepper flakes (adjust for heat preference)
  • 1 small red bell pepper, sliced
  • 1 small orange (or any color) bell pepper, sliced
  • 1 jalapeño, sliced
  • 1 Tbsp olive oil

Sweet Chili Sauce

  • 1 Tbsp butter
  • 3 cloves garlic, minced
  • 1 in fresh ginger, minced
  • ¾ cup sweet chili sauce
  • 1–2 Tbsp honey

Garnish

  • Lime slices
  • 3 Tbsp chopped green onions

directions

  1. Preheat oven to 375 °F.
  2. Cube chicken into ~1″ pieces and toss with corn starch, salt, pepper, and red pepper flakes. Spread olive oil on a rimmed baking sheet.
  3. Arrange coated chicken and sliced peppers/jalapeño evenly, ensuring no overlap. Bake for 20 minutes, flipping chicken halfway. Aim for 165 °F internal temperature.
  4. While baking, melt butter in a saucepan over medium heat. Add garlic and ginger; sauté for about 1 minute. Stir in sweet chili sauce and honey, simmer 1 minute, then remove from heat.
  5. Once chicken is cooked, pour the glaze over everything, toss to coat. Optionally return to oven briefly to reheat.
  6. Serve over rice (or cauliflower rice), garnished with green onions and a squeeze of lime.

Servings and timing

  • Servings: 4
  • Total time: ~35 minutes (10 min prep + 20–25 min cook)

Variations

  • Protein swaps: Use chicken thighs, shrimp, fish, or even tofu.
  • Veggie ideas: Broccoli, zucchini, mushrooms—just adjust bake time accordingly.
  • Sauce tweaks: Swap corn starch with flour or arrowroot. For less heat, skip red pepper flakes or reduce jalapeño.

storage/reheating

  • Storing: Keep leftovers in an airtight container in the fridge for up to 4 days.
  • Freezing: It stays good for up to 2 months—thaw overnight.
  • Reheat: Warm in a skillet on medium or microwave until heated through; add a splash of water or broth if sauce thickens.

FAQs

### Can I use chicken thighs instead of breasts?

Yes—I often use thighs for extra juiciness. Just note they may need slightly more bake time.

### How can I make it less spicy?

I tone down the spiciness by omitting red pepper flakes and jalapeño, and adding more honey until it suits my taste.

### Can I prepare this ahead of time?

Absolutely. I make it in advance, store it in the fridge, and reheat later. The sauce thickens when chilled, so I thin it slightly with a bit of water or broth when reheating.

### What sides pair well with this dish?

I usually serve it over rice or cauliflower rice. It’s also delicious with steamed broccoli, an Asian cucumber salad, or fried rice.

### Can I air-fry the chicken instead?

Yes. Coat and air-fry the cubed chicken at about 400 °F for roughly 10 minutes, flipping halfway. Then toss with the warm sauce.

Conclusion

This Sweet Chili Chicken has become a staple in my cooking because it’s fast, packed with flavor, and endlessly adaptable. I love how the sticky glaze brings it all together. I hope it earns a spot in your regular dinner rotation too!

Print

clock clock iconcutlery cutlery iconflag flag iconfolder folder iconinstagram instagram iconpinterest pinterest iconfacebook facebook iconprint print iconsquares squares iconheart heart iconheart solid heart solid icon
Sweet Chili Chicken

Sweet Chili Chicken

5 Stars 4 Stars 3 Stars 2 Stars 1 Star No reviews
  • Author: Sue
  • Prep Time: 10 minutes
  • Cook Time: 20–35 minutes
  • Total Time: 35 minutes
  • Yield: 4 servings
  • Category: Main Dish
  • Method: Baked, Stovetop
  • Cuisine: Asian, American
  • Diet: Gluten Free
Print Recipe
Pin Recipe

Description

Sweet Chili Chicken combines tender, bite‑sized pieces of chicken with a vibrant sweet‑spicy glaze, perfect for a quick and flavorful weeknight meal.


Ingredients

  • 0.75–1 lb chicken breasts, cubed
  • 1 Tbsp corn starch
  • ¼ tsp black pepper
  • ¼ tsp salt
  • ½ tsp red pepper flakes (adjust for heat preference)
  • 1 small red bell pepper, sliced
  • 1 small orange bell pepper, sliced
  • 1 jalapeño, sliced
  • 1 Tbsp olive oil
  • 1 Tbsp butter
  • 3 cloves garlic, minced
  • 1 in fresh ginger, minced
  • ¾ cup sweet chili sauce
  • 1–2 tablespoon honey
  • Lime slices (for garnish)
  • 3 Tbsp chopped green onions (for garnish)

Instructions

  1. Preheat oven to 375°F.
  2. Cube chicken into ~1-inch pieces and toss with corn starch, salt, pepper, and red pepper flakes. Spread olive oil on a rimmed baking sheet.
  3. Arrange coated chicken and sliced peppers/jalapeño evenly, ensuring no overlap. Bake for 20 minutes, flipping chicken halfway. Aim for 165°F internal temperature.
  4. While baking, melt butter in a saucepan over medium heat. Add garlic and ginger; sauté for about 1 minute. Stir in sweet chili sauce and honey, simmer 1 minute, then remove from heat.
  5. Once chicken is cooked, pour the glaze over everything, toss to coat. Optionally return to oven briefly to reheat.
  6. Serve over rice (or cauliflower rice), garnished with green onions and a squeeze of lime.

Notes

  • Protein swaps: You can use chicken thighs, shrimp, fish, or tofu.
  • Veggie ideas: Broccoli, zucchini, and mushrooms work well—just adjust bake time accordingly.
  • Sauce tweaks: Swap corn starch with flour or arrowroot. For less heat, skip red pepper flakes or reduce jalapeño.
  • If preparing ahead, store in the fridge for up to 4 days or freeze for up to 2 months.
  • Reheat by warming in a skillet or microwave with a splash of water or broth if sauce thickens.

Nutrition

  • Serving Size: 1 serving
  • Calories: 350
  • Sugar: 12g
  • Sodium: 600mg
  • Fat: 18g
  • Saturated Fat: 4g
  • Unsaturated Fat: 12g
  • Trans Fat: 0g
  • Carbohydrates: 14g
  • Fiber: 3g
  • Protein: 30g
  • Cholesterol: 75mg

Have you made this recipe? I'd love to see it!

Click here to Follow me on Pinterest

Easy Wonton Soup Recipe

June 13, 2025 by Sue Leave a Comment

This easy wonton soup recipe is my go-to for a quick, flavorful meal. It combines a simple, savory broth with frozen wontons, creating a comforting dish that's ready in just 15 minutes.

Easy Wonton Soup Recipe

Why I’ll Love This Recipe

I love this recipe because it’s quick, simple, and delivers big on flavor. The broth is aromatic with garlic, ginger, and soy sauce, and the wontons add a satisfying bite. It's a versatile dish that I can tweak to my preferences, adding extra vegetables or protein as desired. Plus, it’s so comforting on chilly evenings or whenever I need something light yet filling.

ingredients

(Here's a tip: Check out the full list of ingredients and measurements in the recipe card below.)

  • 6 cups chicken broth (low-sodium)
  • 1 tablespoon soy sauce
  • 1 clove garlic, minced
  • 1 teaspoon freshly grated ginger
  • 1 cup shredded carrots
  • 4 green onions, thinly sliced (white and green parts separated)
  • 20 frozen wontons (mini chicken)
  • ¼ teaspoon sesame oil
  • Salt & pepper to taste
  • Optional garnish: cilantro, chili oil, sesame seeds

directions

  1. In a large pot, bring the chicken broth, soy sauce, garlic, and ginger to a boil.
  2. Add the shredded carrots and the white parts of the green onions; simmer for 1–2 minutes.
  3. Stir in the frozen wontons and cook for 8–10 minutes, or according to the package instructions, until they float and are heated through.
  4. Remove from heat and stir in the sesame oil. Season with salt and pepper to taste.
  5. Ladle into bowls and garnish with the green onions, cilantro, chili oil, or sesame seeds as desired.

Servings and timing

  • Servings: 6 bowls
  • Prep time: 5 minutes
  • Cook time: 10 minutes
  • Total time: 15 minutes

Variations

  • Swap the chicken broth for vegetable stock and use veggie wontons for a vegetarian version.
  • Add extra vegetables like baby bok choy, spinach, mushrooms, or bean sprouts for added nutrition.
  • For a protein boost, toss in cooked shrimp or shredded chicken towards the end of cooking.
  • Spice it up with chili oil, sambal oelek, or chili flakes for an extra kick.

storage/reheating

  • I store leftovers in airtight containers in the fridge and usually finish them within 3–4 days. The wontons may soften slightly, but the soup still tastes great.
  • To reheat, I warm the soup gently on the stove, adding a splash of broth if needed to refresh it.
  • I prefer not to freeze the soup once the wontons are cooked, as they tend to become mushy. However, the broth alone can be frozen for 3–6 months.

FAQs

How do I prevent wontons from falling apart while cooking?

I find it helpful to add the wontons carefully with a slotted spoon and avoid overcrowding the pot. Once the wontons float, I remove them promptly to avoid overcooking.

Can I make this vegetarian or vegan?

Yes, I swap the chicken broth for vegetable broth and use vegetarian wontons, like mushroom or tofu-filled, for a completely meat-free version.

Which frozen wontons work best?

Mini chicken cilantro wontons are my favorite, but any small frozen wonton will work as long as I follow the package’s cooking time.

Can I add more veggies without extending cooking time?

I often add quick-cooking greens like spinach or bok choy in the last minute or two of cooking for a burst of color and extra nutrients.

How can I deepen the broth flavor?

To enhance the flavor, I simmer the garlic, ginger, and green onion in the broth before adding the wontons. I sometimes add a splash of Shaoxing wine or a dash of fish sauce for an even richer taste.

Conclusion

This Easy Wonton Soup has become a staple in my kitchen for good reason. It’s quick to prepare, super flavorful, and versatile enough to suit whatever ingredients I have on hand. Whether I’m making it for a quick dinner or a light lunch, I know I can always count on this comforting bowl of soup to satisfy my cravings in no time.

Print

clock clock iconcutlery cutlery iconflag flag iconfolder folder iconinstagram instagram iconpinterest pinterest iconfacebook facebook iconprint print iconsquares squares iconheart heart iconheart solid heart solid icon
Easy Wonton Soup Recipe

Easy Wonton Soup Recipe

5 Stars 4 Stars 3 Stars 2 Stars 1 Star No reviews
  • Author: Sue
  • Prep Time: 5 minutes
  • Cook Time: 10 minutes
  • Total Time: 15 minutes
  • Yield: 6 bowls
  • Category: Soup
  • Method: Stovetop
  • Cuisine: Asian
  • Diet: Low Calorie
Print Recipe
Pin Recipe

Description

A comforting, easy-to-make wonton soup that’s perfect for busy nights, using frozen wontons and simple aromatics for a flavorful broth in under 15 minutes.


Ingredients

  • 6 cups chicken broth (low-sodium)
  • 1 tbsp soy sauce
  • 1 clove garlic, minced
  • 1 tsp freshly grated ginger
  • 1 cup shredded carrots
  • 4 green onions, thinly sliced (white and green parts separated)
  • 20 frozen wontons (mini chicken)
  • ¼ tsp sesame oil
  • Salt & pepper to taste
  • Optional garnish: cilantro, chili oil, sesame seeds

Instructions

  1. In a large pot, bring chicken broth, soy sauce, garlic, and ginger to a boil.
  2. Add shredded carrots and white parts of green onions; simmer for 1–2 minutes.
  3. Stir in frozen wontons; cook 8–10 minutes or per package instructions, until they float and are heated through.
  4. Remove from heat; stir in sesame oil. Season with salt and pepper.
  5. Ladle into bowls and garnish with green onions, cilantro, chili oil, or sesame seeds as desired.

Notes

  • Swap chicken broth for vegetable stock and use veggie wontons for a vegetarian version.
  • Add baby bok choy, spinach, mushrooms, bean sprouts, or snow peas for extra nutrition and color.
  • Boost protein by tossing in cooked shrimp or shredded chicken near the end.
  • Spice it up with red chili oil, sambal oelek, or chili crisp.
  • Refrigerate leftovers in airtight containers and enjoy within 3-4 days.
  • To reheat, warm gently on the stove until hot and add a splash of broth to refresh the soup.
  • Do not freeze the soup with cooked wontons—they become mushy. Freeze the broth separately for 3-6 months.

Nutrition

  • Serving Size: 1 bowl
  • Calories: 150
  • Sugar: 3g
  • Sodium: 700mg
  • Fat: 6g
  • Saturated Fat: 1g
  • Unsaturated Fat: 4g
  • Trans Fat: 0g
  • Carbohydrates: 18g
  • Fiber: 2g
  • Protein: 7g
  • Cholesterol: 10mg

Have you made this recipe? I'd love to see it!

Click here to Follow me on Pinterest

Honey Garlic Carrots

June 13, 2025 by Sue Leave a Comment

I love making these honey garlic carrots because they're so easy yet so full of flavor. With just a few simple ingredients, I end up with tender carrots glazed in a sweet, savory honey-butter sauce that’s irresistibly delicious. It’s a side dish that always gets compliments, and it's perfect for both casual dinners and special occasions.

Honey Garlic Carrots

Why You’ll Love This Recipe

  • It’s a one-pan dish, which means easy cleanup for me.
  • The carrots get that lovely caramelized exterior while staying tender inside.
  • The honey balances the garlic and butter, giving a nice depth without being too sweet.
  • It’s naturally gluten-free and vegetarian, making it a versatile choice for any meal.
  • I can easily scale it up to serve more guests, perfect for holidays or gatherings.

Ingredients

(Here's a tip: Check out the full list of ingredients and measurements in the recipe card below.)

  • 2 lb carrots, cut on the diagonal into 2–3 inch pieces
  • 5 tablespoon butter
  • 4 garlic cloves, minced
  • 2 tablespoon honey
  • ¼ teaspoon salt (or to taste)
  • ¼ teaspoon freshly ground black pepper
  • Chopped fresh parsley, for garnish

Directions

  1. Preheat & prep – I preheat my oven to 425°F and lightly grease a rimmed baking sheet.
  2. Make the glaze – In a small saucepan, I melt the butter over medium-low heat. I then add the garlic and cook it for about 3 minutes until it turns golden. I remove the pan from the heat and whisk in the honey.
  3. Toss the carrots – I coat the carrot pieces in the warm honey-garlic mixture, season with salt and pepper, and spread them evenly on the baking sheet.
  4. Roast – I roast the carrots for 22–25 minutes, giving them a stir halfway through to make sure they brown evenly.
  5. Finish & serve – Once the carrots are fork-tender with crispy edges, I adjust the seasoning and sprinkle them with chopped parsley before serving.

Servings and Timing

  • Yield: 6 servings
  • Prep time: 10 minutes
  • Cook time: 25 minutes
  • Total time: 35 minutes

Variations

  • Add spice – I sometimes mix in a pinch of cayenne or smoked paprika for a bit of heat.
  • Herbs – Fresh thyme or rosemary works great alongside the carrots for an earthy flavor.
  • Citrus twist – A squeeze of fresh orange juice or zest brightens up the glaze.
  • Sheet-pan meal – I sometimes toss in parsnips or sweet potatoes along with the carrots for a heartier side.

Storage / Reheating

  • Storage: I refrigerate leftover carrots in an airtight container for up to 4 days.
  • Reheating: I reheat them in a skillet over medium-low heat with a little butter, stirring occasionally until warm.
  • Freezing: I don’t recommend freezing these carrots since they can lose their texture, but they hold up well in the fridge for a few days.

FAQs

How do I keep the garlic from burning?

I cook the garlic on medium-low heat, making sure to watch it carefully. The garlic cooks quickly, so once it turns golden, I remove the pan from the heat immediately.

Can I use baby carrots?

Yes, baby carrots work fine. Just check them a few minutes earlier, as they cook faster than larger ones.

What if my carrots are different thicknesses?

I cut thicker carrots in half lengthwise to ensure even cooking. This way, all the pieces roast at the same rate.

Can I prepare this ahead of time?

I can prep the dish a day ahead. I coat the carrots in the honey-garlic mixture, cover the baking sheet, and refrigerate overnight. Then, I just pop them in the oven the next day.

How can I make the glaze even shinier?

For an extra glossy finish, I drizzle a little bit of honey over the carrots during the last 5 minutes of roasting.

Conclusion

I can’t get enough of these honey garlic carrots! They’re the perfect balance of sweet, savory, and buttery, with just a little kick from the garlic. Whether I’m serving them for a quick weeknight meal or a big holiday gathering, they always impress. With minimal effort and ingredients, I end up with a dish that tastes like a labor of love.


Print

clock clock iconcutlery cutlery iconflag flag iconfolder folder iconinstagram instagram iconpinterest pinterest iconfacebook facebook iconprint print iconsquares squares iconheart heart iconheart solid heart solid icon
Honey Garlic Carrots

Honey Garlic Carrots

5 Stars 4 Stars 3 Stars 2 Stars 1 Star No reviews
  • Author: Sue
  • Prep Time: 10 minutes
  • Cook Time: 25 minutes
  • Total Time: 35 minutes
  • Yield: 6 servings (about 6 cups)
  • Category: Side Dish
  • Method: Roasting
  • Cuisine: American
  • Diet: Vegetarian
Print Recipe
Pin Recipe

Description

These honey garlic carrots are roasted to perfection with a glossy glaze made from browned butter, honey, and garlic. They're tender, slightly caramelized, and incredibly easy to make—a perfect side dish for any meal.


Ingredients

  • 2 lb carrots, cut on the diagonal into 2–3 in pieces
  • 5 Tbsp butter
  • 4 garlic cloves, minced
  • 2 Tbsp honey
  • ¼ tsp salt (or to taste)
  • ¼ tsp freshly ground black pepper
  • Chopped fresh parsley, for garnish

Instructions

  1. Preheat oven to 425°F and lightly grease a rimmed baking sheet.
  2. In a small saucepan, melt butter over medium-low heat, add garlic, and cook for about 3 minutes until lightly golden. Remove from heat and whisk in honey.
  3. Toss carrot pieces in the warm glaze, season with salt and pepper, and spread in a single layer on the baking sheet.
  4. Roast for 22–25 minutes, stirring halfway through, until carrots are fork-tender and caramelized on the edges.
  5. Adjust seasoning, garnish with chopped parsley, and serve.

Notes

  • Add ¼ teaspoon smoked paprika or a pinch of cayenne for a spiced variation.
  • Roast with fresh thyme or rosemary for an herbal twist.
  • Add orange juice or zest for a citrusy flavor.
  • Mix in parsnips or sweet potato wedges for variety.
  • Refrigerate leftovers for up to 4 days; reheat in a skillet with a dab of butter.

Nutrition

  • Serving Size: 1 cup
  • Calories: 130
  • Sugar: 9g
  • Sodium: 180mg
  • Fat: 7g
  • Saturated Fat: 4.5g
  • Unsaturated Fat: 2g
  • Trans Fat: 0g
  • Carbohydrates: 17g
  • Fiber: 3g
  • Protein: 1g
  • Cholesterol: 20mg

Have you made this recipe? I'd love to see it!

Click here to Follow me on Pinterest

Avocado, Mozzarella, and Tomato Grilled Cheese

June 13, 2025 by Sue Leave a Comment

I combine creamy avocado, melted mozzarella, and fresh tomato slices between two buttered slices of bread, then grill it until it’s golden brown and gooey—a simple yet luxurious twist on a classic grilled cheese.

Avocado, Mozzarella, and Tomato Grilled Cheese

Why You’ll Love This Recipe

I adore how the rich avocado adds a velvety texture that complements the melty mozzarella. The juicy tomato brings a fresh brightness that cuts through the richness, and the crisp grilled exterior gives the sandwich a satisfying crunch. It’s a perfect balance of flavors and textures that feels indulgent but is easy to prepare.

Ingredients

Here’s a tip: Check out the full list of ingredients and measurements in the recipe card below.

  • Bread (I use sourdough for flavor, but any sturdy bread works)
  • Ripe avocado, sliced or mashed
  • Fresh tomato, thinly sliced
  • Mozzarella cheese, sliced or shredded
  • Butter or olive oil for grilling
  • Salt and pepper to taste
  • Optional: fresh basil leaves or a drizzle of balsamic glaze

Directions

  1. I begin by buttering one side of each bread slice (or brushing them with olive oil).
  2. On the unbuttered side, I spread the avocado evenly.
  3. I layer mozzarella over the avocado, then add tomato slices on top.
  4. I season with salt and pepper, and if I’m feeling fancy, I add fresh basil or a splash of balsamic.
  5. I close the sandwich with the second bread slice, buttered side out.
  6. I heat a skillet over medium heat and place the sandwich in it.
  7. I grill for about 3–4 minutes on each side, pressing gently with a spatula, until the cheese is melted and the bread is golden brown.
  8. I remove it from heat, let it rest briefly, then slice and serve.

Servings and timing

This recipe makes 1 hearty sandwich (enough for one person).

  • Prep time: about 5 minutes
  • Cook time: about 8 minutes
  • Total time: around 13 minutes

If I want to feed two, I simply double the ingredients and cook each sandwich separately.

Variations

  • Protein boost: I sometimes add sliced turkey for extra heartiness.
  • Extra herbs: I like to include fresh basil or arugula for more flavor and a peppery bite.
  • Spice it up: A few red pepper flakes or a swipe of sriracha adds a nice kick.
  • Cheese swaps: I’ve tried fontina or pepper jack instead of mozzarella for different flavors.

Storage/reheating

If I have leftovers, I wrap the sandwich tightly in foil and store it in the fridge for up to 24 hours. To reheat, I place it in a hot skillet or toaster oven for a few minutes until the cheese is melty again and the bread regains its crispness. I avoid the microwave since it makes the bread soggy.

FAQs

1. Can I make this sandwich vegetarian?

Yes, the sandwich is already vegetarian—just omit any optional turkey additions.

2. Can I prepare it ahead of time?

I can assemble it ahead, wrap it in plastic, and refrigerate for a few hours. I then grill it straight from the fridge when I’m ready.

3. What kind of bread works best?

I prefer sourdough for its flavor and sturdiness, but whole wheat, multigrain, or even a sturdy white bread will work well.

4. How ripe should the avocado be?

I use a ripe avocado that yields slightly to pressure. It should be soft enough to mash or slice easily, but not so ripe that it’s brown inside.

5. Can I add other vegetables?

Absolutely—I’ve added thin cucumber slices, roasted red peppers, or baby spinach for extra flavor and nutrition.

Conclusion

I love this grilled cheese because it’s both comforting and fresh—a simple upgrade with avocado, mozzarella, and tomato that elevates the classic sandwich. Whether I’m making a quick lunch or a cozy dinner, it hits all the right notes: creamy, cheesy, crunchy, and flavorful.

Print

clock clock iconcutlery cutlery iconflag flag iconfolder folder iconinstagram instagram iconpinterest pinterest iconfacebook facebook iconprint print iconsquares squares iconheart heart iconheart solid heart solid icon
Avocado, Mozzarella, and Tomato Grilled Cheese

Avocado, Mozzarella, and Tomato Grilled Cheese

5 Stars 4 Stars 3 Stars 2 Stars 1 Star No reviews
  • Author: Sue
  • Prep Time: 5 minutes
  • Cook Time: 8 minutes
  • Total Time: 13 minutes
  • Yield: 1 sandwich
  • Category: Lunch
  • Method: Grilling
  • Cuisine: American
  • Diet: Vegetarian
Print Recipe
Pin Recipe

Description

A grilled cheese sandwich with creamy avocado, melted mozzarella, and fresh tomato, creating a simple yet luxurious twist on the classic.


Ingredients

  • Bread (sourdough or sturdy bread)
  • Ripe avocado, sliced or mashed
  • Fresh tomato, thinly sliced
  • Mozzarella cheese, sliced or shredded
  • Butter or olive oil for grilling
  • Salt and pepper to taste
  • Optional: fresh basil leaves or a drizzle of balsamic glaze

Instructions

  1. Butter one side of each bread slice or brush with olive oil.
  2. Spread avocado evenly on the unbuttered side of one slice.
  3. Layer mozzarella over the avocado, then add tomato slices on top.
  4. Season with salt and pepper, and optionally add basil or balsamic glaze.
  5. Place the second slice of bread on top, buttered side out.
  6. Heat a skillet over medium heat and place the sandwich in it.
  7. Grill for 3-4 minutes on each side, pressing gently with a spatula until the cheese melts and the bread is golden brown.
  8. Remove from heat, let rest briefly, slice, and serve.

Notes

  • If making for two, double the ingredients and cook separately.
  • Try adding sliced turkey for extra protein.
  • For a spice kick, add red pepper flakes or sriracha.
  • Use fontina or pepper jack cheese for a different flavor.
  • Leftovers can be wrapped in foil and refrigerated for up to 24 hours. Reheat in a skillet or toaster oven to restore crispness.

Nutrition

  • Serving Size: 1 sandwich
  • Calories: 400
  • Sugar: 4g
  • Sodium: 500mg
  • Fat: 25g
  • Saturated Fat: 7g
  • Unsaturated Fat: 15g
  • Trans Fat: 0g
  • Carbohydrates: 35g
  • Fiber: 7g
  • Protein: 14g
  • Cholesterol: 30mg

Have you made this recipe? I'd love to see it!

Click here to Follow me on Pinterest

Mushroom and Spinach Lasagna

June 13, 2025 by Sue Leave a Comment

I created a hearty vegetarian lasagna, layering tender noodles with sautéed mushrooms, spinach, creamy cheeses, and a flavorful marinara sauce. It’s comforting, satisfying, and perfect for a cozy dinner.

Mushroom and Spinach Lasagna

Why You’ll Love This Recipe

I’m a big fan of rich, layered dishes, and this one really delivers. The umami-packed mushrooms and fresh spinach balance the creamy ricotta, gooey mozzarella, and tangy Parmesan. Plus, it’s a complete vegetarian meal that feels indulgent yet wholesome. And when I have leftovers? They're even better the next day.

ingredients

(Here's a tip: Check out the full list of ingredients and measurements in the recipe card below.)

  • 9 lasagna noodles
  • 2 Tbsp olive oil
  • 1 onion, finely chopped
  • 3 cloves garlic, minced
  • 1 lb mushrooms (cremini or button), sliced
  • ½ tsp dried thyme
  • salt and pepper to taste
  • 3 cups marinara sauce
  • 2 cups ricotta cheese
  • 1 cup shredded mozzarella cheese
  • ½ cup grated Parmesan cheese
  • 2 cups fresh spinach leaves, chopped
  • Fresh basil leaves for garnish

directions

  1. Preheat the oven to 375°F (190°C). Grease a 9×13″ baking dish.
  2. Boil the lasagna noodles with a pinch of salt until al dente, then drain and set aside.
  3. In a skillet over medium heat, warm the olive oil. Sauté the onion for 3–4 minutes until translucent. Add the garlic and cook for another minute.
  4. Add the sliced mushrooms, thyme, salt, and pepper. Cook until the mushrooms release moisture and begin to brown. Stir in the chopped spinach and cook until it wilts. Remove from heat.
  5. Spread a little marinara sauce in the bottom of the prepared baking dish. Layer three noodles, half the ricotta, half the mushroom-spinach mixture, and one-third each of the mozzarella and Parmesan cheeses.
  6. Repeat with three more noodles, the remaining ricotta, the remaining mushroom mixture, and another third of the mozzarella and Parmesan cheeses.
  7. Top with the final three noodles, the remaining marinara sauce, and the remaining mozzarella and Parmesan cheeses.
  8. Cover the dish with foil and bake for 25 minutes. Then, uncover and bake for another 10–15 minutes until the cheese is bubbly and golden.
  9. Let the lasagna rest for a few minutes before slicing. Garnish with fresh basil and serve.

Servings and timing

  • Servings: 4–6 people
  • Prep Time: ~25 minutes
  • Cook Time: ~40–45 minutes
  • Total Time: ~1 hour 5–10 minutes

Variations

  • No-boil noodles: If I’m in a hurry, I use no-boil noodles. Just make sure I add a little extra sauce to help them soften during baking.
  • Add vegetables: Sometimes, I sauté bell peppers or zucchini along with the mushrooms for added color and flavor.
  • White sauce swap: For a creamier version, I replace the marinara with béchamel and layer the spinach-mushroom mixture in between the pasta and sauce.

storage/reheating

Once the lasagna has cooled, I cover it tightly and store it in the fridge for up to 3–4 days. To reheat, I bake it at 350°F (175°C) for 15–20 minutes until it’s heated through. If I have leftover unbaked lasagna, I’ll refrigerate it and bake the next day, adding an extra 10–15 minutes to ensure it’s fully hot.

FAQs

How can I make this gluten-free?

I simply swap regular lasagna noodles for certified gluten-free ones. They work the same way—just layer as usual and bake for the same amount of time.

Can I freeze this lasagna?

Yes! I portion it into single servings, wrap them in foil or store in freezer-safe containers, and freeze them for up to 2–3 months. When ready to eat, I bake from frozen at 350°F (175°C) for 30–40 minutes or until heated through.

What cheese substitutes can I use?

I sometimes swap mozzarella for provolone or fontina for a smokier taste. For Parmesan, I use Pecorino Romano. If I want a lighter version, I use cottage cheese instead of ricotta.

How do I prevent a soggy lasagna?

To avoid excess moisture, I make sure to thoroughly drain and squeeze out water from the spinach. I also ensure the mushrooms are fully cooked so any extra moisture evaporates before I assemble the layers.

Can I make this vegan?

Yes! I replace the ricotta with tofu-ricotta (blended tofu with nutritional yeast, lemon juice, and salt), use vegan mozzarella and Parmesan alternatives, and make sure the marinara is plant-based.

Conclusion

This lasagna is one of my go-to meals because it combines earthy mushrooms, fresh spinach, creamy cheeses, and tangy marinara in a hearty vegetarian dish. It’s perfect for a family dinner or any gathering. Plus, it’s easily customizable and freezer-friendly. I hope you enjoy making it as much as I do!

Print

clock clock iconcutlery cutlery iconflag flag iconfolder folder iconinstagram instagram iconpinterest pinterest iconfacebook facebook iconprint print iconsquares squares iconheart heart iconheart solid heart solid icon
Mushroom and Spinach Lasagna

Mushroom and Spinach Lasagna

5 Stars 4 Stars 3 Stars 2 Stars 1 Star No reviews
  • Author: Sue
  • Prep Time: 20 minutes
  • Cook Time: 40 minutes
  • Total Time: 1 hour
  • Yield: 6–8 servings
  • Category: Main Dish
  • Method: Baked
  • Cuisine: Italian-American
  • Diet: Vegetarian
Print Recipe
Pin Recipe

Description

A creamy, savory lasagna layered with sautéed mushrooms, spinach, ricotta, and melted mozzarella—perfect for a comforting vegetarian meal.


Ingredients

  • 9–12 lasagna noodles
  • 2 tbsp olive oil
  • 1 small onion, finely chopped
  • 3 garlic cloves, minced
  • 10 oz mushrooms, sliced
  • 5 oz fresh spinach
  • 15 oz ricotta cheese
  • 1 large egg
  • 2 cups shredded mozzarella
  • ½ cup grated Parmesan
  • 2 cups marinara sauce
  • Salt and pepper, to taste
  • ¼ tsp nutmeg (optional)

Instructions

  1. Preheat oven to 375°F (190°C). Cook lasagna noodles per package; drain and set aside.
  2. Heat olive oil in a large skillet over medium heat. Add onion and cook for 3–4 minutes until soft.
  3. Stir in garlic; cook 1 minute until fragrant.
  4. Add mushrooms; sauté until browned and moisture evaporates, about 5–7 minutes.
  5. Add spinach; cook until wilted. Season with salt, pepper, and nutmeg. Remove from heat.
  6. In a bowl, mix ricotta, egg, half the Parmesan, salt, and pepper.
  7. Spread ½ cup marinara on the bottom of a 9×13″ baking dish.
  8. Layer 3–4 noodles, one-third of the ricotta mixture, sautéed vegetables, ½ cup marinara, and ½ cup mozzarella. Repeat twice.
  9. Top with final layer of noodles, remaining marinara, mozzarella, and Parmesan.
  10. Cover with foil and bake 25 minutes. Remove foil and bake another 10–15 minutes until bubbly and golden.
  11. Let rest 10 minutes before slicing and serving.

Notes

  • You can swap fresh spinach with frozen (thawed and drained).
  • Add a pinch of red pepper flakes for heat.
  • For extra creaminess, stir a little béchamel or cream into the ricotta mixture.
  • Leftovers keep well refrigerated for 3–4 days; freeze up to 2 months.

Nutrition

  • Serving Size: 1 slice (approx. ⅛ of lasagna)
  • Calories: 350 kcal
  • Sugar: 6 g
  • Sodium: 450 mg
  • Fat: 18 g
  • Saturated Fat: 9 g
  • Unsaturated Fat: 7 g
  • Trans Fat: 0 g
  • Carbohydrates: 32 g
  • Fiber: 4 g
  • Protein: 16 g
  • Cholesterol: 60 mg

Have you made this recipe? I'd love to see it!

Click here to Follow me on Pinterest

Crispy Sesame Ball Recipe

June 13, 2025 by Sue Leave a Comment

I’m excited to share my take on these irresistibly crispy and chewy sesame balls—deep-fried glutinous rice dough coated in nutty sesame seeds, often filled with sweet red bean or peanut paste. They puff up beautifully, forming a delightfully hollow interior.

Crispy Sesame Ball Recipe

Why I’ll Love This Recipe

I adore the contrast of the crunchy exterior and chewy interior, and rolling them in sesame seeds adds a rich, toasty flavor. Plus, they make a scene-stealing snack at family gatherings and dim sum brunches.

Ingredients

(Here's a tip: Check out the full list of ingredients and measurements in the recipe card below.)

  • glutinous rice flour
  • hot sugar syrup (water + sugar)
  • oil for frying (peanut, vegetable, or canola)
  • white sesame seeds (untoasted)
  • optional: filling – sweet red bean paste, black sesame paste, peanut paste, or lotus paste

Directions

  1. Make the sugar syrup & dough
    I start by boiling water and sugar until fully dissolved. Then I pour the hot syrup gradually into glutinous rice flour, stirring until a shaggy dough forms. After adding a bit of neutral oil, I knead until the dough is smooth and elastic, adding more flour or water as needed. Next, I let the dough rest for about 30 minutes under a damp cloth.
  2. Shape & coat
    After resting, I divide the dough into equal balls (typically around 16), flatten each, place a small ball of filling in the center, and seal. Rolling them between my palms ensures a smooth finish. I then moisten each ball in water and roll it in sesame seeds, pressing lightly so they adhere.
  3. Deep-fry
    I heat oil to about 300°F in a deep pot. Adding the balls gently, I fry them slowly at this temperature for about 10 minutes, moving them to prevent sticking and ensure even cooking. As they float and begin puffing, I gently submerge them occasionally. Finally, I raise the oil to around 350°F for 3–5 more minutes to crisp the exterior. Once golden, I remove them and drain on paper towels.

Servings and timing

  • Yield: about 16–18 balls (depending on size), or about 4 servings using larger balls
  • Prep time: 30–50 minutes (including rest)
  • Cook time: roughly 25–30 minutes

Variations

  • Fillings: Red bean paste, lotus seed paste, black sesame paste, peanut paste, or leave it hollow
  • Filling twist: I sometimes mash peanuts with maple syrup and a pinch of salt for a nutty peanut filling
  • Fried vs air-fry: While traditional is deep-fried, air-fry versions are also an option though the texture will differ
  • Creative twist: Try a Ferrero Rocher–filled version for something indulgent

Storage/reheating

  • Storage: Keep in an airtight container at room temperature up to 1 day; refrigerate up to 3 days (texture softens)
  • To reheat: I like to warm them in a 375°F oven or air fryer for about 5 minutes to regain crispness

FAQs

What if the dough cracks during frying?

I’ve found that properly hydrating and kneading avoids cracks. If the dough is too dry, I add tiny amounts of water.

Can I make the dough ahead?

Yes. I sometimes prepare the dough, wrap it tightly, and refrigerate for up to 2 days. I shape and fry fresh when ready.

How do I know the oil is the right temperature?

An instant-read thermometer really helps. I keep it at 300°F, then bump to 350°F at the end.

Can sesame seeds fall off?

Yes, if I don’t press them firmly or if dough is too wet. Rolling in water and then sesame seeds, and gently pressing, helps them stick.

Are sesame balls gluten-free?

Absolutely! They’re made with glutinous rice flour, which doesn’t contain gluten, so they’re safe for gluten-free diets.

Conclusion

Making sesame balls takes a bit of care, especially with dough moisture and oil temperature, but the result is so rewarding—crispy, chewy, nutty, and sweet. I hope this article inspires you to try them at home. Every bite reminds me why I love exploring traditional snacks!

Print

clock clock iconcutlery cutlery iconflag flag iconfolder folder iconinstagram instagram iconpinterest pinterest iconfacebook facebook iconprint print iconsquares squares iconheart heart iconheart solid heart solid icon
Crispy Sesame Ball Recipe

Crispy Sesame Ball Recipe

5 Stars 4 Stars 3 Stars 2 Stars 1 Star No reviews
  • Author: Sue
  • Prep Time: 30–50 minutes
  • Cook Time: 25–30 minutes
  • Total Time: 55–80 minutes
  • Yield: 16–18 sesame balls (about 4 servings)
  • Category: Dessert
  • Method: Frying
  • Cuisine: Chinese
  • Diet: Gluten Free
Print Recipe
Pin Recipe

Description

These crispy sesame balls feature a crunchy exterior and chewy interior, made from deep-fried glutinous rice dough coated in sesame seeds. Often filled with sweet red bean or peanut paste, they puff up beautifully and are a popular dim sum snack.


Ingredients

  • 2 cups glutinous rice flour
  • ¾ cup hot sugar syrup (made from ½ cup sugar + ¾ cup water)
  • 2 tablespoons neutral oil (peanut, vegetable, or canola)
  • ½ cup white sesame seeds (untoasted)
  • Optional filling: sweet red bean paste, black sesame paste, peanut paste, or lotus paste (about 1 teaspoon per ball)

Instructions

  1. Make the sugar syrup & dough: Boil water and sugar until dissolved to form syrup. Gradually mix hot syrup into glutinous rice flour to make a shaggy dough. Add oil and knead until smooth and elastic. Cover and rest for 30 minutes under a damp cloth.
  2. Shape & coat: Divide rested dough into 16 equal pieces. Flatten each piece, fill with paste, and seal. Roll into smooth balls, moisten in water, and coat with sesame seeds, pressing gently so seeds adhere.
  3. Deep-fry: Heat oil in a pot to 300°F. Fry sesame balls for about 10 minutes, moving them to avoid sticking. As they float and puff, submerge gently. Raise oil to 350°F and fry an additional 3–5 minutes until golden and crispy. Drain on paper towels.

Notes

  • Ensure dough is smooth and not too dry to prevent cracking.
  • Press sesame seeds firmly to ensure they stick.
  • Refrigerated dough can be stored for up to 2 days before frying.
  • Reheat leftovers in a 375°F oven or air fryer for 5 minutes to restore crispness.

Nutrition

  • Serving Size: 1 sesame ball
  • Calories: 130
  • Sugar: 7g
  • Sodium: 10mg
  • Fat: 5g
  • Saturated Fat: 0.5g
  • Unsaturated Fat: 4.5g
  • Trans Fat: 0g
  • Carbohydrates: 20g
  • Fiber: 1g
  • Protein: 2g
  • Cholesterol: 0mg

Have you made this recipe? I'd love to see it!

Click here to Follow me on Pinterest

Slow Cooker Lipton Onion Potatoes

June 13, 2025 by Sue Leave a Comment

Crisp-edged, fork-tender potatoes infused with Lipton Onion Soup mix are one of my go-to side dishes when I want maximum flavor for minimal effort. I simply toss sliced russets with the soup mix, a drizzle of olive oil, and a hint of garlic, then let the slow cooker do the work. Four hours later I’m rewarded with savory, golden potatoes that pair beautifully with everything from grilled chicken to roast beef.

Slow Cooker Lipton Onion Potatoes

Why I’ll Love This Recipe

  • I can prep the dish in ten minutes, set the cooker, and forget it until dinnertime.
  • The familiar onion-herb flavor of the soup mix seasons the potatoes perfectly—no extra chopping required.
  • Cooking low and slow makes the potatoes creamy inside while the edges caramelize.
  • The recipe scales effortlessly for potlucks or holiday dinners.
  • Leftovers reheat well, so I get two meals out of one batch.

Ingredients

(Here's a tip: Check out the full list of ingredients and measurements in the recipe card below.)

  • 2 lb russet potatoes, thinly sliced
  • 1 packet (1 oz) Lipton Onion Soup mix
  • ⅓ cup olive oil (or melted butter)
  • ¼ teaspoon garlic powder
  • ¼ teaspoon freshly ground black pepper
  • Optional: chopped parsley or shredded Cheddar for serving

Directions

  1. I spray my 4-quart slow cooker with cooking spray and arrange the potato slices in a tidy spiral.
  2. I whisk the soup mix, garlic powder, pepper, and olive oil in a small bowl, then drizzle the mixture evenly over the potatoes.
  3. I cover and cook on HIGH for about 4 hours (or LOW for 7–8 hours) until the potatoes are tender and lightly browned on the edges.
  4. Just before serving, I loosen the potatoes with a spoon and sprinkle on fresh parsley—or a handful of cheese if I’m feeling indulgent.

Servings and Timing

  • Yield: Serves 8 as a side dish
  • Prep Time: 10 minutes
  • Cook Time: 4 hours on HIGH (7–8 hours on LOW)
  • Total Time: About 4 hours 10 minutes

Variations

  • Cheesy Upgrade: In the last 30 minutes, I scatter 1 cup shredded Cheddar over the top for a gooey finish.
  • Herb Twist: A teaspoon of dried rosemary or thyme gives the potatoes a rustic aroma.
  • Butter Lovers: Swapping olive oil for melted butter adds richness and browned-butter notes.
  • Broth Boost: For extra moisture, I splash ½ cup chicken broth over the potatoes before cooking.

Storage/Reheating

I cool leftovers, seal them in an airtight container, and refrigerate for up to 3 days. To reheat, I spread the potatoes on a baking sheet and warm them in a 190 °C (375 °F) oven for 10 minutes, or microwave in 30-second bursts until hot.

FAQs

How thin should I slice the potatoes?

I slice them about ⅛ inch thick so they cook evenly and absorb all that oniony goodness.

Can I use red or Yukon Gold potatoes?

Absolutely. I swap russets for Yukon Golds when I want a creamier texture, or small reds for a pop of color.

Will the potatoes get crispy in the slow cooker?

They won’t be as crispy as oven-roasted potatoes, but the edges caramelize nicely while the centers stay tender.

Can I prep the dish the night before?

Yes. I assemble everything in the crock, cover, and refrigerate overnight. In the morning I set the cooker on LOW and let it go.

Is the recipe gluten-free?

Lipton Onion Soup mix is not certified gluten-free, but if I use a gluten-free onion soup blend, the rest of the ingredients are naturally gluten-free.

Conclusion

Slow Cooker Lipton Onion Potatoes are my secret weapon for effortless, crowd-pleasing sides. I love how the savory soup mix transforms humble spuds into a dish that steals the spotlight—no oven required. One taste and these potatoes earn a permanent spot in my weeknight and holiday rotations.

Print

clock clock iconcutlery cutlery iconflag flag iconfolder folder iconinstagram instagram iconpinterest pinterest iconfacebook facebook iconprint print iconsquares squares iconheart heart iconheart solid heart solid icon
Slow Cooker Lipton Onion Potatoes

Slow Cooker Lipton Onion Potatoes

5 Stars 4 Stars 3 Stars 2 Stars 1 Star No reviews
  • Author: Sue
  • Prep Time: 10 minutes
  • Cook Time: 4 hours on HIGH (7–8 hours on LOW)
  • Total Time: About 4 hours 10 minutes
  • Yield: Serves 8 as a side dish
  • Category: Side Dish
  • Method: Slow Cooker
  • Cuisine: American
  • Diet: Vegetarian
Print Recipe
Pin Recipe

Description

Savory, fork-tender potatoes cooked with Lipton Onion Soup mix in a slow cooker for a simple yet flavorful side dish.


Ingredients

  • 2 lb russet potatoes, thinly sliced
  • 1 packet (1 oz) Lipton Onion Soup mix
  • ⅓ cup olive oil (or melted butter)
  • ¼ tsp garlic powder
  • ¼ tsp freshly ground black pepper
  • Optional: chopped parsley or shredded Cheddar for serving

Instructions

  1. Spray the slow cooker with cooking spray and arrange the potato slices in a tidy spiral.
  2. Whisk the soup mix, garlic powder, pepper, and olive oil in a small bowl, then drizzle the mixture evenly over the potatoes.
  3. Cover and cook on HIGH for about 4 hours (or LOW for 7–8 hours) until the potatoes are tender and lightly browned on the edges.
  4. Just before serving, loosen the potatoes with a spoon and sprinkle on fresh parsley or a handful of cheese if desired.

Notes

  • For a cheesy upgrade, scatter 1 cup shredded Cheddar over the potatoes in the last 30 minutes.
  • Add a teaspoon of dried rosemary or thyme for an herb twist.
  • Substitute olive oil with melted butter for a richer flavor.
  • For extra moisture, splash ½ cup chicken broth over the potatoes before cooking.
  • Leftovers can be refrigerated for up to 3 days. Reheat in an oven or microwave.

Nutrition

  • Serving Size: 1 serving
  • Calories: 150
  • Sugar: 2g
  • Sodium: 400mg
  • Fat: 10g
  • Saturated Fat: 1g
  • Unsaturated Fat: 9g
  • Trans Fat: 0g
  • Carbohydrates: 17g
  • Fiber: 2g
  • Protein: 2g
  • Cholesterol: 0mg

Have you made this recipe? I'd love to see it!

Click here to Follow me on Pinterest

Caprese Pasta Salad

June 13, 2025 by Sue Leave a Comment

I bring together tender pasta, juicy tomatoes, creamy mozzarella, and fresh basil, all tossed in a simple olive oil and balsamic dressing to deliver a light yet satisfying summer salad.

Caprese Pasta Salad

Why You’ll Love This Recipe

I love how this dish comes together quickly with minimal ingredients, yet delivers bright, fresh flavors. It’s perfect for fuss-free meals, potlucks, or gatherings, and gets even better after chilling—letting the flavors meld beautifully.

ingredients

(Here's a tip: Check out the full list of ingredients and measurements in the recipe card below.)

  • 8 oz rotini or mini bowtie pasta
  • 8 oz mozzarella pearls
  • 2 cups grape or cherry tomatoes, halved
  • ⅓ cup fresh basil, chopped or chiffonade
  • ⅓ cup extra‑virgin olive oil
  • ¼ cup balsamic vinegar
  • Salt & pepper, to taste

directions

  1. Cook the pasta according to package directions until al dente. Drain and rinse with cold water to cool.
  2. In a large bowl, whisk together olive oil, balsamic vinegar, salt, and pepper.
  3. Add the pasta, then gently fold in tomatoes, mozzarella pearls, and basil.
  4. Toss everything to coat, then let it rest at room temperature for about 30 minutes—or refrigerate—for flavors to meld.
  5. Taste and adjust seasoning or drizzle with extra balsamic before serving.

Servings and timing

Makes about 6 servings.

  • Prep: 10 minutes
  • Cook: 8 minutes
  • Rest: 30 minutes
  • Total: ~48 minutes

Variations

  • Use bowtie, fusilli, or orzo instead of rotini.
  • Swap balsamic for red wine vinegar plus a touch of honey for a lighter dressing.
  • Add roasted red peppers, capers, or olives for extra flavor and texture.
  • Mix in cooked chicken or white beans to make it heartier.

storage/reheating

Store leftovers in an airtight container in the fridge for up to 3–4 days. I give it a good stir before serving. Serve cold or at room temperature; this salad isn’t meant for reheating.

FAQs

What pasta shape is best for this salad?

I prefer small shapes like rotini or bowtie since they hold the dressing and ingredients nicely, but fusilli or orzo work well too.

Can I make this salad ahead of time?

Yes—I often let it chill for a few hours or overnight. Chilling builds more flavor as the pasta soaks up the dressing.

How do I prevent the mozzarella from becoming rubbery?

Drain the mozzarella pearls well and keep the salad chilled to maintain their soft texture.

Can I make a dairy‑free version?

Absolutely—I substitute dairy‑free mozzarella or skip it entirely and the salad still shines.

Does the salad dry out after a day?

It may absorb dressing over time, so I usually store extra olive oil or balsamic on the side to refresh it before serving.

Conclusion

This Caprese Pasta Salad is a go‑to summer favorite in my house: vibrant, easy, and versatile. Whether I’m bringing it to a BBQ, packing it for lunch, or serving it alongside dinner, it always hits the spot. Enjoy this bright and breezy dish—and feel free to customize with your favorite add‑ins!

Print

clock clock iconcutlery cutlery iconflag flag iconfolder folder iconinstagram instagram iconpinterest pinterest iconfacebook facebook iconprint print iconsquares squares iconheart heart iconheart solid heart solid icon
Caprese Pasta Salad

Caprese Pasta Salad

5 Stars 4 Stars 3 Stars 2 Stars 1 Star No reviews
  • Author: Sue
  • Prep Time: 10 minutes
  • Cook Time: 8 minutes
  • Total Time: ~48 minutes
  • Yield: 6 servings
  • Category: Salad
  • Method: Tossing
  • Cuisine: Italian
  • Diet: Vegetarian
Print Recipe
Pin Recipe

Description

A light and satisfying summer salad made with pasta, mozzarella, tomatoes, basil, and a balsamic dressing.


Ingredients

  • 8 oz rotini or mini bowtie pasta
  • 8 oz mozzarella pearls
  • 2 cups grape or cherry tomatoes, halved
  • ⅓ cup fresh basil, chopped or chiffonade
  • ⅓ cup extra-virgin olive oil
  • ¼ cup balsamic vinegar
  • Salt & pepper, to taste

Instructions

  1. Cook the pasta according to package directions until al dente. Drain and rinse with cold water to cool.
  2. In a large bowl, whisk together olive oil, balsamic vinegar, salt, and pepper.
  3. Add the pasta, then gently fold in tomatoes, mozzarella pearls, and basil.
  4. Toss everything to coat, then let it rest at room temperature for about 30 minutes—or refrigerate—for flavors to meld.
  5. Taste and adjust seasoning or drizzle with extra balsamic before serving.

Notes

  • Use different pasta shapes like fusilli or orzo for variety.
  • For a lighter dressing, substitute balsamic with red wine vinegar and a touch of honey.
  • Mix in roasted red peppers, capers, or olives for extra flavor.
  • Add cooked chicken or white beans for a heartier salad.
  • Store leftovers in an airtight container in the fridge for up to 3–4 days. Stir before serving.
  • Best served cold or at room temperature, not meant for reheating.

Nutrition

  • Serving Size: 1 serving
  • Calories: 250
  • Sugar: 3g
  • Sodium: 300mg
  • Fat: 18g
  • Saturated Fat: 4g
  • Unsaturated Fat: 14g
  • Trans Fat: 0g
  • Carbohydrates: 18g
  • Fiber: 2g
  • Protein: 7g
  • Cholesterol: 20mg

Have you made this recipe? I'd love to see it!

Click here to Follow me on Pinterest

Strawberry Shortcake Cheesecake

June 13, 2025 by Sue Leave a Comment

This strawberry shortcake cheesecake combines the best of two delicious desserts—fluffy strawberry cake, creamy cheesecake, and a crunchy, tangy topping. The result is a decadent, layered treat that's perfect for any special occasion or casual get-together. It's easy to make, but it feels fancy enough to impress guests, with the balance of smooth cream cheese and the burst of fresh strawberry flavor in every bite.

Strawberry Shortcake Cheesecake

Why I’ll Love This Recipe

I love how this recipe combines the flavors of strawberry shortcake and cheesecake into one show-stopping dessert. The strawberry cake layers provide a soft and slightly sweet base, while the cheesecake layer adds richness and smoothness. The crunchy topping gives it that nostalgic twist, reminiscent of the classic strawberry crunch bar. It’s easy to assemble, can be made in advance, and looks beautiful when finished, making it the perfect dessert for gatherings.

Ingredients

(Here's a tip: Check out the full list of ingredients and measurements in the recipe card below.)

  • Cookie Crunch
    • 36 vanilla sandwich cookies, coarsely crushed
    • 1 (3-oz) box strawberry gelatin
    • 4 tablespoon unsalted butter, melted, divided
    • 5–6 drops red gel food coloring
  • Strawberry Cake Layers
    • 1 (16.5-oz) box Strawberry Supreme cake mix
    • 3 large eggs, room temperature
    • ½ cup unsalted butter, melted
    • 1 cup whole milk
    • 1 (3-oz) box strawberry gelatin
  • Cheesecake Layer
    • ¾ cup granulated sugar
    • ¼ cup cornstarch
    • 16 oz cream cheese, softened
    • ¼ cup heavy cream
    • 2 teaspoon pure vanilla extract
    • 3 large eggs, room temperature
  • Cream-Cheese Frosting
    • 8 oz cream cheese, softened
    • ½ cup heavy cream
    • ½ cup unsalted butter, softened
    • 1 teaspoon vanilla extract
    • 2 cups powdered sugar

Directions

  1. Bake the Crunch – I combine half of the crushed cookies with strawberry gelatin, then add a little red food coloring to the rest of the crumbs. After melting butter and tossing both mixtures separately, I bake them at 350°F for about 10 minutes.
  2. Make the Strawberry Cake – I mix the cake ingredients—cake mix, eggs, butter, milk, and strawberry gelatin—until smooth. Then, I divide the batter evenly between two 9-inch pans and bake at 350°F for 24-28 minutes, letting them cool completely.
  3. Prepare the Cheesecake Layer – At 325°F, I mix together cream cheese, sugar, cornstarch, heavy cream, and vanilla until smooth. I pour the mixture into a parchment-lined springform pan and bake for about 40 minutes. Once done, I turn off the oven, let it rest for 20 minutes, and then chill it in the freezer for 1 hour.
  4. Make the Frosting – I beat together softened cream cheese, heavy cream, and butter until fluffy, then mix in vanilla extract and powdered sugar.
  5. Assemble the Cake – I begin by placing one cake layer on my serving plate, then spread a little frosting over it. I add the cheesecake layer on top, followed by more frosting and the second cake layer. I frost the entire cake and press the cookie crunch mixture into the sides and top. I refrigerate it until ready to serve.

Servings and Timing

  • Yield: about 13 generous slices
  • Prep: 30 minutes
  • Bake: 1 hour 35 minutes
  • Chill/Assemble: about 1 hour 30 minutes
  • Total time: roughly 3 hours 35 minutes

Variations

  • Cake-Mix Swap – I use a vanilla or lemon cake mix when strawberry isn’t available. The gelatin still gives the cake a nice berry flavor and color.
  • Mini Cupcakes – If I want a fun, portable version, I scoop the batter into muffin tins and bake for 16-18 minutes, then top with frosting and the cookie crunch.
  • Gluten-Free Version – I’ve used gluten-free cake mix and cookies for a gluten-free twist, and it works wonderfully!
  • Extra Strawberry Flavor – To punch up the berry flavor, I add some finely chopped freeze-dried strawberries into the cookie crunch mixture.

Storage / Reheating

I store leftover cheesecake in the fridge, covered with plastic wrap, for up to 3 days. It’s best served cold, so I simply pull it from the fridge before serving and enjoy it straight from there. The cake doesn't freeze well due to the frosting, so I recommend keeping it refrigerated.

FAQs

How do I prevent the cheesecake layer from cracking?

I make sure to mix the cheesecake ingredients until just smooth, and I bake it at a lower temperature (325°F). After baking, I turn off the oven and let the cheesecake cool gradually to avoid sudden temperature changes.

Can I make this dessert ahead of time?

Yes, I often bake the cake and cheesecake layers a day or two in advance. I let them cool, wrap them tightly, and store them in the fridge. The frosting can be made the day of assembly for the best texture.

What exactly is in the cookie crunch topping?

The cookie crunch topping is made with crushed vanilla cookies, strawberry gelatin, butter, and a bit of red food coloring to give it that perfect strawberry crunch bar texture.

How do I slice this cake neatly?

To get clean slices, I dip a long serrated knife into hot water, wipe it dry, and then slice. Repeating this step between cuts ensures neat, layered slices.

Can I change the flavor of the frosting?

Yes, I sometimes swap the vanilla extract for almond extract or add a bit of strawberry jam to the frosting to enhance the flavor and color.

Conclusion

This strawberry shortcake cheesecake is the perfect dessert when I want something that feels both familiar and exciting. With layers of soft cake, rich cheesecake, and crunchy topping, it hits all the right notes. I can make it ahead, serve it with ease, and enjoy the compliments that follow with each bite. Whether for a birthday or a simple get-together, it’s always a hit!

Print

clock clock iconcutlery cutlery iconflag flag iconfolder folder iconinstagram instagram iconpinterest pinterest iconfacebook facebook iconprint print iconsquares squares iconheart heart iconheart solid heart solid icon
Strawberry Shortcake Cheesecake

Strawberry Shortcake Cheesecake

5 Stars 4 Stars 3 Stars 2 Stars 1 Star No reviews
  • Author: Sue
  • Prep Time: 30 minutes
  • Cook Time: 1 hour 35 minutes
  • Total Time: 3 hours 35 minutes
  • Yield: 13 generous slices
  • Category: Dessert
  • Method: Baking
  • Cuisine: American
  • Diet: Vegetarian
Print Recipe
Pin Recipe

Description

A mash-up of strawberry shortcake and cheesecake, layered with fluffy strawberry cake, a creamy cheesecake core, tangy cream-cheese frosting, and a nostalgic strawberry-cookie crunch.


Ingredients

  • 36 vanilla sandwich cookies, coarsely crushed
  • 1 (3-oz) box strawberry gelatin
  • 4 Tbsp unsalted butter, melted, divided
  • 5–6 drops red gel food coloring
  • 1 (16.5-oz) box Strawberry Supreme cake mix
  • 3 large eggs, room temperature
  • ½ cup unsalted butter, melted
  • 1 cup whole milk
  • 1 (3-oz) box strawberry gelatin
  • ¾ cup granulated sugar
  • ¼ cup cornstarch
  • 16 oz cream cheese, softened
  • ¼ cup heavy cream
  • 2 tsp pure vanilla extract
  • 3 large eggs, room temperature
  • 8 oz cream cheese, softened
  • ½ cup heavy cream
  • ½ cup unsalted butter, softened
  • 1 tsp vanilla extract
  • 2 cups powdered sugar

Instructions

  1. Bake the Crunch: Toss half the crushed cookies with gelatin, tint the rest with buttery red food gel, spread both on a tray, and bake 10 minutes at 350 °F. Let the crumbs cool while making the cakes.
  2. Strawberry Cakes: Beat cake mix, eggs, melted butter, milk, and gelatin until smooth. Divide into two 9-inch pans and bake 24–28 minutes at 350 °F. Cool completely.
  3. Cheesecake: Lower oven to 325 °F. Whip cream cheese, cream, vanilla, eggs, sugar, and cornstarch until smooth. Pour into a parchment-lined 9-inch springform pan and bake for 40 minutes. Let rest in the turned-off oven for 20 minutes. After cooling 30 minutes, freeze the cheesecake for 1 hour.
  4. Frosting: Beat cream cheese, cream, and butter until light, then blend in vanilla and powdered sugar to make fluffy, spreadable frosting.
  5. Assembly: Place one cake layer on a serving plate. Spread ¼ cup frosting, add the chilled cheesecake, top with a thin layer of frosting, then place the second cake layer. Frost the entire cake, press the strawberry and vanilla cookie crumbs onto the sides and top. Refrigerate until serving.

Notes

  • The cheesecake layer should be chilled in the freezer for at least 1 hour to ensure it is firm for stacking.
  • For best texture, assemble the cake the day after baking the cakes and cheesecake.
  • To keep the cheesecake from cracking, avoid overmixing and bake at a low temperature (325 °F).

Nutrition

  • Serving Size: 1 slice
  • Calories: 450
  • Sugar: 30g
  • Sodium: 250mg
  • Fat: 25g
  • Saturated Fat: 12g
  • Unsaturated Fat: 10g
  • Trans Fat: 0g
  • Carbohydrates: 50g
  • Fiber: 2g
  • Protein: 5g
  • Cholesterol: 60mg

Have you made this recipe? I'd love to see it!

Click here to Follow me on Pinterest

Edible Chocolate Chip Cookie Dough

June 13, 2025 by Sue Leave a Comment

This small-batch edible cookie dough tastes exactly like the batter I used to sneak from the mixing bowl—but it’s totally safe to eat. Because I heat-treat the flour and leave out the eggs, I can dig in with zero worries. A creamy brown-sugar vanilla base and plenty of mini chocolate chips make every spoonful nostalgic, sweet, and ridiculously satisfying.

Edible Chocolate Chip Cookie Dough

Why I’ll Love This Recipe

I whip this up when a cookie craving hits but I don’t want to turn on the oven. The entire process—from heat-treating the flour to folding in the chips—takes about ten minutes of hands-on time. The dough firms up in the fridge while I clean the mixing bowl, so instant gratification is practically guaranteed. It’s also endlessly customizable, kid-friendly, and freezer-friendly.

ingredients

(Here's a tip: Check out the full list of ingredients and measurements in the recipe card below.)

  • 1 ¾ cups all-purpose flour
  • 1 cup salted sweet-cream butter, softened
  • ¾ cup packed light brown sugar
  • ½ cup granulated sugar
  • 1 ½ teaspoons vanilla extract
  • 2 tablespoons heavy cream
  • ¼ teaspoon salt
  • 1 ½ cups mini semi-sweet chocolate chips

directions

  1. Heat-treat the flour. I spread the flour on a rimmed baking sheet and bake at 350 °F (175 °C) for 5–7 minutes, stirring once, until it reaches 165 °F throughout. Afterward I let it cool completely.
  2. Cream the butter and sugars. In a stand mixer (or with a hand mixer) I beat the softened butter, brown sugar, and granulated sugar for 2-3 minutes until light and fluffy.
  3. Flavor the base. I mix in the vanilla, salt, and heavy cream just until incorporated.
  4. Add the flour. With the mixer on low, I slowly add the cooled, heat-treated flour and beat until no dry streaks remain.
  5. Fold in the chips. Using a spatula, I gently fold in the mini chocolate chips until they’re evenly distributed.
  6. Chill and serve. I cover the bowl and refrigerate the dough for about 30 minutes so it firms up to scoop-able perfection.

Servings and timing

  • Yield: About 16 two-tablespoon scoops
  • Prep time: 10 minutes
  • Chill time: 30 minutes
  • Total time: 40 minutes

Variations

  • Mix-ins. I swap the mini chips for peanut-butter chips, white chocolate, or rainbow sprinkles when I want a color pop.
  • Flavor twists. A tablespoon of cocoa powder turns it into double-chocolate dough; a dash of cinnamon gives snickerdoodle vibes.
  • Texture change. When I’m craving crunch, I stir in crushed pretzels or toasted chopped nuts.

storage/reheating

I keep leftovers in an airtight container in the fridge for up to one week. For longer storage, I roll the dough into bite-size balls, flash-freeze on a baking sheet, then transfer to a zip-top bag; they stay fresh for about two months. When the craving strikes, I let the bites sit at room temperature for 5–10 minutes—no reheating required, though a five-second microwave zap makes the chips gooey.

FAQs

Can I bake this dough into cookies?

I don’t recommend it—there are no eggs or leaveners, so the texture won’t turn out like traditional cookies.

Do I really have to heat-treat the flour?

Yes. Raw flour can contain harmful bacteria. Heating it to 165 °F makes the dough safe.

Can I make it dairy-free?

I swap the butter for plant-based sticks and the heavy cream for canned coconut milk. The flavor changes slightly but it’s still delicious.

How do I keep the dough soft straight from the fridge?

I stir in an extra teaspoon of cream before chilling; it prevents the butter from firming up too much.

What’s the best way to portion for a party tray?

I use a mini cookie scoop, place the rounds in mini cupcake liners, and chill until firm—easy, mess-free servings for a crowd.

Conclusion

When cookie nostalgia hits, I skip the oven and go straight for this edible dough. With pantry staples and ten stress-free minutes, I’m rewarded with a bowl of sweet, scoop-able bliss that’s perfect for sharing—or not!

Print

clock clock iconcutlery cutlery iconflag flag iconfolder folder iconinstagram instagram iconpinterest pinterest iconfacebook facebook iconprint print iconsquares squares iconheart heart iconheart solid heart solid icon
Edible Chocolate Chip Cookie Dough

Edible Chocolate Chip Cookie Dough

5 Stars 4 Stars 3 Stars 2 Stars 1 Star No reviews
  • Author: Sue
  • Prep Time: 10 minutes
  • Cook Time: 0 minutes
  • Total Time: 40 minutes
  • Yield: 16 two-tablespoon scoops
  • Category: Dessert
  • Method: No-bake
  • Cuisine: American
  • Diet: Vegetarian
Print Recipe
Pin Recipe

Description

This small-batch edible cookie dough tastes exactly like the batter I used to sneak from the mixing bowl—but it’s totally safe to eat. A creamy brown-sugar vanilla base and plenty of mini chocolate chips make every spoonful nostalgic and satisfying.


Ingredients

  • 1 ¾ cups all-purpose flour
  • 1 cup salted sweet-cream butter, softened
  • ¾ cup packed light brown sugar
  • ½ cup granulated sugar
  • 1 ½ teaspoons vanilla extract
  • 2 tablespoons heavy cream
  • ¼ teaspoon salt
  • 1 ½ cups mini semi-sweet chocolate chips

Instructions

  1. Heat-treat the flour by spreading it on a rimmed baking sheet and bake at 350 °F (175 °C) for 5–7 minutes, stirring once, until it reaches 165 °F throughout. Let it cool completely.
  2. Cream the butter and sugars by beating the softened butter, brown sugar, and granulated sugar for 2-3 minutes until light and fluffy.
  3. Flavor the base by mixing in the vanilla, salt, and heavy cream just until incorporated.
  4. Add the flour by slowly adding the cooled, heat-treated flour and beat until no dry streaks remain.
  5. Fold in the chips using a spatula until they’re evenly distributed.
  6. Chill and serve by covering the bowl and refrigerating the dough for about 30 minutes so it firms up to scoop-able perfection.

Notes

  • This recipe yields about 16 two-tablespoon scoops.
  • Leftovers can be stored in an airtight container in the fridge for up to one week.
  • For longer storage, roll the dough into bite-size balls, flash-freeze on a baking sheet, then transfer to a zip-top bag for about two months of freshness.
  • When craving strikes, allow the dough bites to sit at room temperature for 5–10 minutes, or microwave for 5 seconds for gooey chips.

Nutrition

  • Serving Size: 1 scoop (2 tablespoons)
  • Calories: 190
  • Sugar: 16g
  • Sodium: 160mg
  • Fat: 12g
  • Saturated Fat: 7g
  • Unsaturated Fat: 4g
  • Trans Fat: 0g
  • Carbohydrates: 20g
  • Fiber: 1g
  • Protein: 1g
  • Cholesterol: 35mg

Have you made this recipe? I'd love to see it!

Click here to Follow me on Pinterest

Potsticker Soup

June 13, 2025 by Sue Leave a Comment

Potsticker Soup is a comforting, flavorful dish that combines the satisfying texture of potstickers with the warmth and richness of a savory broth. It’s perfect for cozy evenings or whenever I’m craving something hearty yet light. The dumplings add a delicate bite, while the broth, infused with ginger and garlic, brings a delightful depth of flavor. Whether I enjoy it as a light lunch or a full dinner, this soup is guaranteed to hit the spot.

Potsticker Soup

Why You’ll Love This Recipe

I love this recipe because it’s the perfect blend of flavors and textures. The potstickers themselves are soft on the inside with a slight crispy edge, and they soak up the savory broth, creating an irresistible contrast. The broth is soothing and aromatic, with a rich depth of flavor from ginger, garlic, and soy sauce. It’s a simple yet satisfying dish that feels both comforting and special. Plus, it’s easy to customize depending on what I have on hand, making it perfect for a weeknight meal.

Ingredients

  • 1 package of frozen potstickers (about 12-15 pieces)
  • 4 cups chicken or vegetable broth
  • 1 tablespoon soy sauce
  • 1 tablespoon sesame oil
  • 1 teaspoon ginger, minced
  • 2 garlic cloves, minced
  • ½ cup green onions, sliced
  • ½ cup mushrooms, sliced (optional)
  • ¼ cup baby spinach (optional)
  • ¼ teaspoon red pepper flakes (optional for some heat)
  • Salt and pepper to taste

(Here's a tip: Check out the full list of ingredients and measurements in the recipe card below.)

Directions

  1. Heat sesame oil in a large pot over medium heat. Add the minced ginger and garlic, sautéing for about 1-2 minutes until fragrant.
  2. Add the chicken or vegetable broth to the pot and bring to a simmer.
  3. Stir in the soy sauce, green onions, and red pepper flakes (if using). Allow the broth to simmer for another 5 minutes to combine the flavors.
  4. Gently drop the frozen potstickers into the broth. Allow them to cook for about 5-7 minutes, until they float to the surface and are heated through.
  5. If using mushrooms, add them to the soup and cook for an additional 2-3 minutes.
  6. For an extra boost of flavor and nutrition, add the spinach at the end and stir until wilted.
  7. Taste and adjust seasoning with salt and pepper as needed.
  8. Serve hot, garnished with additional green onions if desired.

Servings and Timing

This recipe yields about 4 servings. It takes around 20-25 minutes to prepare and cook from start to finish, making it a perfect quick and easy meal.

Variations

I love how versatile this recipe is! Here are a few variations I like to try:

  • Add protein: Sometimes, I’ll toss in some cooked chicken, shrimp, or tofu to make the soup heartier.
  • Make it spicy: If I’m in the mood for some heat, I add more red pepper flakes or a dash of chili oil to the broth.
  • Use different vegetables: Feel free to swap out the mushrooms and spinach for other vegetables like bok choy, baby corn, or carrots for a unique twist.
  • Homemade potstickers: If I have extra time, I’ll make my own potstickers from scratch. They add an extra touch of freshness to the soup.

Storage/Reheating

If I have leftovers, I store the soup in an airtight container in the fridge for up to 3 days. The potstickers may become a little softer when reheated, but the flavors will still be delicious. To reheat, I simply warm the soup over medium heat in a pot until it’s heated through. If I’ve stored the potstickers separately, I just reheat them in a skillet or air fryer to get them crispy again before adding them back to the soup.

FAQs

Can I use fresh potstickers instead of frozen?

Absolutely! I often use fresh potstickers if I have them. Just be sure to adjust the cooking time slightly since fresh potstickers may cook faster than frozen ones.

Can I make the broth ahead of time?

Yes, I can prepare the broth in advance and store it in the fridge for up to 3 days. When I’m ready to make the soup, I just heat the broth and add the potstickers and any additional vegetables.

What other seasonings can I add to the soup?

I like to experiment with different seasonings depending on the mood. Some options I’ve used include hoisin sauce for sweetness, a splash of rice vinegar for acidity, or even a bit of five-spice powder for a more complex flavor profile.

Is this recipe gluten-free?

This recipe can be made gluten-free by using gluten-free soy sauce and checking the labels of the potstickers. Some frozen potstickers contain gluten, so I’d choose a gluten-free variety or make my own.

Can I freeze the soup?

Yes, the soup can be frozen, but the texture of the potstickers may change after freezing and reheating. If I plan to freeze it, I typically store the broth separately from the potstickers and add the potstickers just before serving.

Conclusion

Potsticker Soup is one of my go-to comfort meals when I want something simple but satisfying. It’s a quick, flavorful dish that brings the joy of potstickers into a cozy, aromatic broth. With endless ways to customize it, I can always make it my own depending on the ingredients I have on hand. Whether I’m having it for lunch or dinner, this soup never fails to hit the spot!

Print

clock clock iconcutlery cutlery iconflag flag iconfolder folder iconinstagram instagram iconpinterest pinterest iconfacebook facebook iconprint print iconsquares squares iconheart heart iconheart solid heart solid icon
Potsticker Soup

Potsticker Soup

5 Stars 4 Stars 3 Stars 2 Stars 1 Star No reviews
  • Author: Sue
  • Prep Time: 10 minutes
  • Cook Time: 15 minutes
  • Total Time: 25 minutes
  • Yield: 4 servings
  • Category: Soup
  • Method: Stovetop
  • Cuisine: Asian-Inspired
Print Recipe
Pin Recipe

Description

Potsticker Soup is a quick and flavorful recipe that combines tender dumplings with a rich, savory broth. Perfect for cozy evenings, this customizable dish is easy to prepare using store-bought or homemade potstickers. Add vegetables, spices, or noodles for a satisfying, comforting meal that everyone will love. :contentReference[oaicite:0]{index=0}


Ingredients

  • 12–15 frozen potstickers (store-bought or homemade)
  • 4 cups chicken broth (or vegetable broth for a vegetarian option)
  • 1 tablespoon soy sauce
  • 1 tablespoon sesame oil
  • 2 teaspoons grated ginger
  • 2 cloves garlic, minced
  • 2–3 green onions, chopped (for garnish)
  • ½ cup sliced mushrooms (optional)
  • ½ cup spinach or bok choy (optional)
  • 1 tablespoon rice vinegar (optional)
  • Salt and pepper to taste
  • 1 teaspoon chili oil or red pepper flakes (optional)

Instructions

  1. Prepare the Broth: Heat sesame oil in a large pot over medium heat. Add garlic and ginger, sautéing for 1 minute until fragrant. Pour in chicken or vegetable broth, soy sauce, and optional rice vinegar. Simmer for 5–10 minutes.
  2. Cook the Potstickers and Vegetables: Add frozen potstickers to the simmering broth, cooking for 5–7 minutes until heated through. Stir in mushrooms or spinach during the last few minutes.
  3. Season the Soup: Adjust seasoning with salt, pepper, and chili oil for a spicy kick. Remove the pot from heat.
  4. Serve and Garnish: Ladle soup into bowls, ensuring an even mix of broth, potstickers, and vegetables. Garnish with green onions and a drizzle of sesame oil.

Notes

  • For a richer flavor, add tamari or fish sauce.
  • Customize with your favorite vegetables or cooked noodles for a heartier meal.
  • Use vegetable broth and vegan potstickers for a vegan-friendly version.

Nutrition

  • Serving Size: 1 serving (¼ recipe) :contentReference[oaicite:9]{index=9}

Have you made this recipe? I'd love to see it!

Click here to Follow me on Pinterest

Cajun Potato Soup

June 13, 2025 by Sue Leave a Comment

Cajun Potato Soup is a creamy, flavorful dish that brings together tender potatoes, a rich broth, and a perfect balance of Cajun spices. The combination of heat from the Cajun seasoning and the smoothness of heavy cream makes this soup both hearty and satisfying. It's an easy, comforting meal that’s perfect for cozy nights.

Cajun Potato Soup

Why You’ll Love This Recipe

I absolutely love how this soup manages to be both spicy and comforting at the same time. The bold flavors from the Cajun seasoning give the soup a nice kick, while the cream and cheese bring it all together into a rich, velvety texture. The potatoes become perfectly tender as they simmer in the broth, soaking up all the flavors. It’s a dish that fills me up and warms me from the inside out, making it a perfect comfort food option for any occasion.

Ingredients

  • 1 tablespoon vegetable oil
  • 1 large onion, diced (about 1 cup)
  • ½ cup diced celery (about 1 rib)
  • ½ red bell pepper, seeded and diced
  • 2 teaspoons garlic, minced
  • 1 teaspoon Cajun seasoning
  • ½ teaspoon kosher salt
  • ½ teaspoon black pepper
  • ½ teaspoon paprika
  • ¼ teaspoon cayenne pepper
  • 4 cups (960 g) chicken broth
  • 4 large russet potatoes, peeled and cubed
  • ½ cup (119 g) heavy whipping cream
  • 1 cup (113 g) mild cheddar cheese, shredded
  • Parsley, chopped for garnish

(Here's a tip: Check out the full list of ingredients and measurements in the recipe card below.)

Directions

  1. In a large pot over medium heat, add the vegetable oil. Once hot, add the diced onion, celery, and red bell pepper. Cook until softened, about 5-8 minutes. Add the minced garlic and cook for an additional minute.
  2. Add the Cajun seasoning, kosher salt, black pepper, paprika, cayenne pepper, chicken broth, and cubed potatoes to the pot. Stir to combine, then reduce the heat and simmer for 20-25 minutes, or until the potatoes are tender.
  3. Stir in the heavy whipping cream and shredded cheddar cheese, continuing to simmer for an additional 5 minutes, or until everything is heated through and the cheese has melted.
  4. Garnish with chopped parsley before serving.

Servings and Timing

  • Servings: 6
  • Prep Time: 20 minutes
  • Cook Time: 45 minutes
  • Total Time: 1 hour 5 minutes

Variations

  • Vegetarian Version: If I want to make the soup completely vegetarian, I can simply switch to vegetable broth instead of chicken broth. Adding extra vegetables like carrots or mushrooms can enhance the flavor and texture.
  • Spice Level: The beauty of this recipe is that I can control the heat. If I prefer a milder soup, I can reduce or omit the cayenne pepper or adjust the amount of Cajun seasoning.
  • Cheese Choices: While cheddar is my go-to, I could easily switch it up with Monterey Jack, Gouda, or even a spicy pepper jack for more flavor and kick.

Storage/Reheating

  • Refrigeration: I let the soup cool to room temperature and then transfer it to an airtight container. It stores in the fridge for up to 3-4 days.
  • Freezing: This soup freezes well, so I can store it in the freezer for 2-3 months. When I’m ready to reheat, I let it thaw in the fridge overnight, then warm it on the stovetop. If the cream separates a bit, I just stir it back together.

FAQs

How can I make the soup thicker?

To thicken the soup, I can use an immersion blender to puree a portion of the soup directly in the pot or remove a couple of cups, blend it, and then return it to the pot. Letting the soup simmer uncovered will also help it reduce and thicken naturally.

Can I add other vegetables to the soup?

Yes, I can definitely add more vegetables to the soup. Carrots, corn, or even spinach are great options for adding extra flavor and nutrients. If I decide to add more vegetables, I may need to adjust the cooking time a little.

Is it necessary to peel the potatoes?

Peeling the potatoes is optional. If I prefer a smoother texture, I can peel them, but leaving the skins on adds more texture and nutrients to the soup.

Can I make this soup in a slow cooker?

Yes, I can make this soup in a slow cooker. After sautéing the vegetables and garlic, I would transfer them to the slow cooker, add the remaining ingredients, and cook on low for 6-7 hours or high for 3-4 hours. Stir in the cream and cheese in the last 30 minutes of cooking.

What can I serve with Cajun Potato Soup?

This soup pairs wonderfully with crusty bread, cornbread, or a fresh salad. If I’m in the mood for something extra indulgent, I love serving it with garlic bread or buttermilk biscuits.

Conclusion

Cajun Potato Soup is a delightful and satisfying dish that offers a creamy, flavorful base with just the right amount of spice. Whether enjoyed on its own or paired with a side of bread, it’s sure to warm you up and keep you coming back for more. It’s simple to make and even easier to customize, making it a great go-to comfort food that’s sure to please.

Print

clock clock iconcutlery cutlery iconflag flag iconfolder folder iconinstagram instagram iconpinterest pinterest iconfacebook facebook iconprint print iconsquares squares iconheart heart iconheart solid heart solid icon
Cajun Potato Soup

Cajun Potato Soup

5 Stars 4 Stars 3 Stars 2 Stars 1 Star No reviews
  • Author: Sue
  • Prep Time: 20 minutes
  • Cook Time: 45 minutes
  • Total Time: 1 hour 5 minutes
  • Yield: 6 servings
  • Category: Soup
  • Method: Stovetop
  • Cuisine: American
  • Diet: Vegetarian
Print Recipe
Pin Recipe

Description

Cajun Potato Soup is a creamy, flavorful dish that combines tender potatoes, a rich broth, and a perfect balance of Cajun spices for a hearty and comforting meal.


Ingredients

  • 1 tablespoon vegetable oil
  • 1 large onion, diced (about 1 cup)
  • ½ cup diced celery (about 1 rib)
  • ½ red bell pepper, seeded and diced
  • 2 teaspoons garlic, minced
  • 1 teaspoon Cajun seasoning
  • ½ teaspoon kosher salt
  • ½ teaspoon black pepper
  • ½ teaspoon paprika
  • ¼ teaspoon cayenne pepper
  • 4 cups (960 g) chicken broth
  • 4 large russet potatoes, peeled and cubed
  • ½ cup (119 g) heavy whipping cream
  • 1 cup (113 g) mild cheddar cheese, shredded
  • Parsley, chopped for garnish

Instructions

  1. In a large pot over medium heat, add the vegetable oil. Once hot, add the diced onion, celery, and red bell pepper. Cook until softened, about 5-8 minutes. Add the minced garlic and cook for an additional minute.
  2. Add the Cajun seasoning, kosher salt, black pepper, paprika, cayenne pepper, chicken broth, and cubed potatoes to the pot. Stir to combine, then reduce the heat and simmer for 20-25 minutes, or until the potatoes are tender.
  3. Stir in the heavy whipping cream and shredded cheddar cheese, continuing to simmer for an additional 5 minutes, or until everything is heated through and the cheese has melted.
  4. Garnish with chopped parsley before serving.

Notes

  • Vegetarian Version: Use vegetable broth instead of chicken broth and add extra vegetables like carrots or mushrooms for enhanced flavor and texture.
  • Spice Level: Adjust the amount of Cajun seasoning or cayenne pepper to control the heat.
  • Cheese Choices: Swap cheddar for Monterey Jack, Gouda, or spicy pepper jack for different flavor profiles.

Nutrition

  • Serving Size: 1 serving
  • Calories: 350
  • Sugar: 5g
  • Sodium: 850mg
  • Fat: 22g
  • Saturated Fat: 11g
  • Unsaturated Fat: 9g
  • Trans Fat: 0g
  • Carbohydrates: 34g
  • Fiber: 5g
  • Protein: 7g
  • Cholesterol: 50mg

Have you made this recipe? I'd love to see it!

Click here to Follow me on Pinterest

Cottage Cheese Pizza Bowl

June 12, 2025 by Sue Leave a Comment

I love this Cottage Cheese Pizza Bowl because it transforms the flavors of pizza into a nutritious, protein-packed, no-bake meal that comes together in just minutes. Cottage Cheese Pizza Bowl

Why You’ll Love This Recipe

I’m always craving pizza, but I don’t want the empty carbs or long bake time. This bowl gives me the familiar taste—tomato sauce, melted cheese, savory seasonings—while keeping it light and balanced. It’s perfect for a quick lunch or a healthy dinner that satisfies my comfort food cravings.

ingredients

(Here's a tip: Check out the full list of ingredients and measurements in the recipe card below.)

  • 1 cup cottage cheese
  • ½ cup cherry tomatoes, halved
  • ¼ cup mini pepperoni slices or chopped large pepperoni
  • 2 Tbsp pizza sauce or marinara
  • ¼ cup shredded mozzarella cheese
  • 1 Tbsp grated Parmesan cheese
  • 1 Tbsp sliced black olives
  • 1 Tbsp diced bell pepper (any color)
  • 1 teaspoon dried oregano or Italian seasoning
  • Fresh basil leaves, optional sprinkle

directions

  1. Spoon cottage cheese into a bowl as the creamy pizza “crust.”
  2. Spread the pizza sauce or marinara evenly over the cottage cheese.
  3. Layer cherry tomato halves and pepperoni slices on top.
  4. Sprinkle with shredded mozzarella, Parmesan, olives, and diced bell pepper.
  5. Finish with a dusting of oregano or Italian seasoning.
  6. If desired, microwave for 30 seconds to melt the cheese slightly (optional).
  7. Garnish with fresh basil leaves and dig in!

Servings and timing

This makes 1 serving and takes about 5 minutes to assemble. If you choose to warm it in the microwave, add another 1–2 minutes.

Variations

  • Veggie Deluxe: skip the pepperoni and add mushrooms, spinach, zucchini, or artichoke hearts for a veggie-rich version.
  • BBQ Chicken Pizza Bowl: swap pizza sauce for BBQ sauce, add cooked chicken and red onion, then top with mozzarella and cilantro.
  • Buffalo Chicken Pizza Bowl: use buffalo sauce instead of pizza sauce, toss in shredded chicken, add mozzarella and blue cheese crumbles for a spicy twist.
  • Mediterranean Pizza Bowl: use olive oil and garlic instead of tomato sauce, then top with tomatoes, olives, red onion, feta, and oregano.
  • Pesto Pizza Bowl: spread pesto over cottage cheese, then layer tomatoes, mozzarella, and pine nuts for a fresh basil flavor.

storage/reheating

  • Make-ahead: Prep the cottage cheese base and toppings separately, then assemble just before eating.
  • Refrigerator: Store components separately in airtight containers for up to 3 days.
  • Reheating: Assemble your bowl, then microwave for 30–60 seconds to melt the cheese; add fresh toppings like basil or olives after warming.

FAQs

What type of cottage cheese works best?

I prefer creamy, medium-curd cottage cheese—it blends well with pizza flavors without being too watery.

Can I make this vegan or dairy-free?

Yes! I swap cottage cheese for firm tofu or vegan ricotta, use dairy-free cheese, and pick plant-based pepperoni.

Can I prepare this ahead of time?

Absolutely. I prep all ingredients the night before and assemble it just before eating for best freshness.

Is microwave warming necessary?

Not at all. I often enjoy it cold, and the flavors still pop. But if I want that melted cheese vibe, I give it a quick zap.

How can I add more protein?

I sometimes top it with cooked chicken, turkey pepperoni, or chickpeas to boost protein without losing flavor.

Conclusion

I love how this Cottage Cheese Pizza Bowl gives me all the flavor of pizza—tomato, cheese, herbs—without the guilt. It’s quick, customizable, and perfect for satisfying cravings any time I want a tasty, healthy meal.

Print

clock clock iconcutlery cutlery iconflag flag iconfolder folder iconinstagram instagram iconpinterest pinterest iconfacebook facebook iconprint print iconsquares squares iconheart heart iconheart solid heart solid icon
Cottage Cheese Pizza Bowl

Cottage Cheese Pizza Bowl

5 Stars 4 Stars 3 Stars 2 Stars 1 Star No reviews
  • Author: Sue
  • Prep Time: 5 minutes
  • Cook Time: 1 minute
  • Total Time: 6 minutes
  • Yield: 1 serving
  • Category: Main
  • Method: No-Cook / Microwave
  • Cuisine: American
Print Recipe
Pin Recipe

Description

This Cottage Cheese Pizza Bowl delivers all the classic pizza flavors in a nutritious, high-protein, no-bake bowl. It's perfect for a quick, satisfying lunch or dinner.


Ingredients

  • 1 cup cottage cheese
  • ½ cup cherry tomatoes, halved
  • ¼ cup mini pepperoni slices or chopped large pepperoni
  • 2 Tbsp pizza sauce or marinara
  • ¼ cup shredded mozzarella cheese
  • 1 Tbsp grated Parmesan cheese
  • 1 Tbsp sliced black olives
  • 1 Tbsp diced bell pepper (any color)
  • 1 tsp dried oregano or Italian seasoning
  • Fresh basil leaves, optional

Instructions

  1. Spoon cottage cheese into a bowl as the creamy pizza “crust.”
  2. Spread the pizza sauce or marinara evenly over the cottage cheese.
  3. Layer cherry tomato halves and pepperoni slices on top.
  4. Sprinkle with shredded mozzarella, Parmesan, olives, and diced bell pepper.
  5. Finish with a dusting of oregano or Italian seasoning.
  6. Microwave for 30 seconds to melt the cheese slightly, if desired.
  7. Garnish with fresh basil leaves and serve.

Notes

  • Enjoy cold or slightly warmed depending on preference.
  • Use vegan substitutes for a dairy-free version.
  • Great for meal prep—store ingredients separately and assemble when ready to eat.

Nutrition

  • Serving Size: 1 bowl
  • Calories: 300
  • Sugar: 5g
  • Sodium: 850mg
  • Fat: 18g
  • Saturated Fat: 8g
  • Unsaturated Fat: 9g
  • Trans Fat: 0g
  • Carbohydrates: 10g
  • Fiber: 2g
  • Protein: 25g
  • Cholesterol: 45mg

Have you made this recipe? I'd love to see it!

Click here to Follow me on Pinterest

Homemade Peanut Butter Dog Treats

June 12, 2025 by Sue Leave a Comment

I made these crunchy peanut butter dog treats using just five simple ingredients—peanut butter, egg, banana, maple syrup, and whole wheat flour—and baked them into adorable bone shapes. They’re wholesome, easy to prepare, and pups absolutely adore them. Homemade Peanut Butter Dog Treats

Why I’ll Love This Recipe

I love how effortlessly I can bake a batch of healthy dog snacks at home. They’re free of preservatives and harmful additives, yet packed with flavor and protein. I also enjoy customizing the shapes and textures—softer for training, crunchier for treats. Plus, my kitchen smells amazing when they’re in the oven!

ingredients

(Here's a tip: Check out the full list of ingredients and measurements in the recipe card below.)

  • 1 cup creamy peanut butter (make sure it contains no xylitol)
  • 1 egg
  • ½ ripe banana, mashed
  • 1 tablespoon maple syrup
  • 1 cup whole wheat flour

directions

  1. I preheat the oven to 350 °F and line a baking sheet with parchment paper.
  2. I beat together the peanut butter, egg, mashed banana, and maple syrup in a bowl until smooth.
  3. I slowly mix in the whole wheat flour until the dough comes together.
  4. On a lightly floured surface, I roll the dough to about ½‑inch thickness. If it feels too crumbly, I add 2–3 tablespoons of water.
  5. I cut out shapes with a cookie cutter and place them on the prepared baking sheet.
  6. I bake the treats for 15–25 minutes until golden brown. Thicker treats need longer, while thinner ones bake faster.
  7. I let them cool completely before giving them to my dog.

Servings and timing

  • Yield: About 40 treats
  • Prep time: 10 minutes
  • Cook time: 15–25 minutes
  • Total time: Approximately 27–35 minutes

Variations

  • For a softer texture, I bake the treats for a shorter time or cut them thicker. For crunchier ones, I bake longer or roll them thinner.
  • Sometimes I sprinkle in dog-safe extras like grated carrot or oats.
  • I’ve also swapped the flour with oat or rice flour for a gluten-free option—just a bit more water helps balance the texture.

storage/reheating

I store the cooled treats in an airtight container:

  • At room temperature for up to 2 days
  • In the refrigerator for up to 10 days
  • In the freezer for up to 3 months

If I want to crisp them up again, I warm them in the oven at 300 °F for about 5 minutes.

FAQs

What kind of peanut butter is safe for dogs?

I always use natural peanut butter with no added sugar or xylitol. Xylitol is dangerous for dogs, so I double-check the label every time.

Can I substitute honey for maple syrup?

Yes, I’ve used honey instead with no issues. I keep the same measurement and make sure it’s pure honey.

What if the dough is too dry?

I add water a tablespoon at a time until the dough holds together and I can roll it out smoothly.

Can I make these without wheat flour?

Yes, I’ve made these using oat flour or gluten-free blends. The texture stays great with just a little extra moisture.

How long do the treats stay fresh?

Mine usually last 2 days at room temperature, 10 days in the fridge, and up to 3 months in the freezer.

Conclusion

I love whipping up these homemade peanut butter dog treats—they’re simple, nutritious, and my dogs go crazy for them. Baking them is fun, and I feel good knowing exactly what’s in every bite. Whether I’m rewarding good behavior or just sharing a moment with my furry friend, these treats are a perfect pick.

Print

clock clock iconcutlery cutlery iconflag flag iconfolder folder iconinstagram instagram iconpinterest pinterest iconfacebook facebook iconprint print iconsquares squares iconheart heart iconheart solid heart solid icon
Homemade Peanut Butter Dog Treats

Homemade Peanut Butter Dog Treats

5 Stars 4 Stars 3 Stars 2 Stars 1 Star No reviews
  • Author: Sue
  • Prep Time: 10 minutes
  • Cook Time: 15–25 minutes
  • Total Time: 27 minutes
  • Yield: About 40 treats
  • Category: Dog Treats
  • Method: Baking
  • Cuisine: American
  • Diet: Halal
Print Recipe
Pin Recipe

Description

Crunchy homemade peanut butter dog treats made with five wholesome ingredients—peanut butter, egg, banana, maple syrup, and whole wheat flour. Simple to bake and a hit with pups!


Ingredients

  • 1 cup creamy peanut butter (ensure it contains no xylitol)
  • 1 egg
  • ½ ripe banana, mashed
  • 1 tablespoon maple syrup
  • 1 cup whole wheat flour

Instructions

  1. Preheat oven to 350 °F (175 °C) and line a baking sheet with parchment paper.
  2. In a bowl, beat together the peanut butter, egg, mashed banana, and maple syrup until smooth.
  3. Slowly mix in the whole wheat flour until the dough comes together.
  4. On a lightly floured surface, roll the dough to about ½‑inch thickness. If crumbly, add 2–3 tablespoons of water.
  5. Cut out shapes with a cookie cutter and place them on the baking sheet.
  6. Bake for 15–25 minutes until golden brown, adjusting time based on thickness.
  7. Let the treats cool completely before serving to your dog.

Notes

  • Use only peanut butter that does not contain xylitol, which is toxic to dogs.
  • For softer treats, cut thicker and bake for less time; for crunchier treats, cut thinner and bake longer.
  • Oat or gluten-free flour can be used as a 1:1 substitute, but may require more liquid.
  • Store in an airtight container: 2 days at room temperature, 10 days in the fridge, or freeze for several months.
  • Optional: Add dog-friendly toppings like kibble or dog-safe frosting.

Nutrition

  • Serving Size: 1 treat
  • Calories: 45
  • Sugar: 1g
  • Sodium: 20mg
  • Fat: 3g
  • Saturated Fat: 0.5g
  • Unsaturated Fat: 2.5g
  • Trans Fat: 0g
  • Carbohydrates: 4g
  • Fiber: 0.5g
  • Protein: 1.5g
  • Cholesterol: 5mg

Have you made this recipe? I'd love to see it!

Click here to Follow me on Pinterest

Creamy Mushroom and Spinach Stuffed Sweet Potatoes

June 12, 2025 by Sue Leave a Comment

I love how these sweet potatoes are loaded with a creamy, savory filling made from sautéed mushrooms, fresh spinach, and tahini. They’re cozy yet light—a satisfying dish I happily make for lunch, dinner, or even a hearty breakfast.

Creamy Mushroom and Spinach Stuffed Sweet Potatoes

Why I’ll Love This Recipe

I find this recipe irresistible because:

  1. It’s nutrient-dense and naturally vegan.
  2. It’s comforting but doesn’t feel heavy.
  3. It’s simple to make with minimal ingredients.
  4. I can customize it in many ways.
  5. It works perfectly for meal prep.

ingredients

(Here's a tip: Check out the full list of ingredients and measurements in the recipe card below.)

  • 2 small sweet potatoes
  • 1 small onion, diced
  • 200 g mushrooms, sliced
  • 2 garlic cloves, crushed
  • 60 g spinach
  • 1 heaped tablespoon tahini
  • 1 teaspoon nutritional yeast
  • Salt and pepper, to taste
  • Juice of ½ a small lemon
  • Pinch of cayenne pepper (optional)

directions

  1. Preheat the oven to 180 °C (fan). Pierce the sweet potatoes and place them on a baking tray lined with baking paper. Bake for around 40 minutes, or until they’re soft.
  2. While the potatoes are baking, sauté the onion, mushrooms, and garlic in a pan with a bit of oil or water until the mushrooms brown (about 5–7 minutes).
  3. Add the spinach, tahini, nutritional yeast, salt, and pepper. Stir and let the spinach wilt (about 3–4 minutes).
  4. Remove from heat and stir in the lemon juice and cayenne pepper if using.
  5. Once the sweet potatoes are baked, slice them open lengthwise, fluff the insides with a fork, and fill them generously with the mushroom and spinach mixture.
  6. Serve warm.

Servings and timing

  • Servings: 2
  • Prep time: 10 minutes
  • Cook time: 40 minutes
  • Total time: 50 minutes

Variations

  • I sometimes add cooked chickpeas, lentils, or quinoa to the filling for extra protein.
  • Almond butter or cashew butter works well if I don’t have tahini.
  • I like throwing in some extra vegetables like bell peppers or zucchini.
  • When I want heat, I use more cayenne or a drizzle of hot sauce.
  • A sprinkle of cheese or vegan cheese gives it a rich, indulgent touch.

storage/reheating

I store the stuffed sweet potatoes in an airtight container in the fridge for up to 3 days. To reheat, I use the microwave for 1–2 minutes or pop them in a preheated oven at 180 °C until warmed through.

FAQs

Can I use larger sweet potatoes?

Yes, I just adjust the baking time. Larger ones might need an extra 10–15 minutes in the oven.

Can I make this ahead of time?

I often bake the sweet potatoes and cook the filling in advance. When I’m ready to eat, I just reheat and assemble.

What can I use instead of tahini?

I’ve used almond butter, cashew butter, and even plain plant-based yogurt. All work nicely depending on the flavor I want.

Can I freeze this recipe?

Yes, I freeze the baked sweet potatoes and the filling separately. When ready, I thaw and reheat before assembling.

Is this recipe gluten-free?

It is naturally gluten-free, as long as the tahini and nutritional yeast I use are certified gluten-free.

Conclusion

This recipe is one of my go-to meals when I want something hearty, flavorful, and nourishing. The combination of sweet potato with creamy mushrooms and spinach never gets old for me. Whether I’m cooking for myself or guests, it’s always a hit.

Print

clock clock iconcutlery cutlery iconflag flag iconfolder folder iconinstagram instagram iconpinterest pinterest iconfacebook facebook iconprint print iconsquares squares iconheart heart iconheart solid heart solid icon
Creamy Mushroom and Spinach Stuffed Sweet Potatoes

Creamy Mushroom and Spinach Stuffed Sweet Potatoes

5 Stars 4 Stars 3 Stars 2 Stars 1 Star No reviews
  • Author: Sue
  • Prep Time: 10 minutes
  • Cook Time: 40 minutes
  • Total Time: 50 minutes
  • Yield: 2 servings
  • Category: Main Dish
  • Method: Baking
  • Cuisine: Fusion
  • Diet: Vegan
Print Recipe
Pin Recipe

Description

Creamy Mushroom and Spinach Stuffed Sweet Potatoes are cozy yet light, packed with savory mushrooms, fresh spinach, and a creamy tahini blend. Perfect for a wholesome vegan meal.


Ingredients

  • 2 small sweet potatoes
  • 1 small onion, diced
  • 200 g mushrooms, sliced
  • 2 garlic cloves, crushed
  • 60 g spinach
  • 1 heaped tablespoon tahini
  • 1 tsp nutritional yeast
  • Salt and pepper, to taste
  • Juice of ½ a small lemon
  • Pinch of cayenne pepper (optional)

Instructions

  1. Preheat the oven to 180 °C (fan). Pierce sweet potatoes with a fork, place them on a baking paper-lined tray, and bake for about 40 minutes or until soft.
  2. In a pan, sauté diced onion, mushrooms, and crushed garlic in a little oil or water for 5–7 minutes until mushrooms brown.
  3. Stir in spinach, tahini, nutritional yeast, salt, and pepper. Cook for another 3–4 minutes until the spinach wilts. Add lemon juice and cayenne if using.
  4. Slice the baked sweet potatoes lengthwise, fluff the insides, and fill them generously with the mushroom-spinach mixture.
  5. Serve warm as a main dish or hearty side.

Notes

  • Add chickpeas, lentils, or quinoa for extra protein.
  • Swap tahini with almond or cashew butter.
  • Incorporate bell peppers or zucchini in the sauté.
  • Add cheese or dairy-free cheese if desired.
  • Reheat in microwave or oven at 180 °C for best results.

Nutrition

  • Serving Size: 1 stuffed sweet potato
  • Calories: 250
  • Sugar: 7g
  • Sodium: 120mg
  • Fat: 10g
  • Saturated Fat: 1g
  • Unsaturated Fat: 8g
  • Trans Fat: 0g
  • Carbohydrates: 32g
  • Fiber: 5g
  • Protein: 6g
  • Cholesterol: 0mg

Have you made this recipe? I'd love to see it!

Click here to Follow me on Pinterest

The Best Homemade Biscuit Recipe

June 12, 2025 by Sue Leave a Comment

There’s something irresistibly comforting about warm, flaky biscuits straight from the oven. This is my go-to homemade biscuit recipe, and it never fails to deliver golden, buttery layers with a tender inside. Whether I serve them at breakfast with a pat of butter, alongside hearty stews, or just as a snack with jam, these biscuits always disappear fast. The Best Homemade Biscuit Recipe

Why You’ll Love This Recipe

I love how simple and quick this biscuit recipe is—no need for fancy equipment or hard-to-find ingredients. The dough comes together in minutes, and the results are impressively fluffy and rich. I also enjoy how customizable it is, making it easy to add herbs, cheese, or spices depending on the mood or meal. It’s the kind of reliable recipe I keep coming back to.

Ingredients

(Here's a tip: Check out the full list of ingredients and measurements in the recipe card below.)

  • All-purpose flour
  • Baking powder
  • Salt
  • Cold unsalted butter
  • Milk (whole milk or buttermilk works well)

Directions

  1. I start by preheating the oven to 425°F (220°C) and lining a baking sheet with parchment paper.
  2. In a large bowl, I whisk together the flour, baking powder, and salt.
  3. I cut in the cold butter using a pastry cutter or my fingers until the mixture resembles coarse crumbs.
  4. I pour in the milk and gently stir until just combined—I’m careful not to overmix.
  5. I turn the dough out onto a lightly floured surface and pat it into a rectangle. Then I fold it over a few times to create layers before gently flattening it to about 1-inch thickness.
  6. I cut out the biscuits with a round cutter, being careful not to twist, and place them on the baking sheet close together for soft sides or spaced out for crispier edges.
  7. I bake for 12–15 minutes until the tops are golden brown, then I let them cool slightly before serving.

Servings and timing

This recipe makes about 8 biscuits and takes roughly 30 minutes from start to finish, including prep and baking time. It’s perfect for a quick weekday breakfast or an addition to weekend brunch.

Variations

I often mix shredded cheddar or Parmesan into the dough for cheesy biscuits. Sometimes I add chopped fresh herbs like rosemary or thyme to make them more savory. For a touch of sweetness, I’ve stirred in a spoonful of honey or sprinkled sugar on top before baking.

Storage/Reheating

I store leftover biscuits in an airtight container at room temperature for up to 2 days. If I want to keep them longer, I refrigerate for up to a week or freeze them for up to 2 months. To reheat, I pop them in a 350°F oven for about 5–7 minutes, or until warmed through. Microwaving is quick too, though it softens the texture a bit.

FAQs

How do I make sure my biscuits turn out fluffy?

I keep my butter very cold and avoid overworking the dough. Those cold butter pockets help create steam and give the biscuits their signature fluff.

Can I use buttermilk instead of milk?

Yes, I sometimes use buttermilk for a tangier flavor and even softer texture. It reacts with the baking powder to boost rise.

Why did my biscuits turn out dense?

That usually happens when I overmix the dough or don’t use enough leavening. I try to handle the dough gently and avoid compressing it.

Can I make the dough ahead of time?

Yes, I prepare the dough and refrigerate it (covered) for up to 24 hours before baking. I just cut and bake straight from the fridge.

Can I freeze the unbaked biscuits?

Absolutely. I freeze the cut biscuits on a tray, then transfer them to a freezer bag. I bake from frozen, adding a couple of extra minutes to the baking time.

Conclusion

These homemade biscuits are one of the easiest and most rewarding things I bake. I love how adaptable, quick, and consistently delicious they are. Whether I’m serving them fresh with breakfast or using leftovers for sandwich sliders, they always hit the spot.

Print

clock clock iconcutlery cutlery iconflag flag iconfolder folder iconinstagram instagram iconpinterest pinterest iconfacebook facebook iconprint print iconsquares squares iconheart heart iconheart solid heart solid icon
The Best Homemade Biscuit Recipe

The Best Homemade Biscuit Recipe

5 Stars 4 Stars 3 Stars 2 Stars 1 Star No reviews
  • Author: Sue
  • Prep Time: 15 minutes
  • Cook Time: 15 minutes
  • Total Time: 30 minutes
  • Yield: 8 biscuits
  • Category: Breakfast
  • Method: Baking
  • Cuisine: American
  • Diet: Vegetarian
Print Recipe
Pin Recipe

Description

Warm, flaky, buttery homemade biscuits that are quick to make and perfect for breakfast, snacks, or as a side for hearty meals.


Ingredients

  • 2 cups all-purpose flour
  • 1 tablespoon baking powder
  • ½ teaspoon salt
  • ½ cup cold unsalted butter
  • ¾ cup milk (whole milk or buttermilk)

Instructions

  1. Preheat the oven to 425°F (220°C) and line a baking sheet with parchment paper.
  2. In a large bowl, whisk together the flour, baking powder, and salt.
  3. Cut in the cold butter using a pastry cutter or your fingers until the mixture resembles coarse crumbs.
  4. Pour in the milk and gently stir until just combined, being careful not to overmix.
  5. Turn the dough out onto a lightly floured surface and pat it into a rectangle. Fold it over a few times to create layers, then gently flatten to about 1-inch thickness.
  6. Cut out the biscuits with a round cutter without twisting, and place them on the baking sheet either close together or spaced out depending on desired edges.
  7. Bake for 12–15 minutes until the tops are golden brown. Let cool slightly before serving.

Notes

  • Use very cold butter to ensure fluffy texture.
  • Do not overmix the dough to prevent dense biscuits.
  • Customize with cheese, herbs, or sweet toppings for variation.
  • Freeze unbaked biscuits for convenience and bake from frozen.

Nutrition

  • Serving Size: 1 biscuit
  • Calories: 210
  • Sugar: 1g
  • Sodium: 280mg
  • Fat: 12g
  • Saturated Fat: 7g
  • Unsaturated Fat: 4g
  • Trans Fat: 0g
  • Carbohydrates: 22g
  • Fiber: 1g
  • Protein: 4g
  • Cholesterol: 30mg

Have you made this recipe? I'd love to see it!

Click here to Follow me on Pinterest

Can't Stop Baking These Cookies – Third Night in a Row!

June 12, 2025 by Sue Leave a Comment

I rediscovered a nostalgic Midwestern favorite: washboard cookies. With their signature cracked tops and tender, buttery crumb, these cookies are comfort personified—perfect with tea, coffee, milk, or even ice cream.

Can't Stop Baking These Cookies – Third Night in a Row!

Why You’ll Love This Recipe

I fell for this recipe because it blends simplicity with heartwarming flavor. The dough comes together in minutes with pantry staples, and the charming washboard pattern adds a homey touch. Every bite is lightly crisp at the edges, soft in the center, and melts in my mouth—I literally baked them three nights in a row!

Ingredients

(Here's a tip: Check out the full list of ingredients and measurements in the recipe card below.)

  • 1 cup unsalted butter, softened
  • 1 cup granulated sugar
  • 1 teaspoon vanilla extract
  • 2 cups all-purpose flour
  • ½ teaspoon baking powder
  • ¼ teaspoon salt
  • 2 tablespoons milk

Directions

  1. Preheat the oven to 350 °F (175 °C). Line a baking sheet with parchment paper.
  2. In a large bowl, cream the softened butter and sugar until light and fluffy.
  3. Stir in the vanilla extract.
  4. In another bowl, whisk together the flour, baking powder, and salt.
  5. Gradually mix the dry ingredients into the butter mixture, alternating with milk, until a soft dough forms.
  6. Roll the dough into 1‑inch balls and place them on the baking sheet.
  7. Press each ball gently with a fork to create the washboard pattern.
  8. Bake 12–15 minutes, until the edges are just golden.
  9. Let cookies cool on the sheet for a few minutes, then transfer them to a wire rack to cool completely.

Servings and timing

  • Makes about 24 cookies
  • Total time: ~25 minutes (10 minutes prep, 12–15 minutes bake)

Variations

I’ve experimented with these tweaks:

  • Stir in 1 tsp ground cinnamon or nutmeg for warmth.
  • Fold in chopped pecans or walnuts for crunch.
  • Sprinkle a little sugar on top before baking for sparkle.
  • Dip half of each cooled cookie in melted chocolate for a festive twist.

storage/reheating

I store these in an airtight container at room temperature; they stay fresh for about 4–5 days. To refresh them, I pop a cookie on a baking sheet and warm it at 325 °F for 3–4 minutes—just enough to soften the center without losing the crisp edge.

FAQs

How do I make the washboard pattern if I don’t have a fork?

If I don’t have a fork, I gently drag the tines of a cake tester or even the tines of a spoon across the tops, pressing lightly to mimic the ridges. It’s more for charm than function, so a flat top works too.

Can I make the dough ahead of time?

Absolutely. I roll the dough into balls, arrange them on a tray, cover tightly, and refrigerate for up to 48 hours before baking. I add an extra minute or two to the bake time straight from the fridge.

Is there a gluten-free option?

I substitute with a 1:1 gluten-free all-purpose flour blend. The texture shifts slightly—more tender—but they still deliver on flavor and the classic pattern.

Can I freeze the dough or baked cookies?

Yes! I freeze the shaped dough balls on a tray, then transfer to a zip‑top bag for up to 3 months. Bake from frozen, adding a couple extra minutes. Or freeze baked cookies in an airtight container; they thaw beautifully.

What’s the best way to serve these?

I love pairing them with tea or coffee. They’re also perfect alongside vanilla ice cream or whipped cream. At family gatherings, I set them out with cold milk. They’re versatile!

Conclusion

These washboard cookies are my go‑to when I want something easy, nostalgic, and utterly delicious. I’ve baked them night after night, tweaking spices, add-ins, and decorative chocolate dips. They’re a comforting classic that never gets old—and I hope they become part of your baking routine too.

Print

clock clock iconcutlery cutlery iconflag flag iconfolder folder iconinstagram instagram iconpinterest pinterest iconfacebook facebook iconprint print iconsquares squares iconheart heart iconheart solid heart solid icon
Can't Stop Baking These Cookies – Third Night in a Row!

Can't Stop Baking These Cookies – Third Night in a Row!

5 Stars 4 Stars 3 Stars 2 Stars 1 Star No reviews
  • Author: Sue
  • Prep Time: 10 minutes
  • Cook Time: 12–15 minutes
  • Total Time: 25 minutes
  • Yield: 24 cookies
  • Category: Dessert
  • Method: Baking
  • Cuisine: Midwestern American
  • Diet: Vegetarian
Print Recipe
Pin Recipe

Description

These nostalgic Midwestern washboard cookies have a tender, buttery crumb and charming ridged tops. They're quick to make, comforting, and perfect with tea, coffee, milk, or ice cream.


Ingredients

  • 1 cup unsalted butter, softened
  • 1 cup granulated sugar
  • 1 teaspoon vanilla extract
  • 2 cups all-purpose flour
  • ½ teaspoon baking powder
  • ¼ teaspoon salt
  • 2 tablespoons milk

Instructions

  1. Preheat the oven to 350 °F (175 °C). Line a baking sheet with parchment paper.
  2. In a large bowl, cream the softened butter and sugar until light and fluffy.
  3. Stir in the vanilla extract.
  4. In another bowl, whisk together the flour, baking powder, and salt.
  5. Gradually mix the dry ingredients into the butter mixture, alternating with milk, until a soft dough forms.
  6. Roll the dough into 1‑inch balls and place them on the baking sheet.
  7. Press each ball gently with a fork to create the washboard pattern.
  8. Bake 12–15 minutes, until the edges are just golden.
  9. Let cookies cool on the sheet for a few minutes, then transfer them to a wire rack to cool completely.

Notes

  • Sprinkle sugar on top before baking for added sparkle.
  • Dip cooled cookies in melted chocolate for a decorative twist.
  • Add cinnamon or nutmeg for a warm spice variation.
  • Store in an airtight container at room temperature for 4–5 days.
  • Reheat in a 325 °F oven for 3–4 minutes to refresh.

Nutrition

  • Serving Size: 1 cookie
  • Calories: 130
  • Sugar: 8g
  • Sodium: 45mg
  • Fat: 7g
  • Saturated Fat: 4g
  • Unsaturated Fat: 2.5g
  • Trans Fat: 0g
  • Carbohydrates: 15g
  • Fiber: 0g
  • Protein: 1g
  • Cholesterol: 20mg

Have you made this recipe? I'd love to see it!

Click here to Follow me on Pinterest

Coffee Cookies

June 12, 2025 by Sue Leave a Comment

A chewy, chocolate-studded cookie infused with espresso—the perfect treat for any coffee lover. Coffee Cookies

Why You’ll Love This Recipe

I adore these cookies because the bold espresso flavor pairs beautifully with the rich dark chocolate. Chilling the dough gives them a chewy, bakery-style texture that just can't be beaten.

ingredients

(Here's a tip: Check out the full list of ingredients and measurements in the recipe card below.)

2 cups all-purpose flour
⅓ cup espresso powder
1 teaspoon baking soda
½ teaspoon baking powder
½ teaspoon kosher salt
¾ cup salted sweet cream butter, softened
⅔ cup dark brown sugar
⅓ cup granulated sugar
1 extra-large whole egg, room temperature
1 extra-large egg yolk, room temperature
1½ teaspoons pure vanilla extract
12 oz semi-sweet chocolate chunks
1 cup dark chocolate chips

directions

  1. I start by whisking together the flour, espresso powder, baking soda, baking powder, and salt in a medium bowl.
  2. In a separate bowl, I beat the butter with both sugars until the mixture is light and fluffy, about 1½ to 2 minutes.
  3. I mix in the egg, egg yolk, and vanilla until fully combined.
  4. I gradually add the dry ingredients to the wet, mixing until just combined.
  5. I stir in the chocolate chunks and chips, then cover the dough and chill it for 30 minutes.
  6. I preheat the oven to 350°F and line baking sheets with parchment paper.
  7. I scoop out 1½-tablespoon portions of dough, spacing them 2 inches apart on the baking sheet.
  8. I bake for 10 to 12 minutes, let the cookies rest for 2 to 3 minutes on the sheet, then transfer them to a wire rack to cool completely.

Servings and timing

• Yields: 36 cookies
• Prep time: 10 minutes
• Cook time: 12 minutes
• Total time: about 52 minutes

storage/reheating

I keep these cookies in an airtight container at room temperature for up to 5 days. If I want to store them longer, I freeze the dough balls and bake them straight from the freezer—just add 2 extra minutes to the baking time. To reheat already baked cookies, I warm them in a 300°F oven for 5 minutes to bring back that fresh-out-of-the-oven magic.

Variations

  • I sometimes use instant coffee granules instead of espresso powder for a lighter flavor.
  • I’ve swapped vanilla extract with almond or coconut extract for a unique twist.
  • Using all semi-sweet or all dark chocolate changes the flavor intensity.
  • A pinch of cinnamon or nutmeg adds a subtle depth.
  • I occasionally add white chocolate chips or chopped nuts for more texture.

FAQs

Can I use instant coffee instead of espresso powder?

Yes—I’ve tried it, and it gives a milder flavor that still works well in the recipe.

Can I make the dough ahead of time?

Absolutely. I often chill the dough for up to 48 hours and bake it when ready.

How long do these cookies stay fresh?

They stay soft and chewy for about 5 days when stored in an airtight container.

Can I freeze the cookie dough or baked cookies?

Definitely. I freeze the dough in pre-portioned scoops or freeze the baked cookies and thaw them as needed.

How can I make the coffee flavor stronger?

I like to add an extra tablespoon of espresso powder if I want a more intense coffee kick.

Conclusion

These coffee cookies combine two of my favorite things—bold coffee and rich chocolate—in one irresistible dessert. They’re easy to make, freezer-friendly, and ideal for satisfying a sweet craving with a touch of caffeine. Every bite is chewy, flavorful, and comforting.

Print

clock clock iconcutlery cutlery iconflag flag iconfolder folder iconinstagram instagram iconpinterest pinterest iconfacebook facebook iconprint print iconsquares squares iconheart heart iconheart solid heart solid icon
Coffee Cookies

Coffee Cookies

5 Stars 4 Stars 3 Stars 2 Stars 1 Star No reviews
  • Author: Sue
  • Prep Time: 10 minutes
  • Cook Time: 12 minutes
  • Total Time: 52 minutes
  • Yield: 36 cookies
  • Category: Dessert
  • Method: Baking
  • Cuisine: American
  • Diet: Vegetarian
Print Recipe
Pin Recipe

Description

A chewy, chocolate-studded cookie infused with bold espresso flavor, perfect for coffee lovers.


Ingredients

  • 2 cups all-purpose flour
  • ⅓ cup espresso powder
  • 1 teaspoon baking soda
  • ½ teaspoon baking powder
  • ½ teaspoon kosher salt
  • ¾ cup salted sweet cream butter, softened
  • ⅔ cup dark brown sugar
  • ⅓ cup granulated sugar
  • 1 extra-large whole egg, room temperature
  • 1 extra-large egg yolk, room temperature
  • 1½ teaspoons pure vanilla extract
  • 12 oz semi-sweet chocolate chunks
  • 1 cup dark chocolate chips

Instructions

  1. In a medium bowl, whisk together flour, espresso powder, baking soda, baking powder, and salt.
  2. In a separate bowl, beat butter with both sugars for about 1½–2 minutes until light and fluffy.
  3. Add the egg, egg yolk, and vanilla; beat until no streaks remain.
  4. Gradually fold in the dry ingredients until just combined.
  5. Stir in the chocolate chunks and chips. Cover and chill the dough for 30 minutes.
  6. Preheat oven to 350 °F and line baking sheets with parchment paper.
  7. Scoop 1½‑tablespoon portions, space them 2 inches apart, and bake for 10–12 minutes.
  8. Let them rest on the sheet for 2–3 minutes before transferring to a wire rack to cool.

Notes

  • Store in an airtight container at room temperature for up to 5 days.
  • Freeze dough balls for up to 2 months; bake from frozen with a few extra minutes.
  • Reheat cookies in a 300°F oven for 5 minutes to refresh.
  • Use instant coffee granules if espresso powder is unavailable.
  • Experiment with extracts and chocolate types for variations.

Nutrition

  • Serving Size: 1 cookie
  • Calories: 160
  • Sugar: 12g
  • Sodium: 90mg
  • Fat: 8g
  • Saturated Fat: 5g
  • Unsaturated Fat: 2g
  • Trans Fat: 0g
  • Carbohydrates: 20g
  • Fiber: 1g
  • Protein: 2g
  • Cholesterol: 20mg

Have you made this recipe? I'd love to see it!

Click here to Follow me on Pinterest

Chicken Buffalo Dip (Crock Pot)

June 12, 2025 by Sue Leave a Comment

I love how this crockpot buffalo chicken dip marries creamy cheese, spicy buffalo sauce, and tender shredded chicken—making it perfect for game day, parties, or any casual gathering.

Chicken Buffalo Dip (Crock Pot)

Why You’ll Love This Recipe

I’ll tell you why this is the best buffalo chicken dip: it blends tangy cream cheese, zesty ranch, fiery hot sauce, and melty cheddar for a crowd-pleasing appetizer that’s rich, comforting, and irresistibly dippable. It’s simple to prep, easy to adapt, and perfect for feeding around ten people.

ingredients

(Here's a tip: Check out the full list of ingredients and measurements in the recipe card below.)

  • 3 frozen chicken breasts
  • 8 oz cream cheese
  • 1 cup ranch dressing
  • 1 cup Frank's RedHot sauce
  • 1 cup shredded cheddar cheese

directions

  1. I place the frozen chicken breasts in a large pan and cover them with water. Then I bring it to a boil and cook for about 20 minutes until no pink remains.
  2. In a bowl or directly in the crockpot, I combine the cream cheese, ranch dressing, hot sauce, and shredded cheddar.
  3. Once the chicken is cooked, I shred it with a fork and stir it into the mixture.
  4. I cook everything on low in the crockpot for about 30 minutes, stirring once halfway through, until it’s hot, bubbly, and creamy.

Servings and timing

  • Servings: About 10
  • Prep time: 5 minutes
  • Cook time: 50 minutes total (20 minutes boiling chicken, 30 minutes in crockpot)
  • Total time: 55 minutes

Variations

  • Heat level: I adjust the amount of hot sauce depending on how spicy I want it.
  • Cheese swaps: I sometimes use Monterey Jack, mozzarella, or even blue cheese crumbles for a twist.
  • Dressing alternative: I’ve swapped ranch with sour cream and dry ranch mix for a bolder taste.
  • Chicken shortcut: When I’m in a rush, I use canned or rotisserie chicken to skip boiling.

storage/reheating

  • Fridge: I store any leftover dip in an airtight container for up to 3 days.
  • Freezing: I don’t recommend freezing it since the texture changes after thawing.
  • To reheat: I warm it in the crockpot on low or microwave it in short intervals, stirring often until it’s smooth again.

FAQs

Can I bake this dip instead?

Yes—I’ve baked it at 350°F for about 20–25 minutes in an oven-safe dish and it turns out great.

Can I use a different hot sauce brand?

Absolutely—I’ve used other brands depending on what I have on hand and it still tastes amazing.

Can the crockpot cook the chicken instead of boiling it?

Yes—I’ve cooked frozen chicken on low in the crockpot for 4–5 hours until fully cooked, then shredded it and added the rest.

Can I make this ahead of time?

Definitely—I’ve made it the night before, kept it in the fridge, and then heated it in the crockpot when ready to serve.

How do I thicken the dip if it’s too runny?

If it’s too thin, I stir in a bit more cream cheese or some shredded cheese until it thickens up nicely.

Conclusion

This buffalo chicken dip has become one of my go-to party recipes because it’s always a hit. I love how easy it is to make, how flexible the ingredients are, and how it disappears within minutes of serving. Once I made it for one event, I found myself making it again and again—it's just that good.

Print

clock clock iconcutlery cutlery iconflag flag iconfolder folder iconinstagram instagram iconpinterest pinterest iconfacebook facebook iconprint print iconsquares squares iconheart heart iconheart solid heart solid icon
Chicken Buffalo Dip (Crock Pot)

Chicken Buffalo Dip (Crock Pot)

5 Stars 4 Stars 3 Stars 2 Stars 1 Star No reviews
  • Author: Sue
  • Prep Time: 5 minutes
  • Cook Time: 50 minutes
  • Total Time: 55 minutes
  • Yield: 10 servings
  • Category: Appetizer
  • Method: Slow Cooker
  • Cuisine: American
Print Recipe
Pin Recipe

Description

This creamy, spicy crockpot buffalo chicken dip combines tender shredded chicken, cream cheese, ranch dressing, Frank’s RedHot sauce, and cheddar cheese for a crowd-pleasing appetizer perfect for parties and game days.


Ingredients

  • 3 frozen chicken breasts
  • 8 oz cream cheese
  • 1 cup ranch dressing
  • 1 cup Frank's RedHot sauce
  • 1 cup shredded cheddar cheese

Instructions

  1. Place the frozen chicken breasts in a large pan and cover with water. Bring to a boil and cook for about 20 minutes, until no pink remains.
  2. In a bowl or directly in your crockpot, combine cream cheese, ranch dressing, hot sauce, and cheddar cheese.
  3. Shred the cooked chicken with a fork and mix it into the cheese-hot sauce mixture.
  4. Cook on low in the crockpot for about 30 minutes, stirring halfway through, until the dip is hot and creamy.

Notes

  • Add more or less hot sauce to adjust spiciness.
  • Try Monterey Jack, mozzarella, or blue cheese as alternatives.
  • Use sour cream and dry ranch mix instead of ranch dressing.
  • Use rotisserie or canned chicken to save time.
  • Store leftovers in the fridge for 2–3 days; avoid freezing.
  • Reheat in the crockpot or microwave, stirring occasionally.

Nutrition

  • Serving Size: 1/10th of recipe
  • Calories: 250
  • Sugar: 1g
  • Sodium: 700mg
  • Fat: 20g
  • Saturated Fat: 10g
  • Unsaturated Fat: 8g
  • Trans Fat: 0g
  • Carbohydrates: 3g
  • Fiber: 0g
  • Protein: 15g
  • Cholesterol: 60mg

Have you made this recipe? I'd love to see it!

Click here to Follow me on Pinterest

Mini Strawberry Pies

June 12, 2025 by Sue Leave a Comment

A delightful and fuss‑free twist on classic strawberry pie—these mini treats are made in individual graham cracker crusts, filled with a luscious fresh strawberry mixture, chilled, and topped with whipped cream and mint. They’re perfect for hot weather, portable, and ready in under two hours.

Mini Strawberry Pies

Why You’ll Love This Recipe

I adore how fresh and vibrant these pies taste. With most strawberries untouched by heat, they retain their natural flavor. The lightly cooked filling, thickened with cornstarch, keeps its shape beautifully in the crust. Plus, going mini means no pie slicing—just pure, individual indulgence.

ingredients

(Here's a tip: Check out the full list of ingredients and measurements in the recipe card below.)

mini graham cracker crusts (store‑bought or homemade)
fresh strawberries (about 1 lb), chopped
granulated sugar (adjust to strawberry sweetness)
cornstarch
lemon juice
red food coloring (optional, for vibrant color)
for garnish:
homemade whipped cream
mint leaves

directions

  1. Make the strawberry filling
    • Puree about 1 cup chopped strawberries with sugar, cornstarch, lemon juice, and optional food coloring in a blender.
    • Cook in a saucepan over medium heat until it boils and thickens (1–2 minutes).
    • Remove from heat, let cool slightly, then stir in remaining chopped strawberries.
  2. Assemble pies
    • Divide filling into mini graham cracker crusts.
    • Chill in the fridge for 1–2 hours until set.
  3. Garnish and serve
    • Top each pie with whipped cream and a fresh mint leaf before serving.

Servings and timing

  • Servings: makes 6 mini pies
  • Prep time: ~15 minutes
  • Cook time: ~5 minutes
  • Chill time: 1–2 hours

variations

  • Make one 9″ pie using a full crust—just bake or use a graham cracker crust; cool before adding filling.
  • Add a brush of egg‑white wash to a baked dough crust to prevent sogginess.
  • Stir in a splash of vanilla or liqueur into the filling for added warmth or depth.

storage/reheating

  • Refrigerator: Cover and store for up to 4–5 days.
  • Freezer: Wrap tightly and keep for up to 6 months.
  • Thaw in the fridge before serving.
  • No reheating needed—serve cold or at room temperature.

FAQs

### How do I prevent a soggy crust?

I brush the baked crust with a thin layer of egg-white mixed with water before filling. It helps seal the crust.

### Can I use frozen strawberries?

Yes—I thaw and drain them well, then treat them like fresh strawberries in the recipe.

### Can I make these ahead of time?

Absolutely. I prepare them and chill; add whipped cream just before serving to keep things fresh.

### Can I use store-bought whipped cream?

Sure! I often do when I’m short on time—it’s totally fine here.

### How can I make it non‑gelatin or vegan?

This recipe is already gelatin-free. For a vegan version, I’d use a plant-based crust and coconut cream whipped topping—but keep the filling ingredients plant-based too.

Conclusion

I’m in love with how easy and satisfying these mini strawberry pies are. They look impressive, taste like summer in a bite, and require minimal effort. Whether I’m hosting guests or craving a sweet treat just for me, these pies always hit the spot.

Print

clock clock iconcutlery cutlery iconflag flag iconfolder folder iconinstagram instagram iconpinterest pinterest iconfacebook facebook iconprint print iconsquares squares iconheart heart iconheart solid heart solid icon
Mini Strawberry Pies

Mini Strawberry Pies

5 Stars 4 Stars 3 Stars 2 Stars 1 Star No reviews
  • Author: Sue
  • Prep Time: 15 minutes
  • Cook Time: 5 minutes
  • Total Time: 1 hour 20 minutes
  • Yield: 6 mini pies
  • Category: Dessert
  • Method: No-Bake
  • Cuisine: American
  • Diet: Vegetarian
Print Recipe
Pin Recipe

Description

A fresh, no-bake twist on the classic strawberry pie—made in individual graham cracker crusts, filled with a luscious strawberry mixture, and topped with whipped cream and mint. Perfect for warm weather and ready in under 2 hours.


Ingredients

  • 6 mini graham cracker crusts (store-bought or homemade)
  • 1 lb fresh strawberries, chopped
  • ½ cup granulated sugar (adjust to taste)
  • 2 tablespoons cornstarch
  • 1 tablespoon lemon juice
  • 1-2 drops red food coloring (optional)
  • Whipped cream, for garnish
  • Fresh mint leaves, for garnish

Instructions

  1. Puree 1 cup chopped strawberries with sugar, cornstarch, lemon juice, and food coloring (if using) in a blender.
  2. Cook the puree in a saucepan over medium heat until boiling and thickened, about 1–2 minutes.
  3. Remove from heat and let cool slightly. Stir in remaining chopped strawberries.
  4. Divide the strawberry filling into the mini graham cracker crusts.
  5. Chill the pies in the refrigerator for 1–2 hours until set.
  6. Before serving, top each pie with whipped cream and a mint leaf.

Notes

  • Use a brush of egg-white wash on baked crusts to prevent sogginess.
  • Add vanilla extract or a splash of liqueur to the filling for extra flavor.
  • For a vegan version, use plant-based crust and coconut cream topping.

Nutrition

  • Serving Size: 1 mini pie
  • Calories: 220
  • Sugar: 18g
  • Sodium: 130mg
  • Fat: 9g
  • Saturated Fat: 4g
  • Unsaturated Fat: 4g
  • Trans Fat: 0g
  • Carbohydrates: 32g
  • Fiber: 2g
  • Protein: 2g
  • Cholesterol: 15mg

Have you made this recipe? I'd love to see it!

Click here to Follow me on Pinterest

Oven Roasted Garlic Cabbage Steaks

June 12, 2025 by Sue Leave a Comment

I love how this simple recipe transforms humble cabbage into crispy, flavorful “steaks.” It’s healthy, versatile, and comes together with ease—whether in the oven or air fryer. Oven Roasted Garlic Cabbage Steaks

Why You’ll Love This Recipe

I always find myself reaching for this when I want something satisfying and nutritious. These cabbage steaks get beautifully caramelized edges and tender centers. The garlic‑paprika seasoning brings a warm, savory punch. It totally elevates cabbage beyond the usual side dish.

ingredients

(Here's a tip: Check out the full list of ingredients and measurements in the recipe card below.)

  • 1 large green (or red) cabbage
  • 3 tablespoons olive oil (or melted butter for richness)
  • 1 teaspoon garlic powder
  • 1 teaspoon smoked paprika
  • ½ teaspoon onion powder
  • ½ teaspoon dried thyme
  • 1 teaspoon salt, adjust to taste
  • ½ teaspoon black pepper
  • Optional toppings: grated Parmesan, red pepper flakes, fresh parsley

directions

  1. Preheat the oven to 400 °F (200 °C), or 375 °F (190 °C) for the air fryer. Line a baking sheet with parchment paper.
  2. Remove any damaged leaves, then slice the cabbage into ¾–1″ thick rounds, keeping the core intact so they hold together.
  3. In a small bowl, whisk olive oil with garlic powder, smoked paprika, onion powder, thyme, salt, and pepper.
  4. Brush both sides of each cabbage steak generously with the seasoned oil.
  5. Place the steaks in a single layer on the baking sheet.
    • For oven: Roast at 400 °F for 25–30 minutes, flipping halfway, until golden and crispy on the edges.
    • For air fryer: Preheat to 375 °F and cook for 10–15 minutes, flipping once, until edges are crisp.
  6. Remove when caramelized and serve with your choice of toppings.

Servings and timing

This recipe makes about 4–6 cabbage steaks, serving 2–3 as a main or 4–6 as a side dish.

  • Prep time: 10 minutes
  • Cook time: Oven: 25–30 minutes; Air fryer: 10–15 minutes
  • Total time: 35–45 minutes

Variations

  • I like to swap olive oil with melted butter for a deeper flavor.
  • Using curry powder or Cajun seasoning adds a fun twist.
  • After roasting, I sometimes top the steaks with sautéed mushrooms or a mushroom sauce.
  • A squeeze of lemon juice or a drizzle of balsamic glaze adds a bright finish.

storage/reheating

I store cooled cabbage steaks in an airtight container in the fridge for up to 3 days.
To reheat, I use the oven or air fryer at 350 °F (175 °C) for 5–7 minutes to bring back the crispiness.

FAQs

How do I prevent cabbage steaks from getting soggy?

I make sure to leave space between the steaks on the pan. This helps them roast instead of steam.

Can I make these ahead of time?

Yes, I roast them and refrigerate. Reheating in the oven or air fryer keeps the texture nice and crispy.

What toppings work best?

I enjoy grated Parmesan, red pepper flakes, or chopped parsley. Sautéed mushrooms also work beautifully.

Are they vegan or gluten‑free?

They’re naturally gluten-free. To keep them vegan, I just skip the Parmesan.

Can I use red cabbage instead?

Definitely. Red cabbage works just as well and adds a vibrant color to the dish.

Conclusion

I’m always impressed by how such a basic vegetable can turn into something this tasty. These garlic cabbage steaks are quick, wholesome, and easy enough for any night of the week. I like serving them as a main or alongside something heartier—they fit in just about anywhere.

Print

clock clock iconcutlery cutlery iconflag flag iconfolder folder iconinstagram instagram iconpinterest pinterest iconfacebook facebook iconprint print iconsquares squares iconheart heart iconheart solid heart solid icon
Oven Roasted Garlic Cabbage Steaks

Oven Roasted Garlic Cabbage Steaks

5 Stars 4 Stars 3 Stars 2 Stars 1 Star No reviews
  • Author: Sue
  • Prep Time: 10 minutes
  • Cook Time: 25–30 minutes (oven) or 10–15 minutes (air fryer)
  • Total Time: 35–45 minutes
  • Yield: 2–3 servings as a main, 4–6 as a side
  • Category: Side Dish
  • Method: Roasting
  • Cuisine: American
  • Diet: Vegan
Print Recipe
Pin Recipe

Description

Oven Roasted Garlic Cabbage Steaks are a healthy, flavorful way to enjoy cabbage, seasoned with garlic, smoked paprika, and thyme, and roasted until crispy on the edges and tender inside.


Ingredients

  • 1 large green (or red) cabbage
  • 3 tablespoons olive oil (or melted butter)
  • 1 teaspoon garlic powder
  • 1 teaspoon smoked paprika
  • ½ teaspoon onion powder
  • ½ teaspoon dried thyme
  • 1 teaspoon salt, adjust to taste
  • ½ teaspoon black pepper
  • Optional toppings: grated Parmesan, red pepper flakes, fresh parsley

Instructions

  1. Preheat oven to 400 °F (200 °C) or air fryer to 375 °F (190 °C). Line a baking sheet with parchment paper.
  2. Remove damaged leaves from cabbage and slice into ¾–1″ thick rounds, keeping the core intact.
  3. In a bowl, whisk olive oil, garlic powder, smoked paprika, onion powder, thyme, salt, and pepper.
  4. Brush both sides of each cabbage steak with the seasoned oil mixture.
  5. Place steaks on the sheet in a single layer.
  6. For oven: Roast for 25–30 minutes, flipping halfway, until edges are golden and crispy. For air fryer: Cook for 10–15 minutes, flipping halfway.
  7. Remove and sprinkle with optional toppings like Parmesan, red pepper flakes, or parsley. Serve immediately.

Notes

  • Don’t overcrowd the pan to keep edges crispy.
  • Use red cabbage for a vibrant twist.
  • Store leftovers in the fridge for up to 3 days.
  • Reheat in the oven or air fryer for best texture.
  • Top with sautéed mushrooms or creamy sauce for extra flavor.

Nutrition

  • Serving Size: 1–2 steaks
  • Calories: 120
  • Sugar: 3g
  • Sodium: 400mg
  • Fat: 9g
  • Saturated Fat: 1.5g
  • Unsaturated Fat: 7g
  • Trans Fat: 0g
  • Carbohydrates: 9g
  • Fiber: 3g
  • Protein: 2g
  • Cholesterol: 0mg

Have you made this recipe? I'd love to see it!

Click here to Follow me on Pinterest

Juicy Garlic Parmesan Chicken Meatloaves

June 12, 2025 by Sue Leave a Comment

I can’t get enough of these juicy, garlic-packed mini chicken meatloaves topped with melty Parmesan. They’re hearty yet light, easy to make, and satisfyingly savory.

Juicy Garlic Parmesan Chicken Meatloaves

Why You’ll Love This Recipe

I love how quickly I can whip these up—just about an hour from start to finish. Ground chicken makes them lighter than classic meatloaf, and the garlic-Parmesan flavor combo is irresistibly comforting. Plus, shaping them into individual loaves means even cooking and easy portioning—perfect for leftovers or meal prep.

ingredients

(Here's a tip: Check out the full list of ingredients and measurements in the recipe card below.)

  • 1 lb ground chicken
  • 1 cup seasoned breadcrumbs
  • 1 cup grated Parmesan cheese
  • 2 large eggs
  • 4 cloves garlic, minced
  • 1 medium yellow onion, finely chopped
  • 1 cup milk
  • 2 tablespoon fresh parsley, chopped
  • 1 teaspoon Italian seasoning
  • 1 teaspoon salt
  • ½ teaspoon black pepper
  • 1 tablespoon olive oil (for brushing)
  • 1 cup shredded mozzarella cheese (optional topping)

directions

  1. I preheat the oven to 350°F (175°C) and grease a loaf pan or line a baking sheet.
  2. In a large bowl, I mix ground chicken, breadcrumbs, Parmesan, eggs, garlic, onion, milk, parsley, Italian seasoning, salt, and pepper—just until combined.
  3. I shape the mixture into loaves (one large or several minis) and place them on the prepared pan.
  4. I brush the tops with olive oil to help them brown.
  5. I bake for about 45 minutes, until the center reaches 165°F (74°C).
  6. If I’m using mozzarella, I sprinkle it on top during the last 5 minutes of baking until melted and bubbly.
  7. I let the loaves rest for 10 minutes before slicing to keep them juicy.

Servings and timing

  • Makes 4 servings
  • Prep time: 15 minutes
  • Cook time: 45 minutes
  • Total time: 1 hour

Variations

  • Mini loaves: I bake them in a muffin tin at 375°F for 22–25 minutes.
  • Gluten-free: I use gluten-free breadcrumbs or almond flour.
  • Add-ins: Sometimes I mix in shredded zucchini, chopped spinach, or sun-dried tomatoes for a twist.
  • Cheese swap: I change up the flavor with cheddar or provolone instead of mozzarella.

storage/reheating

I store leftovers in an airtight container in the fridge for up to 4 days. For longer storage, I wrap them tightly and freeze for up to 3 months. To reheat, I cover and warm them in a 350°F oven for 10–15 minutes or microwave individual slices for 1–2 minutes. I sometimes add a splash of broth or sauce to keep them moist.

FAQs

Can I prep this ahead of time?

Yes, I like to mix and shape the loaves in advance and refrigerate them up to 24 hours before baking.

Can I freeze the meatloaf before or after cooking?

I do both. I freeze raw shaped loaves or cooked leftovers—just thaw in the fridge overnight before baking or reheating.

How do I keep the meatloaf moist?

I make sure not to overmix, and I always include enough milk and eggs. Resting after baking also helps retain the juices.

Can I use turkey instead of chicken?

Absolutely. I often use lean ground turkey and get nearly the same juicy texture and flavor.

What if I don’t have Parmesan?

I’ve replaced Parmesan with Pecorino Romano, Asiago, or even a bit of nutritional yeast when needed.

Conclusion

These Juicy Garlic Parmesan Chicken Meatloaves have become a regular in my dinner rotation. They’re flavorful, comforting, and easy to prepare. Whether I’m serving them fresh or reheating leftovers, they never fail to hit the spot.

Print

clock clock iconcutlery cutlery iconflag flag iconfolder folder iconinstagram instagram iconpinterest pinterest iconfacebook facebook iconprint print iconsquares squares iconheart heart iconheart solid heart solid icon
Juicy Garlic Parmesan Chicken Meatloaves

Juicy Garlic Parmesan Chicken Meatloaves

5 Stars 4 Stars 3 Stars 2 Stars 1 Star No reviews
  • Author: Sue
  • Prep Time: 15 minutes
  • Cook Time: 45 minutes
  • Total Time: 1 hour
  • Yield: 4 servings
  • Category: Dinner
  • Method: Baking
  • Cuisine: American
  • Diet: Low Fat
Print Recipe
Pin Recipe

Description

Juicy Garlic Parmesan Chicken Meatloaves are mini individual loaves packed with flavor from garlic and Parmesan cheese, offering a hearty yet light alternative to traditional meatloaf.


Ingredients

  • 1 lb (450 g) ground chicken
  • 1 cup seasoned breadcrumbs
  • 1 cup grated Parmesan cheese
  • 2 large eggs
  • 4 cloves garlic, minced
  • 1 medium yellow onion, finely chopped
  • 1 cup milk
  • 2 tbsp fresh parsley, chopped
  • 1 tsp Italian seasoning
  • 1 tsp salt
  • ½ tsp black pepper
  • 1 tbsp olive oil (for brushing)
  • 1 cup shredded mozzarella cheese (optional topping)

Instructions

  1. Preheat the oven to 350°F (175°C) and grease a loaf pan or line a baking sheet.
  2. In a large bowl, mix ground chicken, breadcrumbs, Parmesan, eggs, garlic, onion, milk, parsley, Italian seasoning, salt, and pepper just until combined.
  3. Shape the mixture into loaves (one large or several minis) and place them on the prepared pan.
  4. Brush the tops with olive oil to help them brown.
  5. Bake for about 45 minutes, until the center reaches 165°F (74°C).
  6. If using mozzarella, sprinkle it on top during the last 5 minutes of baking until melted and bubbly.
  7. Let the loaves rest for 10 minutes before slicing to keep them juicy.

Notes

  • To make gluten-free, use gluten-free breadcrumbs or almond flour.
  • Add-ins like shredded zucchini, spinach, or sun-dried tomatoes can enhance flavor and nutrition.
  • Store leftovers in the fridge for up to 4 days or freeze for up to 3 months.
  • Reheat covered in a 350°F oven for 10–15 minutes or microwave slices for 1–2 minutes.

Nutrition

  • Serving Size: 1 mini loaf
  • Calories: 310
  • Sugar: 2g
  • Sodium: 620mg
  • Fat: 18g
  • Saturated Fat: 6g
  • Unsaturated Fat: 10g
  • Trans Fat: 0g
  • Carbohydrates: 12g
  • Fiber: 1g
  • Protein: 25g
  • Cholesterol: 135mg

Have you made this recipe? I'd love to see it!

Click here to Follow me on Pinterest

Best Apple Crisp Coffee Cake

June 12, 2025 by Sue Leave a Comment

I created a warm, tender coffee cake that captures the essence of apple crisp—stuffed with spiced apples, topped with buttery streusel, and perfect from breakfast to dessert. Best Apple Crisp Coffee Cake

Why You’ll Love This Recipe

I adore this recipe because it marries a classic American coffee cake base with the sweet-tart warmth of apple crisp. The cake is soft and fragrant, the apple layer adds juicy texture, and the streusel on top gives a delightful crunch. It's ideal for cozy mornings or sharing at gatherings.

ingredients

(Here's a tip: Check out the full list of ingredients and measurements in the recipe card below.)

  • all-purpose flour
  • granulated sugar
  • baking powder
  • baking soda
  • salt
  • ground cinnamon
  • ground nutmeg (optional)
  • unsalted butter (room temperature)
  • eggs
  • vanilla extract
  • sour cream or plain yogurt
  • peeled and chopped apples (Granny Smith or Honeycrisp)
  • streusel topping (butter, brown sugar, flour, oats, cinnamon)

directions

  1. Preheat the oven to 350 °F (175 °C). Grease a 9×13" baking pan.
  2. In a bowl, whisk flour, baking powder, baking soda, salt, cinnamon, and nutmeg.
  3. In another bowl, cream the butter and granulated sugar until light. Beat in eggs one at a time, then stir in vanilla.
  4. Alternately add the dry ingredients and sour cream, beginning and ending with the dry mix.
  5. Fold in chopped apples. Spread batter evenly in the prepared pan.
  6. Make the streusel by mixing flour, brown sugar, oats, cinnamon, and cold butter until crumbly. Sprinkle over batter.
  7. Bake for 35–45 minutes, until a toothpick in the center comes out clean.
  8. Cool slightly before cutting and serving.

Servings and timing

This cake yields about 12 to 15 servings. Prep time is 15 minutes, baking time around 40 minutes, for a total of 55 minutes.

Variations

  • Nuts add crunch: Stir in chopped pecans or walnuts into the streusel.
  • Glazed finish: Mix powdered sugar, a dash of milk, and vanilla to drizzle over the cooled cake.
  • Fruit swap: Substitute or add pears alongside apples for a subtly sweeter flavor.
  • Oat flour: Replace up to ⅓ of the flour with oat flour for a heartier texture.

storage/reheating

Store the cooled cake covered at room temperature for up to 2 days, or refrigerate for up to 5 days. Reheat slices in the microwave (15–20 seconds) or warm them in a 325 °F oven for a few minutes to recapture that fresh-from-the-oven feel.

FAQs

### How do I know when the cake is done?

I insert a toothpick into the center. If it comes out mostly clean with a few moist crumbs (especially from apples), it's perfectly baked.

### Can I make this in advance?

Yes—I often bake it the night before and enjoy it warm in the morning. Just reheat lightly to refresh the texture.

### What kind of apples work best?

I prefer Granny Smith for their tartness and firm texture, but Honeycrisp or Fuji are also great for a sweeter bite.

### Can I freeze leftovers?

Absolutely. I wrap portions tightly and freeze them for up to 3 months. Thaw overnight in the fridge and warm before serving.

### Is it possible to bake this in a loaf pan instead?

Yes! I’ve used a 9×5" loaf pan—bake at the same temperature for about 50–60 minutes. Check with a toothpick; adjust time as needed.

Conclusion

I find this apple crisp coffee cake hits all the cozy, comforting notes I crave—soft cake, juicy apples, and crunchy topping. Whether for a leisurely weekend breakfast or a sweet treat after dinner, it’s one of my favorite recipes to bake and share.

Print

clock clock iconcutlery cutlery iconflag flag iconfolder folder iconinstagram instagram iconpinterest pinterest iconfacebook facebook iconprint print iconsquares squares iconheart heart iconheart solid heart solid icon
Best Apple Crisp Coffee Cake

Best Apple Crisp Coffee Cake

5 Stars 4 Stars 3 Stars 2 Stars 1 Star No reviews
  • Author: Sue
  • Prep Time: 15 minutes
  • Cook Time: 40 minutes
  • Total Time: 55 minutes
  • Yield: 12 to 15 servings
  • Category: Breakfast, Dessert
  • Method: Baking
  • Cuisine: American
  • Diet: Vegetarian
Print Recipe
Pin Recipe

Description

A warm, tender coffee cake that combines the cozy flavors of apple crisp with a buttery streusel topping. Perfect for breakfast or dessert.


Ingredients

  • 2 cups all-purpose flour
  • 1 cup granulated sugar
  • 2 tsp baking powder
  • ½ tsp baking soda
  • ½ tsp salt
  • 1 tsp ground cinnamon
  • ¼ tsp ground nutmeg (optional)
  • ½ cup unsalted butter (room temperature)
  • 2 large eggs
  • 1 tsp vanilla extract
  • 1 cup sour cream or plain yogurt
  • 2 cups peeled and chopped apples (Granny Smith or Honeycrisp)
  • Streusel Topping: ½ cup cold unsalted butter, ⅔ cup brown sugar, ⅔ cup all-purpose flour, ½ cup oats, 1 teaspoon ground cinnamon

Instructions

  1. Preheat the oven to 350 °F (175 °C). Grease a 9×13" baking pan.
  2. In a bowl, whisk flour, baking powder, baking soda, salt, cinnamon, and nutmeg.
  3. In another bowl, cream the butter and granulated sugar until light. Beat in eggs one at a time, then stir in vanilla.
  4. Alternately add the dry ingredients and sour cream, beginning and ending with the dry mix.
  5. Fold in chopped apples. Spread batter evenly in the prepared pan.
  6. Make the streusel by mixing flour, brown sugar, oats, cinnamon, and cold butter until crumbly. Sprinkle over batter.
  7. Bake for 35–45 minutes, until a toothpick in the center comes out clean.
  8. Cool slightly before cutting and serving.

Notes

  • Use tart apples like Granny Smith for best texture and flavor balance.
  • Optional glaze: Mix powdered sugar, milk, and vanilla for drizzling.
  • To freeze, wrap portions tightly and freeze for up to 3 months.

Nutrition

  • Serving Size: 1 slice
  • Calories: 320
  • Sugar: 22g
  • Sodium: 180mg
  • Fat: 15g
  • Saturated Fat: 9g
  • Unsaturated Fat: 5g
  • Trans Fat: 0g
  • Carbohydrates: 42g
  • Fiber: 2g
  • Protein: 4g
  • Cholesterol: 55mg

Have you made this recipe? I'd love to see it!

Click here to Follow me on Pinterest

  • « Previous Page
  • 1
  • …
  • 14
  • 15
  • 16
  • 17
  • 18
  • …
  • 40
  • Next Page »
Modern Sidebar

Hey there! I'm Sue, a mom, a wife, and someone who’s always in the kitchen trying out new recipes or revisiting old ones that remind me of family gatherings and special moments.

Learn more

Popular

  • Slow Cooker Hot Honey Chicken Sandwiches
    Slow Cooker Hot Honey Chicken Sandwiches
  • Crockpot French Onion Meatloaf with Melted Swiss Cheese
    Crockpot French Onion Meatloaf with Melted Swiss Cheese
  • Cheddar & Havarti Chicken Bowtie Pasta with Roasted Broccoli & Carrots
    Cheddar & Havarti Chicken Bowtie Pasta with Roasted Broccoli & Carrots
  • Honey Butter Sweet Alabama Pecan Bread
    Honey Butter Sweet Alabama Pecan Bread

Footer

↑ back to top

About

  • About
  • Contact
  • Disclosure Policy
  • DMCA
  • Privacy Policy
  • Terms and Conditions

Newsletter

  • Sign Up! for emails and updates

Recipes

  • Appetizers & Snacks
  • Beef
  • Breakfast
  • Chicken
  • Desserts
  • Dinner
  • Drinks
  • Side-Dish
  • Soups

As an Amazon Associate I earn from qualifying purchases.

Copyright © 2025 Sue Recipe