Golden biscuit pockets filled with juicy garlic‑seasoned ground beef and melted cheeses, topped with Parmesan and served warm — these garlic cheeseburger bombs are the perfect party snack or cozy appetizer. Each bite bursts with rich, savory flavors and cheesy goodness, all wrapped up in a flaky, buttery crust.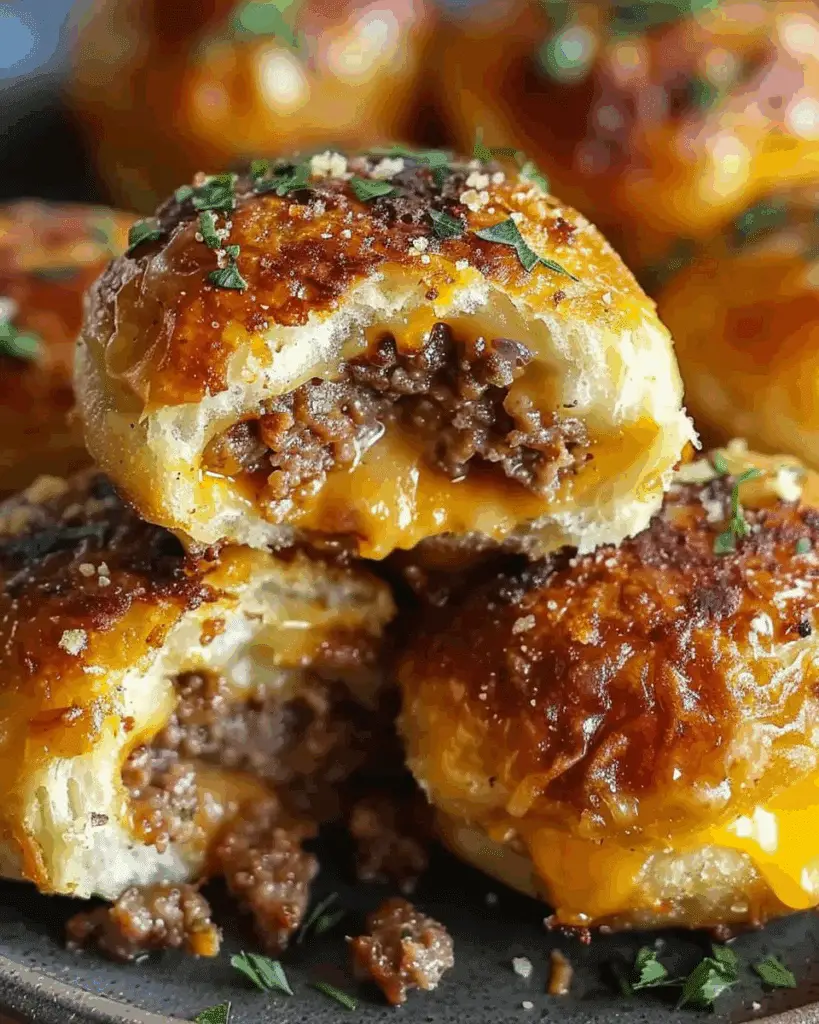
Why You’ll Love This Recipe
I love how this recipe takes classic cheeseburger flavors and transforms them into a fun, bite-sized treat. The blend of garlic-seasoned beef, melty cheddar and Parmesan, all encased in a golden biscuit crust, makes each bite irresistible. These bombs are easy to prep, bake quickly, and are guaranteed to be a hit whether I'm serving them at a casual get-together or enjoying them as a weeknight snack. Plus, they’re kid-friendly and super versatile.
Ingredients
(Here's a tip: Check out the full list of ingredients and measurements in the recipe card below.)
-
1 lb ground beef (≈ 450 g)
-
2 cloves garlic, minced
-
½ cup Parmesan cheese, grated or shredded
-
1 cup cheddar cheese, cubed or shredded
-
1 can (about 16.3 oz) refrigerated biscuit dough (8 biscuits)
-
2 tablespoons butter, melted
-
Salt & black pepper, to taste
-
Fresh parsley, chopped (for garnish, optional)
Directions
-
I preheat the oven to 375 °F (≈ 190‑200 °C) and line a baking sheet with parchment paper or lightly grease it.
-
In a skillet over medium heat, I cook the ground beef with the minced garlic until the meat is browned and fully cooked. I drain any excess fat and season with salt and pepper.
-
After removing the skillet from the heat, I stir in the Parmesan and cheddar cheeses until the mixture is evenly combined.
-
I flatten each biscuit into a 4-inch circle using my hands or a rolling pin.
-
I place about 2 tablespoons of the beef-cheese filling in the center of each dough circle, making sure to leave space around the edges.
-
Then, I fold the edges up over the filling and pinch them tightly to seal — a little water helps if the dough resists.
-
I arrange the sealed bombs seam-side down on the prepared baking sheet.
-
I brush the tops with the melted butter.
-
I bake them for 12‑15 minutes, until golden brown and cooked through.
-
After baking, I let them rest for 5 minutes, garnish with parsley if I’m feeling fancy, and serve them warm.
Servings and timing
-
Yield: 8 bombs
-
Prep Time: 15 minutes
-
Cook Time: 15 minutes
-
Total Time: 30 minutes
Variations
-
I sometimes use mozzarella in place of cheddar for an even stretchier cheese pull.
-
For a spicy kick, I add chopped jalapeños or a pinch of red pepper flakes to the beef mixture.
-
Instead of beef, I’ve swapped in ground turkey or plant-based meat with great results.
-
Adding diced onions or bell peppers during the beef sauté gives it a bit more texture and flavor.
-
I like to sprinkle a little garlic powder and extra Parmesan on top before baking for a crispy, flavorful crust.
storage/reheating
I store any leftovers in an airtight container in the fridge for up to 3 days. To reheat, I pop them in a 350 °F (175 °C) oven for about 8–10 minutes, or until warmed through. If I’m in a hurry, the microwave works too — about 30 seconds per bomb — though the crust is a bit softer that way. For freezing, I let them cool completely, wrap each in foil or plastic, and freeze for up to a month. Reheat from frozen in the oven at 375 °F for 15–20 minutes.
FAQs
How do I keep the filling from leaking out?
I make sure to seal the edges of the dough really well — pressing firmly and even using a bit of water helps. Placing the sealed side down on the tray also prevents leaks during baking.
Can I make these ahead of time?
Yes, I often assemble them the night before and refrigerate. When I’m ready to bake, I just add a couple extra minutes to the bake time.
Can I use homemade biscuit dough?
Absolutely. If I have a favorite biscuit dough recipe, it works perfectly here — just roll it out to a similar thickness and cut into rounds.
What dipping sauces go well with these?
I like serving them with ketchup, mustard, ranch, or even a garlic aioli. Barbecue sauce is also a tasty match.
Can I make them vegetarian?
Yes — I swap the beef with plant-based meat or even sautéed mushrooms and onions with cheese for a satisfying vegetarian version.
Conclusion
These garlic cheeseburger bombs are everything I want in a warm, comforting snack — buttery, cheesy, and packed with flavor. They’re simple to make, versatile enough to customize, and always a crowd-pleaser. Whether I’m serving them at a party or enjoying them solo on a cozy night in, they hit the spot every time.
Print
Garlic Cheeseburger Bombs
- Prep Time: 15 mins
- Cook Time: 15 mins
- Total Time: 30 mins
- Yield: 8 bombs
- Category: Appetizer / Snack
- Method: Baking
- Cuisine: American
- Diet: Halal
Description
Golden biscuit pockets filled with juicy garlic‑seasoned ground beef and melted cheeses, topped with Parmesan and served warm — the perfect cheeseburger‑inspired appetizer.
Ingredients
- 1 lb ground beef (≈ 450 g)
- 2 cloves garlic, minced
- ½ cup Parmesan cheese, grated or shredded
- 1 cup cheddar cheese, cubed or shredded
- 1 can (about 16.3 oz) refrigerated biscuit dough (8 biscuits)
- 2 tablespoons butter, melted
- Salt & black pepper, to taste
- Fresh parsley, chopped (for garnish, optional)
Instructions
- Preheat the oven to 375 °F (≈ 190‑200 °C). Line a baking sheet with parchment paper or lightly grease it.
- In a skillet over medium heat, cook the ground beef with minced garlic until the beef is browned and cooked through. Drain any excess fat. Season with salt & pepper.
- Remove skillet from heat; stir in Parmesan cheese and cheddar cheese until evenly combined.
- Flatten each biscuit into a circle (about 4‑inch diameter) using your hands or a rolling pin.
- Place about 2 tablespoons of the beef‑cheese filling into the center of each biscuit, leaving a border around the edges.
- Fold the edges up over the filling and pinch the seams tightly to seal each bomb. If needed, use a bit of water on the edges to help seal.
- Place the sealed bombs seam‑side down on the prepared baking sheet.
- Brush the tops with the melted butter.
- Bake for 12‑15 minutes, or until the biscuits are golden brown and cooked through.
- Let rest for 5 minutes. Garnish with chopped parsley if desired, then serve warm.
Notes
- To boost the garlic flavor, add a sprinkle of garlic powder to the melted butter before brushing the tops.
- Don’t overfill the biscuits, or they might split during baking.
- Make ahead: assemble the bombs, refrigerate overnight, then bake when you're ready. You may need a few extra minutes in the oven.
- For safety, let them cool a little before cutting or biting so the hot cheese doesn’t burn.
Nutrition
- Serving Size: 1 bomb
- Calories: ≈ 220 kcal
- Sugar: 1 g
- Sodium: 450 mg
- Fat: 14 g
- Saturated Fat: 6 g
- Unsaturated Fat: ≈ 5 g
- Trans Fat: 0.5 g
- Carbohydrates: 15 g
- Fiber: 0 g
- Protein: 10 g
- Cholesterol: 35 mg




Leave a Reply