
I absolutely love sharing my favorite guilt-free treats, and this Healthy Protein Cheesecake Jars Recipe is one of my all-time go-tos whenever I want something delicious yet nourishing. It’s like having the creamy richness of cheesecake without the heavy guilt. The jars make it so fun to serve individually, perfect for sharing or just indulging solo. I’m always amazed by how simple ingredients like cottage cheese and protein powder can come together into something so satisfyingly smooth and flavorful. If you love dessert but want to keep it on the healthy side, this recipe will quickly become a staple in your kitchen too.
Why You'll Love This Healthy Protein Cheesecake Jars Recipe
From the very first bite, I was hooked on the delicate balance of flavors in this Healthy Protein Cheesecake Jars Recipe. The creamy texture blends perfectly with just a hint of sweetness from the sugar-free maple syrup, while the vanilla protein powder adds a lovely depth and subtle aroma. It manages to hit that classic cheesecake note without feeling too heavy or overly sweet, which for me is a game changer.
One of the things I adore most about this recipe is how incredibly easy it is to prepare. There’s no complicated baking required, and it comes together in under an hour including chilling time. The assembly is straightforward, which means you can whip up this dessert any time you want without stress. Plus, using mason jars or small containers makes the portions perfect and portable, great for parties, meal prep, or a quick snack.
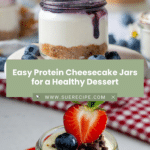
What truly sets this cheesecake apart is how versatile it is. Whether you're serving it for a family gathering, a summer picnic, or just treating yourself after a workout, it fits the bill beautifully. The crunchy graham cracker base adds just the right contrast to the velvety filling, and topping it with fresh fruit or a smear of jam gives it a vibrant burst of color and natural sweetness I find irresistible.
Ingredients You'll Need

This recipe shines in its simplicity, with just a handful of pantry essentials that combine for maximum flavor and texture. Each ingredient plays a vital role in creating that classic cheesecake experience—light, creamy, yet packed with protein.
TIP : You'll find the full list of ingredients and measurements in the recipe card below
- Cottage cheese: This adds creaminess and a boost of protein while keeping the dish light.
- Fat-free cream cheese: Gives that traditional cheesecake texture without the added fat.
- Vanilla protein powder: Enhances flavor and ups the protein content for a healthy twist.
- Sugar-free maple syrup: Sweetens the cheesecake naturally without extra calories.
- Graham crackers or crumbs: The crunchy base that balances the smooth filling perfectly.
- Melted butter: Helps bind the crumbs for a sturdy crust in each jar.
- Fresh fruit or jam for topping: Adds a fresh, colorful finish and natural sweetness.
Directions
Step 1: In a blender or food processor, combine the cottage cheese, fat-free cream cheese, vanilla protein powder, sugar-free maple syrup, and a dash of vanilla extract if you like. Blend until the mixture becomes perfectly smooth and creamy, scraping down the sides as needed to make sure everything is incorporated.
Step 2: Next, crush the graham crackers into fine crumbs using a rolling pin or by pulsing them in a food processor. Stir the crumbs together with the melted butter so they stick together well, then press this crumb mixture firmly into the bottoms of your serving jars to create an even crust layer.
Step 3: Spoon the cheesecake filling over the prepared crusts in each jar, tapping gently to level the surface. The filling should sit thick and creamy atop the crumb base.
Step 4: Refrigerate the jars for at least 1 to 2 hours to allow the cheesecake to firm up nicely. Just before serving, top each jar with fresh fruit or a dollop of your favorite jam for that extra pop of flavor and color. Serve chilled and enjoy!
Servings and Timing
This recipe makes about 4 servings, perfect for sharing or saving some for later. The prep time is roughly 15 minutes, which is mostly just combining and blending the ingredients. There’s no actual cooking time since this cheesecake doesn’t bake, but you’ll want to set aside about 1 to 2 hours of chilling time in the refrigerator to let it firm up beautifully. So, the total time from start to finish comes to about 1 hour and 15 minutes.
How to Serve This Healthy Protein Cheesecake Jars Recipe

When I serve this Healthy Protein Cheesecake Jars Recipe, I love playing around with different toppings and presentation styles. Fresh berries like blueberries, strawberries, or raspberries add a tangy contrast and vibrant colors that make the jars feel extra festive. Alternatively, a spoonful of low-sugar jam or compote adds a lovely richness and sweetness that feels indulgent but still smart.
For beverage pairings, I find that a light herbal tea or a chilled glass of sparkling water with lemon works wonderfully to cleanse the palate between bites. If it’s for a special occasion, a crisp white wine or a fruity sparkling cocktail can elevate the moment beautifully without overpowering the subtle cheesecake flavors.
Serving these jars chilled is definitely key; it keeps the texture just right and the flavors fresh. I usually serve them in small Mason jars or elegant dessert glasses and recommend portion sizes just right for a satisfying but guilt-free finish to any meal. These jars fit in perfectly at brunches, family dinners, or even casual gatherings where you want to impress without fuss.
Variations
I love how forgiving this Healthy Protein Cheesecake Jars Recipe is when it comes to customization. If you want to make it gluten-free, simply swap the graham crackers for gluten-free cookies or crushed nuts for your crust. For a vegan version, I’d experiment with plant-based cream cheese and a vegan-friendly protein powder, maybe blending soaked cashews to replace cottage cheese for a creamy base.
Flavor-wise, the vanilla protein powder keeps this cheesecake classic, but I often try chocolate or berry-flavored protein powders to put a unique twist on it. You can also add a pinch of cinnamon or lemon zest to the filling for extra brightness and warmth. For the crust, try different nut butters or coconut oil instead of butter for varying textures and flavors.
If you want a quicker dessert, sometimes I skip the chilling step and enjoy the jars immediately after assembly as a creamy mousse, though chilling definitely improves the texture and taste. For a bit of fun, I’ve layered the jars with fresh fruit or chia seed jam for a parfait-style surprise that’s a hit every time.
Storage and Reheating
Storing Leftovers
I always store leftover cheesecake jars in airtight containers or keep the lids tightly screwed on if I used Mason jars. They keep beautifully in the refrigerator for up to 3 days, maintaining their texture and flavor perfectly. Just make sure to keep the toppings separate or add fresh fruit right before serving to avoid sogginess.
Freezing
This recipe can be frozen, but I recommend freezing the filling and crust separately if possible. Freezing the whole assembled jar might affect the texture slightly, making it less creamy. If you do freeze assembled jars, freeze for up to 1 month and thaw overnight in the fridge before enjoying. Adding fresh toppings after thawing helps bring back brightness and freshness.
Reheating
Since this is a no-bake creamy dessert, I don’t recommend reheating. It’s best served chilled to retain its texture and taste. If you find it a bit too firm straight from the fridge, just let it sit at room temperature for 10–15 minutes before eating—it softens up nicely without losing its creamy charm.
FAQs
Can I use other types of protein powder in this recipe?
Absolutely! While I use vanilla whey protein powder because it blends smoothly and tastes great, you can substitute with plant-based protein powders or different flavors like chocolate or berry. Just keep in mind the flavor might slightly influence the overall cheesecake taste.
Is fat-free cream cheese necessary or can I use regular cream cheese?
You can definitely use regular cream cheese if you prefer a richer texture and flavor. The fat-free version helps keep the recipe lighter, but both work well depending on your dietary preferences.
Can I prepare these jars in advance for a party?
Yes, prepping these jars ahead of time is one of my favorite ways to save time. You can assemble them fully and refrigerate for up to 24 hours before your event. Just add fresh toppings shortly before serving for the best presentation.
Is it possible to make the crust without butter?
Certainly! If you want to avoid butter, you can use coconut oil or even nut butters to bind the graham cracker crumbs. Keep in mind this may slightly change the flavor and texture, but it still creates a tasty crust.
What if I don’t have graham crackers—what’s a good substitute?
If graham crackers aren’t available, digestive biscuits, vanilla wafers, or crushed nuts all work wonderfully as alternatives. I sometimes use crushed almonds or pecans for an extra nutty flavor and crunch in the crust.
Conclusion
I can’t encourage you enough to give this Healthy Protein Cheesecake Jars Recipe a try. It’s one of those rare treats that feels indulgent without the guilt, and once you taste the creamy, protein-packed filling with the crunchy base, you’ll understand why it’s a favorite in my kitchen. Perfect for all occasions and incredibly flexible, this cheesecake in a jar is sure to brighten your dessert game and satisfy your sweet tooth in the healthiest way possible.
Print
Healthy Protein Cheesecake Jars Recipe
- Prep Time: 15 minutes
- Cook Time: 0 minutes
- Total Time: 1 hour 15 minutes
- Yield: 4 servings
- Category: Dessert
- Method: No-Cook
- Cuisine: American
- Diet: Low Fat
Description
These Healthy Protein Cheesecake Jars are a delicious and nutritious dessert option that combines creamy cottage cheese, fat-free cream cheese, and vanilla protein powder for a high-protein treat. Layered on a buttery graham cracker crust and topped with fresh fruit or sugar-free jam, these no-bake cheesecake jars are perfect for a light, guilt-free indulgence that you can easily prepare ahead of time.
Ingredients
Cheesecake Filling
- 1 ¼ cups cottage cheese
- 1 cup fat-free cream cheese
- ½ cup vanilla protein powder
- Sugar-free maple syrup, to taste (about 2 tbsp)
Crust
- 6 graham crackers (crushed into crumbs)
- 1 tbsp melted butter
Toppings
- Fresh fruit, for garnish
- Jam (sugar-free), for garnish
Instructions
- Prepare the cheesecake filling: In a blender or food processor, combine the cottage cheese, fat-free cream cheese, vanilla protein powder, sugar-free maple syrup, and a splash of vanilla extract if desired. Blend until the mixture is completely smooth and creamy.
- Make the crust: Crush the graham crackers into fine crumbs using a food processor or by placing them in a sealed bag and crushing with a rolling pin. Mix the crumbs with the melted butter until evenly combined.
- Assemble the jars: Spoon or press the graham cracker crust evenly into the bottom of each jar or serving container to form a solid base.
- Add the filling: Spoon the cheesecake filling carefully over the graham cracker crust in each jar, filling them almost to the top.
- Chill: Refrigerate the assembled jars for 1 to 2 hours to allow the cheesecake filling to set and the flavors to meld.
- Add toppings and serve: Just before serving, add fresh fruit or a dollop of sugar-free jam on top of each cheesecake jar. Serve chilled for the best texture and taste.
Notes
- For a vegan or dairy-free version, substitute cottage cheese and cream cheese with plant-based alternatives.
- Adjust the sweetness by varying the amount of sugar-free maple syrup according to your taste.
- The jars can be prepared up to a day in advance and stored in the refrigerator, making them perfect for meal prep or entertaining.
- If you prefer a firmer crust, you can bake the graham cracker crust mixture at 350°F (175°C) for 5 minutes before assembling.
- Use protein powder with a mild vanilla flavor to keep the cheesecake taste balanced and creamy.


Leave a Reply