A large, oven-baked quesadilla made on a sheet pan — cheesy, crispy, and easy to serve to a crowd. This Tex-Mex inspired dish is perfect for family dinners, game nights, or casual get-togethers when I want something flavorful and filling without standing over the stove.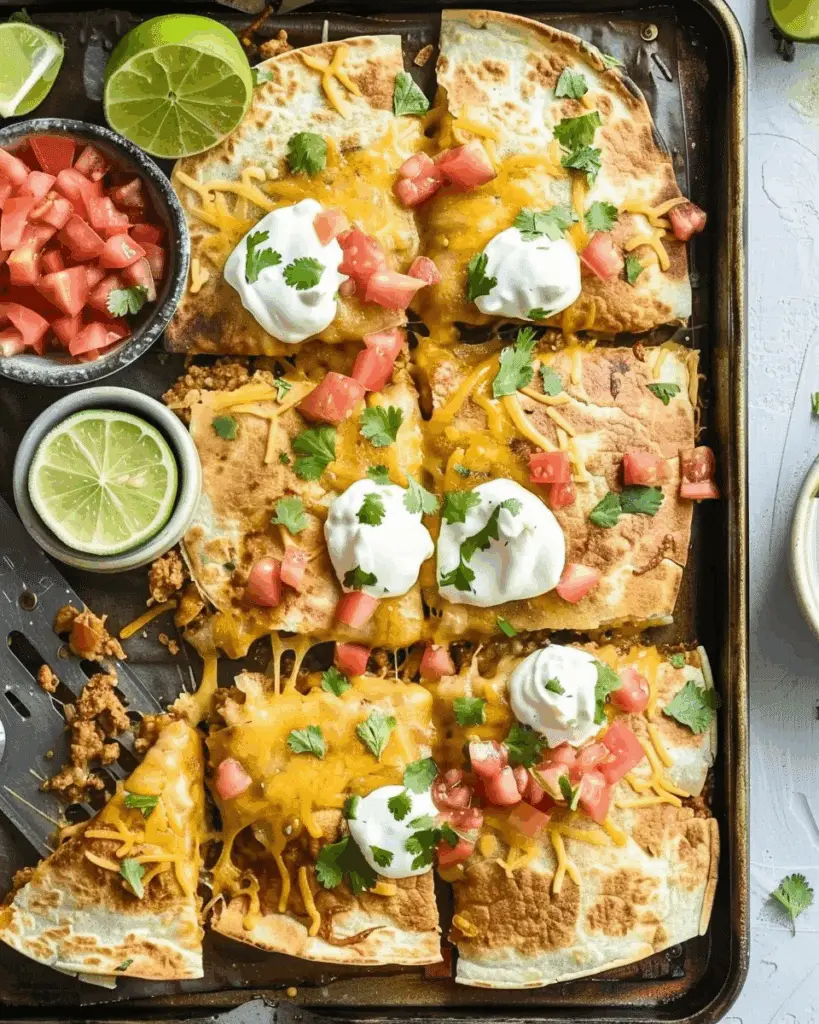
Why I Love This Recipe
I love how easy it is to prepare this sheet pan quesadilla for a group. It has all the flavors of a classic quesadilla, but instead of individually flipping tortillas, I just layer everything on a sheet pan, bake it, and serve. The combo of seasoned beef, black beans, veggies, and melty cheese gives it a hearty, satisfying taste, while the crisped tortillas add the perfect texture. Plus, I can customize the filling to fit whatever I have in my pantry or fridge.
Ingredients
(Here's a tip: Check out the full list of ingredients and measurements in the recipe card below.)
-
8 large burrito‑size flour tortillas
-
1 lb ground beef
-
1 (15‑oz) can black beans, drained & rinsed
-
1 (2.25‑oz) can sliced black olives, drained & rinsed
-
3 cups Colby + Monterey Jack cheese, shredded
-
½ cup salsa
-
1 bell pepper, seeded & diced
-
1 small yellow onion, diced
-
2 green onions, thinly sliced
-
1½ tablespoon olive oil
-
1½ teaspoon chili powder
-
1½ teaspoon cumin
-
1½ teaspoon smoked paprika
-
1 teaspoon minced garlic
-
1 teaspoon kosher salt
-
1 teaspoon black pepper
-
Sour cream (optional, for serving)
Directions
-
I start by preheating the oven to 425 °F (≈ 220 °C).
-
Then I lightly spray an 18×13 inch sheet pan with nonstick cooking spray.
-
In a large skillet over medium heat, I add olive oil, bell pepper, and yellow onion. I cook them for about 5 minutes, stirring often, until they’re soft.
-
Next, I add the ground beef and garlic, cooking until the beef is nicely browned.
-
I drain any excess fat and return everything to the skillet. Then I stir in the chili powder, cumin, smoked paprika, salt, pepper, black beans, black olives, and salsa.
-
On the prepared sheet pan, I place 6 tortillas around the edges so they overlap and hang over the side, leaving a gap in the center. I put 1 tortilla over the center to cover that space.
-
I spread the beef and bean mixture evenly over the tortillas, then sprinkle the cheese and green onions over the top.
-
I lay the final tortilla over the center and fold the overhanging tortillas inward to fully enclose the filling.
-
I place a second sheet pan on top to press everything down and help the edges seal.
-
I bake it for 20 minutes, then remove the top pan and bake for another 5 minutes until the top is golden and crisp.
-
Once out of the oven, I let it cool slightly before slicing and serving with sour cream if I feel like it.
Servings and timing
This recipe makes about 12 servings — perfect for a crowd.
-
Prep Time: 20 minutes
-
Cook Time: 25 minutes
-
Total Time: 45 minutes
Variations
-
I often make a vegetarian version by skipping the beef and adding more beans or lentils along with extra sautéed vegetables.
-
For a chicken variation, I substitute shredded cooked chicken for the ground beef.
-
If I’m short on time, I use a store-bought taco seasoning in place of the individual spices.
-
For a spicy twist, I sometimes mix in diced jalapeños or use a spicy salsa.
Storage/Reheating
-
To store leftovers, I refrigerate them in an airtight container for up to 4 days.
-
To reheat and keep the quesadilla crispy, I bake it in a preheated oven at 325–350 °F for about 10 minutes or use a toaster oven.
-
If I want to freeze portions, I slice the baked quesadilla into servings, freeze them on a tray until firm, wrap them tightly, and store in the freezer for up to 2 months. When ready, I reheat them directly in the oven.
FAQs
What’s the best way to keep the quesadilla crispy when reheating?
I like to use the oven or a toaster oven at 325–350 °F for about 10 minutes. This keeps the tortilla nice and crispy, unlike microwaving which tends to soften it.
Can I make this ahead of time?
Yes, I prepare the filling and assemble the quesadilla a few hours ahead, cover it with foil, and refrigerate until I’m ready to bake. I just add a few extra minutes to the baking time if it’s cold from the fridge.
Can I use corn tortillas instead of flour tortillas?
I don’t recommend it for this recipe. Corn tortillas are smaller and more fragile, so they won’t hold up well in a large sheet pan format. Stick with flour tortillas for best results.
What sides go well with this quesadilla?
I like to serve it with a fresh green salad, guacamole, extra salsa, or a side of Mexican rice or corn. It’s a filling main dish, so light sides pair nicely.
Can I make it spicier?
Absolutely. I add diced jalapeños to the filling or use a spicy salsa. A few dashes of hot sauce mixed in with the beef also give it a nice kick.
Conclusion
This sheet pan quesadilla is one of my go-to recipes when I want something easy, crowd-pleasing, and full of bold Tex-Mex flavor. It’s versatile, freezer-friendly, and totally satisfying. Whether I’m hosting friends or feeding a hungry family, this dish always hits the spot.
Print
Sheet Pan Quesadilla
- Prep Time: 20 minutes
- Cook Time: 25 minutes
- Total Time: 45 minutes
- Yield: 12 servings
- Category: Dinner / Main Dish
- Method: Baking / Sheet Pan
- Cuisine: Mexican / Tex‑Mex
- Diet: Halal
Description
A large, oven‑baked quesadilla made on a sheet pan — cheesy, crispy, and easy to serve to a crowd.
Ingredients
- 8 large burrito‑size flour tortillas
- 1 lb ground beef
- 1 (15‑oz) can black beans, drained & rinsed
- 1 (2.25‑oz) can sliced black olives, drained & rinsed
- 3 cups Colby + Monterey Jack cheese, shredded
- ½ cup salsa
- 1 bell pepper, seeded & diced
- 1 small yellow onion, diced
- 2 green onions, thinly sliced
- 1½ tbsp olive oil
- 1½ tsp chili powder
- 1½ tsp cumin
- 1½ tsp smoked paprika
- 1 tsp minced garlic
- 1 tsp kosher salt
- 1 tsp black pepper
- Sour cream (optional, for serving)
Instructions
- Preheat oven to 425 °F (≈ 220 °C).
- Spray one 18×13 inch sheet pan lightly with nonstick cooking spray.
- In a large skillet over medium heat, add olive oil, bell pepper, and yellow onion. Cook about 5 minutes, stirring often, until softened.
- Add ground beef and garlic. Cook until beef is browned.
- Drain excess fat, then return meat/veggies to skillet. Stir in chili powder, cumin, smoked paprika, salt, pepper, black beans, black olives, and salsa.
- On the prepared sheet pan, place 6 of the tortillas around the edges so they overlap and hang over the edge, leaving a gap in the center. Place 1 tortilla over the bottom center gap.
- Evenly spread the meat‑bean mixture over the tortillas. Sprinkle the cheese on top, then scatter the green onions.
- Lay the final tortilla over the top center of the filling. Starting from either side, tightly fold the overhanging tortillas toward the middle so they enclose the filling.
- Place a second sheet pan on top of the folded tortillas to press them down and keep edges sealed.
- Bake for 20 minutes. Remove the top sheet pan and bake an additional 5 minutes, until the top is golden and crisp.
- Let the quesadilla cool slightly before cutting into portions. Serve with sour cream if desired.
Notes
- Vegetarian version: omit the beef and add extra veggies or cooked lentils or beans.
- You can substitute chicken (cooked/shredded) for the beef if desired.
- Use a store‑bought taco seasoning instead of separate spices if you prefer.
- To reheat and keep crispiness, bake leftovers at 325‑350 °F for ~10 minutes (or use a toaster oven).
- For freezing: after baking, cut into servings, place on a pan to freeze until firm, then wrap tightly and freeze (up to 2 months). Reheat in oven when ready.
Nutrition
- Calories: 271 kcal
- Sugar: 2 g
- Sodium: 639 mg
- Fat: 16 g
- Saturated Fat: 8 g
- Carbohydrates: 14 g
- Fiber: 1 g
- Protein: 18 g
- Cholesterol: 55 mg




Leave a Reply