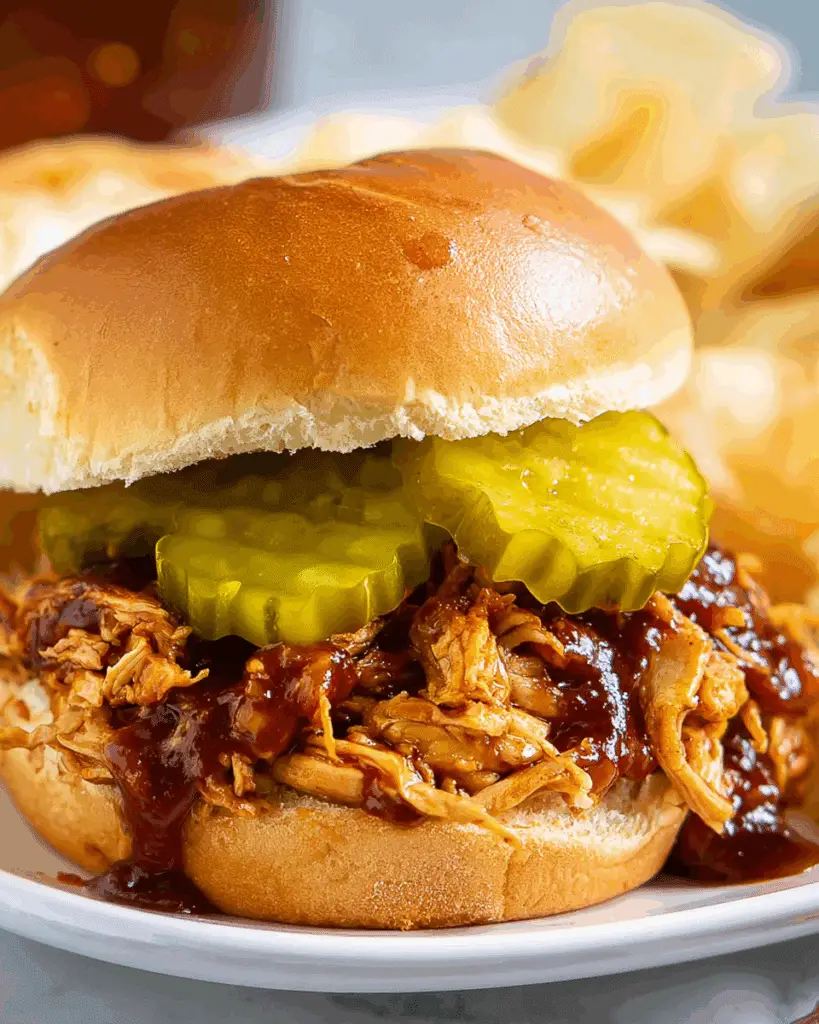
I share a spicy-sweet slow cooker sandwich recipe that’s both effortless and crowd-friendly. Juicy, shredded chicken cooked all day in a tantalizing hot honey sauce, all piled onto soft buns and topped with crisp pickles.
Why You’ll Love This Recipe
I love how this takes just 5 minutes of prep and then practically cooks itself—either 2 hours on high or 4 on low in the slow cooker. I can easily adjust the level of heat to match what my family loves, and it’s the perfect go-to when I’m feeding a crowd—8 servings with minimal effort.
Ingredients
(Here's a tip: Check out the full list of ingredients and measurements in the recipe card below.)
I use the following ingredients for this recipe:
chicken – boneless, skinless chicken breasts (or thighs if preferred)
cayenne pepper – start with 1 tablespoon (or ½ tablespoon for less heat), adjust as needed
smoked paprika – adds smoky depth
garlic salt – a 3:1 mix of salt and garlic powder
brown sugar – I use light or dark to balance spicy with sweet
honey – local honey if possible, to complement the heat
vinegar – either white or apple cider vinegar works
I spray the bottom of a 6-quart slow cooker with non-stick spray, arranging trimmed chicken breasts inside.
I mix together the cayenne, smoked paprika, and garlic salt, then sprinkle over the chicken. Next, I add brown sugar, drizzle honey, pour vinegar, and top with pats of butter.
I cover and cook on LOW for 4 hours or HIGH for 2 hours.
When done, I use forks (or meat claws) to shred the chicken right in the slow cooker.
Then I pile the chicken onto buns, top with pickles, and serve—sometimes adding ranch, coleslaw, or cheese to taste.
Servings and timing
Serves: 8 Prep time: 5 minutes Cook time: 2 hours on HIGH or 4 hours on LOW Total time: about 2 hours 5 minutes (HIGH) or 4 hours 5 minutes (LOW)
Variations
I can switch things up by:
Reducing cayenne to ½ tablespoon to lower the heat, or increasing to 2 tablespoons for extra spicy
Swapping chicken thighs for breasts
Serving over rice or stuffing into baked potatoes instead of buns
Adding cheese (like pepper jack or cheddar), ranch, or creamy coleslaw for extra flavor and texture
Storage/reheating
Storage: I store leftovers covered in the fridge for up to 3 days. Freezing: I prep everything as directed, then pack the ingredients into a freezer bag, squeeze out air, label, and freeze for up to 6 months. To cook, I thaw in the fridge overnight or submerge in cold water for about an hour before transferring to the slow cooker—then cook on LOW for 7–8 hours. Reheating: I reheat in the microwave for individual portions, or return the batch to the slow cooker until heated through.
FAQs
Do I have to add liquid to the slow cooker?
I don’t—chicken releases enough moisture during cooking, so no extra liquid is needed.
Can I put frozen chicken in the slow cooker?
I don’t recommend it. Slow cookers heat slowly, and frozen meat may stay too long in the danger zone.
How can I adjust the heat level?
I start with 1 tablespoon cayenne and go down to ½ tablespoon for a milder version—or up to 2 tablespoons if I want more heat.
What kinds of buns and toppings should I use?
I use brioche, hamburger, pretzel, slider buns, or Hawaiian rolls. Toppings like ranch, coleslaw, or cheese also elevate the sandwich.
Can I serve the chicken in other ways?
Yes—I can pair it with rice, use it to top baked potatoes, or even make it part of a salad instead of sandwiches.
Conclusion
I hope this article helps you fall in love with the ease and flavor of these Slow Cooker Hot Honey Chicken Sandwiches. With only minutes of prep and options to tweak the heat and toppings, they’re perfect for busy weeknights, gatherings, or freezer-friendly meals. I like making a big batch so there’s always something satisfying ready to go.
Crockpot French Onion Meatloaf with Melted Swiss Cheese is a cozy, comforting twist on a classic dish. The meatloaf is slow-cooked until juicy and flavorful, infused with rich French onion flavor, and topped with melted Swiss cheese that brings everything together with a savory finish. It’s the perfect no-fuss dinner that delivers big on flavor and comfort.
Why You’ll Love This Recipe
I love how the crockpot makes this recipe nearly hands-off, letting all those delicious flavors meld slowly over time. The French onion soup mix gives the meatloaf a savory, deep onion flavor, and the Swiss cheese adds a creamy, melty layer on top that makes every bite irresistible. It’s the kind of meal that makes the whole kitchen smell amazing while it cooks and has everyone coming back for seconds.
Ingredients
(Here's a tip: Check out the full list of ingredients and measurements in the recipe card below.)
Ground beef
French onion soup mix
Bread crumbs
Eggs
Milk
Worcestershire sauce
Garlic powder
Salt and pepper
Swiss cheese slices
Fresh parsley (optional, for garnish)
Directions
I start by mixing the ground beef, French onion soup mix, bread crumbs, eggs, milk, Worcestershire sauce, garlic powder, salt, and pepper in a large bowl until everything is well combined.
I shape the mixture into a loaf and place it in the center of the crockpot.
I cover and cook on low for about 6 to 7 hours, or until the meatloaf is fully cooked through and tender.
About 15 minutes before it’s done, I layer Swiss cheese slices over the top of the meatloaf, then cover again to let them melt.
Once the cheese is melted and bubbly, I carefully remove the meatloaf, let it rest for a few minutes, slice, and serve.
I like to garnish with fresh parsley for a pop of color and freshness.
Servings and timing
This recipe serves 6 to 8 people. The prep time takes about 10 to 15 minutes, and the cooking time is 6 to 7 hours on low. If I’m in a hurry, I can cook it on high for about 3 to 4 hours, but low and slow really brings out the best flavor.
Variations
I sometimes swap the Swiss cheese for provolone or mozzarella if I want a different kind of melt.
For an extra onion kick, I add caramelized onions on top before adding the cheese.
I occasionally mix in half ground turkey with the beef for a lighter version.
storage/reheating
I store any leftovers in an airtight container in the fridge for up to 4 days. To reheat, I use the microwave or oven. In the oven, I cover the slices with foil and warm them at 350°F for about 15 minutes. If I freeze it, I make sure it’s tightly wrapped, and it keeps well for up to 2 months. I thaw overnight in the fridge before reheating.
FAQs
How do I know when the meatloaf is fully cooked?
I check with a meat thermometer—it's done when the internal temperature reaches 160°F.
Can I make this recipe ahead of time?
Yes, I often mix and shape the meatloaf the night before and store it in the fridge. In the morning, I just place it in the crockpot and start cooking.
What can I serve with this meatloaf?
I usually pair it with mashed potatoes, green beans, or a simple side salad for a complete meal.
Can I use a different type of cheese?
Absolutely. I’ve tried provolone, cheddar, and even Gruyère, and they all work beautifully.
Do I need to line the crockpot?
I don’t usually line it, but if I want easier cleanup, I use a slow cooker liner or place a strip of parchment under the loaf.
Conclusion
Crockpot French Onion Meatloaf with Melted Swiss Cheese is the kind of comfort food that’s both easy and satisfying. The slow cooking brings out amazing flavor, the melted cheese makes it extra indulgent, and it’s always a hit at dinner. I love how it turns a simple meal into something special with very little effort.
This Cheddar & Havarti Chicken Bowtie Pasta with Roasted Broccoli & Carrots is a cozy, cheesy, and satisfying meal that brings together creamy pasta, tender chicken, and perfectly roasted vegetables. It’s an all-in-one dinner that’s both comforting and packed with flavor.
Why You’ll Love This Recipe
I love how this dish strikes a perfect balance between rich and healthy. The creamy Cheddar and Havarti cheese sauce gives the pasta a velvety texture, while roasted broccoli and carrots add a naturally sweet and earthy depth. It’s a complete meal with protein, carbs, and veggies in one bowl. Plus, it’s great for feeding the family or meal prepping for the week.
ingredients
(Here's a tip: Check out the full list of ingredients and measurements in the recipe card below.)
Bowtie pasta (farfalle)
Boneless, skinless chicken breast or thighs, cooked and cubed
Havarti cheese, shredded
Sharp cheddar cheese, shredded
Whole milk or heavy cream
Garlic, minced
Butter
Olive oil
Fresh broccoli florets
Carrots, peeled and sliced
Salt and black pepper
Paprika (optional for extra flavor)
directions
I start by preheating the oven to 425°F (220°C).
On a baking sheet, I toss the broccoli and carrots with olive oil, salt, and pepper. Then I roast them for about 20-25 minutes until they’re tender and slightly caramelized.
While the vegetables roast, I cook the bowtie pasta according to the package instructions until al dente. Then I drain and set it aside.
In a large skillet, I melt butter and sauté garlic until fragrant.
I pour in the milk or cream and bring it to a gentle simmer before adding the shredded cheddar and Havarti cheese. I stir until the sauce is smooth and creamy.
I add the cooked chicken to the cheese sauce and stir to coat.
I toss in the cooked pasta and mix until everything is evenly combined.
Finally, I gently fold in the roasted broccoli and carrots, adjust seasoning with salt, pepper, and a touch of paprika if desired.
Servings and timing
This recipe makes about 4 hearty servings. Prep time: 15 minutes Cook time: 30 minutes Total time: 45 minutes
Variations
I sometimes swap the bowtie pasta for penne or rotini.
For extra flavor, I marinate the chicken in lemon juice and herbs before cooking.
I’ve used a mix of cheeses like mozzarella or gouda when I’m low on Havarti.
To make it vegetarian, I skip the chicken and add more roasted vegetables like bell peppers or mushrooms.
I also love adding red pepper flakes for a spicy kick.
storage/reheating
I store leftovers in an airtight container in the fridge for up to 4 days. To reheat, I warm it gently in a skillet with a splash of milk to bring back the creaminess, or microwave it in intervals, stirring between each one. The roasted vegetables keep their flavor well, even after reheating.
FAQs
What can I use instead of Havarti cheese?
I sometimes use mozzarella, Monterey Jack, or Fontina as alternatives. They melt well and keep that creamy texture.
Can I use frozen vegetables instead of fresh?
Yes, I’ve used frozen broccoli and carrots in a pinch. I just make sure to roast them longer to get that caramelized finish.
Is it okay to use rotisserie chicken?
Absolutely. When I’m short on time, I shred rotisserie chicken and toss it right into the cheese sauce.
Can I make this dish ahead of time?
Yes. I’ve prepped the sauce and pasta the day before, then reheated and added fresh roasted vegetables before serving.
What’s the best way to shred Havarti?
I chill the Havarti slightly in the freezer for 10–15 minutes—it makes shredding easier since it’s a softer cheese.
Conclusion
Cheddar & Havarti Chicken Bowtie Pasta with Roasted Broccoli & Carrots is one of those recipes I keep coming back to. It’s warm, filling, and incredibly easy to adapt based on what’s in my fridge. The combination of creamy cheese, savory chicken, and sweet roasted veggies makes it a comfort food favorite in my kitchen.
This Honey Butter Sweet Alabama Pecan Bread is a rich, buttery quick bread loaded with chopped pecans and a touch of honey that brings warmth and Southern charm to every bite. It's soft in the center, golden on the outside, and topped with a honey-butter glaze that melts right into the warm bread. It’s simple, soulful, and perfect for sharing—or keeping all to myself.
Why You’ll Love This Recipe
I love how this recipe hits that perfect balance between sweet and nutty. It’s easy to make, comes together in one bowl, and doesn’t require any fancy tools or skills. The texture is moist and dense, almost like a cake, with the added crunch of roasted pecans. It works just as well for breakfast with coffee as it does for a dessert or snack later in the day. Plus, the honey-butter glaze is an irresistible finishing touch that takes it to the next level.
Ingredients
(Here's a tip: Check out the full list of ingredients and measurements in the recipe card below.)
All-purpose flour
Baking powder
Salt
Granulated sugar
Chopped pecans
Eggs
Milk
Unsalted butter (melted)
Honey
For the honey butter glaze:
Unsalted butter
Honey
Powdered sugar
Vanilla extract
Directions
I start by preheating the oven to 350°F and greasing a loaf pan.
In a large bowl, I mix the dry ingredients: flour, baking powder, salt, sugar, and chopped pecans.
In a separate bowl, I whisk together the eggs, milk, melted butter, and honey until smooth.
I pour the wet ingredients into the dry and stir just until combined—being careful not to overmix.
I transfer the batter to the prepared loaf pan and smooth the top.
I bake for about 50–60 minutes, or until a toothpick inserted in the center comes out clean.
While the bread bakes, I prepare the honey butter glaze by melting butter and whisking in honey, powdered sugar, and vanilla.
As soon as the bread comes out of the oven, I pour the glaze over the top, letting it soak in while it’s still warm.
I let the bread cool in the pan for about 15 minutes before slicing and serving.
Servings and timing
This recipe makes 1 loaf, which I slice into about 8 to 10 servings. It takes roughly 10 minutes to prepare and 50–60 minutes to bake, depending on the oven. I always check around the 50-minute mark to make sure it doesn’t overbake.
Variations
Sometimes I like to swap out the pecans for walnuts or even toasted almonds if that’s what I have on hand. For a fall twist, I add a teaspoon of cinnamon or pumpkin pie spice to the batter. If I’m feeling indulgent, I drizzle a bit of maple syrup on top instead of honey. And when I want to go all out, I fold in a handful of mini chocolate chips or dried cranberries.
Storage/Reheating
I store this bread tightly wrapped in plastic wrap or an airtight container at room temperature for up to 3 days. For longer storage, I refrigerate it for up to a week or freeze it (sliced or whole) for up to 3 months. When I want to reheat a slice, I pop it in the microwave for about 10–15 seconds or warm it in a low oven for a few minutes until soft and toasty.
FAQs
What kind of honey works best for this recipe?
I like using a mild clover or wildflower honey that complements the buttery flavor without overpowering the pecans. Local raw honey works great too.
Can I use oil instead of butter?
Butter gives the bread its rich flavor, especially in the glaze, so I don’t recommend replacing it with oil. If I’m in a pinch, I might use half oil and half butter, but the taste isn’t quite the same.
How do I know when the bread is done baking?
I always test the center with a toothpick—if it comes out clean or with just a few moist crumbs, it's ready. The top should be golden brown and slightly firm to the touch.
Can I make this recipe into muffins?
Absolutely. I divide the batter into a muffin tin and bake at 350°F for about 20–25 minutes. I still spoon a little glaze over each one while they’re warm for that extra flavor.
What can I serve with this bread?
It’s delicious on its own, but I sometimes enjoy it with a pat of salted butter or a drizzle of cream. It pairs perfectly with coffee or a cold glass of milk.
Conclusion
This Honey Butter Sweet Alabama Pecan Bread is pure comfort in every slice. I love how simple it is to whip up, and yet it tastes like something truly special. Whether I’m making it for guests, gifting it, or treating myself to a cozy snack, it never disappoints. It’s a sweet slice of the South I can enjoy any time of year.
I make soft, chewy-on-the-inside and crispy-on-the-outside pretzels with simple pantry ingredients and a classic baking soda bath for that unmistakable pretzel flavor.
Why You’ll Love This Recipe
I love how easy this recipe is—yet it yields such tender, golden pretzels that I might believe I spent hours on them. The baking soda bath gives them that chewy exterior and distinctive pretzel taste, and they turn out beautifully every time. Plus, working with the dough is almost therapeutic, and kids usually love helping shape the pretzels.
ingredients
(Here’s a tip: Check out the full list of ingredients and measurements in the recipe card below.)
1 ¼ tablespoons sugar
1 ½ teaspoons kosher salt
1 package instant yeast
4 ½ cups all-purpose flour
1 ½ cups warm water (about 110 °F)
¼ cup salted butter, melted
8 cups water
½ cup baking soda
1 large egg yolk beaten with 1 tablespoon water
Pretzel salt
directions
In the bowl of a stand mixer or a large mixing bowl, I whisk together the sugar, kosher salt, instant yeast, and flour.
I stir in the warm water and melted butter.
If I’m using a stand mixer, I mix with the dough hook on low until combined, then medium until the dough is smooth and pulls away from the bowl (about 5 minutes). If mixing by hand, I knead it until smooth.
I transfer the dough to a lightly oiled bowl, cover it, and let it rise in a warm place until doubled in size—about 50 to 55 minutes.
I preheat the oven to 450 °F and line two baking sheets with parchment paper or silicone mats, then coat them with cooking spray.
I boil 8 cups of water and the baking soda in a large pot.
I turn the dough out onto a lightly oiled surface and divide it into 12 equal pieces. I roll each piece into a 16 to 18-inch rope.
I form each rope into a U-shape, cross the ends, and press them onto the bottom to create the classic pretzel shape. Then I place them on the prepared baking sheets.
I boil each pretzel, one at a time, for 30 seconds, then transfer them back to the baking sheet.
I brush each pretzel with the egg wash and sprinkle generously with pretzel salt.
I bake the pretzels for about 12 to 14 minutes, until they’re golden brown and puffy.
I let them cool on a rack for about 5 minutes before serving.
Servings and timing
Prep time: 15 minutes
Cook time: 14 minutes
Total time: 1 hour 29 minutes
Yields: 12 pretzels
Variations
I sometimes adapt the recipe by changing up the dips—like spicy mustard or blue cheese. I’ve even tried a cinnamon sugar version by skipping the salt topping and brushing the baked pretzels with butter and cinnamon sugar. For smaller portions, I shape the dough into bite-sized pieces and bake them as pretzel nuggets.
storage/reheating
To store the pretzels, I keep them in an airtight container at room temperature for up to 2 days. If I want to keep them longer, I freeze them in a sealed bag. To reheat, I pop them in a 350 °F oven for 2 to 3 minutes, which brings back the warmth and slight crisp on the outside.
FAQs
What’s a baking soda bath—and why is it important?
I use the baking soda bath because it gives the pretzels their deep golden color and that chewy, flavorful crust that makes them taste like real pretzels.
Can I use active dry yeast instead of instant yeast?
Yes, I can use active dry yeast—I just proof it in the warm water with the sugar first and let it sit until it gets foamy before mixing it in with the flour and other ingredients.
How can I get the salt to stick?
The egg wash is key here. I brush it on just before baking, and it helps the salt adhere while also giving the pretzels a shiny, golden finish.
Does the recipe work without a stand mixer?
Absolutely. I’ve made it by hand plenty of times. It just takes a little extra kneading to get the dough smooth and elastic, but it works just as well.
Can I make the dough ahead of time?
Yes, I can make the dough ahead and store it in the fridge overnight. I just let it come back to room temperature before shaping and baking.
Conclusion
This homemade soft pretzel recipe never fails to impress. I love the golden crust, the chewy texture, and the freedom to shape or top them however I like. Whether I’m baking for game day, a party, or just a cozy snack, these pretzels are always worth the effort.
This Creamy Baked Asiago Chicken is a rich and comforting dish that brings together juicy chicken breasts, a savory cream sauce, and the sharp, nutty flavor of Asiago cheese. It's an easy yet impressive meal that works beautifully for both weeknight dinners and special occasions.
Why You’ll Love This Recipe
I love how simple ingredients come together to create something truly decadent. The chicken stays tender and juicy, baked to perfection in a velvety cream sauce infused with garlic, herbs, and a generous layer of melted Asiago cheese. It's a one-pan wonder that fills the kitchen with an irresistible aroma. Whether I serve it over pasta, mashed potatoes, or roasted veggies, this dish always delivers comfort and flavor.
ingredients
(Here's a tip: Check out the full list of ingredients and measurements in the recipe card below.)
Boneless, skinless chicken breasts
Salt and black pepper
Olive oil
Butter
Garlic, minced
Heavy cream
Chicken broth
Italian seasoning
Crushed red pepper flakes (optional)
Freshly grated Asiago cheese
Fresh parsley, chopped (for garnish)
directions
I start by preheating the oven to 375°F (190°C).
I season the chicken breasts with salt and pepper on both sides.
In a large oven-safe skillet, I heat olive oil over medium-high heat and sear the chicken for 3-4 minutes per side until golden. Then I remove the chicken and set it aside.
In the same skillet, I melt the butter and sauté the minced garlic until fragrant, about 1 minute.
I pour in the chicken broth and heavy cream, then stir in Italian seasoning, crushed red pepper flakes, and half of the Asiago cheese.
I let the sauce simmer for a few minutes until slightly thickened.
I return the chicken to the skillet, spoon some sauce over the top, and sprinkle the remaining Asiago cheese over the chicken.
I transfer the skillet to the oven and bake for 20-25 minutes, or until the chicken is cooked through and the cheese is bubbly and golden.
I garnish with chopped parsley before serving.
Servings and timing
This recipe serves 4 people and takes about 40 minutes in total — 15 minutes for prep and 25 minutes for baking. It’s quick enough for a weeknight but fancy enough for entertaining.
Variations
I like to switch things up occasionally by using boneless chicken thighs instead of breasts for more flavor. For a lower-carb version, I skip the side of pasta and serve it over sautéed spinach or steamed cauliflower. If I’m craving a different cheese twist, I sometimes mix in Parmesan or Fontina along with the Asiago.
storage/reheating
To store leftovers, I place the cooled chicken and sauce in an airtight container and refrigerate for up to 3 days. For reheating, I prefer using the oven at 350°F for 10-15 minutes, covered with foil to prevent drying. If I’m short on time, the microwave works too — just a couple of minutes on medium heat. I like to add a splash of cream or broth when reheating to keep the sauce smooth.
FAQs
How do I know when the chicken is fully cooked?
I always use a meat thermometer to be sure. The internal temperature should reach 165°F (74°C) at the thickest part of the breast.
Can I use pre-shredded Asiago cheese?
I prefer grating it fresh for the best melt and flavor, but pre-shredded can work in a pinch. Just make sure it’s finely shredded to help it blend into the sauce.
What can I serve with this dish?
I often serve it with mashed potatoes, buttered noodles, or roasted vegetables. A side salad with a light vinaigrette balances out the richness nicely.
Can I make this ahead of time?
Yes, I sometimes prepare the sauce and sear the chicken earlier in the day. When I’m ready to bake, I assemble it all in the skillet and pop it in the oven.
Is Asiago cheese similar to Parmesan?
They’re both hard, aged cheeses, but Asiago has a slightly nuttier and creamier flavor. I find it adds a distinctive richness that pairs beautifully with the creamy sauce.
Conclusion
This Creamy Baked Asiago Chicken is one of those recipes I come back to again and again. It’s comforting, flavorful, and easy to make — the perfect combination. Whether I’m cooking for family or guests, this dish never disappoints.
I whip up these oven-baked chicken tenders to enjoy a healthier, yet still crispy and satisfying alternative to fried chicken. They’re simple to make, juicy inside, and golden outside—perfect for family dinners or meal prep.
Why I’ll Love This Recipe
I love how easy and foolproof this recipe is. I only need basic pantry items—like panko, some spices, eggs, and Parmesan. Baking them keeps things cleaner, and using a wire rack delivers that coveted crunch without deep frying. Plus, they’re kid-friendly, flavorful, and versatile for dipping or pairing with sides.
ingredients
(Here's a tip: Check out the full list of ingredients and measurements in the recipe card below.)
1 lb chicken breasts or chicken tenders, cut into strips
2 large eggs, beaten
1 cup panko breadcrumbs (or regular breadcrumbs)
½ cup grated Parmesan cheese (optional, for extra flavor)
1 teaspoon garlic powder
1 teaspoon paprika
½ teaspoon onion powder
½ teaspoon salt
¼ teaspoon black pepper
Olive oil spray, for coating
directions
I begin by seasoning and cutting the chicken (if I’m using breasts). I set up two stations: one bowl for the beaten eggs and another with the breadcrumbs, Parmesan, and spices mixed together. I dip each strip into the egg, then coat in the breadcrumb blend—pressing gently so it sticks. For extra crunch, I sometimes double-dip the strips. I line a baking sheet with parchment or a silicone liner, and if I have a wire rack, I place it on top to help the air circulate. I arrange the tenders with a bit of space between them, spray lightly with olive oil spray, then bake at 400 °F (200 °C) for 20–25 minutes, flipping halfway through so they brown evenly. I check they reach 165 °F (74 °C), then let them rest a few minutes before serving with my favorite dips.
Servings and timing
Servings: 4
Prep time: about 10 minutes
Cook time: about 20–25 minutes
Total time: around 30 minutes
Variations
I like that I can tweak the recipe easily: swap regular breadcrumbs for gluten-free ones, skip the Parmesan for a lighter version, or double-coat for extra crunch. I also sometimes coat with a mix that includes cornflakes for a different texture. Alternatively, I’ve used mayonnaise instead of eggs—it keeps the meat extra juicy and adds great browning. For a fun twist, I’ve even crushed cheese crackers for a kid-friendly, cheesy crust.
storage/reheating
I store leftovers in the fridge for up to 3 days. To reheat and bring back crispiness, I bake them at 350 °F for 10–15 minutes. I can also freeze the raw breaded tenders by placing them on a tray to firm up, then transferring them to a sealed bag. When I’m ready to bake, I just pop them in the oven straight from frozen—adding a few extra minutes to the cook time.
FAQs
What dipping sauces go well with these chicken tenders?
I like honey mustard, BBQ sauce, or ranch—each brings a different flavor profile that complements the crispy coating and tender chicken.
Can I make these gluten-free?
Absolutely—I simply swap in gluten-free breadcrumbs, and if Parmesan is an issue, I leave it out or replace it with a gluten-free alternative.
How do I make the coating extra crunchy?
Using a wire rack during baking really helps by letting air circulate. I can also double-coat the tenders or use crispier crumbs like panko or crushed cornflakes for added texture.
Can I prepare these ahead of time?
Yes—I can bread them in advance and refrigerate for up to a day before baking, or freeze them fully prepped then bake from frozen.
Do I need to flip them during baking?
Yes, flipping about halfway helps them brown evenly and become crisp on both sides.
Conclusion
I’ve found this baked chicken tenders recipe to be a go-to for busy evenings. It’s speedy, minimal-mess, and gives me the crispy satisfaction of fried chicken without the oil. I love tweaking it—whether adding flavors, switching coatings, or prepping ahead. Whether served with dipping sauces, fresh salads, or roasted veggies, they always feel like a comforting, crowd-pleasing meal.
These pumpkin sugar cookies are crisp, buttery, and perfect for decorating. I use a classic sugar cookie dough that holds its shape beautifully when baked, making it ideal for creating pumpkin-shaped treats with smooth, vibrant icing. Whether I’m making them for Halloween, Thanksgiving, or just a cozy fall day, they’re always a seasonal showstopper.
Why You’ll Love This Recipe
I love how fun and festive these cookies look on the table. They’re not only delicious but also a joy to decorate. The dough is easy to work with, rolls out smoothly, and cuts clean shapes that don’t spread in the oven. Once baked, I can decorate them with royal icing for a beautiful, professional-looking finish. They’re perfect for gifting, party favors, or adding a sweet touch to any autumn celebration.
Ingredients
(Here's a tip: Check out the full list of ingredients and measurements in the recipe card below.)
All-purpose flour
Baking powder
Salt
Unsalted butter, softened
Granulated sugar
Egg
Vanilla extract
Almond extract (optional, but I like the flavor it adds)
I start by preheating the oven to 350°F (175°C) and lining my baking sheets with parchment paper.
In a medium bowl, I whisk together the flour, baking powder, and salt.
In a separate large bowl, I cream the butter and sugar until light and fluffy.
I beat in the egg, vanilla extract, and almond extract (if using).
Gradually, I mix in the dry ingredients until a soft dough forms.
I divide the dough in half, flatten it into discs, and roll it out on a lightly floured surface to about ¼-inch thick.
Using a pumpkin-shaped cookie cutter, I cut out the cookies and place them on the prepared baking sheets.
I bake for 8 to 10 minutes, or until the edges just start to turn golden.
I let them cool completely on a wire rack before decorating.
For decorating, I prepare royal icing in separate bowls and tint it with orange and green gel food coloring.
Using piping bags or squeeze bottles, I outline and flood each cookie, starting with the orange pumpkin body and then adding green stems and vines once dry.
Servings and timing
z
This recipe makes about 24 medium-sized cookies. Prep time: 20 minutes Chill time (optional but helpful): 30 minutes Bake time: 8-10 minutes Decorating time: 30+ minutes, depending on detail Total time: About 1.5 to 2 hours
Variations
Sometimes I add a teaspoon of pumpkin pie spice to the dough for a subtle autumn flavor. I also switch up the shapes—leaves, acorns, and ghosts are fun alternatives. For a more detailed look, I use edible markers or gold dust to add finishing touches once the icing has dried. If I want a softer cookie, I roll the dough slightly thicker and reduce baking time by a minute.
Storage/Reheating
I store these cookies in a single layer in an airtight container at room temperature for up to 1 week. Once the icing is completely dry, I can stack them with parchment paper in between. For longer storage, I freeze the undecorated cookies and thaw them before decorating. I don’t reheat these cookies, but they thaw beautifully at room temperature if frozen.
FAQs
Can I make the dough ahead of time?
Yes, I often make the dough a day or two in advance and keep it wrapped in the fridge. It also freezes well for up to 3 months.
How do I get the icing so smooth?
I use the "flooding" technique with royal icing—first outlining the shape, then filling it in with slightly thinner icing. A toothpick or scribe tool helps smooth it out.
How long does the icing take to dry?
Royal icing usually takes about 8 hours to fully dry at room temperature. I let mine sit uncovered overnight before stacking or packaging.
Can I use buttercream instead of royal icing?
I can, but buttercream won’t set hard like royal icing. It’s best for cookies I plan to eat right away and not stack.
What if I don’t have pumpkin-shaped cookie cutters?
I’ve used round or oval cutters and added details with icing to mimic pumpkins—it still turns out adorable.
Conclusion
Pumpkin sugar cookies are one of my favorite fall traditions. They’re as fun to make as they are to eat, and the decorating possibilities are endless. Whether I keep them simple or go all out with detailed designs, they always bring a little autumn magic to the table.
This Street Corn Chicken Casserole captures everything I love about the vibrant flavors of Mexican street corn—roasted corn, creamy sauce, smoky spices, and tangy lime—blended into a hearty, satisfying bake with tender chicken and melted cheese. It’s a warm, comforting dish that brings a little fiesta to the dinner table any night of the week.
Why You’ll Love This Recipe
I love this recipe because it's packed with flavor, incredibly easy to throw together, and perfect for feeding a hungry family or a group of friends. The creamy texture and slight sweetness of the corn pairs beautifully with the spiced chicken and melty cheese. Plus, it reheats like a dream and makes delicious leftovers. It’s one of those comfort meals I keep coming back to—familiar yet exciting with every bite.
Ingredients
(Here's a tip: Check out the full list of ingredients and measurements in the recipe card below.)
Shredded cooked chicken
Frozen or canned corn (fire-roasted for best flavor)
Sour cream
Mayonnaise
Monterey Jack or Mexican blend cheese
Cream cheese
Fresh cilantro
Lime juice
Chili powder
Paprika
Garlic powder
Salt and pepper
Optional toppings: crumbled cotija, extra cilantro, jalapeños, or lime wedges
Directions
I preheat the oven to 375°F and grease a 9x13 baking dish.
In a large mixing bowl, I combine the shredded chicken, corn, sour cream, mayo, softened cream cheese, half of the shredded cheese, lime juice, and all the seasonings. I stir until everything’s well mixed and creamy.
I spread the mixture evenly into the prepared dish and top it with the remaining shredded cheese.
I bake it uncovered for about 25–30 minutes, until it’s bubbling and the cheese on top is melted and slightly golden.
I let it cool slightly before garnishing with fresh cilantro and any extra toppings I’m in the mood for.
Servings and timing
This casserole makes about 6 to 8 generous servings. Prep time: 15 minutes Cook time: 30 minutes Total time: 45 minutes
Variations
Spicy version: I like to add diced jalapeños or a few dashes of hot sauce for a kick.
Vegetarian option: I swap the chicken for black beans or sautéed zucchini for a meatless twist.
Low-carb version: I reduce the corn and add in riced cauliflower for a lighter take.
Add-ins: Sometimes I throw in green onions, red bell peppers, or a can of green chiles for more texture and flavor.
Storage/reheating
I store any leftovers in an airtight container in the fridge for up to 4 days. To reheat, I simply microwave individual portions for about 1-2 minutes, or bake in the oven at 350°F until warmed through. If freezing, I wrap it tightly and store for up to 2 months—just thaw overnight in the fridge before reheating.
FAQs
What kind of chicken works best for this casserole?
I usually use rotisserie chicken or leftover grilled chicken, but any cooked and shredded chicken works great.
Can I make this casserole ahead of time?
Yes, I often prepare it the night before and keep it covered in the fridge. When I’m ready to bake, I just take it out and pop it in the oven.
Can I use canned corn instead of frozen?
Absolutely. I drain the canned corn well, and I love using fire-roasted corn for a deeper flavor.
What cheese melts best in this recipe?
I prefer Monterey Jack or a Mexican blend because they melt smoothly and complement the other ingredients perfectly.
Can I double this recipe for a crowd?
Definitely. I just use a larger baking dish or two 9x13 pans and adjust the baking time slightly if needed.
Conclusion
This Street Corn Chicken Casserole is a flavor-packed, comforting, and incredibly satisfying dish I can count on any time I want something easy and delicious. Whether I'm making it for a casual weeknight dinner or prepping ahead for a potluck, it never disappoints. Creamy, cheesy, with just the right hint of spice—it’s everything I crave in one dish.
I love whisking together pantry staples to bake rich, fudgy brownies that outshine any boxed mix. These brownies come out dense, chocolaty, and satisfying with a crinkly top that’s just irresistible.
Why I’ll Love This Recipe
I find this recipe irresistibly simple and decadent—it turns out incredibly dense, intensely chocolaty, and delivers a homemade flavor that box mixes just can't match. I always have the ingredients on hand, so it’s a go-to when I need a quick, satisfying dessert.
Ingredients
(Here's a tip: Check out the full list of ingredients and measurements in the recipe card below.) I gather:
1 cup salted butter
2 cups granulated white sugar
4 large eggs
1 ¼ cups unsweetened cocoa powder
1 teaspoon salt
1 teaspoon baking powder
1 tablespoon pure vanilla extract
1 ½ cups all-purpose flour
1 cup chocolate chips
Directions
I follow these steps:
Preheat the oven to 350°F and line a 9×13-inch baking pan with parchment paper. I also lightly spray it to help with release.
In a small saucepan over medium-low heat, I melt the butter, then stir in the sugar for 1–2 minutes until mostly dissolved, making sure not to let it boil.
I transfer that warm mixture to a mixing bowl. In another bowl, I whisk together the eggs, cocoa powder, salt, baking powder, and vanilla using a hand mixer for about a minute.
I pour the egg mixture into the butter mixture and stir to combine. Then I fold in the flour and chocolate chips until everything is well blended.
I pour the batter into the prepared pan and bake for about 30 minutes, or until a toothpick inserted into the center comes out with a few moist crumbs.
I let the brownies cool in the pan, then lift them out using the parchment overhang and slice into squares.
Servings and Timing
This recipe makes about 15 brownies.
Prep Time: 15 minutes
Cook Time: 30 minutes
Total Time: 45 minutes
Variations
I’ve tried using black cocoa powder for a richer, darker chocolate flavor—it gives a bold twist. I also like adjusting the sugar by about ¼ cup when I want them slightly less sweet. If I’m feeling fancy, I add a handful of chopped nuts or swirl in some peanut butter before baking.
Storage / Reheating
I store these brownies at room temperature in an airtight container for up to 5 days. For longer storage, I wrap them individually and freeze them for up to 3 months. When I want one, I let it thaw at room temperature or warm it for a few seconds in the microwave.
FAQs
How can I make these brownies even fudgier?
I slightly underbake them by a minute or two and let them finish setting as they cool. This gives a rich, gooey center.
Can I use unsalted butter instead of salted?
Yes, I just add an extra ¼ teaspoon of salt to the batter to make up the difference.
What kind of chocolate chips work best?
I like using semi-sweet chips, but dark chocolate chips add extra richness if I want something more intense.
Can I cut the recipe in half?
Absolutely. I use an 8x8 or 9x9 pan and bake for about 25–27 minutes when halving the recipe.
How do I know when they’re done?
I check by inserting a toothpick into the center—if it comes out with moist crumbs but no wet batter, they’re perfect.
Conclusion
These better-than-box mix brownies are one of my all-time favorite treats. They’re simple, rich, and packed with chocolate flavor that’s miles ahead of anything from a package. Whether I’m baking for a party or just want something sweet at home, I know this recipe delivers every time.
I present a juicy grilled chicken marinated in a tropical blend of soy sauce, brown sugar, pineapple juice, and aromatic spices. The result is a sweet, savory, and caramelized dish that brings the aloha spirit straight to my barbecue.
Why I’ll Love This Recipe
I love how the tangy-sweet marinade seeps into each piece of chicken when I let it marinate for hours—especially overnight—so every bite bursts with flavor. The caramelized, glossy glaze I see on the grill reminds me of tropical sunsets, and grilling it makes me feel like I'm on the shores of Hawaii. It’s simple enough for a beginner yet impressive enough for gatherings.
ingredients
(Here's a tip: Check out the full list of ingredients and measurements in the recipe card below.) I gather:
Whole chicken, cut into pieces
Soy sauce
Brown sugar
Ketchup
Chicken broth
Rice vinegar
Pineapple juice
White wine or sherry
Grated ginger
Minced garlic
Sesame oil
Optional: Sriracha (or another hot sauce)
Ground black pepper
directions
I whisk together soy sauce, brown sugar, ketchup, chicken broth, rice vinegar, pineapple juice, white wine or sherry, grated ginger, minced garlic, sesame oil, Sriracha (if using), and black pepper until the sugar dissolves.
I reserve about 1 cup of the marinade for basting and set it aside.
I marinate the chicken pieces in the remaining mixture for at least 4 hours—better if overnight—for maximum depth of flavor.
I fire up the grill and cook the chicken, brushing it with the reserved marinade as it sizzles and caramelizes.
I cook the chicken until it’s beautifully charred, glossy, and cooked through.
I remove the chicken and let it rest for a few minutes to let the juices settle before serving.
Servings and timing
Servings: About 6 people
Prep time: 15 minutes
Cook time: 40 minutes
Rest time: 5 minutes
Total time: About 1 hour (plus marinating time of at least 4–6 hours, ideally overnight)
Variations
I sometimes use chicken thighs or drumsticks instead of a whole chicken—they stay juicy and are easier to grill.
I swap apple cider vinegar for rice vinegar when I want a sharper tang.
I add a touch of smoked paprika for depth or mirin instead of sherry for sweetness.
I bake the marinated chicken in the oven at 375 °F, then broil for a few minutes to caramelize the glaze when grilling isn’t an option.
storage/reheating
I let the cooked chicken cool before storing it in an airtight container in the fridge. It keeps well for 3–4 days. When reheating, I warm it gently in a low oven or on the stovetop to keep it moist. Cold leftovers are delicious too—I often slice them into salads or use them in sandwiches.
FAQs
What does "Huli Huli" mean?
“Huli” means “turn” in Hawaiian, and the dish got its name from being turned repeatedly on a spit while basting with sauce.
How long should I marinate the chicken?
I marinate it for at least 4 hours, but I prefer overnight because it gives the deepest flavor.
Can I use other cuts of chicken besides whole chicken pieces?
Yes, I often use thighs or drumsticks for their tenderness and ease of cooking.
Is there a non-grill cooking option?
I can bake the chicken in the oven and finish with a quick broil to achieve that caramelized finish.
How can I prevent the marinade from burning on the grill?
Since the marinade has sugar, I cook the chicken over medium heat and baste during the last part of grilling to avoid scorching.
Conclusion
I’ve created a flavorful and festive dish that brings my backyard right to the Hawaiian Islands. With its balanced sweet-savory marinade, glossy caramelized glaze, and tender, juicy chicken, this dish is as fun to make as it is to eat. Whether I grill it for a special occasion or make it a weeknight favorite, it promises tropical sunshine and savory delight in every bite.
I’m sharing a cozy, retro-inspired dish—those irresistibly sweet-and-savory meatballs made with frozen meatballs, grape jelly, and BBQ sauce, all slow-cooked into sticky perfection.
Why I’ll Love This Recipe
I love how this recipe turns just three pantry staples into a crowd-pleasing marvel with almost no effort. Dumping everything into the Crockpot means I can walk away and come back to tender meatballs cloaked in a rich, glossy sauce. It’s nostalgic, comforting, and always disappears fast—whether it’s for a laid-back dinner or a busy party table.
Ingredients
(Here's a tip: Check out the full list of ingredients and measurements in the recipe card below.) 1 (32 oz) bag frozen homestyle meatballs 1 cup barbecue sauce (I choose a smoky or bold style—avoiding ultra‑vinegary ones) 1 cup grape jelly (but I sometimes swap in raspberry, cherry, or even pineapple preserves) Optional flavor boosters: • 1 tablespoon soy sauce • 1 teaspoon garlic powder • ½ teaspoon chili flakes
Directions
Prep the Crockpot I lightly spray the inside with cooking oil—cleanup is so much easier! Then I dump in the frozen meatballs in an even layer.
Make the Sauce I whisk together the BBQ sauce and grape jelly (plus any optional add‑ins) until it's velvety and smooth.
Coat the Meatballs I pour that magical sauce over the meatballs and gently turn them to make sure each one gets coated.
Slow & Steady Cooking
I cook on LOW for 4–5 hours or HIGH for 2–3 hours.
I resist stirring or lifting the lid too often so the heat stays cozy and the sauce thickens.
If the sauce seems too runny near the end, I uncover and cook on HIGH for an extra 20 minutes.
Servings and timing
This makes a generous 8 servings. Prep is about 10 minutes, then I let the Crockpot work its magic. Low heat cooking takes around 4–5 hours; high heat runs about 2–3 hours.
Variations
• Spicy Dragon Breath: I stir in 2 tablespoon sriracha or 1 minced chipotle for a fiery edge. • Island Vacation: I swap the grape jelly for pineapple preserves and toss in ¼ cup crushed pineapple for tropical vibes. • Berry Bliss: I use raspberry or blackberry jelly instead—visible and flavorful twist. • From‑Scratch Meatballs: I brown 1 lb of homemade meatballs first, then drop them in (adding ¼ cup broth or water since they’re not frozen). • Instant Pot Express: I combine sauce and meatballs in the Instant Pot, cook on high pressure for 5 minutes, release quickly, and sauté to thicken if needed.
Storage/reheating
I let leftovers cool completely, then refrigerate for up to 3 days or freeze for up to 3 months. To reheat, I slide them back into the Crockpot on LOW, adding a little water if needed to loosen the sauce.
FAQs
Can I use homemade meatballs?
Absolutely—if I’m using homemade, I brown them first for extra flavor, and add about ¼ cup of broth or water since they aren’t frozen. I usually check doneness around 3 hours on LOW.
What if my sauce is too thin or too thick?
If it’s too thin, I uncover and crank the heat to HIGH, stirring occasionally for 20–30 minutes, or whisk in a slurry (1 tablespoon cornstarch + 2 tablespoon cold water). If it’s too thick, I stir in a splash of apple juice, broth, or water until it reaches my desired texture.
Can I make these ahead of time?
Yes—after cooking, I cool them, refrigerate for up to 3 days, or freeze. When I’m ready to serve, I gently reheat them low and slow in the Crockpot, maybe with a bit of added liquid.
My BBQ sauce is super sweet—is that a problem?
I avoid overly sweet versions by choosing smoky or bold BBQ sauce. If it’s still too sweet, I add 1 tbsp apple cider vinegar or lemon juice, or sprinkle in chili flakes to balance the flavors.
Can I customize the jelly?
Definitely—I’ve used raspberry, cherry, or even tropical preserves like pineapple, depending on what I have. Reduced‑sugar options work, too, though the sauce may be a bit thinner.
Conclusion
I adore how this recipe transforms just three ingredients into something deeply comforting and nostalgic—with minimal effort. It’s that magical “Wait, grape jelly?!” moment that always steals the show. Whether it’s for a relaxed weeknight dinner or a big gathering, this recipe feels like a hug in food form. May my Crockpot be busy, my meatballs saucy, and my life deliciously effortless.
I’m absolutely smitten with these Pistachio Dream Cookie Bars. They blend a lightly buttery sugar cookie base with the irresistible nutty richness of pistachio pudding mix, resulting in soft, chewy bars that are delightfully sweet and surprisingly simple to make.
Why I’ll Love This Recipe
I really love how this recipe brings together just a handful of familiar ingredients for a dessert that tastes far fancier than it is. The pistachio pudding mix infuses the cookie dough with a creamy, nutty flavor and keeps the texture wonderfully soft. It’s ideal for whipping up for a gathering, indulging in during a cozy night in, or just satisfying a pistachio craving without a ton of fuss.
ingredients
(Here’s a tip: Check out the full list of ingredients and measurements in the recipe card below.) ½ cup unsalted butter, softened 2 large eggs 3.4 oz pistachio instant pudding mix 1 package sugar cookie mix
directions
I preheat the oven to 375 °F.
I cream together the softened butter, eggs, and pistachio pudding mix in a large bowl until it's smooth and creamy.
I gradually stir in the sugar cookie mix until a sticky dough forms.
I grease a 10 × 15‑inch baking sheet and press the dough evenly to the edges.
I bake in the preheated oven for about 18–22 minutes, until the edges are just lightly golden.
I let the pan cool completely before slicing into bars.
Servings and timing
Servings: I usually get about 16–20 cookie bars, depending on how I slice them.
Prep Time: Roughly 10 minutes
Baking Time: About 18–22 minutes
Total Time: Around 30–35 minutes from start to finish
Variations
Nutty Topping: I like sprinkling chopped pistachios—or even almonds or walnuts—on top before baking for extra crunch.
Chocolate-Chip Twist: I sometimes fold in chocolate chips into the dough to balance the pistachio flavor with a touch of chocolate.
Gluten-Free Version: I swap in a gluten-free sugar cookie mix to make the bars suitable for those with gluten sensitivities.
Frosted Option: I top the cooled bars with cream cheese frosting or a light glaze when I’m craving something even sweeter.
storage/reheating
Storage: I store the cookie bars in an airtight container at room temperature for 3–4 days. If I want them to last longer, I refrigerate them, and they stay fresh for about a week.
Freezing: I wrap bars individually or in small batches with plastic wrap or foil, pop them into a freezer-safe container, and they stay great for up to 3 months.
Reheating: I rewarm a bar in the microwave for about 15–20 seconds, or pop it in a 300 °F oven for 5–7 minutes when I want that just-baked warmth.
FAQs
1. Can I use a different flavor of pudding mix for this recipe?
Absolutely—I’ve tried vanilla and chocolate pudding mixes, and they work beautifully too.
2. How do I know when the cookie bars are done baking?
I look for lightly golden edges and test with a toothpick—it should come out clean or with just a few crumbs attached.
3. Can I make this recipe without eggs?
Yes, I’ve used flax eggs (1 tablespoon ground flaxseed + 3 tablespoon water per egg) as a vegan substitute with good results.
4. What can I use instead of a sugar cookie mix?
I sometimes use my own sugar cookie dough made from butter, sugar, flour, and baking soda—it works just as well.
5. How thick should I spread the cookie dough in the pan?
I spread it evenly to fill the pan completely—remember it will rise a bit during baking, so covering the pan ensures even results.
Conclusion
I find these Pistachio Dream Cookie Bars to be an effortlessly delicious dessert that combines simplicity with rich, nutty flavor. Whether I’m bringing them to a potluck or enjoying a warm square myself, they always feel like an indulgence. Minimal ingredients, minimal effort, maximum delight—I’m hooked!
I introduce this Street Corn Dip as a vibrant, creamy, and tangy appetizer inspired by Mexican elote, blending smoky roasted corn with cheesy, zesty flavors that are ideal for game days, family gatherings, or casual snacking.
Why You’ll Love This Recipe
I love how it balances familiar pantry staples with bold, smoky chili and paprika notes. It works hot or cold, comes together quickly, and feels both comforting and exciting. It’s a versatile, crowd‑pleasing dip I can serve with chips, crackers, or veggies — and I can customize the heat and cheese to my guests' preferences.
ingredients
(Here's a tip: Check out the full list of ingredients and measurements in the recipe card below.)
3 cups corn kernels (fresh, frozen, or canned)
1 cup mayonnaise
1 cup sour cream
1 cup crumbled cotija or feta cheese
½ cup shredded cheddar or Monterey Jack cheese
1 tablespoon lime juice
1 teaspoon chili powder
1 teaspoon smoked paprika
½ teaspoon garlic powder
½ teaspoon cumin
Salt and pepper to taste
Garnishes: fresh cilantro (chopped), optional jalapeño slices, extra cotija cheese, sprinkle of chili powder or Tajín
directions
I start by roasting the corn: I heat a cast‑iron skillet (or grill pan) over medium‑high, add the corn kernels (if fresh, cut from the cob), and roast for 5–7 minutes, stirring occasionally, until the kernels are golden and charred. (Skip this if using canned corn.)
In a mixing bowl, I combine mayonnaise, sour cream, crumbled cotija (or feta), shredded cheddar (or Monterey Jack), lime juice, chili powder, smoked paprika, garlic powder, cumin, salt, and pepper until smooth and well‑blended.
I fold in the roasted (or canned) corn.
I transfer everything to a serving dish and garnish with chopped cilantro, optional jalapeño slices, extra cotija, and a dusting of chili powder or Tajín.
I serve it warm or chilled — both are delicious options.
Servings and timing
The recipe yields about 6 servings.
Prep time: around 10 minutes, including roasting.
Total time: approximately 15–20 minutes.
Variations
I can switch up cheeses — feta instead of cotija, or use only cheddar/Monterey Jack for milder flavors. I might swap smoked paprika or chili powder for Tajín to give it a zesty lime‑chili twist. For extra heat, I’ll add diced jalapeños or chili flakes. If I want it lighter, I’ll use Greek yogurt instead of sour cream, or reduce the mayo a bit.
storage/reheating
I store leftovers in an airtight container in the fridge. If I serve it cold, I keep it chilled; if it was served warm, I gently reheat on low in a skillet or microwave until just warmed through. It keeps well for about 3–4 days.
FAQs
Can I make this dip ahead of time?
I can! I usually prepare it a few hours in advance and refrigerate. If serving cold, I keep it chilled; if hot, I’ll reheat gently before guests arrive.
Can I use canned or frozen corn instead of fresh?
Absolutely—I’ve used all three. Fresh gives the best texture, but frozen (thawed) or canned corn work fine. If using canned, I’ll drain and skip roasting. If using frozen, I thaw and roast or sauté for more flavor.
What can I substitute for cotija cheese?
I often use feta if I don’t have cotija — both bring a salty, tangy element. I’ve also seen recipes swap in Parmesan or omit it entirely if needed.
Is it better served hot or cold?
I personally love it warmed up—so cheesy and melty—but it’s also delicious cold or at room temperature, especially when the flavors meld after chilling.
How spicy is it? Can I adjust the heat?
The spice level is moderate — chili powder and smoked paprika add warmth, but it's not fiery. I control the heat easily: omit the chili powder for milder, or add jalapeño, Tajín, or cayenne for a kick.
Conclusion
I find this Street Corn Dip recipe endlessly adaptable, bursting with smoky, tangy, cheesy flavors that guests love. I can whip it up quickly, make it ahead, and tailor it to any taste or occasion. Whether I'm serving it warm and gooey or cool and refreshing, it’s always a hit.
Pumpkin Cinnamon Roll Muffins are the perfect cross between a soft cinnamon roll and a cozy pumpkin muffin. Each bite is packed with fall flavors, swirled with cinnamon sugar, and topped with a creamy glaze that makes them truly irresistible. These muffins are perfect for breakfast, brunch, or an afternoon treat with a cup of coffee or tea.
Why You’ll Love This Recipe
I love how these muffins bring together the best parts of two classic treats: pumpkin spice and cinnamon rolls. The texture is moist and tender, thanks to the pumpkin purée, and the warm spices make them taste like autumn in every bite. The cinnamon sugar swirl adds a beautiful marbled look and a burst of sweet spice. Plus, they’re easier to make than traditional cinnamon rolls—no yeast or waiting for dough to rise!
Ingredients
(Here's a tip: Check out the full list of ingredients and measurements in the recipe card below.)
All-purpose flour
Baking powder
Baking soda
Salt
Pumpkin pie spice
Ground cinnamon
Granulated sugar
Brown sugar
Pumpkin purée
Eggs
Milk
Vegetable oil or melted butter
Vanilla extract
Powdered sugar (for the glaze)
Milk or cream (for the glaze)
Directions
I start by preheating the oven to 350°F (175°C) and lining a muffin tin with paper liners or lightly greasing it.
In a large bowl, I whisk together the dry ingredients: flour, baking powder, baking soda, salt, pumpkin pie spice, and ground cinnamon.
In a separate bowl, I mix the wet ingredients: pumpkin purée, eggs, milk, oil (or butter), and vanilla extract until smooth.
I combine the wet and dry ingredients, stirring just until combined. I make sure not to overmix so the muffins stay tender.
In a small bowl, I mix brown sugar and cinnamon for the swirl.
I spoon a layer of muffin batter into each muffin cup, sprinkle with a bit of the cinnamon sugar mixture, and repeat with more batter and sugar until the cups are about ¾ full. I swirl the tops with a toothpick for a marbled effect.
I bake the muffins for 18–22 minutes, or until a toothpick inserted into the center comes out clean.
While the muffins cool, I whisk together powdered sugar and milk (or cream) to make the glaze, then drizzle it over the cooled muffins.
Servings and timing
This recipe makes about 12 muffins. They take approximately 10 minutes to prepare and 20 minutes to bake, so I usually have them ready to enjoy in around 30 minutes total.
Variations
I sometimes add chopped pecans or walnuts to the batter for extra crunch.
A handful of mini chocolate chips gives a sweet twist that pairs well with the pumpkin and cinnamon.
For a richer glaze, I use cream cheese mixed with powdered sugar and vanilla.
I swap the pumpkin pie spice with just cinnamon if I want a more classic cinnamon roll flavor.
Storage/Reheating
I store these muffins in an airtight container at room temperature for up to 2 days, or in the refrigerator for up to 5 days. To reheat, I pop them in the microwave for about 10–15 seconds to bring back that fresh-baked warmth and soften the glaze.
FAQs
How do I keep the muffins moist?
Using pumpkin purée keeps them naturally moist. I also avoid overbaking and store them in an airtight container to maintain freshness.
Can I freeze these muffins?
Yes, I freeze them (without glaze) for up to 2 months. I just thaw them at room temperature and glaze them fresh before serving.
Can I use homemade pumpkin purée?
Absolutely. I’ve made these muffins with homemade purée and they turn out just as delicious. I just make sure it’s thick and not too watery.
Do I need a stand mixer?
No, I make this recipe using just bowls and a whisk. It’s super simple and doesn’t require special equipment.
Can I make these muffins gluten-free?
Yes, I use a 1:1 gluten-free flour blend in place of all-purpose flour and they turn out well. Just make sure the baking powder is gluten-free too.
Conclusion
Pumpkin Cinnamon Roll Muffins are one of my favorite fall bakes because they’re easy, cozy, and full of flavor. Whether I’m making them for a weekend breakfast or a seasonal get-together, they’re always a hit. The soft pumpkin muffin base and sweet cinnamon swirl are simply irresistible—and that glaze on top brings everything together beautifully.
This Hamburger Green Bean Casserole is a cozy, hearty, and satisfying dish that’s perfect for busy weeknights or potluck gatherings. Ground beef, tender green beans, and creamy soup come together under a layer of crispy fried onions to create a classic comfort food with just the right touch of nostalgia. It’s a one-dish wonder that’s incredibly easy to prepare and sure to please everyone at the table.
Why You’ll Love This Recipe
I love how quick and simple this casserole is—just a few staple ingredients and I’ve got dinner in the oven in under 15 minutes. The ground beef adds protein and heartiness, while the green beans bring freshness and a pop of color. It’s the perfect blend of creamy, crunchy, and savory. Whether I'm serving it fresh from the oven or reheating leftovers the next day, this dish never disappoints.
Ingredients
(Here's a tip: Check out the full list of ingredients and measurements in the recipe card below.)
Ground beef
Canned or frozen green beans
Cream of mushroom soup
Milk
Salt and pepper
Garlic powder (optional)
Cheddar cheese (optional, for extra richness)
Crispy fried onions
Directions
I start by browning the ground beef in a skillet over medium heat, breaking it apart until it's fully cooked and no longer pink. I season it with salt, pepper, and garlic powder for more flavor.
While the beef is cooking, I preheat the oven to 350°F (175°C).
Once the beef is ready, I drain any excess grease and stir in the cream of mushroom soup and milk, mixing until everything is well combined.
Then, I fold in the green beans—either canned (drained) or thawed frozen ones—until evenly coated.
I pour the mixture into a greased casserole dish and spread it out evenly.
If I’m using cheese, I sprinkle it on top before baking.
I bake the casserole uncovered for about 25–30 minutes, then top it with crispy fried onions and return it to the oven for another 5–10 minutes until golden and bubbly.
I let it cool slightly before serving to allow everything to set.
Servings and timing
This recipe typically serves 6 and takes about 10 minutes of prep time, with a total cook time of 35–40 minutes. It’s perfect for a family dinner or for meal prepping a few days in advance.
Variations
I sometimes swap the cream of mushroom soup with cream of chicken or cream of celery for a different flavor.
For extra veggies, I add corn or diced carrots to the mix.
When I want a low-carb version, I use fresh green beans and skip the fried onion topping, replacing it with a sprinkle of parmesan.
To make it spicier, I add chopped jalapeños or a dash of cayenne pepper to the beef mixture.
Storage/Reheating
I store leftovers in an airtight container in the fridge for up to 4 days. When reheating, I either microwave individual portions or warm the casserole in a 350°F oven until heated through—usually about 15 minutes. If I want to restore the crispiness of the fried onions, I add a fresh layer before reheating in the oven.
FAQs
What type of green beans work best for this casserole?
I like using canned green beans for convenience, but frozen or even fresh green beans (lightly steamed first) work great if I want a firmer texture.
Can I make this casserole ahead of time?
Absolutely. I often assemble the casserole a day ahead, cover it tightly, and refrigerate it. When I’m ready to bake, I just add a few extra minutes to the cook time.
Do I have to use cream of mushroom soup?
No, I’ve made this recipe with cream of chicken and even cream of celery soup, and it turns out just as creamy and delicious.
How can I make this casserole gluten-free?
To make it gluten-free, I use a gluten-free cream soup and either skip the crispy onions or use a certified gluten-free version.
Can I freeze Hamburger Green Bean Casserole?
Yes, I’ve frozen it successfully. I let the cooked casserole cool completely, then wrap it tightly and freeze for up to 2 months. I thaw it overnight in the fridge before reheating.
Conclusion
Hamburger Green Bean Casserole is one of those timeless dishes I keep coming back to. It’s simple, satisfying, and endlessly customizable. Whether I’m cooking for the family or prepping meals ahead of a busy week, it always delivers comfort and flavor with minimal effort.
I bring together tender shredded chicken, creamy cheese, hearty beans, and tangy buffalo sauce in this slow-cooked chili that's bursting with bold flavor.
Why I’ll Love This Recipe
I love this recipe because the tangy heat of buffalo sauce pairs perfectly with creamy textures. It’s incredibly easy—everything goes into the crockpot, and it does the work while I tackle my day. Plus, it's ideal for game-day gatherings or cozy dinners.
Ingredients
(Here’s a tip: Check out the full list of ingredients and measurements in the recipe card below.)
I place the cubed butter at the bottom of the crockpot, then add the chicken breasts on top.
Next, I pour in the buffalo sauce, chicken broth, diced onion, fire-roasted tomatoes, corn, white beans, and seasonings (garlic powder, cumin, dill, oregano, paprika, salt, and pepper).
I stir everything to combine, cover the crockpot, and cook on low for 5–6 hours or high for 3–4 hours.
Once the chicken is cooked, I remove and shred it.
I add the shredded chicken and cream cheese back into the crockpot, cooking for another 8–10 minutes until the cream cheese has melted into the chili.
I serve it hot, with my favorite toppings if I want to enhance flavor and texture.
Servings and timing
Servings: 6 people
Prep time: 10 minutes
Cook time: about 6 hours on low (or 3–4 hours on high)
Total time: approximately 6 hours 10 minutes
Variations
I can customize this chili in several ways:
To tone down the heat, I reduce the buffalo sauce and add extra chicken broth.
I love topping it with green onions, blue cheese crumbles, sour cream, cilantro, tortilla chips, avocado, or a squeeze of lime for extra brightness.
If I don’t have a crockpot, I make it on the stovetop over medium-low heat—just stirring occasionally to prevent sticking.
Storage/reheating
Refrigerate: I store leftovers in an airtight container in the fridge for up to 4 days.
Freeze: It keeps well in a freezer-safe container for up to 3 months.
Reheat: If refrigerated, I reheat on the stovetop. If frozen, I thaw it in the fridge overnight, then heat it on the stove until warmed through.
FAQs
What if I don’t have fire-roasted tomatoes?
I use regular diced tomatoes instead—they still add flavor, though I might increase the paprika or cumin for a smoky touch.
Can I use chicken thighs instead of breasts?
Yes—I use thighs when I want juicier, richer meat. I adjust the cooking time slightly if needed.
How do I make it less spicy?
I dial back the buffalo sauce and balance it with extra chicken broth. The cream cheese also helps mellow the heat.
Can I prep this the night before?
Absolutely—I layer the ingredients in the crockpot the night before, store it in the fridge, then cook it the next day.
What are good toppings to serve with this chili?
I love green onions, blue cheese crumbles, sour cream, cilantro, tortilla chips, and avocado—maybe a lime wedge for zing.
Conclusion
I adore this Crockpot Buffalo Chicken Chili because it’s flavorful, effortless, and perfect for feeding friends, family, or just me on a busy day. Its creamy, tangy heat is customizable, and it stores well for easy reheating. I can’t wait to make it for my next game-day spread or cozy dinner night in.
This Chicken Spaghetti recipe brings together creamy, cheesy comfort with just the right touch of spice. It’s one of those cozy, family-style dishes that feels like a warm hug on a busy night—and it only takes about 30 minutes from start to finish.
Why I’ll Love This Recipe
I love how easy this recipe is to throw together, especially when I already have some cooked chicken on hand. The combination of tender spaghetti, savory cream of chicken soup, and flavorful Rotel tomatoes makes the sauce irresistibly creamy with a mild kick. It’s the kind of dish that pleases picky eaters, makes great leftovers, and still manages to taste like something special.
ingredients
(Here's a tip: Check out the full list of ingredients and measurements in the recipe card below.)
10 ounces spaghetti
1 tablespoon olive oil
1 small onion, diced
2 cloves garlic, minced
1 medium green pepper, diced
1 cup chicken broth
1 (10.5-ounce) can cream of chicken soup
1 (10-ounce) can Rotel tomatoes (diced tomatoes with green chiles)
1 cup cheddar cheese
1 cup mozzarella cheese
2 cups cooked chicken breast, chopped
Salt and pepper, to taste
directions
I cook the spaghetti according to the package directions, then drain and set it aside.
In a large skillet, I heat the olive oil over medium heat and sauté the onion, garlic, and green pepper until softened—about 5 to 6 minutes.
I pour in the chicken broth, cream of chicken soup, and Rotel tomatoes (with their juice). I bring everything to a boil, then lower the heat and let it simmer for about 2 to 3 minutes.
I stir in the cheddar and mozzarella cheeses until melted and creamy, then add the chopped chicken. I season the mixture with salt and pepper to taste.
I remove the skillet from the heat and toss in the cooked spaghetti, stirring until everything is coated evenly in the sauce.
Servings and timing
Servings: 4
Prep time: 20 minutes
Cook time: 10 minutes
Total time: 30 minutes
Variations
I like to mix things up with these simple twists:
I use plain diced tomatoes instead of Rotel when I want less heat.
Sometimes I swap cheddar for pepper jack for extra spice.
I’ve tried this with penne or rotini pasta, which hold the sauce nicely.
For a baked version, I transfer everything to a casserole dish, sprinkle extra cheese on top, and bake until bubbly.
I toss in extra vegetables like mushrooms or spinach to boost the nutrition.
storage/reheating
I store leftovers in an airtight container in the fridge for up to 3 days. To reheat, I use the stovetop over low heat or the microwave in short bursts, adding a splash of broth or milk if the pasta needs loosening up. The cheese sauce melts right back into creamy goodness.
FAQs
How can I reduce the spice level?
I replace the Rotel with regular canned diced tomatoes to tone down the heat without losing flavor.
Can I use rotisserie chicken?
Yes, I often use shredded rotisserie chicken when I’m short on time—it makes the whole recipe even faster.
Can I freeze this dish?
I don’t recommend freezing it since the cheese sauce can separate, but it does keep well in the fridge for a few days.
Can I make this ahead?
Yes, I can prepare the whole dish, then refrigerate it before reheating. I also sometimes make just the sauce and cook the pasta fresh when it’s time to eat.
What can I serve with this?
I like to serve it with a simple green salad or garlic bread to balance out the creamy richness of the pasta.
Conclusion
This Chicken Spaghetti is one of my favorite go-to comfort meals. It’s quick, hearty, and flexible enough to suit whatever I’ve got in the fridge. Whether I’m feeding family or just looking for an easy dinner with plenty of leftovers, this recipe always delivers.
Cool Whip Pineapple Fluff is a quick, no-bake dessert that’s light, creamy, and bursting with tropical flavor. Made with just a few simple ingredients, it comes together effortlessly and is perfect for potlucks, BBQs, holidays, or a sweet weeknight treat. The sweet pineapple and fluffy whipped topping make a refreshing combo everyone seems to love.
Why I Love This Recipe
I love how easy this Cool Whip Pineapple Fluff is to throw together—no oven, no stress. It takes just a few minutes to mix everything in one bowl, and then I let the fridge do the rest. The creamy texture paired with sweet pineapple and mini marshmallows is always a hit with family and guests. I also enjoy that I can make it ahead of time, which makes hosting even easier. It’s one of those nostalgic desserts that brings comfort and a touch of sunshine to the table.
Ingredients
(Here's a tip: Check out the full list of ingredients and measurements in the recipe card below.)
Crushed pineapple (with juice)
Instant vanilla pudding mix
Cool Whip (thawed)
Mini marshmallows
Chopped pecans or walnuts (optional)
Shredded coconut (optional)
Directions
In a large mixing bowl, I combine the entire can of crushed pineapple with its juice and the instant vanilla pudding mix. I stir until everything is well blended and the mixture starts to thicken.
I gently fold in the Cool Whip until fully incorporated, creating a smooth, fluffy texture.
Next, I add the mini marshmallows and stir them in evenly.
If I’m using nuts or coconut, I fold those in last for some extra texture and flavor.
I refrigerate the mixture for at least 1 hour before serving so it firms up and all the flavors meld together.
Servings and timing
This recipe makes about 6 to 8 servings. It takes only 10 minutes to prepare, and I like to chill it for at least 1 hour before serving. For best results, I make it 2 to 3 hours ahead of time.
Variations
I sometimes swap vanilla pudding with cheesecake-flavored pudding for a richer taste.
If I want a slightly tangier flavor, I add a small can of drained mandarin oranges.
For a fun twist, I mix in maraschino cherries (halved) for both color and flavor.
I’ve also tried using flavored mini marshmallows for an extra pop of sweetness.
If I'm serving a crowd, I double the recipe easily and layer it into a trifle dish for presentation.
Storage/Reheating
I store the Cool Whip Pineapple Fluff in an airtight container in the refrigerator for up to 3 days. I never freeze it, as the texture changes too much and becomes watery. It’s a dish best served chilled and fresh. Reheating isn’t necessary since it’s meant to be served cold.
FAQs
How far in advance can I make Cool Whip Pineapple Fluff?
I usually make it up to 24 hours in advance. The longer it chills, the better the flavors come together, but I try not to exceed 2 days for the best texture.
Can I use homemade whipped cream instead of Cool Whip?
Yes, I can substitute homemade whipped cream, but I make sure it’s stabilized so the fluff holds its shape after chilling.
What if my fluff is too runny?
If it’s too runny, it might be because the pudding didn’t have enough time to set. I always double-check that I used the right pudding mix and allowed enough chilling time.
Is this recipe gluten-free?
Most of the ingredients are gluten-free, but I always check the labels—especially on the pudding mix and marshmallows—to make sure.
Can I leave out the marshmallows?
Yes, I can leave them out or reduce the amount. They add sweetness and texture, but the dessert will still be delicious without them.
Conclusion
Cool Whip Pineapple Fluff is my go-to for a light, creamy, and tropical dessert that requires minimal effort and delivers big flavor. I love how flexible it is, and it always disappears fast at any gathering. Whether I’m making it for a potluck or just craving something sweet, this recipe never fails to hit the spot.
I love how this Cracker Barrel–style meatloaf turns out flavorful and juicy, just like the restaurant’s version. It’s topped with a sweet and tangy glaze that really makes it shine and makes comfort food night a cinch!
Why I’ll Love This Recipe
I’m hooked on this recipe because it’s easy to make, packs all the comforting flavors of Cracker Barrel’s legendary meatloaf, and even better—it reheats beautifully as leftovers. It’s become a favorite in my family rotation for good reason!
ingredients
(Here's a tip: Check out the full list of ingredients and measurements in the recipe card below.)
Meatloaf ingredients
1 ½ lb ground beef (80/20)
3 large eggs, beaten
1 cup crushed Ritz crackers (about 1½ sleeves)
1 small yellow onion, finely diced
½ green bell pepper, finely diced (optional: red bell pepper)
3 cups fresh shredded cheddar cheese
1 teaspoon ground oregano
1 teaspoon ground thyme
1 teaspoon garlic powder
2 tablespoon fresh parsley, finely chopped
½ cup whole milk
1 tablespoon Worcestershire sauce
½ teaspoon salt
⅛ teaspoon ground black pepper
Topping ingredients
½ cup ketchup
½ cup light brown sugar, packed
1 teaspoon yellow mustard
1 teaspoon apple cider vinegar
directions
Preheat oven to 350 °F.
In a large bowl, add the ground beef and break it into large crumbs with a spoon.
Mix in the rest of the meatloaf ingredients until just combined—I use my hands for the best mix.
Line a baking dish with foil, grease it, then shape the meat mixture into a loaf in the dish. (Alternatively, I sometimes use a 9×5-inch loaf pan.)
Bake for 30 minutes.
While it bakes, mix all the topping ingredients in a small bowl.
Spread the topping over the partially baked loaf and return it to the oven for another 20–30 minutes, until the top is golden and the internal temperature hits 160 °F.
Let the meatloaf rest for 10 minutes before slicing and serving.
Servings and timing
This recipe makes 8 hearty servings and takes about 1 hour and 10 minutes in total—20 minutes for prep and around 50 minutes of cook time.
Variations
I like playing around with this meatloaf depending on what I have on hand or what flavors I’m in the mood for:
Swap ground turkey or chicken for the beef for a lighter take.
Use different types of crushed crackers, breadcrumbs, or day-old bread instead of Ritz.
If I’m out of ingredients for the glaze, I use plain ketchup or barbecue sauce instead.
Changing up the cheese works great too—cheddar is my go-to, but pepper jack or mozzarella adds a twist.
storage/reheating
I store leftover slices in an airtight container in the fridge for up to 3–4 days. For reheating, I prefer using the oven at 300 °F for about 10–15 minutes, but the microwave works fine if I’m short on time. The meatloaf stays moist and flavorful.
FAQs
What if I only have pre-shredded cheese?
Pre-shredded cheese doesn’t melt as smoothly and tends to dry things out. If I use it, I add an extra egg to help keep the texture moist.
Can I use leaner ground beef?
Yes, but I’ve noticed leaner meat can make the loaf a bit dry. I usually stick with 80/20 ground beef for the best balance of flavor and juiciness.
Should I cover the meatloaf while baking?
I don’t usually cover it. I like letting the glaze caramelize on top during the final baking stage. If needed, I cover it loosely for the first half and uncover later.
Why does my meatloaf fall apart?
It often comes down to not enough binder (like eggs or crackers) or overmixing. I try to mix just enough to hold everything together without compacting it too much.
What's the ideal internal temperature?
I always use a meat thermometer to check for 160 °F in the center. That way I know it’s safe to eat and still nice and juicy.
Conclusion
This Cracker Barrel copycat meatloaf is the kind of meal I keep coming back to. It’s hearty, comforting, and so easy to customize. Whether I serve it with mashed potatoes or roasted veggies, it always hits the spot and brings that nostalgic, home-cooked flavor to my table.
Hillbilly Pie, often called Poor Man’s Pie, is a charming old-fashioned dessert made from the most basic pantry staples. It’s the kind of recipe that generations have passed down—simple, satisfying, and full of heart. A soft, buttery base forms beneath a bubbling layer of sweet fruit, creating a rustic pie that brings comfort in every bite.
Why You’ll Love This Recipe
I love how this recipe delivers big flavor with minimal effort. It only takes one bowl, a few common ingredients, and about an hour to make. I don’t need any special equipment or prep—just mix, pour, bake, and enjoy. It’s flexible enough for any canned fruit I have on hand, and every time I make it, the warm aroma fills the kitchen and makes the house feel like home.
ingredients
(Here's a tip: Check out the full list of ingredients and measurements in the recipe card below.)
½ cup (1 stick) unsalted butter
1 cup self-rising flour
1 cup granulated sugar
1 cup milk
1 (12-ounce) can fruit pie filling (cherry, apple, peach, blueberry, etc.)
If I don’t have self-rising flour, I use 1 cup all-purpose flour plus 1½ teaspoons baking powder and ¼ teaspoon salt.
directions
I preheat the oven to 350°F and lightly grease a 9-inch pie or baking dish.
In a mixing bowl, I cream the butter and sugar together until fluffy.
I mix in the flour gradually until fully combined.
I slowly pour in the milk, stirring to form a smooth batter.
I pour the batter into the prepared dish and spoon the fruit pie filling over the top—without stirring it in.
I bake it for 45 to 50 minutes, until the top is golden and the fruit is bubbling through.
I let it cool slightly before serving so the layers settle.
Servings and timing
This recipe makes about 6 servings. Prep takes 10 minutes, and the bake time is 45 to 50 minutes. I usually let it cool for at least 10 to 15 minutes before slicing and serving.
Variations
I sometimes use fresh fruit instead of canned—just cook it down a bit with sugar and cornstarch first.
A sprinkle of cinnamon or nutmeg in the batter adds a cozy touch, especially with apple or peach filling.
I’ve added chopped pecans or walnuts on top before baking for added texture.
If I want it less sweet, I reduce the sugar to ¾ cup.
storage/reheating
I store leftover pie in the fridge for up to 3 days, covered tightly with plastic wrap or foil. When I want to reheat it, I use the microwave for about 20–30 seconds or place it in a 300°F oven for 10 minutes. It also tastes great cold straight from the fridge. I’ve frozen it before—wrapped well—and it keeps for up to 2 months. I thaw it overnight in the fridge and warm it up gently before serving.
FAQs
What is Hillbilly Pie made of?
It’s made with basic ingredients like flour, sugar, butter, milk, and canned fruit pie filling. Everything bakes into a soft, cake-like base with sweet fruit bubbling on top.
Do I need to stir the fruit filling into the batter?
No. I spoon it on top of the batter and let it sink in naturally as it bakes. That gives the pie its signature layered look and texture.
Can I double the recipe?
Yes, I double it in a 9x13-inch baking dish and bake it for about 5–10 minutes longer. It comes out perfectly and feeds more people.
Can I use fresh fruit instead of canned?
I can! I cook fresh fruit with a little sugar and cornstarch until it thickens, then use it just like canned filling.
Can I make it ahead of time?
Yes. I often make it earlier in the day and either serve it room temperature or reheat it before serving. It holds up well and still tastes amazing.
Conclusion
Hillbilly Pie is one of those desserts that proves you don’t need a lot of fancy ingredients to make something special. It’s warm, nostalgic, and endlessly comforting. I love how easy it is to throw together, and it’s always a hit whether I’m sharing it with family or enjoying a quiet evening treat. This is the kind of pie that never goes out of style.
I’m sharing a recipe that delivers super fudgy, intensely chocolatey cupcakes in just one bowl—with minimal cleanup and no mixer required. They’re moist, rich, and topped with a dreamy chocolate buttercream that melts in my mouth.
Why I’ll Love This Recipe
I love that I can whip up these cupcakes in one bowl using pantry staples. The result is a deep chocolate flavor with a spongey, fudgy texture that makes every bite a little celebration. Plus, the simplicity gives me more time to savor rather than fuss.
ingredients
(Here’s a tip: Check out the full list of ingredients and measurements in the recipe card below.)
1 large egg
½ cup buttermilk
½ cup vegetable oil
1½ teaspoons pure vanilla extract
1 cup all-purpose flour
½ cup granulated sugar
½ cup light brown sugar, packed
⅓ cup unsweetened cocoa powder
1 teaspoon baking soda
½ teaspoon salt
½ cup hot water
directions
Preheat the oven to 350 °F and line a cupcake or muffin pan with liners.
In a medium bowl, whisk together the egg, buttermilk, oil, and vanilla.
In a separate large bowl, mix the flour, granulated sugar, brown sugar, cocoa powder, baking soda, and salt.
Add the dry ingredients to the wet mix in batches, whisking until just combined.
Stir in the hot water until the batter is smooth and somewhat thin—this is expected.
Fill the liners only about halfway to allow room for rising.
Bake for 15–20 minutes or until a toothpick comes out with a few moist crumbs.
Let the cupcakes cool completely before frosting.
Servings and timing
Servings: Makes about 16 cupcakes
Prep time: 12 minutes
Cook time: 15–20 minutes
Total time: 27–32 minutes
Variations
I sometimes swap the hot water for hot coffee to deepen the chocolate flavor—it gives a lovely mocha nuance. I can easily replace buttermilk with regular milk plus a splash of vinegar or lemon juice if needed. For a lighter texture, I occasionally experiment with Dutch-process cocoa or mix in a bit of espresso powder to enhance the aroma. If I want a surprise inside, I’ll add a spoonful of Nutella or peanut butter into the center of the batter before baking. I’ve also made mini versions of these using a mini muffin tin—they bake faster and are perfect for parties.
storage/reheating
I store these cupcakes in an airtight container at room temperature for up to two days. If I need them to last longer, I refrigerate them and let them come back to room temperature before serving. They stay moist and tender for several days. I don’t recommend microwaving as it can dry them out—instead, I leave them out on the counter for a few hours if chilled.
FAQs
What happens if I overfill the cupcake liners?
Overfilling can lead to messy spillovers and domed tops. I always fill them just halfway to ensure even baking and a perfect rise.
Can I use regular milk instead of buttermilk?
Yes, I’ve used regular milk mixed with a teaspoon of vinegar or lemon juice, and it works great as a substitute.
Do I really need hot water?
Absolutely. The hot water helps bloom the cocoa powder and creates a smooth, moist batter with rich chocolate flavor.
Do I need a mixer for this recipe?
No mixer needed. I love that I can make the entire batter by hand with a simple whisk and bowl.
Why do the cupcakes stay moist?
Using oil instead of butter keeps the texture soft and moist. The hot water and sugars also help lock in that fudgy consistency.
Conclusion
These Perfect Chocolate Cupcakes are a dream come true for any chocolate lover. They’re rich, moist, and deeply satisfying—all while being incredibly easy to make. I keep coming back to this recipe whenever I need a reliable, crowd-pleasing dessert.
I’m sharing a cozy comfort‑food staple: richly seasoned ground‑beef patties slow‑cooked in a creamy mushroom gravy, perfect over mashed potatoes or rice.
Why I’ll Love This Recipe
I adore how effortless and satisfying this recipe is. I just mix up flavorful patties, brown them quickly, and let the slow cooker take care of the rest. The gravy becomes irresistibly savory with minimal effort, and it’s a reliable family‑friendly dinner I can count on when I’m pressed for time.
ingredients
(Here's a tip: Check out the full list of ingredients and measurements in the recipe card below.) 1 pound lean ground beef 1 packet onion soup mix (about 1 oz) 1 tablespoon Worcestershire sauce 1 teaspoon Montreal steak seasoning 1 large egg ½ cup bread crumbs 1 can (10.5 oz) cream of mushroom soup 1 cup water 1 packet (about 0.87 oz) brown gravy mix Parsley (optional, for garnish)
directions
I combine the ground beef, onion soup mix, Worcestershire sauce, steak seasoning, egg, and bread crumbs in a large bowl—mixing just until combined.
I divide the mixture into four patties and brown them in a hot skillet for 2–3 minutes per side—just enough to sear, not cook through.
I place the browned patties into the slow cooker (sprayed lightly for easy cleanup).
I whisk together the cream of mushroom soup, water, and brown gravy mix, then pour the mixture over the patties.
I cook on high for 3–4 hours or low for 5–6 hours, until the patties are tender and the gravy is bubbly.
Finally, I serve the steaks with plenty of gravy over mashed potatoes, rice, or egg noodles, and garnish with parsley if I have it on hand.
Servings and timing
This recipe serves 4 and takes about 15 minutes of prep time, plus 3–4 hours on high or 5–6 hours on low in the slow cooker.
Variations
I sometimes swap cream of mushroom soup with cream of onion or cream of chicken for a flavor twist.
If I want to lighten it up, I use ground turkey instead of beef and switch to turkey gravy.
For extra veggies, I layer sliced onions and mushrooms at the bottom of the slow cooker.
When I’m in a rush, I’ll use frozen beef patties instead of forming my own.
A touch of liquid smoke can add a smokey depth that I love.
storage/reheating
I keep leftovers in an airtight container in the fridge for up to 3 days. For longer storage, I freeze fully cooked servings for up to 3 months—then thaw overnight and reheat in the microwave, on the stovetop, or back in the slow cooker.
FAQs
Why won’t my Salisbury steak patties stay together?
I find it’s key to use the right ratio of beef, egg, and breadcrumbs. If the patties fall apart, I add a bit more breadcrumb or egg to help bind.
Is Salisbury steak actually steak?
It’s not a traditional steak. It’s ground beef formed into patties, often seasoned and cooked in gravy—similar to meatloaf in a different form.
Are Salisbury steak and country fried steak the same thing?
No. Salisbury steak is made from seasoned ground beef patties in gravy, while country fried steak is a breaded beef cutlet that’s pan-fried and served with white gravy.
How do I avoid tough Salisbury steak?
Overmixing the meat mixture can make the patties dense and tough. I mix just until everything is combined and avoid compacting the patties too tightly.
What sides go best with Salisbury steak?
I love it over mashed potatoes or rice, but it also pairs well with egg noodles, roasted vegetables, steamed green beans, or buttery corn.
Conclusion
This Slow Cooker Salisbury Steak recipe is one of my go-to comfort meals. It’s simple to prepare, packed with flavor, and always a hit at the dinner table. Whether I’m cooking for family or just want an easy dinner with leftovers, this dish delivers every time.
I created a fiery chicken ramen with a comforting garlic cream sauce that balances spice with silkiness. Tender, flavorful chicken meets ramen noodles bathed in rich garlic cream, finished with my favorite ramen toppings. It’s like having a gourmet ramen experience right at home.
Why You’ll Love This Recipe
I love how this dish brings together intense flavor and creamy comfort. It’s spicy and rich, yet ready in just 30 minutes—perfect for satisfying weeknight dinners. I can adjust the heat easily to suit my mood, and it delivers a restaurant-quality bowl right in my kitchen.
ingredients
(Here's a tip: Check out the full list of ingredients and measurements in the recipe card below.)
For the Spicy Chicken:
2 boneless, skinless chicken breasts, sliced into strips
1 tablespoon soy sauce
1 teaspoon sesame oil
1 teaspoon cornstarch
1 teaspoon smoked paprika
1 teaspoon chili powder
½ teaspoon cayenne pepper (adjust to taste)
½ teaspoon black pepper
1 tablespoon vegetable oil
For the Creamy Garlic Sauce:
2 tablespoon butter
4 cloves garlic, minced
1½ cups heavy cream (or half-and-half if lighter)
½ cup chicken broth
½ teaspoon salt
½ teaspoon black pepper
½ teaspoon red pepper flakes (optional, for extra heat)
½ cup grated Parmesan cheese
For the Ramen Bowl:
2 packs ramen noodles (discard seasoning packets)
1 teaspoon sesame oil
½ cup sliced green onions
½ cup shredded carrots (optional, for crunch)
1 soft-boiled egg, halved (for topping)
Sesame seeds & nori strips, for garnish
directions
Step 1: Marinate & Cook the Spicy Chicken
I mix the soy sauce, sesame oil, cornstarch, smoked paprika, chili powder, cayenne, and black pepper, then toss the chicken strips in that mixture and let it sit for about 10 minutes. I sear them in vegetable oil over medium-high heat until golden and fully cooked, about 5–6 minutes per side. Then I set them aside.
Step 2: Make the Creamy Garlic Sauce
In the same pan or a new saucepan, I melt the butter and sauté the minced garlic for about 30 seconds until fragrant. I stir in the heavy cream, chicken broth, salt, pepper, and optional red pepper flakes, letting it simmer for 2–3 minutes until slightly thickened. I finish by whisking in Parmesan until smooth, then remove from heat.
Step 3: Cook the Ramen Noodles
I boil the ramen noodles per package instructions, drain them, then toss with a teaspoon of sesame oil to keep them from sticking and add a hint of flavor.
Step 4: Assemble the Ramen Bowls
I divide the noodles into bowls, pour over the creamy garlic sauce, top with the spicy chicken strips, then add green onions, shredded carrots, a halved soft-boiled egg, sesame seeds, and nori strips. I serve immediately while it's hot and steamy.
Servings and timing
Servings: This recipe makes approximately 4 servings.
Timing: Prep and cook take around 30 minutes in total.
Variations
I enjoy changing things up depending on what I have or my mood:
Use chicken thighs for a juicier texture.
Swap heavy cream for half-and-half or coconut milk for a lighter or dairy-free version.
Add veggies like spinach, bok choy, or mushrooms in the garlic sauce.
Try miso paste for an umami-rich twist, or tofu and veggie broth for a vegetarian version.
Finish with chili oil or extra red pepper flakes for more heat, or add a pinch of lime for brightness.
storage/reheating
I store the leftover chicken and creamy sauce separate from noodles in the fridge for up to 3 days. When reheating, I gently warm the sauce on the stovetop and add a splash of broth if needed, then combine with freshly heated noodles and chicken. I prefer not to freeze the noodles since they can become mushy, but the chicken and sauce can be frozen separately.
FAQs
1. Can I use chicken thighs instead of breasts?
Yes. I often use thighs—they stay juicier and add more flavor.
2. What can I use instead of heavy cream?
I sometimes use half-and-half or coconut milk for a lighter or dairy-free version.
3. How can I make this vegetarian?
I swap in tofu and use a vegetable broth base instead of chicken broth and meat.
4. Can I prep this ahead?
Yes. I cook and slice the chicken and make the sauce ahead of time—just refrigerate. I reheat and combine with fresh noodles before serving.
5. How do I reduce the spice level?
I dial down or skip the cayenne and chili powder, and add more Parmesan or cream to mellow it out.
Conclusion
I absolutely love how this Fiery Chicken Ramen shows that spice, creaminess, and savoriness can come together in just 30 minutes to create a cozy, gourmet experience. Whether I need a quick dinner or comfort food with a kick, this dish fits the bill—and it’s always a hit.
I created this vibrant Mediterranean dish—Greek Chicken Tenders—for its juicy, herb-infused flavor and simplicity. Marinated in a zesty blend of olive oil, lemon juice, garlic, oregano, salt, pepper, and paprika, these tenders are grilled or baked to golden perfection and promise a bright, savory experience every time.
Why I’ll Love This Recipe
I love how this recipe simplifies meal prep with a flavorful marinade that I can easily customize with what I have on hand. The aromatic blend of lemon and herbs makes it visually stunning and delightful to serve, whether I’m grilling for a warm-weather gathering or baking for a cozy night in.
ingredients
(Here's a tip: Check out the full list of ingredients and measurements in the recipe card below.)
I use the following ingredients to deliver that signature Greek flair and tender juiciness:
Boneless, skinless chicken breasts
Fresh garlic cloves, minced
Extra-virgin olive oil
Freshly squeezed lemon juice
Dried oregano
Salt
Black pepper
Smoked paprika
directions
I follow these steps to bring the dish together:
In a bowl, I whisk olive oil, lemon juice, minced garlic, oregano, salt, pepper, and paprika until well combined.
I add the chicken breasts, coating them thoroughly in the marinade. Then I cover and refrigerate for at least 30 minutes—up to 4 hours—for deeper flavor.
I preheat the grill to medium-high heat or the oven to 400°F (200°C).
I cook the chicken tenders by grilling or baking for about 6–7 minutes per side, until they reach an internal temperature of 165°F (75°C) and are golden brown.
I let the chicken rest for about 5 minutes before slicing to keep them juicy.
Servings and timing
Servings: 4
Prep Time: 10 minutes
Cook Time: 15 minutes
Total Time: 25 minutes, plus marinade time (30 minutes to 4 hours)
Variations
I love putting my own twist on this dish by:
Swapping in fresh herbs like thyme, rosemary, or dill
Adding crumbled feta for a creamy, tangy boost
Including lemon zest to elevate the citrus flavor even more
storage/reheating
I store leftovers in an airtight container in the fridge for up to three days. When reheating, I prefer using a skillet to restore some crispiness while keeping the inside moist and tender. A microwave works in a pinch but may dry the meat slightly.
FAQs
What is the best way to marinate Greek chicken tenders?
I like marinating them overnight in the fridge when possible—it lets the herbs and citrus fully infuse the meat.
Can I bake the tenders instead of grilling?
Absolutely. I bake them at 400°F (200°C) for about 20 minutes, flipping halfway through for even cooking.
How do I know when they’re done cooking?
I use a meat thermometer and make sure they reach 165°F (75°C) in the thickest part to guarantee they're fully cooked and juicy.
How long should I let them rest before serving?
I let them rest for at least 5 minutes so the juices can redistribute and keep every bite moist.
Can I substitute chicken breasts for another cut?
Yes. While I typically use chicken breasts, chicken thighs or drumsticks work great too—just adjust cooking time accordingly.
Conclusion
These Greek Chicken Tenders bring bold Mediterranean flavors to my table with ease. With just a handful of ingredients and flexible cooking methods, this recipe has become one of my go-tos for a quick, satisfying meal that always impresses.
I’m excited to share my version of a comforting and wildly easy slow cooker boneless turkey breast with cranberry sauce. With just 5 minutes of prep, this cozy dish yields a tender, juicy turkey smothered in a sweet-tart sauce—perfect for holidays or stress-free weeknight dinners.
Why You’ll Love This Recipe
I find this recipe utterly practical and rewarding. I love how minimal the prep is—just dump the sauce over the turkey, walk away, and come back to a perfectly cooked, flavorful turkey. The slow cooker keeps the meat moist and lets me free up the oven for other sides. It’s incredibly forgiving, flavorful, and so elegant-looking—plus, leftovers make the best sandwiches or salads.
Ingredients
(Here's a tip: Check out the full list of ingredients and measurements in the recipe card below.)
Boneless turkey roast (about 3 pounds)
1 can (14 ounces) cranberry sauce (whole or jellied is up to me)
½ cup orange juice
1 envelope (2 ounces) dry onion soup mix
2 teaspoons light brown sugar
1 teaspoon paprika
1 teaspoon poultry seasoning
1 teaspoon garlic powder
Fresh parsley (optional garnish)
Directions
I mix together the cranberry sauce, orange juice, dry onion soup mix, brown sugar, paprika, poultry seasoning, and garlic powder in a bowl.
I place the thawed turkey roast into the bottom of my slow cooker and pour the cranberry mixture over it.
I cover and cook on low for 4–6 hours, until the center reaches 165 °F. I start checking at 4 hours to ensure it doesn’t overcook.
Once done, I remove the turkey, discard any netting, and let it rest for 10–15 minutes before slicing. Then, I serve it topped with the sauce.
Servings and timing
Servings: About 4 servings
Prep time: 5 minutes
Cook time: 4–6 hours
Total time: Roughly 4 hours and 5 minutes
Variations
For a bit of heat, I add a pinch of cayenne or red pepper flakes to the sauce.
For extra brightness, I grate in some orange zest.
I sometimes tuck in root veggies like carrots, parsnips, or small potatoes—adding them about 2 hours before the turkey’s done keeps them from turning mushy.
I might swap regular paprika with smoked paprika for a subtle smoky flavor.
If I’m not in the mood for turkey, I swap in 3 pounds of chicken breasts instead with delicious results.
Storage / Reheating
I store leftovers in an airtight container in the fridge for up to 3 days. Alternatively, I freeze the leftover turkey for up to 3 months. To reheat, I gently warm slices in the oven or microwave with some of the sauce to keep things juicy.
FAQs
What is the best way to cook a boneless turkey breast?
I find the slow cooker is the most hands-off way to get consistently juicy results—I cook it on low for 4–6 hours until it hits an internal temp of 165 °F.
How many will a 3 lb turkey breast feed?
In my experience, a 3 lb boneless turkey breast serves about 4 people—perfect for a smaller holiday or cozy dinner.
How long does a 3 lb Butterball boneless turkey breast take in the crockpot?
I typically cook it on the low setting for around 4–6 hours. I avoid high heat as it risks drying the meat.
Can I put frozen turkey in the crockpot?
I always thaw my turkey first—never cook it from frozen. Thawing in the fridge takes around 18–24 hours; a cold-water method can take 2–3 hours.
Can I use a bone-in turkey breast?
Absolutely! If it’s still approximately 3 pounds, the cook time stays similar. If it’s heavier, I add more time or use a slow cooker with a built-in thermometer for safety.
Conclusion
I love how this slow cooker turkey recipe takes minimal effort yet delivers maximum flavor and moist, succulent meat. It frees up oven space, handles itself, and gives me wonderful leftovers. Whether it’s a holiday centerpiece or a midweek meal, this cranberry-infused turkey is always a win in my book.
This Pumpkin Chocolate Chip Bread is the perfect blend of cozy fall flavors and rich chocolatey indulgence. It’s moist, warmly spiced, and packed with pumpkin puree and gooey chocolate chips, making every bite irresistible. Whether I bake it for breakfast, a snack, or dessert, this loaf never lasts long in my kitchen.
Why You’ll Love This Recipe
I love how easy and satisfying this recipe is. It brings out the earthy sweetness of pumpkin and balances it with decadent semi-sweet chocolate chips. I only need one bowl and simple pantry staples, which makes cleanup a breeze. This bread also freezes beautifully, so I often double the batch to enjoy later. The texture is perfectly soft and tender, and the flavor deepens after a day—if it even lasts that long.
Ingredients
(Here's a tip: Check out the full list of ingredients and measurements in the recipe card below.)
All-purpose flour
Baking soda
Baking powder
Salt
Ground cinnamon
Ground nutmeg
Ground cloves
Granulated sugar
Brown sugar
Pumpkin puree
Vegetable oil
Eggs
Vanilla extract
Semi-sweet chocolate chips
Directions
I preheat the oven to 350°F (175°C) and grease a standard 9x5-inch loaf pan or line it with parchment paper.
In a large bowl, I whisk together the flour, baking soda, baking powder, salt, cinnamon, nutmeg, and cloves.
In another bowl, I combine the granulated sugar, brown sugar, pumpkin puree, oil, eggs, and vanilla extract.
I stir the wet ingredients into the dry ingredients just until combined—making sure not to overmix.
I fold in the chocolate chips gently with a spatula.
I pour the batter into the prepared loaf pan and smooth the top.
I bake the bread for 55–65 minutes, or until a toothpick inserted into the center comes out clean or with just a few moist crumbs.
I let the bread cool in the pan for 10 minutes before transferring it to a wire rack to cool completely.
Servings and timing
This recipe yields one 9x5-inch loaf, which serves about 10 slices. Prep time: 10 minutes Bake time: 55–65 minutes Cooling time: 10–15 minutes
Variations
When I feel like switching things up, I swap the chocolate chips for chopped walnuts or pecans for a crunchy texture. Sometimes, I add a handful of dried cranberries for a sweet-tart contrast. If I want extra spice, I increase the cinnamon or add pumpkin pie spice. For a richer loaf, I use dark chocolate chunks instead of semi-sweet chips.
Storage/reheating
I store the cooled bread in an airtight container at room temperature for up to 3 days. For longer storage, I refrigerate it for up to a week or freeze slices wrapped tightly in plastic wrap and stored in a freezer bag. To reheat, I warm a slice in the microwave for 10–15 seconds or toast it lightly for a crisp edge.
FAQs
How do I keep my pumpkin bread moist?
I make sure not to overbake it and always store it in an airtight container. The pumpkin puree naturally adds moisture that keeps the loaf tender for days.
Can I use fresh pumpkin instead of canned?
Yes, I can use homemade pumpkin puree—just make sure it's smooth and not too watery.
Can I make this bread gluten-free?
Absolutely. I substitute the all-purpose flour with a 1:1 gluten-free baking blend, and it works great.
What type of chocolate chips should I use?
I usually go with semi-sweet chocolate chips, but I’ve also used dark or milk chocolate depending on what I have on hand.
Can I make this recipe into muffins?
Yes, I divide the batter into muffin tins and bake at 350°F (175°C) for about 20–25 minutes, or until a toothpick comes out clean.
Conclusion
This Pumpkin Chocolate Chip Bread is a cozy and delicious treat that’s simple to make and easy to love. With its warm spices and melty chocolate pockets, it captures everything I enjoy about fall baking in one perfect loaf. Whether I serve it fresh from the oven or toast up a slice for breakfast, it never disappoints.
This Honey Butter Sweet Potato Cornbread is a moist, rich, and slightly sweet twist on the traditional Southern favorite. Made with mashed sweet potatoes and drizzled with luscious honey butter, it’s the perfect side for a cozy meal or a sweet standalone treat.
Why You’ll Love This Recipe
I love how this cornbread brings together earthy sweet potatoes and creamy honey butter for a warm, comforting flavor that feels like fall in every bite. It’s moist, not crumbly, and has just the right amount of sweetness. Whether I serve it with chili, fried chicken, or enjoy it with a cup of coffee, it never disappoints. Plus, it’s easy to make and adds a special touch to any meal.
Ingredients
(Here's a tip: Check out the full list of ingredients and measurements in the recipe card below.)
Cornmeal
All-purpose flour
Baking powder
Baking soda
Salt
Cinnamon
Mashed cooked sweet potatoes
Honey
Brown sugar
Eggs
Milk or buttermilk
Unsalted butter (melted)
Vanilla extract
For the honey butter:
Unsalted butter
Honey
Pinch of salt
Directions
I start by preheating my oven to 375°F and greasing a baking pan or skillet.
In a large bowl, I whisk together the cornmeal, flour, baking powder, baking soda, salt, and cinnamon.
In another bowl, I combine the mashed sweet potatoes, honey, brown sugar, eggs, milk, melted butter, and vanilla. I stir until everything is well mixed.
I pour the wet mixture into the dry ingredients and stir just until combined—being careful not to overmix.
I pour the batter into the prepared pan and bake for about 30–35 minutes, or until a toothpick inserted in the center comes out clean.
While the cornbread bakes, I make the honey butter by mixing softened butter, honey, and a pinch of salt until smooth.
Once the cornbread is out of the oven, I spread the honey butter over the top while it’s still warm so it melts right in.
Servings and timing
This recipe makes about 9 servings and takes approximately 45 minutes total—10 minutes of prep time and 35 minutes of baking.
Variations
I sometimes add chopped pecans or walnuts for a little crunch.
For a spicy twist, I mix in a bit of cayenne pepper or diced jalapeños.
If I want it dairy-free, I use plant-based milk and vegan butter substitutes.
A handful of corn kernels can add extra texture and sweetness.
I also love using maple syrup in place of honey for a different flavor profile.
Storage/Reheating
I store any leftovers in an airtight container at room temperature for up to 2 days, or in the fridge for up to 5 days. For longer storage, I wrap slices and freeze them for up to 2 months. To reheat, I warm individual slices in the microwave for about 20–30 seconds, or in a 300°F oven until heated through.
FAQs
How do I know when the cornbread is done?
I check for doneness by inserting a toothpick into the center. If it comes out clean or with a few moist crumbs, it’s ready.
Can I make this recipe gluten-free?
Yes, I substitute the all-purpose flour with a gluten-free blend, and it works just fine.
What kind of sweet potatoes should I use?
I usually use orange-fleshed sweet potatoes like Beauregard or Garnet for their natural sweetness and creamy texture.
Can I use canned sweet potatoes?
I can, but I make sure they’re not packed in syrup. I drain and mash them well before using.
What’s the best way to serve this cornbread?
I like to serve it warm with an extra dollop of honey butter on top, alongside a bowl of chili, or with roasted chicken.
Conclusion
This Honey Butter Sweet Potato Cornbread is more than just a side dish—it’s a cozy, flavorful comfort food that brings warmth to any table. Whether I serve it with dinner or enjoy it as a snack, it always hits the spot. It's simple to make, full of wholesome flavor, and that honey butter topping takes it over the top.
This Crock Pot Brisket recipe delivers fall-apart tender beef infused with smoky, sweet, and tangy BBQ flavors, all made effortlessly in a slow cooker. The brisket soaks up the sauce as it cooks low and slow, creating a deeply flavorful dish that tastes like it came from a Southern smokehouse — no grill or smoker required.
Why You’ll Love This Recipe
I love how incredibly easy this brisket is to prepare. I just rub the brisket with a simple seasoning blend, sear it for extra flavor (optional but worth it), then let the Crock Pot work its magic. It’s perfect for holidays, weeknight dinners, or feeding a crowd. The BBQ sauce turns irresistibly rich as it cooks, and every bite of brisket is juicy, tender, and packed with flavor. Plus, the leftovers are just as delicious.
ingredients
(Here's a tip: Check out the full list of ingredients and measurements in the recipe card below.)
Beef brisket
Olive oil (for searing)
Smoked paprika
Garlic powder
Onion powder
Salt
Black pepper
Brown sugar
BBQ sauce (use your favorite brand or homemade)
Worcestershire sauce
Apple cider vinegar
Liquid smoke (optional for extra smoky flavor)
directions
I start by patting the brisket dry with paper towels. Then I mix together the paprika, garlic powder, onion powder, salt, pepper, and brown sugar to make a dry rub.
I rub the seasoning mix all over the brisket, pressing it in to make sure it sticks well.
In a large skillet, I heat olive oil over medium-high heat and sear the brisket on all sides until browned (this step is optional but adds great flavor).
I place the brisket into the Crock Pot.
In a bowl, I mix together BBQ sauce, Worcestershire sauce, apple cider vinegar, and liquid smoke (if using), then pour the mixture over the brisket.
I cover and cook on low for 8–10 hours, or on high for 4–6 hours, until the brisket is fork-tender.
Once done, I remove the brisket and let it rest for about 10–15 minutes before slicing against the grain.
I serve the brisket with the sauce spooned over the top, or I return it to the sauce to soak up even more flavor.
Servings and timing
This recipe makes about 8 servings. It takes approximately 15 minutes to prep and 8–10 hours to cook on low (or 4–6 hours on high). Resting time is an additional 10–15 minutes before slicing.
Variations
Spicy Kick: I sometimes add a teaspoon of cayenne pepper or chipotle chili powder to the dry rub for a spicy version.
Honey BBQ Flavor: When I want a sweeter profile, I stir in 2 tablespoons of honey into the BBQ sauce mixture.
No-Sear Shortcut: If I’m short on time, I skip the searing step, and it still turns out tender and flavorful.
Oven Method: I’ve also baked the brisket covered in a roasting pan at 300°F for 3–4 hours when I didn’t want to use the slow cooker.
storage/reheating
I store leftover brisket in an airtight container in the fridge for up to 4 days. For longer storage, I freeze slices in a freezer-safe container for up to 3 months. To reheat, I place the brisket in a baking dish, cover with foil, and warm it in a 300°F oven until heated through. Sometimes I reheat it in a saucepan with a splash of water or broth to keep it moist.
FAQs
How do I know when the brisket is done in the Crock Pot?
I check if the brisket is fork-tender — it should easily pull apart. If it still feels tough, I let it cook longer.
Can I use frozen brisket in this recipe?
I always thaw the brisket fully before cooking. Cooking from frozen won’t let the spices and sauce absorb properly, and the texture may be off.
Do I need to trim the fat from the brisket?
I trim excess fat but leave a thin layer for flavor. Too much fat can make the sauce greasy, but a little helps keep the meat moist.
Can I use a different cut of beef?
Yes, I’ve used chuck roast or tri-tip in a pinch. While brisket has a unique texture, these cuts still turn out tender in the slow cooker.
What BBQ sauce works best for this?
I prefer a smoky, slightly sweet BBQ sauce, but any style works. I adjust the vinegar or sugar depending on how tangy or sweet the sauce is.
Conclusion
This Crock Pot Brisket with BBQ Sauce is my go-to when I want something hearty, flavorful, and practically effortless. The long slow cooking makes the brisket melt-in-your-mouth tender, while the BBQ sauce soaks into every bite. Whether I serve it sliced on a plate, piled into sandwiches, or shredded for tacos, it’s always a hit.
This Easy Crockpot Chicken and Gravy recipe is the kind of comforting, no-fuss meal I love making on busy weekdays or lazy weekends. With just a few pantry staples and minimal prep, the slow cooker takes over and delivers a rich, creamy chicken dish that’s perfect served over mashed potatoes, rice, or noodles.
Why You’ll Love This Recipe
I love how incredibly simple and hearty this recipe is. It only takes a few ingredients and virtually no hands-on cooking time. The chicken turns out tender and juicy, and the gravy is so flavorful and creamy, it tastes like I spent hours in the kitchen. It’s a great recipe for both meal prepping and feeding a family without the stress of stovetop cooking.
ingredients
(Here's a tip: Check out the full list of ingredients and measurements in the recipe card below.)
Boneless, skinless chicken breasts
Chicken gravy mix packets
Cream of chicken soup
Chicken broth or water
Garlic powder
Onion powder
Black pepper
Sour cream (optional, for extra creaminess)
directions
I start by placing the chicken breasts in the bottom of the slow cooker.
In a bowl, I mix the chicken gravy packets, cream of chicken soup, and either chicken broth or water until it’s well combined.
I pour the mixture over the chicken, making sure it's fully coated.
I sprinkle in garlic powder, onion powder, and black pepper for extra flavor.
Then I cover the crockpot and cook everything on low for 6–8 hours, or on high for about 3–4 hours.
Once the chicken is fully cooked and tender, I shred it with two forks right in the slow cooker and stir it into the gravy.
If I want a richer flavor, I add a dollop of sour cream and mix it in just before serving.
Servings and timing
This recipe makes about 4 servings. Prep time: 5 minutes Cook time: 6–8 hours on low or 3–4 hours on high Total time: Up to 8 hours
Variations
I sometimes use chicken thighs instead of breasts for a more tender, flavorful result.
For a mushroom twist, I replace one can of cream of chicken soup with cream of mushroom.
I like adding frozen peas or corn during the last hour of cooking to sneak in some veggies.
When I want a Southern-style dish, I serve it over biscuits instead of mashed potatoes or rice.
For extra depth, I add a splash of Worcestershire sauce or a sprinkle of poultry seasoning.
storage/reheating
I store leftovers in an airtight container in the refrigerator for up to 4 days. To reheat, I warm it on the stove over medium-low heat or in the microwave, stirring occasionally until heated through. If the gravy thickens too much in the fridge, I just add a splash of chicken broth or water while reheating. I don’t recommend freezing it if I’ve added sour cream, as the texture can change.
FAQs
How do I know when the chicken is done in the crockpot?
I check if the chicken is cooked through by ensuring it reaches an internal temperature of 165°F. It should shred easily with a fork when it’s ready.
Can I use frozen chicken in this recipe?
Yes, I can use frozen chicken, but I usually add an extra hour to the cooking time and make sure the chicken reaches the safe temperature.
What should I serve with chicken and gravy?
I love serving it over mashed potatoes, egg noodles, or white rice. A side of green beans or steamed broccoli also pairs perfectly.
Can I make this recipe without cream of chicken soup?
Yes, I can substitute with a homemade white sauce or another condensed soup like cream of mushroom or cream of celery.
Is it necessary to shred the chicken?
Not at all—I can leave the chicken whole or cut it into chunks if I prefer. Shredding just helps it soak up the gravy better.
Conclusion
This Easy Crockpot Chicken and Gravy is the ultimate comfort food that basically cooks itself. I love how little effort it takes to create such a rich and satisfying dish. Whether I’m feeding my family or prepping meals for the week, this recipe never disappoints.
Cranberry turkey stuffing balls are a comforting and flavorful twist on classic holiday flavors. They combine tender ground turkey, dried cranberries, and seasoned stuffing into bite-sized portions that are perfect for serving as appetizers, side dishes, or even a quick main meal. I find them hearty, festive, and a clever way to use up leftover turkey or stuffing.
Why You’ll Love This Recipe
I like how these stuffing balls bring together sweet, savory, and herby notes in every bite. They’re easy to prepare, make-ahead friendly, and versatile enough for both casual weeknight dinners and special holiday gatherings. I also appreciate that they’re portioned individually, which makes serving and reheating simple.
Ingredients
(Here's a tip: Check out the full list of ingredients and measurements in the recipe card below.)
Ground turkey
Prepared stuffing (or leftover stuffing)
Dried cranberries
Egg
Chicken or turkey broth (as needed for moisture)
Salt
Pepper
Fresh parsley (optional, for garnish)
Directions
I preheat the oven to 375°F (190°C) and lightly grease a baking sheet or line it with parchment paper.
In a large bowl, I combine the ground turkey, stuffing, dried cranberries, egg, salt, and pepper. If the mixture feels too dry, I add a splash of broth to help it hold together.
I roll the mixture into evenly sized balls, about golf-ball size, and place them on the prepared baking sheet.
I bake them for 20–25 minutes, or until the turkey is cooked through and the tops are lightly golden.
Once done, I let them rest a few minutes before serving.
Servings and timing
This recipe makes about 12 stuffing balls, serving 4 people as a side dish or 2–3 people as a main course. The preparation takes around 15 minutes, and the baking time is 25 minutes, so I can have them ready in about 40 minutes.
Variations
I sometimes use ground chicken instead of turkey for a lighter version. For more texture, I add chopped pecans or walnuts. When I want extra richness, I mix in a little shredded cheese. Fresh herbs like rosemary or sage also make a fragrant addition, especially around the holidays.
storage/reheating
I store leftovers in an airtight container in the refrigerator for up to 3 days. To reheat, I place them in a 350°F (175°C) oven for 10 minutes or warm them in the microwave until heated through. For longer storage, I freeze them on a baking sheet, then transfer them to a freezer bag and keep for up to 2 months. I reheat frozen ones directly in the oven until hot.
FAQs
Can I make these stuffing balls ahead of time?
Yes, I prepare the mixture, shape the balls, and refrigerate them uncooked for up to 24 hours before baking.
Can I use leftover holiday turkey instead of ground turkey?
I can chop or shred cooked turkey finely and mix it with the stuffing and cranberries for a similar result.
What kind of stuffing works best?
I usually use classic herb stuffing, but cornbread stuffing or wild rice stuffing also works nicely.
How do I keep the stuffing balls from falling apart?
I make sure to add enough egg and, if needed, a bit of broth. Chilling the mixture before shaping also helps them stay firm.
Can I serve these with a sauce?
Yes, I often pair them with turkey gravy, cranberry sauce, or even a light mustard sauce for dipping.
Conclusion
Cranberry turkey stuffing balls are one of my favorite ways to enjoy the comforting flavors of the holiday season in a fun, convenient form. They’re easy to prepare, adaptable, and perfect for both festive gatherings and simple family meals. I like how they use up leftovers creatively while still feeling special and satisfying.
I’m inviting you to a creamy, spiced dish that's become my go-to comfort food: a velvety butter chicken that's simple to make and full of aromatic warmth.
Why You’ll Love This Recipe
I love how this recipe combines tender, marinated chicken with a rich tomato-cream sauce that’s finished with butter for an indulgent, silky texture. It’s quick, comforting, and perfect for both cozy family dinners and casual gatherings.
Ingredients
(Here’s a tip: Check out the full list of ingredients and measurements in the recipe card below.)
1.5 lbs skinless boneless chicken thighs, cut into bite-sized chunks
1 teaspoon salt
1 teaspoon garlic powder
1 teaspoon sweet paprika
1 teaspoon curry powder
½ cup Greek yogurt
2 tablespoon vegetable oil
3 tablespoon butter, divided
3 garlic cloves, minced
1 medium onion, diced
1 cup tomato sauce
1 tablespoon sugar
½ cup heavy cream
½ teaspoon black pepper
¼ teaspoon cayenne pepper (optional)
1 teaspoon garam masala
1 teaspoon additional curry powder
1 tablespoon freshly chopped parsley (optional, for garnish)
Naan bread and steamed rice, for serving
Directions
I begin by mixing chicken pieces with salt, garlic powder, sweet paprika, curry powder, and Greek yogurt, making sure every piece is coated. I let it marinate for at least 15 minutes.
Next, I heat vegetable oil in a skillet over medium-high heat. I cook the marinated chicken for about 8–10 minutes until it’s golden and cooked through, then I set it aside.
In the same pan, I reduce the heat to medium and add one tablespoon of butter. I deglaze the skillet, then add minced garlic and diced onion with a pinch of salt, sautéing until the onion turns translucent.
I stir in tomato sauce and sugar, letting it simmer for 2–3 minutes. Then I add the chicken back in and pour in the heavy cream, stirring until the sauce becomes a beautiful orange hue.
I season the sauce with cayenne pepper (if I want heat), garam masala, additional curry powder, and black pepper. I allow it to simmer on low for 10 minutes so all the flavors meld.
Finally, I stir in the remaining two tablespoons of cold butter for a silky finish and sprinkle freshly chopped parsley if I’m using it.
I serve it piping hot, alongside naan bread and steamed rice.
Servings and Timing
This recipe serves 4 people. The total time from start to finish is about 45 minutes — that includes approximately 15 minutes to marinate, 25 minutes of active cooking, and a few minutes to finish the sauce.
Variations
I’ve swapped chicken thighs for chicken breasts when I want a leaner version, and it still turns out great with slight adjustments to cooking time.
I sometimes use regular plain yogurt or coconut yogurt instead of Greek yogurt for a dairy-free twist.
If I’m out of butter, I’ll use ghee or a plant-based butter alternative.
On busy days, I swap tomato sauce for pureed canned tomatoes or tomato paste mixed with water.
To lighten it up, I use coconut cream or half-and-half instead of heavy cream.
Storage/Reheating
I store leftovers in an airtight container in the fridge for up to 3 days. When reheating, I gently warm it on the stovetop over low heat, adding a splash of water or cream if the sauce becomes too thick. For longer storage, I freeze the dish for up to 2 months, thaw it in the fridge overnight, and then reheat gently.
FAQs
Can I use chicken breasts instead of chicken thighs?
I choose thighs for juiciness, but yes — chicken breasts work well too. I just watch the cooking time closely, since breasts can dry out more quickly.
What can I substitute for heavy cream?
I often use coconut cream, half-and-half, or cashew cream. While the richness will vary slightly, the result is still delightfully creamy.
Is butter chicken supposed to be spicy?
I control the heat. If I want a mild dish, I skip the cayenne pepper. For a bit of kick, I add it gradually until it suits my taste.
Can I make this dish ahead of time?
Absolutely. I sometimes prepare it a day ahead. I refrigerate the sauce and reheat it gently, then finish with cold butter before serving to restore the silky texture.
How do I thicken the sauce if it's too thin?
If it gets too runny, I mix a tablespoon of cornstarch with about a third cup of water and stir it in. It thickens nicely in just a few minutes of simmering.
Conclusion
I find this butter chicken recipe to be a comforting, versatile dinner that brings restaurant-level flavor right to my kitchen — without the fuss. Whether I'm looking for something indulgent or a cozy family meal, this dish never disappoints.
I’m sharing a delightful recipe for Pumpkin Cheesecake Cookies—soft, cinnamon-spiced cookies with a creamy pumpkin cheesecake center. I find these treats incredibly moist, flavorful, and perfect for cozy fall baking.
Why I’ll Love This Recipe
I love how these cookies combine the best of two worlds: the warmth of pumpkin spice and the richness of cheesecake. They’re easy to make, great for gatherings, and look as beautiful as they taste. I appreciate how quickly they come together with simple pantry ingredients, and I enjoy serving them both chilled and at room temperature.
Ingredients
(Here’s a tip: Check out the full list of ingredients and measurements in the recipe card below.) • graham cracker crumbs • all-purpose flour • baking powder • salt • unsalted butter (room temperature) • granulated sugar • egg • pumpkin puree (100% pure, not pie filling) • vanilla extract • cinnamon • ground ginger • pinch of nutmeg • cream cheese • caramel sauce (optional, for drizzling)
Directions
I start by mixing the graham cracker crumbs, flour, baking powder, and salt in a bowl.
In a separate bowl, I beat the butter until smooth, then add sugar and continue beating until light and fluffy.
I add in the egg, pumpkin puree, vanilla, and spices, mixing until well combined.
I gradually stir the dry ingredients into the wet mixture until a soft dough forms.
For the filling, I beat cream cheese until smooth, then add sugar, pumpkin, and spices until creamy and light.
I scoop the dough into balls and place them on a baking sheet, spacing them about 2 inches apart.
I press a well into the center of each cookie using the back of a teaspoon and fill it with the cheesecake mixture.
I bake the cookies at 350°F for 10–12 minutes, until they’re golden and the centers are set.
After letting them cool completely, I like to drizzle them with caramel sauce before serving.
Servings and timing
This recipe makes about 28 cookies. I spend around 10 minutes preparing the ingredients and another 12 minutes baking, so they’re ready in just over 20 minutes.
Variations
Sometimes I add a touch of cloves or pumpkin pie spice to deepen the flavor. When I want a fun twist, I swap the pumpkin in the filling with a dollop of Nutella or spiced apple butter. If I’m out of graham crackers, crushed gingersnaps also make a delicious base.
Storage/Reheating
I keep these cookies in an airtight container in the refrigerator for up to 4 days. They taste great cold, but if I prefer a softer texture, I let them sit at room temperature for 10–15 minutes before serving.
FAQs
Can I make these cookies gluten-free?
Yes, I use gluten-free graham crackers and flour as substitutes and they turn out just as delicious.
Do I have to chill the dough before baking?
No, I don’t need to chill the dough. These cookies bake well right after forming and filling.
Can I freeze the cookies?
I can freeze the baked cookies in an airtight container for up to a month. I let them thaw in the fridge before serving.
How do I keep the cheesecake filling from cracking?
I make sure not to overbake the cookies—the filling should look just set when I take them out of the oven. Cooling them completely also helps prevent cracks.
Can I skip the caramel drizzle?
Absolutely. I often leave it off if I want a less sweet version or dress them up differently with a dusting of cinnamon sugar.
Conclusion
Every time I make these Pumpkin Cheesecake Cookies, I’m reminded why they’re one of my favorite fall bakes. The mix of creamy, spiced filling and buttery cookie is hard to beat. They’re easy, comforting, and always a hit at gatherings or quiet moments with coffee.
I make this Crockpot Marry Me Chicken when I want something rich, creamy, and comforting with minimal effort. The tender chicken simmers slowly in a dreamy sauce made with garlic, sun-dried tomatoes, and Parmesan—every bite tastes like it was made to impress.
Why I’ll Love This Recipe
I love how everything comes together in one pot without needing constant attention. The slow cooking makes the chicken incredibly juicy, and the creamy garlic-Parmesan sauce is packed with flavor. It’s one of those dishes I can serve to guests or make for a cozy dinner at home—and it never disappoints.
Ingredients
(Here’s a tip: Check out the full list of ingredients and measurements in the recipe card below.)
boneless skinless chicken breasts salt pepper olive oil minced garlic chicken broth heavy cream cornstarch sun-dried tomatoes fresh thyme red pepper flakes Parmesan cheese basil leaves
Directions
I season the chicken breasts with salt and pepper, then sear them in olive oil for about 4 minutes per side until golden brown. Once done, I place them into the crockpot.
In the same pan, I sauté garlic briefly, then stir in chicken broth. I whisk together heavy cream and cornstarch until smooth and add that to the skillet. I let it simmer for a couple of minutes.
I pour the sauce over the chicken in the crockpot, then add the sun-dried tomatoes, fresh thyme, and red pepper flakes.
I cover and cook everything on low for 5–6 hours or on high for 3–4 hours, until the chicken is fully cooked and tender.
Just before serving, I stir in Parmesan cheese and top it all with fresh basil.
Servings and timing
This recipe makes 4 servings. Prep time: 15 minutes Cook time: 4 hours 30 minutes Total time: 4 hours 45 minutes
Variations
Sometimes I swap the chicken breasts for boneless, skinless thighs for even more flavor. I’ve used evaporated milk or half and half in place of heavy cream when I’m in a pinch. If I want a spicier kick, I add more red pepper flakes or even a dash of cayenne. For a low-carb twist, I serve it over cauliflower rice instead of pasta.
Storage/reheating
Leftovers keep well in the fridge for up to 4–5 days in an airtight container. When I reheat it, I do so gently on the stove or in the microwave, adding a splash of broth or cream to bring the sauce back to life. It also freezes well for up to 2 months, though the texture may change slightly after thawing.
FAQs
Can I skip searing the chicken first?
I can skip it, but I prefer searing because it adds a lot more flavor and helps the chicken stay juicy.
What can I serve this with?
I like to serve it over pasta, mashed potatoes, rice, or even with crusty bread to soak up the sauce.
Can I use chicken thighs instead of breasts?
Yes, I often switch to boneless, skinless chicken thighs. They cook the same way and come out super tender.
Can I make this dairy-free?
I haven’t tried it dairy-free, but I imagine full-fat coconut milk and nutritional yeast could be used as substitutes for the cream and Parmesan.
Can I double the recipe?
Yes, I double the ingredients and use a large crockpot. The cooking time stays the same—just make sure everything is well covered in sauce.
Conclusion
Crockpot Marry Me Chicken is one of those recipes that feels fancy but is secretly so simple. I love how the slow cooker brings out deep, creamy flavors without any fuss. It’s a reliable crowd-pleaser and one of my favorite comfort meals to come home to.
I make this rich, smooth, and indulgent hot fudge sauce in just 10 minutes, and it instantly transforms any dessert. It’s thick, chocolatey, and perfect for drizzling over ice cream, brownies, cakes, or anything that needs a fudgy finish.
Why I’ll Love This Recipe
I love how easy this sauce is to whip up with pantry staples and no special equipment. It tastes better than store-bought, and I can control how rich or sweet I want it. Plus, it keeps well in the fridge, so I always have a jar ready for a spontaneous dessert moment.
Ingredients
(Here’s a tip: Check out the full list of ingredients and measurements in the recipe card below.)
¼ cup unsalted butter 4 ounces bittersweet baking chocolate or ⅔ cup semisweet chocolate chips 8 ounces evaporated milk or half and half ¾ cup granulated sugar 6 to 8 tablespoons unsweetened cocoa powder ¼ teaspoon salt 2 teaspoons vanilla extract
Directions
In a medium saucepan over medium-low heat, I melt the butter and chocolate, stirring frequently until smooth.
I whisk in the evaporated milk (or half and half) until it’s well combined.
Then I add the sugar, cocoa powder, and salt, whisking until fully blended.
I continue cooking over medium-low heat, whisking often, for about 5–6 minutes until the mixture just reaches a boil.
I reduce the heat and simmer for 2–3 more minutes, stirring constantly until the sauce slightly thickens.
I remove it from the heat and stir in the vanilla extract.
I serve it warm or let it cool and store it in a jar in the refrigerator for up to 3 weeks.
Servings and timing
This recipe makes about 2 cups, which is approximately 16 servings at 2 tablespoons each. Prep time: 2 minutes Cook time: 8 minutes Total time: 10 minutes
Variations
Sometimes I use 6 tablespoons of cocoa for a milder chocolate flavor, or go all in with 8 tablespoons for a deep, rich taste. I like using half and half when I want a slightly creamier result. If I’m out of baking chocolate, semisweet chocolate chips work beautifully.
Storage/reheating
I store the cooled sauce in a sealed jar in the fridge for up to 3 weeks. When I want to use it, I reheat it in the microwave at 50% power in 15-second bursts, stirring between each until warm and pourable. If the sauce turns grainy, blending it for a minute smooths it right out.
FAQs
Can I freeze this hot fudge sauce?
I don’t recommend freezing it since the texture can change. It stores well in the fridge, so I just make a fresh batch when needed.
What can I serve this sauce with?
I love it over vanilla ice cream, drizzled on brownies, pancakes, or even stirred into warm milk for a quick hot chocolate.
Can I use milk instead of evaporated milk or half and half?
I’ve tried it with regular milk, but it doesn’t get quite as rich or creamy. I stick with evaporated milk or half and half for the best texture.
How do I fix grainy fudge sauce?
If the sauce turns grainy, I blend it with an immersion blender or regular blender for 1–2 minutes until smooth again.
Is this sauce thick enough to use as a filling or dip?
Yes, it thickens nicely once cooled. I let it sit a bit before using it as a dip for fruit or as a cake filling.
Conclusion
I love having this quick hot fudge sauce in my back pocket—it’s rich, chocolatey, and comes together in no time. It’s my go-to dessert topping, whether I’m dressing up a simple scoop of ice cream or adding flair to a homemade treat. Once I made it from scratch, I never went back to store-bought.
I’ve discovered that this Easy Lemon Pepper Chicken is my go-to “fake-fancy” weeknight meal when life gets hectic. It’s simple, bright, and delivers flavor without needing fancy gadgets—if I can almost trigger the smoke alarm making it, anyone can!
Why I’ll Love This Recipe I love this recipe because the lemon gives everything a bright zing and the cracked black pepper adds just the right kick. It’s forgiving, too: I’ve used chicken thighs when I forgot to defrost breasts, swapped zest for bottled juice, and it still shines. It’s perfect for chaos‑filled evenings like right before Jeopardy! starts—it delivers every time without fuss.
Ingredients (Here’s a tip: Check out the full list of ingredients and measurements in the recipe card below.)
2 boneless, skinless chicken breasts (or thighs if that’s what I have)
Juice of 1 lemon (bottled works too in a pinch)
Zest of 1 lemon (optional but brightens the flavor)
1 tablespoon olive oil (sometimes avocado oil)
1 teaspoon cracked black pepper (I go bolder when I’m feeling it)
1 teaspoon salt (usually eyeballed, to be honest)
½ teaspoon garlic powder
½ teaspoon onion powder (optional, but I find it rounds out the flavor)
A small handful of fresh parsley, chopped (dried works too—just don’t let the food snobs know!)
Directions
I pat the chicken dry and, if it’s uneven, pound it gently—sometimes with a mug or rolling pin.
I toss together the lemon juice, zest, olive oil, cracked pepper, salt, garlic powder, and onion powder—usually right in a zip-top bag for easy cleanup.
I marinate the chicken in that mix while I hunt down my missing sock—about 10–15 minutes is enough.
I heat some oil in a skillet over medium‑high until it sizzles, then place the chicken without crowding it. If it sticks at first, that crust is building—and I know it’s a good sign. I cook 5–6 minutes per side.
Just before serving, I sprinkle chopped parsley for freshness.
Servings and Timing This makes about 4 servings. I usually spend around 10 minutes prepping and about 20 minutes cooking, so the total comes to approximately 30 minutes.
Storage/Reheating I pop leftovers into an airtight container and refrigerate—they stay good for up to 3 days in my house, though they rarely last that long! To reheat, I splash a little water or chicken broth in a pan so the chicken stays juicy.
Variations
Swap chicken thighs—especially helpful if I forgot to defrost.
Bake instead: everything goes into a baking dish and off into a 400 °F (200 °C) oven for about 20 minutes—less cleanup, slightly less juiciness.
Add a sweet twist with a little honey.
Spice things up with a sprinkle of chili flakes or Italian seasoning.
Skip the zest and squeeze in some bottled lemon juice—flavor’s a bit softer, but still good.
FAQs Can I use bottled lemon juice instead of fresh? I’ve used bottled juice plenty of times—it works, though the brightness is a bit softer than fresh.
How can I keep the chicken juicy? Don’t overcook—medium‑high heat in the pan, and let it rest briefly before slicing. A quick pan sauce with a splash of broth or butter can help if things dry out.
Can I make this recipe ahead of time? Absolutely. I sometimes think it tastes better the next day, though my husband thinks I just like cold chicken.
What sides go best with it? Honestly, whatever’s on hand—pasta, rice, roasted potatoes, steamed broccoli… I sometimes serve it over buttered noodles, and a lemon wedge always helps.
Can I double the recipe? Totally! Just use a bigger pan or switch to the oven so the chicken doesn’t steam.
Conclusion I love how this Easy Lemon Pepper Chicken is both effortless and flavorful—it’s become my reliable, “fake-fancy” solution for busy nights. Minimal ingredients, little cleanup, and the flexibility to adapt to what’s on hand make this a recipe I adore. I hope it becomes a fast favorite for you in exactly the same way.
I share a quick, flavorful dinner idea where tender, juicy chicken is seared and then bathed in a velvety herb-cream sauce—perfect for simple weeknight cooking.
Why I’ll Love This Recipe
I absolutely love how effortlessly this dinner comes together—sear the chicken, whisk up the creamy herb sauce, and dinner is ready in about 30 minutes. The sauce is rich yet bright with fresh or dried thyme, rosemary, and parsley, making each bite deeply satisfying. And I’m always drawn to meals that feel indulgent but still come together quickly.
½ cup grated Parmesan cheese (optional, for extra richness)
Fresh chopped parsley, for garnish
Directions
Season the Chicken: Pat the chicken breasts dry, then season both sides generously with salt and black pepper for depth of flavor.
Cook the Chicken: In a hot skillet, heat olive oil or butter over medium-high. Once it’s hot, add the chicken and cook 6–7 minutes per side until golden and cooked through (internal temperature 165°F / 75°C). Then set the chicken aside.
Make the Sauce: Sauté minced garlic in the same skillet just until fragrant—about 30 seconds—being careful not to burn it. Pour in the chicken broth and scrape up the flavorful browned bits from the pan.
Add Cream and Herbs: Stir in heavy cream, Dijon mustard, thyme, rosemary, parsley, and the Parmesan (if using). Let the sauce simmer gently for 3–5 minutes until it thickens.
Combine Chicken and Sauce: Return the chicken to the skillet, coating it well with the creamy sauce, and heat everything together for another 2–3 minutes so the flavors meld.
Serve and Garnish: Sprinkle fresh parsley atop and serve hot—great over mashed potatoes, rice, or alongside steamed veggies.
Servings and Timing
Servings: This recipe serves 4 people (based on using 4 chicken breasts).
Timing: It takes about 30 minutes total: a few minutes to prep and brown the chicken, then a few more minutes for the creamy, herb-infused sauce to come together.
Variations
Sometimes swap in chicken thighs instead of breasts—they stay juicier and have richer flavor. Just increase cooking time to about 8–10 minutes per side depending on thickness.
For a lighter version, replace the heavy cream with half-and-half or whole milk mixed with a tablespoon of cornstarch for thickness.
For a dairy-free spin, use full-fat coconut milk, which still gives great creaminess and adds a subtle, tasty twist.
Storage/Reheating
Store leftovers in an airtight container in the fridge—they stay good for up to 3 days. Reheat gently on the stovetop over low heat or microwave in short bursts, stirring occasionally to preserve the creamy texture.
FAQs
How can I tell when the chicken is perfectly cooked without a thermometer? Look for a golden-brown exterior and ensure that juices run clear when cutting into the thickest part. If it’s translucent or has pink juices, it needs more time.
Can I make this completely ahead of time? Yes—you can fully cook both the chicken and sauce ahead of time, store them separately, then reheat the sauce gently and return the chicken just before serving to keep the textures fresh.
What’s a good side to serve this with? I love it over mashed potatoes for the extra creaminess—it also pairs well with rice or a colorful mix of steamed or roasted vegetables for a well-rounded plate.
Is there a lighter version of the sauce that still tastes good? Absolutely. Use half-and-half or whole milk thickened with a bit of cornstarch for a lower-fat alternative. Coconut milk works too—just keeps things creamy and adds depth.
Can I freeze leftovers? I don’t recommend freezing because dairy-based sauces may separate when thawed. It’s best to enjoy this dish fresh within three days of cooking.
Conclusion
I find this creamy herb chicken recipe wonderfully comforting, flavorful, and time-efficient. It always hits the spot when I want something that feels special with minimal effort. I hope this article format matches your needs—just let me know if you’d like any tweaks or additions!
I’ve created decadent lasagna roll‑ups filled with creamy ricotta, tender shrimp, sweet crab, and rich Alfredo sauce—rolled into noodles and baked until bubbly perfection.
Why I’ll Love This Recipe
I love how indulgent yet easy this feels—I’m serving something that looks fancy but takes just minutes to prep. It’s cozy enough for a weeknight but elegant enough to impress guests. And I can make it ahead and bake when ready, which makes me feel like a dinner superhero.
ingredients
(Here's a tip: Check out the full list of ingredients and measurements in the recipe card below.)
Lasagna noodles
Cooked shrimp, chopped
Crab meat (real or imitation)
Alfredo sauce
Ricotta cheese
Mozzarella cheese, shredded
Parmesan cheese, grated
Garlic (powder or fresh)
Italian seasoning or simple herbs
Olive oil (if sautéing garlic/shrimp)
Fresh parsley, chopped (for garnish)
directions
I start by preheating the oven to 375°F. I cook the lasagna noodles until al dente, drain them, and lay them flat. I mix ricotta, an egg, Parmesan, half the mozzarella, chopped shrimp, crab, garlic, herbs, salt, and pepper in a bowl. I spread a third of the Alfredo sauce on the bottom of my baking dish. Then I spoon the seafood‑cheese mixture along each noodle, roll them up, and place them seam‑side down in the dish. Over the roll‑ups, I pour the remaining Alfredo sauce and sprinkle with the rest of the mozzarella and Parmesan. I bake covered for about 25 minutes, then uncover and bake another 10 minutes until bubbly and golden. Finally, I let them rest a few minutes and top with chopped parsley before serving.
Servings and timing
Based on the recipe, I expect this to make about 6 servings The estimated timing is Prep Time: 20 minutes and Cook Time: 30 minutes—bringing the total to around 50 minutes.
Variations
I can use imitation crab instead of real crab to save money.
I often use frozen shrimp (thawed and patted dry) to make prep quicker.
To lighten it, I’ll use part‑skim ricotta or reduced‑fat Alfredo sauce and sneak in chopped spinach.
For extra flavor, I sometimes add Cajun seasoning or red pepper flakes to the filling.
I’ve experimented with Fontina or Gruyère instead of mozzarella for a richer melt.
storage/reheating
I store any leftovers in an airtight container in the fridge for up to 3 days. To reheat, I pop them in the oven at 350°F until warmed through, or microwave individual portions. If I freeze them unbaked, I wrap them tightly—when ready, I bake from frozen, adding about 15–20 extra minutes to the cook time.
FAQs
Can I make this dish ahead of time?
Yes—I often assemble the roll‑ups ahead and refrigerate them, then bake when I'm ready to serve.
Can I use fresh crab instead of imitation or canned?
Absolutely—I prefer fresh lump crab for the best flavor, though imitation works fine and is more budget‑friendly.
How can I lighten up this recipe?
I use lighter Alfredo sauce and part‑skim ricotta, and I sometimes mix in chopped spinach or extra veggies to cut richness.
Can I freeze the roll‑ups?
Yes—I freeze them uncooked (tightly wrapped). When I'm ready to serve, I bake them from frozen, adding about 15–20 minutes to the total bake time.
What sides go well with this dish?
I like serving garlic bread to soak up sauce, or a bright green salad with lemon vinaigrette to balance the creaminess.
Conclusion
I consider these Shrimp & Crab Alfredo Lasagna Roll‑Ups a gorgeous balance of rich flavors and ease of prep. Whether I’m cooking for guests or treating myself, this dish feels indulgent yet approachable. Elegant, comforting, and totally crave‑worthy—worth every minute and every bite!
This Peanut Butter Zucchini Cake is the perfect combination of rich peanut flavor, moist texture from the zucchini, and a luscious layer of chocolate icing to top it all off. It’s a simple yet indulgent dessert that lets me sneak some veggies into a treat without compromising on taste. The result is a perfectly balanced cake—soft, nutty, chocolaty, and irresistible.
Why You’ll Love This Recipe
I love how this cake gives a whole new purpose to zucchini—it melts into the batter, adding moisture and structure without making the cake taste like vegetables. The peanut butter adds a savory richness that pairs so well with the sweet, soft crumb of the cake. I find that the chocolate icing is what takes this dessert over the top. Whether I'm serving it for a family gathering or just treating myself, it never fails to impress. It’s also a great way for me to use up that extra zucchini sitting in the fridge.
Ingredients
(Here's a tip: Check out the full list of ingredients and measurements in the recipe card below.)
All-purpose flour
Baking soda
Baking powder
Salt
Ground cinnamon
Granulated sugar
Eggs
Vegetable oil
Creamy peanut butter
Vanilla extract
Grated zucchini (unpeeled)
Semi-sweet chocolate chips (for the icing)
Heavy cream (for the icing)
Directions
I start by preheating the oven to 350°F (175°C) and greasing a 9x13-inch baking pan.
In a medium bowl, I whisk together the flour, baking soda, baking powder, salt, and cinnamon.
In a large bowl, I beat the sugar, eggs, oil, peanut butter, and vanilla until smooth and well combined.
I fold in the dry ingredients, then gently stir in the grated zucchini until evenly distributed.
I pour the batter into the prepared pan and bake for about 35–40 minutes, or until a toothpick inserted in the center comes out clean.
While the cake cools, I make the icing by melting the chocolate chips and heavy cream together in a small saucepan over low heat, stirring until smooth.
Once the cake is completely cooled, I spread the chocolate icing over the top and let it set before slicing.
Servings and timing
This recipe makes approximately 12 to 16 servings, depending on how I slice it. It takes about 15 minutes to prepare and 35 to 40 minutes to bake, with an additional 20 minutes to cool and frost—so I plan for about 1 hour and 15 minutes total from start to finish.
Variations
I sometimes swap the creamy peanut butter with crunchy for added texture.
If I’m feeling extra indulgent, I stir in a handful of mini chocolate chips or chopped nuts into the batter.
For a lighter version, I’ve used applesauce in place of some of the oil and it still turns out great.
I’ve also tried a cream cheese frosting instead of chocolate, and it brings a whole different flavor profile that I enjoy.
For a gluten-free option, I use a 1:1 gluten-free flour blend with excellent results.
Storage/Reheating
I store the cake in an airtight container at room temperature for up to 3 days. For longer storage, I keep it in the fridge for up to 5 days. To freeze, I wrap individual slices tightly and store them in a freezer-safe bag for up to 2 months. I let slices thaw at room temperature or warm them slightly in the microwave if I want a soft, just-baked feel.
FAQs
What does zucchini do in this cake?
Zucchini adds moisture and helps keep the cake soft and tender without changing the flavor. It basically melts into the batter while baking.
Can I use natural peanut butter?
I’ve tried it, but I find that the consistency can make the cake a little greasy or dense. I prefer using regular creamy peanut butter for better texture.
Do I need to peel the zucchini?
No, I leave the skin on. It adds color and nutrients, and it becomes soft and unnoticeable after baking.
Can I make this cake ahead of time?
Yes, I often bake it a day in advance. I wait to add the icing until just before serving so the top stays smooth and fresh.
Is this cake suitable for kids?
Absolutely. Kids love the peanut butter and chocolate combo, and they won’t even notice the hidden vegetables.
Conclusion
This Peanut Butter Zucchini Cake has quickly become one of my go-to recipes when I want something comforting, moist, and a little different. It brings together the nutty richness of peanut butter, the natural softness of zucchini, and the indulgent finish of chocolate icing in a way that feels both homey and special. Whether I’m baking for a crowd or just for myself, it always hits the spot.
I’m excited to share this hearty and comforting Cowboy Casserole—a layered bake of seasoned ground beef, vegetables, creamy mushroom soup, crispy tater tots, and melting cheese. It’s easy, filling, and perfect for busy evenings.
Why I’ll Love This Recipe
I love how this casserole brings together creamy and crispy textures in one satisfying dish. The savory ground beef and onions meld with the creamy mushroom sauce and corn, while the tater tots on top get beautifully crispy. It’s comforting, customizable, and always a family favorite.
ingredients
(Here's a tip: Check out the full list of ingredients and measurements in the recipe card below.)
1 (32‑ounce) bag frozen tater tots
1 pound ground beef
½ medium yellow onion, diced
1 (10‑ounce) can Rotel tomatoes, not drained
½ teaspoon garlic powder
½ teaspoon onion powder
¼ teaspoon ground black pepper
1 cup sour cream
1 (10.5‑ounce) can condensed cream of mushroom soup, undiluted
1 (15.25‑ounce) can whole kernel corn, drained
1½ cups Monterey Jack and Colby cheese, shredded, divided
1 tablespoon chives, chopped
directions
I lightly spray a 9×13‑inch baking dish with cooking spray, arrange the tater tots inside, and bake at 375 °F for 8 minutes. Then I remove them, put them in a bowl, and increase the oven to 425 °F.
I brown the ground beef and diced onion in a skillet over medium heat until the beef is no longer pink and the onion is tender.
I stir in the Rotel tomatoes (with juice), garlic powder, onion powder, and black pepper—and cook until the liquid reduces, about 8 minutes.
I mix in sour cream, condensed cream of mushroom soup, corn, and half of the shredded cheese. Then I spread that mixture evenly over the base of the casserole dish.
I layer the pre‑baked tater tots on top, followed by the remaining cheese. Then I bake the casserole until the cheese melts and everything is hot and bubbly—about 20 to 25 minutes.
Finally, I sprinkle the chopped chives over the hot casserole before serving.
Servings and timing
This recipe makes about 6 servings. From start to finish, it takes roughly 45 to 50 minutes, including prep, pre-baking the tater tots, assembling, and baking the full casserole.
Variations
I like that this recipe is flexible and easy to adjust. Here are a few of my favorite tweaks:
Adding black beans or pinto beans for a southwestern touch. I stir them in with the Rotel tomatoes.
Mixing in diced bell peppers or peas and carrots to add extra vegetables.
Using spicy Rotel or adding a dash of hot sauce when I want a little heat.
Skipping the tomatoes for a more classic creamy casserole flavor.
storage/reheating
I let the casserole cool completely before storing leftovers in an airtight container in the fridge for up to 4 days. To reheat, I microwave individual portions or place the full dish in a 350 °F oven until warmed through. To freeze, I portion it into freezer-safe containers and store for up to 3 months. I thaw overnight in the fridge before reheating.
FAQs
What if I don’t have Rotel tomatoes?
I just use regular diced tomatoes, or leave them out altogether. The casserole still tastes rich and creamy without them.
Can I make this ahead of time?
Absolutely. I assemble it fully, cover it, and refrigerate. When I’m ready to bake, I add the cheese topping and pop it in the oven.
Can I double the recipe?
Yes! I double all the ingredients and use two baking dishes or one larger pan. I just adjust the baking time until everything is hot and bubbly.
Can I use fresh mushrooms instead of soup?
Yes, but I make a quick creamy mushroom sauce to replace the soup—usually with sautéed mushrooms, butter, flour, and milk.
Is there a vegetarian version?
Definitely. I use a plant-based ground meat substitute or extra beans, and make sure to use vegetarian mushroom soup.
Conclusion
I love how this Cowboy Casserole delivers so much flavor and comfort with simple, budget-friendly ingredients. It’s one of those dishes I know everyone will enjoy, and it always disappears fast. Whether I’m cooking for family or meal prepping for the week, this casserole never disappoints.