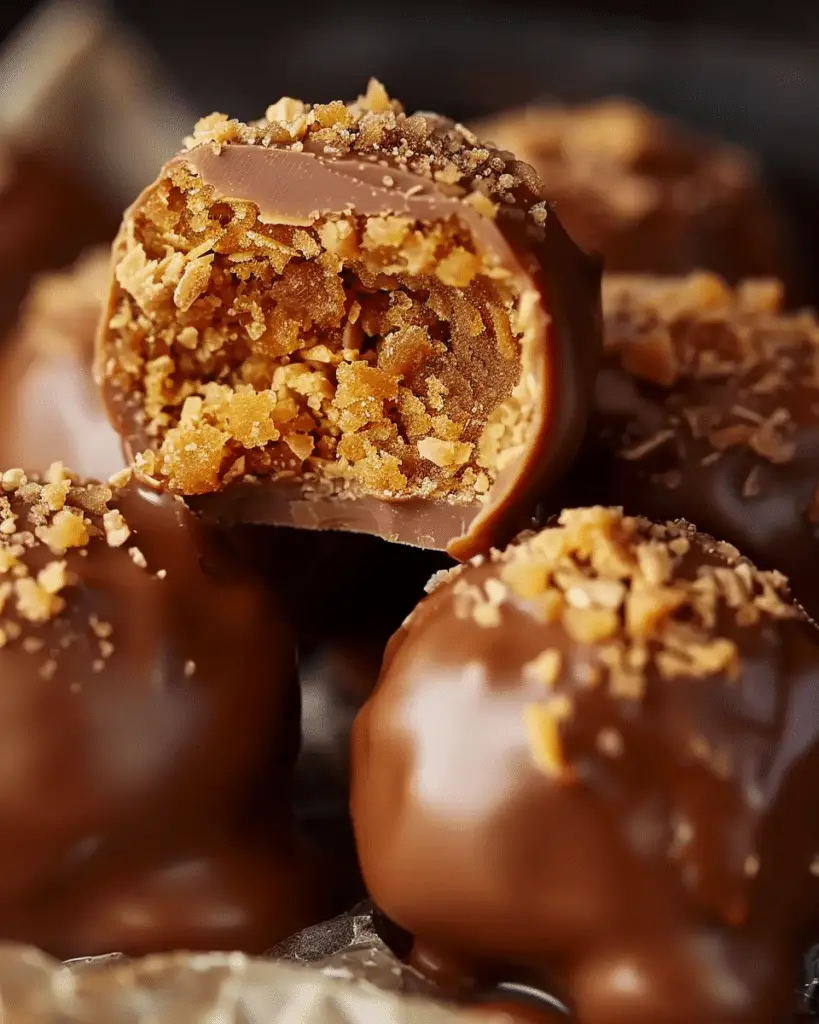
Butterfinger balls are rich, chocolatey, and packed with the signature crunch and peanut-buttery goodness of Butterfinger candy bars. These no-bake treats are super easy to whip up and perfect for holidays, parties, or when I just want a sweet bite-sized indulgence.
Why You’ll Love This Recipe
I love making Butterfinger balls because they’re fast, fun, and always a crowd-pleaser. The texture is a dreamy combo of creamy and crunchy, and the flavor hits that sweet spot between salty peanut butter and smooth chocolate. Plus, with no baking involved, I can prep a whole batch in minutes.
Ingredients
(Here's a tip: Check out the full list of ingredients and measurements in the recipe card below.)
- Creamy peanut butter
- Powdered sugar
- Crushed Butterfinger candy bars
- Vanilla extract
- Chocolate chips or melting chocolate
- Coconut oil or shortening (optional, for smoother chocolate)
Directions
- In a large bowl, I mix peanut butter, powdered sugar, and crushed Butterfinger bars until well combined.
- I stir in a splash of vanilla extract for added flavor.
- I scoop out portions and roll them into bite-sized balls, then place them on a lined baking sheet.
- I chill the balls in the freezer for about 20–30 minutes to firm up.
- While they chill, I melt the chocolate chips in the microwave or over a double boiler, adding a little coconut oil if I want a shinier, smoother finish.
- I dip each chilled ball into the melted chocolate, letting any excess drip off, and place them back on the tray.
- I chill them again until the chocolate is set—usually another 15–20 minutes.
- I store them in an airtight container in the fridge or freezer.
Servings and timing
This recipe yields about 20–24 balls depending on the size. It takes roughly 15 minutes to prep, plus about 30–45 minutes of chilling time.
Variations
- I sometimes use crunchy peanut butter for extra texture.
- A white chocolate coating makes a fun twist, especially for holidays.
- For a deeper peanut flavor, I mix in a bit of peanut butter powder.
- I roll the dipped balls in crushed Butterfinger crumbs or sprinkles before the chocolate sets for a decorative finish.
Storage/Reheating
I store Butterfinger balls in the fridge for up to a week, or in the freezer for up to 2 months. I let them sit at room temperature for a few minutes before serving if frozen. No reheating needed—just pop and enjoy.
FAQs
Do I need to crush full-size Butterfinger bars?
I usually use fun-size bars and crush them in a zip-top bag with a rolling pin. A food processor works too for a finer texture.
Can I make these without chocolate coating?
Yes, I’ve made them plain and just rolled them in powdered sugar or cocoa powder—they’re still delicious.
What’s the best way to melt chocolate for dipping?
I prefer using the microwave in 20-second bursts, stirring in between, but a double boiler works if I want more control.
Can I make these ahead of time?
Absolutely. I make them up to a week in advance and keep them chilled until I’m ready to serve.
Are Butterfinger balls gluten-free?
Butterfinger bars are generally gluten-free, but I always check the labels, especially for any new ingredients or cross-contamination warnings.
Conclusion
Butterfinger balls are my go-to no-bake treat when I want something quick, sweet, and totally addictive. They combine the nostalgic taste of a candy bar with the ease of a simple dessert recipe. Whether for gifting, parties, or a personal treat stash, these little bites always hit the spot.
Print
Butterfinger Balls
- Prep Time: 15 minutes
- Cook Time: 30–45 minutes
- Total Time: 1 hour
- Yield: 20–24 balls
- Category: Dessert, No-Bake Treat
- Method: No-Bake
- Cuisine: American
- Diet: Vegetarian
Description
These Butterfinger balls are the ultimate no-bake treat—creamy, crunchy, and loaded with peanut butter and crushed Butterfinger candy. Dipped in smooth chocolate and perfectly bite-sized, they’re an easy dessert to whip up for parties, holidays, or a sweet snack any day.
Ingredients
- 1 cup creamy peanut butter
- 1½ cups powdered sugar
- 1 cup crushed Butterfinger candy bars (about 6 fun-size bars)
- 1 tsp vanilla extract
- 1½ cups chocolate chips or melting chocolate
- 1 tbsp coconut oil or shortening (optional, for melting chocolate)
Instructions
- In a large bowl, mix peanut butter, powdered sugar, and crushed Butterfinger bars until fully combined.
- Stir in vanilla extract.
- Roll the mixture into 1-inch balls and place on a lined baking sheet.
- Freeze for 20–30 minutes until firm.
- While chilling, melt chocolate chips with optional coconut oil in 20-second bursts in the microwave (or over a double boiler), stirring until smooth.
- Dip each ball into the melted chocolate, letting the excess drip off, and return to the baking sheet.
- Chill again for 15–20 minutes, or until the chocolate is fully set.
- Store in an airtight container in the fridge or freezer.
Notes
- Use crunchy peanut butter for added texture.
- Swap in white chocolate or dark chocolate for the coating.
- For a fun finish, roll the dipped balls in crushed Butterfinger crumbs or colorful sprinkles before the chocolate sets.
- These freeze beautifully—perfect for prepping ahead of time.


Leave a Reply