Butterfinger Pie is a rich, creamy, no-bake dessert that combines the nostalgic crunch of Butterfinger candy bars with a smooth peanut butter and cream cheese filling, all nestled in a chocolatey Oreo crust. It’s the kind of treat I turn to when I want something indulgent yet incredibly easy to prepare.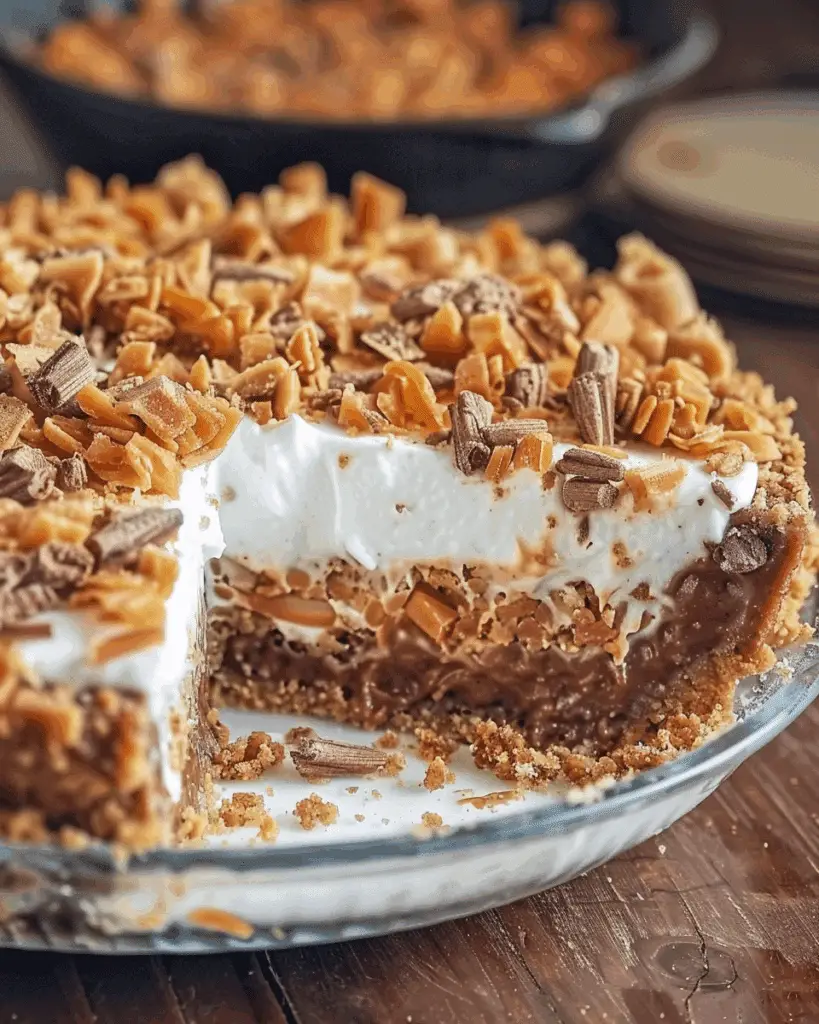
Why I Love This Recipe
I love this Butterfinger Pie because it’s a no-bake dessert that comes together quickly, making it perfect for warm days when I don’t want to turn on the oven. The combination of creamy peanut butter, tangy cream cheese, and crunchy Butterfinger pieces creates a delightful texture and flavor. Plus, it’s always a hit at gatherings, disappearing in no time.
Ingredients
(Here's a tip: Check out the full list of ingredients and measurements in the recipe card below.)
- 20 Oreo cookies (about 2 cups), crushed
- ¼ cup butter, melted
- 8 oz cream cheese, softened
- ½ cup creamy peanut butter
- 1 ½ cups powdered sugar
- 2 teaspoons vanilla extract
- 10.2 oz bag of fun-sized Butterfinger bars, crushed (reserve some for topping)
- 8 oz container of Cool Whip, thawed
Directions
- Prepare the crust: I crush the Oreo cookies into fine crumbs using a food processor, then mix them with the melted butter until well combined. I press this mixture firmly into the bottom of a pie dish to form the crust.
- Make the filling: In a mixing bowl, I beat the softened cream cheese and peanut butter together until smooth. Then, I add the powdered sugar and vanilla extract, mixing until fully incorporated.
- Add the Butterfinger pieces: I gently fold in the crushed Butterfinger bars, reserving some for the topping, and then fold in the Cool Whip until the mixture is light and fluffy.
- Assemble the pie: I spread the filling evenly over the prepared crust and sprinkle the reserved crushed Butterfinger pieces on top.
- Chill: I refrigerate the pie for at least 4 hours, or until set, before serving.
Servings and Timing
This recipe yields 8 servings. The preparation time is about 15 minutes, and the pie needs to chill for at least 4 hours to set properly.
Variations
- Crust options: Sometimes, I switch up the crust by using a graham cracker crust or a chocolate cookie crust for a different flavor profile.
- Toppings: I like to drizzle chocolate or caramel sauce over the top before serving for an extra touch of sweetness.
- Candy variations: If I’m out of Butterfingers, I substitute with other candy bars like Snickers or Reese's for a different twist.
Storage and Reheating
I store the pie covered in the refrigerator for up to 4 days. For longer storage, I wrap it tightly and freeze it for up to 3 months. When ready to serve, I thaw it in the refrigerator overnight. Since this is a no-bake pie, reheating isn't necessary.
FAQs
Can I use homemade whipped cream instead of Cool Whip?
Yes, I can use homemade whipped cream. I whip 1 cup of heavy cream with 2 tablespoons of powdered sugar until stiff peaks form and use it in place of Cool Whip.
What’s the best way to crush Butterfinger bars?
I place the unwrapped bars in a zip-top bag and use a rolling pin to crush them into small pieces. This method keeps the mess contained and gives me control over the size of the pieces.
Can I make this pie ahead of time?
Absolutely. I often make it a day in advance and keep it refrigerated until ready to serve. It allows the flavors to meld together beautifully.
Is there a way to make this pie gluten-free?
Yes, by using gluten-free chocolate sandwich cookies for the crust and ensuring the Butterfinger bars are gluten-free, I can make this pie suitable for a gluten-free diet.
Can I add other mix-ins to the filling?
Certainly. Sometimes, I add chopped peanuts or mini chocolate chips to the filling for added texture and flavor.
Conclusion
Butterfinger Pie is a delightful, easy-to-make dessert that combines creamy and crunchy textures with the irresistible flavor of Butterfinger candy bars. Whether I’m making it for a family gathering or just to satisfy a sweet craving, it’s always a crowd-pleaser. The no-bake aspect makes it especially convenient, and the ability to customize it with different crusts or mix-ins means I can tailor it to my preferences.
Print
Butterfinger Pie
- Prep Time: 15 minutes
- Cook Time: 0 minutes
- Total Time: 4 hours 15 minutes
- Yield: 8 servings
- Category: Dessert
- Method: No-Bake
- Cuisine: American
- Diet: Vegetarian
Description
Butterfinger Pie is a rich, no-bake dessert that features a creamy peanut butter and cream cheese filling with crushed Butterfinger candy bars, all set in a chocolate Oreo crust.
Ingredients
- 20 Oreo cookies (about 2 cups), crushed
- ¼ cup butter, melted
- 8 oz cream cheese, softened
- ½ cup creamy peanut butter
- 1 ½ cups powdered sugar
- 2 teaspoons vanilla extract
- 10.2 oz bag of fun-sized Butterfinger bars, crushed (reserve some for topping)
- 8 oz container of Cool Whip, thawed
Instructions
- Crush Oreo cookies into fine crumbs and mix with melted butter. Press into the bottom of a pie dish to form the crust.
- In a bowl, beat cream cheese and peanut butter until smooth.
- Add powdered sugar and vanilla extract, mixing until fully incorporated.
- Fold in crushed Butterfinger bars (reserve some for topping), then gently fold in Cool Whip until mixture is light and fluffy.
- Spread the filling evenly over the crust and top with reserved Butterfinger pieces.
- Refrigerate for at least 4 hours, or until set, before serving.
Notes
- Can substitute Cool Whip with homemade whipped cream (1 cup heavy cream + 2 tablespoon powdered sugar).
- Store in fridge up to 4 days or freeze up to 3 months.
- Switch crust or candy bars for different flavor variations.
Nutrition
- Serving Size: 1 slice
- Calories: 510
- Sugar: 38g
- Sodium: 320mg
- Fat: 32g
- Saturated Fat: 14g
- Unsaturated Fat: 15g
- Trans Fat: 1g
- Carbohydrates: 51g
- Fiber: 2g
- Protein: 6g
- Cholesterol: 30mg




Leave a Reply