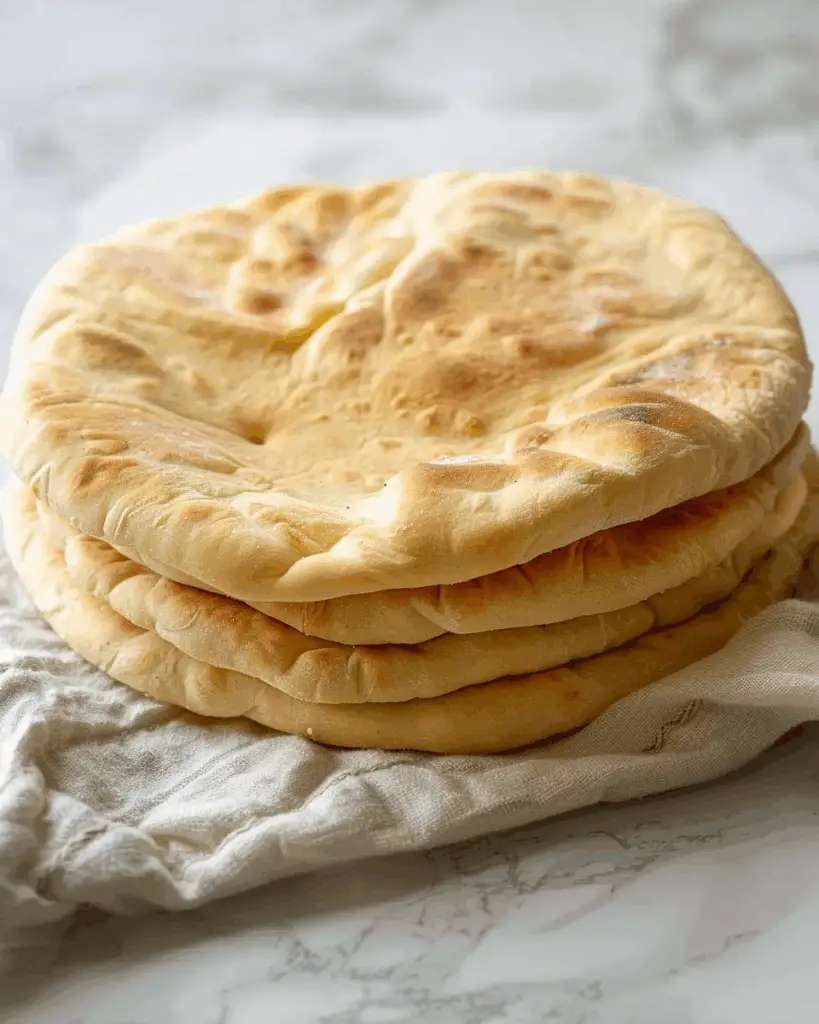
Making my own pita bread at home has been a game-changer. It's soft, fluffy, and forms perfect pockets—ideal for stuffing with my favorite fillings. With just a few pantry staples, I can create fresh, warm pita bread that's far superior to any store-bought version.
Why I Love This Recipe
I love this recipe because it's straightforward and requires only six basic ingredients. The process is therapeutic, and the result is incredibly rewarding. The pitas puff up beautifully, creating those classic pockets that are perfect for sandwiches or dipping. Plus, the taste of freshly baked bread is unmatched.
Ingredients
(Here's a tip: Check out the full list of ingredients and measurements in the recipe card below.)
- 1 cup (8 oz.) lukewarm water (about 105–110°F)
- 1 tablespoon sugar
- 2 ¼ teaspoons (1 package) active dry yeast
- Approximately 3 cups all-purpose flour (or enough to form a soft and slightly sticky dough)
- 1 tablespoon extra virgin olive oil
- 1 ¾ teaspoons salt
Directions
- In the bowl of a stand mixer, I combine the warm water, sugar, yeast, and 1 cup of flour. I whisk everything together until uniform and let it sit for 15 minutes until it becomes bubbly and foamy.
- I add the olive oil, salt, and 1 ½ cups of flour to the mixture. Using the dough hook attachment, I mix on low speed until the dough is soft and no longer sticks to the sides of the bowl. If it remains sticky, I add up to ½ cup more flour, a little at a time.
- I knead the dough on low for 5 to 6 minutes. Then, I turn it out onto a floured surface and form it into a ball.
- I lightly oil a large bowl, place the dough inside, and turn it to coat with oil. I cover the bowl with a clean kitchen towel and let the dough rise in a warm area for 2 hours, or until doubled in size.
- After the dough has risen, I punch it down and divide it into 8 equal pieces. I roll each piece into a ball, cover them with a towel, and let them rest for 10 minutes.
- I roll each ball into a ¼-inch thick circle. I preheat a cast-iron skillet over medium-high heat and cook each pita for 1-2 minutes on each side, until they puff up and have golden spots.
- I wrap the cooked pitas in a clean kitchen towel to keep them warm and soft.
Servings and Timing
This recipe yields 8 pitas. The total time required is approximately 3 hours and 30 minutes, which includes preparation, rising, and cooking time.
Variations
- Whole Wheat Pita: I sometimes replace 1 cup of all-purpose flour with whole wheat flour for a nuttier flavor and added nutrition.
- Herbed Pita: Adding dried herbs like oregano or thyme to the dough gives the pitas an aromatic twist.
- Garlic Pita: Mixing in minced garlic or garlic powder adds a delightful flavor that's perfect for savory fillings.
Storage and Reheating
I store leftover pitas in an airtight container at room temperature for up to 2 days or in the refrigerator for up to 5 days. To reheat, I wrap them in foil and warm them in a 350°F oven for about 10 minutes, or I heat them in a skillet over medium heat for a couple of minutes on each side.
FAQs
How do I know if my yeast is active?
If the yeast mixture becomes bubbly and foamy after 15 minutes, it's active. If not, the yeast may be expired or the water temperature may have been too hot or too cold.
Can I make the dough ahead of time?
Yes, I often prepare the dough and let it rise in the refrigerator overnight. I bring it to room temperature before dividing and cooking.
Why didn't my pitas puff up?
Pitas may not puff if the skillet isn't hot enough or if the dough wasn't rolled evenly. Ensuring a hot cooking surface and uniform thickness helps achieve the desired puff.
Can I freeze the cooked pitas?
Absolutely. I let them cool completely, then place parchment paper between each pita and store them in a freezer bag. They can be frozen for up to 3 months.
What can I serve with homemade pita bread?
I enjoy serving pitas with hummus, falafel, grilled vegetables, or using them as a base for wraps and sandwiches.
Conclusion
Making homemade pita bread is a fulfilling experience that yields delicious results. With simple ingredients and a bit of patience, I can enjoy fresh, warm pitas that elevate any meal. Whether I'm dipping them into hummus or stuffing them with my favorite fillings, these pitas are a staple in my kitchen.
Print
Easy Homemade Pita Bread
- Prep Time: 30 minutes
- Cook Time: 16 minutes
- Total Time: 3 hours 30 minutes
- Yield: 8 pitas
- Category: Bread
- Method: Stovetop
- Cuisine: Middle Eastern
- Diet: Vegetarian
Description
This easy homemade pita bread is soft, fluffy, and forms perfect pockets. Made with simple pantry staples, it's far superior to store-bought versions and ideal for stuffing or dipping.
Ingredients
- 1 cup (8 oz.) lukewarm water (about 105–110°F)
- 1 tablespoon sugar
- 2 ¼ teaspoons (1 package) active dry yeast
- Approximately 3 cups all-purpose flour
- 1 tablespoon extra virgin olive oil
- 1 ¾ teaspoons salt
Instructions
- In a bowl, combine warm water, sugar, yeast, and 1 cup of flour. Whisk until uniform and let sit for 15 minutes until foamy.
- Add olive oil, salt, and 1 ½ cups of flour. Mix using a stand mixer with a dough hook on low speed until soft and not sticky. Add more flour if needed.
- Knead on low speed for 5–6 minutes. Turn dough onto a floured surface and shape into a ball.
- Oil a large bowl, place dough inside, turn to coat, cover, and let rise in a warm area for 2 hours or until doubled.
- Punch down dough, divide into 8 equal pieces, roll each into a ball, cover with a towel, and rest for 10 minutes.
- Roll each ball into a ¼-inch thick circle. Preheat a cast-iron skillet over medium-high heat and cook each pita 1–2 minutes per side until puffed and golden.
- Wrap cooked pitas in a clean kitchen towel to keep warm and soft.
Notes
- Use lukewarm water to activate yeast effectively.
- Ensure skillet is hot enough to allow pitas to puff up.
- For variation, try whole wheat or herbed versions.
Nutrition
- Serving Size: 1 pita
- Calories: 180
- Sugar: 1g
- Sodium: 350mg
- Fat: 3g
- Saturated Fat: 0.5g
- Unsaturated Fat: 2.5g
- Trans Fat: 0g
- Carbohydrates: 34g
- Fiber: 1g
- Protein: 5g
- Cholesterol: 0mg


Leave a Reply