Sue Recipe

  • Recipe Index
  • Chicken
  • Desserts
  • About
  • Contact
menu icon
go to homepage
  • Recipe Index
  • Chicken
  • Desserts
  • About
  • Contact

search icon
Homepage link
  • Recipe Index
  • Chicken
  • Desserts
  • About
  • Contact

×

Fried Cheese Balls

Published: Oct 2, 2025 by Sue · This post may contain affiliate links · Leave a Comment

Jump to Recipe·Leave a Review

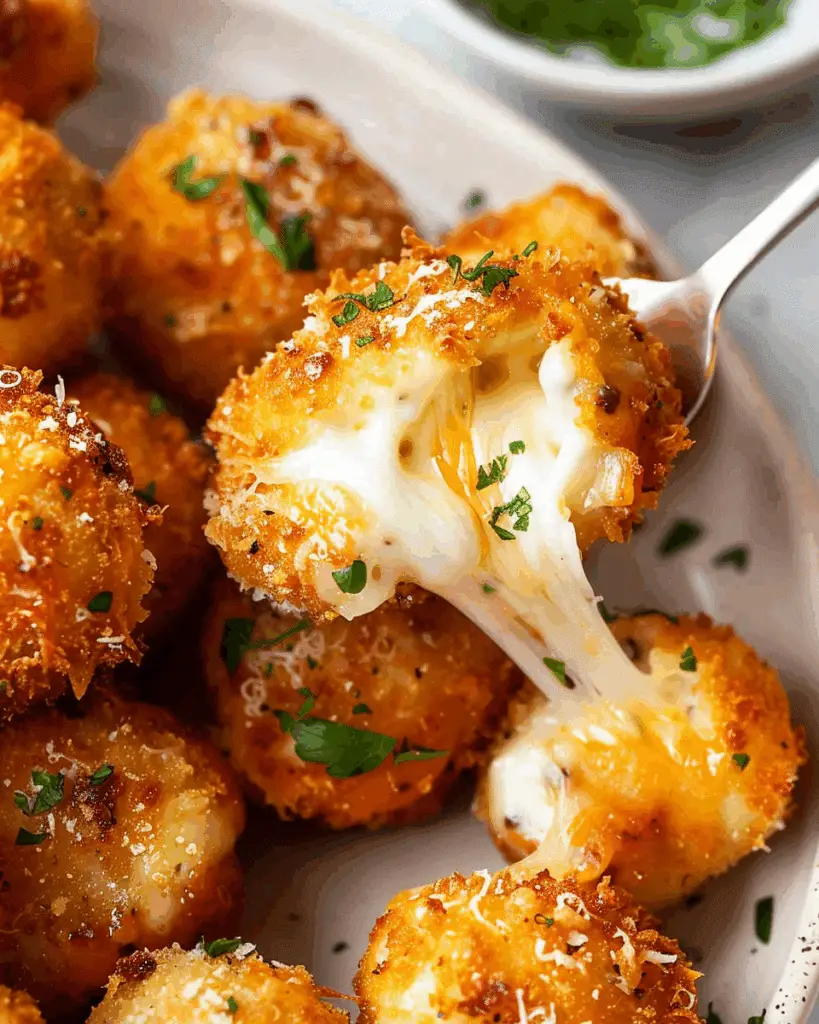
Crispy, golden-fried balls of melted cheese — that’s what I call comfort food at its finest. These bite-sized snacks deliver the perfect combination of crunch on the outside and gooey, stretchy cheese on the inside. Whether I serve them as party appetizers or a quick indulgent snack, they always disappear fast. Fried Cheese Balls

Why You’ll Love This Recipe

I love how simple and satisfying these fried cheese balls are. They take just a handful of ingredients and a few quick steps to make. They’re versatile too — I can switch up the type of cheese or season the coating to match whatever flavor I’m craving. Best of all, they fry up in just a minute or two and are ready to serve piping hot with my favorite dipping sauces.

ingredients

(Here's a tip: Check out the full list of ingredients and measurements in the recipe card below.)

  • 200 g mozzarella cheese (or firm melting cheese), cut into cubes

  • ½ cup all-purpose flour

  • 1 large egg, beaten

  • ½ cup breadcrumbs

  • Salt and pepper, to taste

  • Oil for frying (vegetable, canola, or similar)

directions

  1. I start by cutting the cheese into bite-sized cubes, about 2 cm each.

  2. I season the flour with a bit of salt and pepper, then dredge each cheese cube, shaking off any excess.

  3. Next, I dip each cube into the beaten egg, making sure it’s fully coated.

  4. I roll the cubes in breadcrumbs until completely covered. For an extra crispy finish, I sometimes dip them again in egg and breadcrumbs for a double coating.

  5. Then, I chill the coated cheese balls in the fridge or freezer for about 15–20 minutes. This helps them hold their shape when frying.

  6. I heat oil in a deep pan or fryer to around 175–180 °C (350–360 °F).

  7. I fry the cheese balls in batches, gently lowering them into the hot oil and turning them as needed, until they’re golden brown (about 1–2 minutes).

  8. I remove them with a slotted spoon and let them drain on paper towels.

  9. I serve them hot, sometimes with marinara, aioli, or sweet chili sauce for dipping.

Servings and timing Fried Cheese Balls

  • Yield: about 12–15 cheese balls (depending on size)

  • Prep Time: 15 minutes (plus chilling)

  • Cook Time: 5 minutes (for frying batches)

  • Total Time: 20–25 minutes

Variations

I like experimenting with this recipe by switching out the cheese — cheddar, gouda, or even a mix work beautifully. I sometimes add garlic powder, paprika, or Italian seasoning to the breadcrumb mix for a boost of flavor. And when I want a little kick, I stir some chili flakes into the flour before dredging. Double coating the cheese balls gives them an extra crispy crust, which I love.

storage/reheating

To store leftovers, I let the cheese balls cool completely, then refrigerate them in an airtight container for up to 3 days. For longer storage, I freeze them in a single layer before transferring to a freezer bag. To reheat, I pop them in an oven or air fryer at 180°C (350°F) until heated through and crispy again — about 5–8 minutes. I avoid microwaving them, since they can get soggy.

FAQs

How do I keep the cheese from leaking while frying?

Chilling or briefly freezing the coated cheese balls helps prevent the cheese from melting too quickly and leaking out during frying. I also make sure the coating is sealed well — double coating helps too.

Can I use an air fryer instead of deep frying?

Yes, I can make these in an air fryer. I spray them lightly with oil and cook at 200°C (400°F) for about 6–8 minutes, flipping halfway through. They won’t be quite as golden but still tasty.

What dipping sauces go best with fried cheese balls?

My favorites are marinara, garlic aioli, or sweet chili sauce. Ranch or sriracha mayo also pair well, depending on the seasoning I’ve used in the coating.

Can I make these ahead of time?

Yes. I often coat the cheese balls and keep them chilled or frozen until I’m ready to fry. That way, I can just fry and serve fresh when I need them.

What cheese works best for frying?

Mozzarella is my go-to because it melts beautifully, but I also love mixing in gouda or cheddar for flavor. The key is using a firm cheese that won’t melt too fast.

Conclusion

These fried cheese balls are one of my favorite quick appetizers — crispy, cheesy, and totally satisfying. They’re simple to make and easy to customize, whether I’m feeding a crowd or just treating myself. Once I tried them, they quickly became a go-to snack in my kitchen.

Print

clock clock iconcutlery cutlery iconflag flag iconfolder folder iconinstagram instagram iconpinterest pinterest iconfacebook facebook iconprint print iconsquares squares iconheart heart iconheart solid heart solid icon
Fried Cheese Balls

Fried Cheese Balls

5 Stars 4 Stars 3 Stars 2 Stars 1 Star No reviews
  • Author: Sue
  • Prep Time: 15 minutes (plus chilling)
  • Cook Time: 5 minutes (for frying batches)
  • Total Time: 20–25 minutes
  • Yield: about 12–15 cheese balls (depending on size)
  • Category: Appetizer / Snack
  • Method: Deep Frying
  • Cuisine: International / Finger Food
  • Diet: Vegetarian
Print Recipe
Pin Recipe

Description

Crispy, golden‑fried balls of melted cheese — a delicious appetizer or snack.


Ingredients

  • 200 g mozzarella cheese (or firm melting cheese), cut into cubes
  • ½ cup all‑purpose flour
  • 1 large egg, beaten
  • ½ cup breadcrumbs
  • Salt and pepper, to taste
  • Oil for frying (vegetable, canola, or similar)

Instructions

  1. Cut the cheese into bite‑sized cubes (about 2 cm).
  2. Season the flour with a little salt and pepper. Dredge each cheese cube in flour, shaking off excess.
  3. Dip into beaten egg, ensuring it’s fully coated.
  4. Roll in breadcrumbs to cover completely. For extra crispness, you can repeat the egg + breadcrumb step (double coating).
  5. Chill the coated cheese balls in the freezer or fridge for 15–20 minutes (this helps them hold shape while frying).
  6. Heat oil in a deep pan or fryer to about 175‑180 °C (350‑360 °F).
  7. Fry the balls in batches, gently lowering them in, turning as needed, until golden brown (about 1–2 minutes).
  8. Remove with a slotted spoon and drain on paper towels.
  9. Serve hot, optionally with a dipping sauce (e.g. marinara, aioli, or sweet chili).

Notes

  • Freeze or chill before frying to prevent cheese from melting too fast and leaking.
  • You can use different melting cheeses (cheddar, gouda, etc.) or mix cheeses for flavor.
  • Add herbs or spices (e.g. garlic powder, Italian seasoning) to the breadcrumbs for extra flavor.
  • Do not overcrowd the frying pan — maintain oil temperature.

Nutrition

  • Serving Size: 100 g (approx)
  • Calories: ≈ 714 kcal per cup (≈ 238 g) → ~300 kcal per 100 g
  • Sugar: ≈ 4.8 g per 238 g (≈ 2 g per 100 g) :contentReference[oaicite:0]{index=0}
  • Sodium: ≈ 1428.6 mg per 238 g (≈ 600 mg per 100 g) :contentReference[oaicite:1]{index=1}
  • Fat: ≈ 47.6 g per 238 g (≈ 20 g per 100 g) :contentReference[oaicite:2]{index=2}
  • Saturated Fat: ≈ 23.8 g per 238 g (≈ 10 g per 100 g) :contentReference[oaicite:3]{index=3}
  • Unsaturated Fat: ≈ (47.6 g – 23.8 g) = 23.8 g per 238 g (≈ 10 g per 100 g) :contentReference[oaicite:4]{index=4}
  • Trans Fat: not specified
  • Carbohydrates: ≈ 47.6 g per 238 g (≈ 20 g per 100 g) :contentReference[oaicite:5]{index=5}
  • Fiber: 0 g (in that source) :contentReference[oaicite:6]{index=6}
  • Protein: ≈ 23.8 g per 238 g (≈ 10 g per 100 g) :contentReference[oaicite:7]{index=7}
  • Cholesterol: ≈ 95.2 mg per 238 g (≈ 40 mg per 100 g) :contentReference[oaicite:8]{index=8}

Have you made this recipe? I'd love to see it!

Click here to Follow me on Pinterest

More Appetizers & Snacks

  • Spinach Artichoke Crescent Rolls
    Spinach Artichoke Crescent Rolls
  • Sheet Pan Quesadilla
    Sheet Pan Quesadilla
  • Crockpot Buffalo Chicken Dip
    Crockpot Buffalo Chicken Dip
  • Crispy Smashed Carrots with Parmesan and Paprika
    Crispy Smashed Carrots with Parmesan and Paprika

Leave a Reply Cancel reply

Your email address will not be published. Required fields are marked *

Recipe rating 5 Stars 4 Stars 3 Stars 2 Stars 1 Star

Modern Sidebar

Hey there! I'm Sue, a mom, a wife, and someone who’s always in the kitchen trying out new recipes or revisiting old ones that remind me of family gatherings and special moments.

Learn more

Popular

  • French Onion Pot Roast
    French Onion Pot Roast
  • Roast Turkey with Herb Butter, Citrus & Vegetables
    Roast Turkey with Herb Butter, Citrus & Vegetables
  • Spiced Pumpkin Loaf with Cream Cheese Frosting
    Spiced Pumpkin Loaf with Cream Cheese Frosting
  • Protein-Rich Cottage Cheese Clafoutis with Berries
    Protein-Rich Cottage Cheese Clafoutis with Berries

Footer

↑ back to top

About

  • About
  • Contact
  • Disclosure Policy
  • DMCA
  • Privacy Policy
  • Terms and Conditions

Newsletter

  • Sign Up! for emails and updates

Recipes

  • Appetizers & Snacks
  • Beef
  • Breakfast
  • Chicken
  • Desserts
  • Dinner
  • Drinks
  • Side-Dish
  • Soups

As an Amazon Associate I earn from qualifying purchases.

Copyright © 2025 Sue Recipe