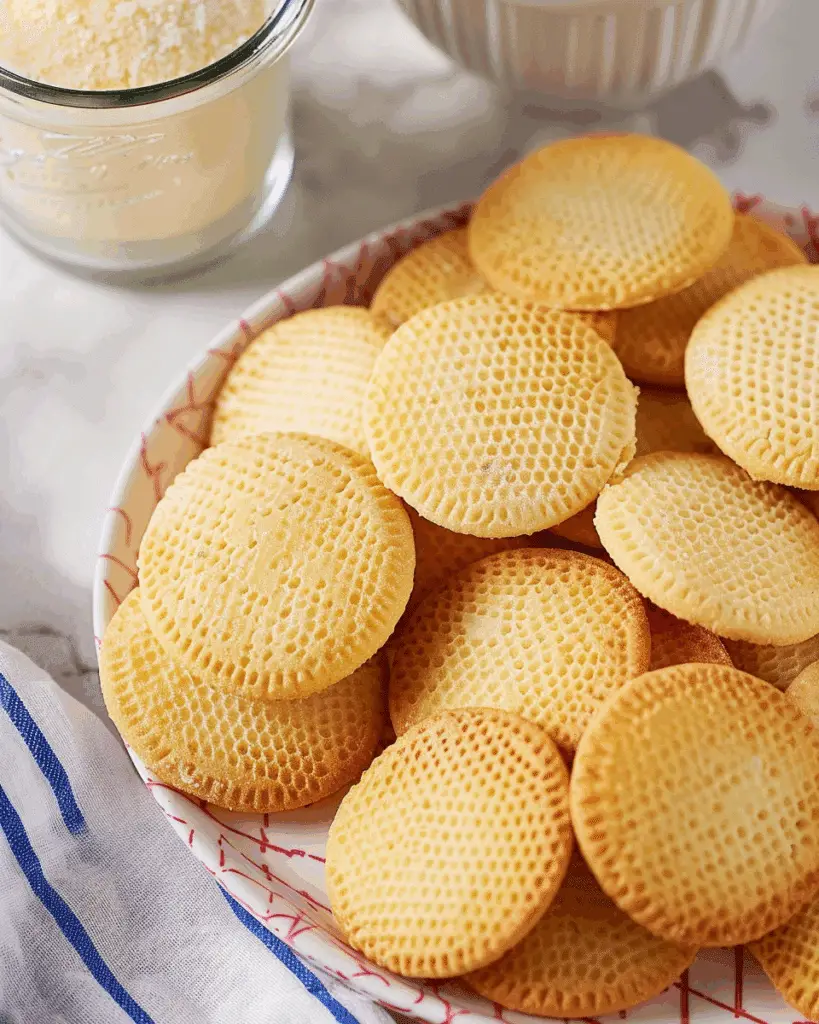
These homemade Nilla wafers are delightfully crisp, buttery, and infused with real vanilla flavor. I find them perfect for snacking, layering into banana pudding, or even using as a base for mini cheesecakes. They bring back the nostalgic taste of childhood but with a fresher, homemade touch.
Why I Love This Recipe
I love how simple and satisfying these cookies are to make. With just a few pantry staples, I can whip up a batch of these golden wafers in under an hour. The aroma of vanilla and butter wafting through my kitchen is irresistible. Plus, I appreciate knowing exactly what's in my treats—no preservatives or artificial flavors here.
Ingredients
(Here's a tip: Check out the full list of ingredients and measurements in the recipe card below.)
- All-purpose flour
- Baking powder
- Salt
- Unsalted butter
- Granulated sugar
- Egg
- Vanilla extract
- Milk
Directions
- I start by preheating my oven to 350°F (175°C) and lining a baking sheet with parchment paper.
- In a bowl, I whisk together the flour, baking powder, and salt.
- In another bowl, I cream the butter and sugar until light and fluffy.
- I beat in the egg and vanilla extract until well combined.
- Gradually, I add the dry ingredients to the wet mixture, alternating with the milk, and mix until a smooth dough forms.
- Using a teaspoon, I drop small amounts of dough onto the prepared baking sheet, spacing them about 2 inches apart.
- I bake the cookies for 12-15 minutes, or until the edges are golden brown.
- After removing them from the oven, I let the cookies cool on the baking sheet for a few minutes before transferring them to a wire rack to cool completely.
Servings and Timing
This recipe yields approximately 24 cookies. The preparation time is about 15 minutes, and the baking time is 12-15 minutes per batch, totaling around 30 minutes from start to finish.
Variations
- Gluten-Free: I substitute the all-purpose flour with a gluten-free flour blend to make these cookies gluten-free.
- Dairy-Free: I use plant-based butter and milk alternatives to create a dairy-free version.
- Flavor Twist: Sometimes, I add a pinch of cinnamon or a few drops of almond extract for a different flavor profile.
Storage/Reheating
I store the cooled cookies in an airtight container at room temperature for up to 5 days. To keep them crisp, I ensure the container is sealed tightly. If they lose their crunch, I reheat them in a 300°F (150°C) oven for 5 minutes to revive their texture.
FAQs
How do I make these cookies crispier?
To achieve a crisper texture, I bake the cookies a bit longer until the edges are a deeper golden brown. I also make sure to cool them completely on a wire rack to prevent moisture buildup.
Can I freeze the dough?
Yes, I often freeze the dough after shaping it into balls. I place them on a baking sheet to freeze individually, then transfer them to a freezer bag. When ready to bake, I add a couple of extra minutes to the baking time.
What can I use these wafers for besides snacking?
These wafers are versatile. I use them in banana pudding, crush them for pie crusts, or layer them in trifles. They're also great as a base for mini cheesecakes.
Can I double the recipe?
Absolutely. I double the ingredients to make a larger batch, especially when preparing desserts for gatherings or gifting.
Why did my cookies spread too much?
If my cookies spread excessively, it might be due to over-creaming the butter and sugar or using butter that's too soft. I ensure the butter is just softened and mix until combined to prevent over-aeration.
Conclusion
Making homemade Nilla wafers is a rewarding experience. I enjoy the process of baking them and the delicious results. They're a delightful treat that brings comfort and joy, whether enjoyed on their own or as part of a dessert.
Print
Homemade Nilla Wafers
- Prep Time: 15 minutes
- Cook Time: 12–15 minutes
- Total Time: 30 minutes
- Yield: Approx. 24 cookies
- Category: Dessert, Snack
- Method: Baking
- Cuisine: American
- Diet: Vegetarian
Description
These homemade Nilla wafers are buttery, crisp, and packed with real vanilla flavor—perfect for snacking, banana pudding, or dessert crusts. With simple ingredients and no preservatives, they’re an easy and nostalgic treat made fresh from your kitchen. A must-try for fans of classic vanilla cookies!
Ingredients
- All-purpose flour
- Baking powder
- Salt
- Unsalted butter
- Granulated sugar
- Egg
- Vanilla extract
- Milk
Instructions
- Preheat oven to 350°F (175°C) and line a baking sheet with parchment paper.
- Whisk together flour, baking powder, and salt.
- In a separate bowl, cream butter and sugar until light and fluffy.
- Beat in egg and vanilla extract until well combined.
- Gradually add the dry ingredients, alternating with milk, and mix into a smooth dough.
- Drop teaspoonfuls of dough onto the baking sheet, spaced 2 inches apart.
- Bake for 12–15 minutes, or until edges are golden brown.
- Cool on the baking sheet for a few minutes, then transfer to a wire rack to cool completely.
Notes
- For extra crispness, bake until edges are deeply golden.
- Store in an airtight container for up to 5 days.
- Refresh softness by reheating in a 300°F oven for 5 minutes.
- Freeze raw dough for easy future baking—add 2–3 extra minutes to bake time.





Leave a Reply