
I absolutely adore sharing this Monster Cookie Cheesecakes Recipe because it combines two of my favorite treats into one irresistible dessert. Imagine a rich, creamy cheesecake nestled on a chewy peanut butter and oatmeal cookie crust, all topped with playful mini M&M’s that add a pop of color and crunch. Every bite feels like a celebration of flavors and textures, and I find this recipe both fun to make and incredibly satisfying to eat. Whether it’s for a casual get-together or a special occasion, these mini cheesecakes always steal the show.
Why You'll Love This Monster Cookie Cheesecakes Recipe
From the first time I made this recipe, I was hooked by how perfectly balanced the flavors are. The peanut butter and brown sugar cookie base gives a warm, slightly sweet foundation that contrasts beautifully with the smooth, tangy cream cheese filling. Adding mini M&M’s on top brings a burst of fun color and a bit of chocolatey crunch that elevates every mouthful. I love how the rich, creamy cheesecake and the chewy cookie come together in a way that feels indulgent without being overwhelming.
What really excites me about this Monster Cookie Cheesecakes Recipe is the ease of preparation. The steps are straightforward enough for anyone to follow, and you can whip up a dozen mini cheesecakes in under an hour. No complicated techniques or fancy equipment—just mixing, baking, and enjoying. It’s perfect for those moments when I want something show-stopping but without hours of effort in the kitchen.
These mini cheesecakes are perfect for a variety of occasions. I often bring them to family gatherings, birthday parties, or even casual weekend brunches. Their colorful appearance and manageable size make them crowd-pleasers for kids and adults alike. Plus, because they’re individually portioned, sharing is easy and no one feels guilty about indulging. It’s truly a standout recipe that I keep coming back to whenever I want to make something special yet simple.
Ingredients You'll Need
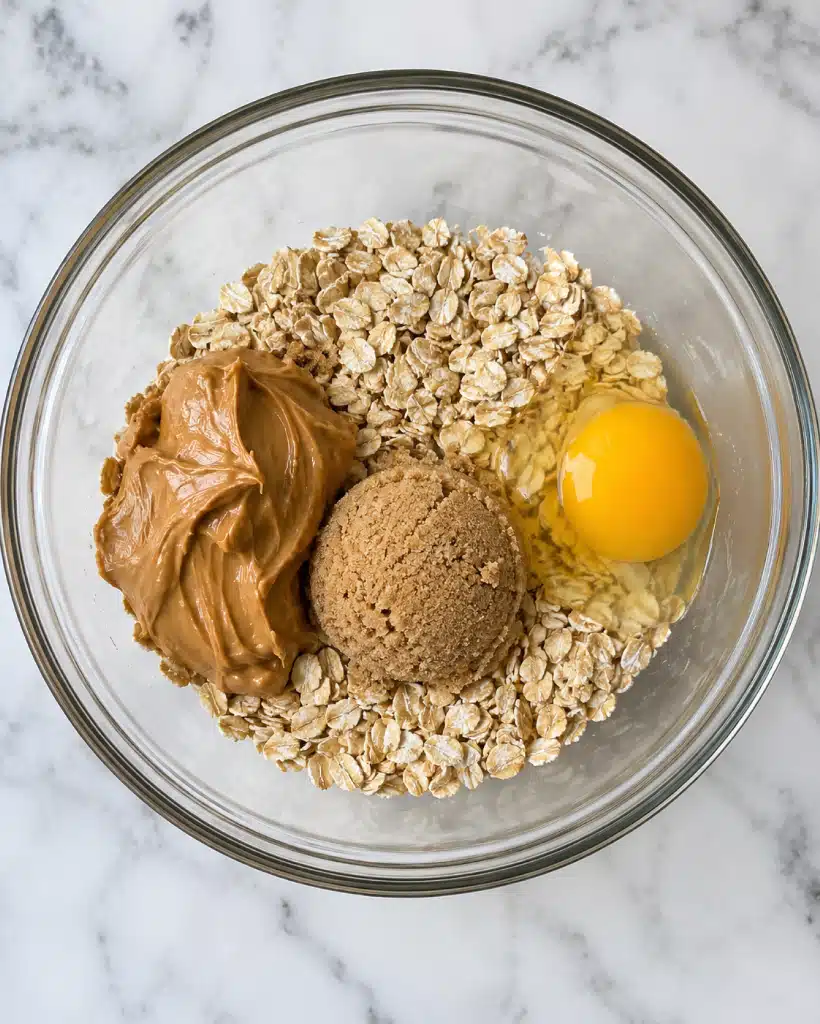
All you need are a handful of simple, wholesome ingredients that come together to create something beyond delicious. Each element contributes uniquely—the creamy peanut butter adds depth and moisture, the oats bring texture and chew, and the mini M&M’s offer a delightful burst of color and sweetness to finish.
TIP : You'll find the full list of ingredients and measurements in the recipe card below
- Peanut butter: I always use creamy for a smooth texture that blends beautifully with the oats.
- Brown sugar: This adds a lovely caramel sweetness and keeps the cookie base soft.
- Eggs: They bind our cookie and cheesecake layers perfectly without any fuss.
- Quick oats: Using quick oats ensures the cookie base is chewy yet tender—feel free to use certified gluten-free oats if needed.
- Cream cheese: Room temperature is key here for that silky and lump-free cheesecake filling.
- Granulated sugar: A little sweetness to balance the tang of the cream cheese.
- Vanilla extract: This brings out all the warm, cozy flavors harmoniously.
- Mini M&M's: I love the crunch and festive color they add as the finishing touch on top.
Directions
Step 1: Preheat your oven to 350°F (175°C) and line a 12-cup muffin pan with cupcake liners. This makes cleanup a breeze and keeps your cheesecakes perfectly shaped.
Step 2: Prepare the cookie base by combining the peanut butter, brown sugar, egg, and oats in a medium bowl. Stir everything until it forms a sticky dough. Then, press about one tablespoon of this dough into the bottom of each muffin liner, creating an even layer.
Step 3: Bake the cookie bases for 5 to 7 minutes until they are mostly set but still slightly soft on top. This brief baking gives them just enough hold without drying them out.
Step 4: While the bases bake, make the cheesecake filling. Beat the cream cheese in a bowl until smooth and creamy. Then beat in the granulated sugar, vanilla extract, and the remaining egg until the mixture is silky and lump-free.
Step 5: Remove the muffin pan from the oven. Divide the cheesecake batter evenly over the cookie bases, filling each liner nearly to the top. Then crumble the rest of your cookie dough over each cheesecake and sprinkle generously with mini M&M’s.
Step 6: Return the pan to the oven and bake for another 12 to 15 minutes. Look for the cheesecake to be just set in the center and the cookie crumble on top to turn a light golden brown.
Step 7: Let the cheesecakes cool in the pan for about 10 minutes. Then carefully remove the liners and transfer the cheesecakes to the fridge to chill for several hours. This chilling step helps the flavors meld and the texture firm up.
Servings and Timing
This Monster Cookie Cheesecakes Recipe yields 12 delightful mini cheesecakes — perfect for sharing or saving a few for later. The prep time is about 15 minutes, with bake times totaling around 20 minutes. Add to that at least 2 hours of chilling to achieve the perfect texture. Altogether, you’re looking at roughly 2 hours and 35 minutes from start to finish, including resting and cooling time. I find that the wait is totally worth it!
How to Serve This Monster Cookie Cheesecakes Recipe
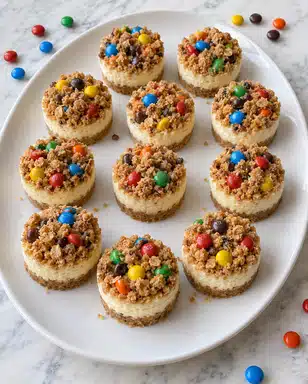
I love serving these cheesecakes chilled right from the refrigerator. The cool, creamy filling paired with the chewy cookie crust is just heavenly. For a special touch, I sometimes garnish each cheesecake with a few extra mini M&M’s or a light dusting of powdered sugar to make them pop visually.
If I’m serving these at a party, I like to arrange them on a colorful platter to highlight those bright candy sprinkles. They’re perfect finger foods at gatherings, and I always suggest a smaller portion per person so everyone can enjoy more than one. For an easy pairing, a cold glass of milk or a simple cup of coffee brings out the dessert’s flavors beautifully.
For adult gatherings, I’ve found that these cheesecakes go surprisingly well with a sweet Riesling or a creamy dessert cocktail like a White Russian. The slight acidity of the wine balances the richness, making every bite feel fresh and indulgent. Whether it’s a family celebration, holiday party, or a laid-back weeknight treat, I always feel these Monster Cookie Cheesecakes make the moment a little sweeter.
Variations
One of the things I adore about this Monster Cookie Cheesecakes Recipe is how versatile it is. You can swap the peanut butter for almond or sunflower seed butter if you want a different nutty flavor or need a peanut-free option. For a gluten-free twist, just make sure to use certified gluten-free oats, and you’re good to go.
If you’re looking for a vegan version, you can experiment with dairy-free cream cheese alternatives and flax eggs or other egg substitutes for binding. The texture might be slightly different but still wonderfully rich and satisfying. To shake things up on the flavor front, try tossing in some chopped walnuts or pecans instead of oats for added crunch, or swap mini M&M's for mini chocolate chips or rainbow sprinkles for a new look.
I’ve even tried baking these as one large cheesecake in a springform pan instead of mini servings, which works great if you need a showstopper centerpiece. Just adjust the baking time accordingly and enjoy the same irresistible flavor in a different format!
Storage and Reheating
Storing Leftovers
These little cheesecakes store beautifully in the refrigerator. I recommend placing them in an airtight container to keep them moist and fresh. They’ll happily keep for about 4 to 5 days, so you can enjoy them well after the initial baking day. When I store them, I try not to stack them directly on top of each other unless separated by parchment paper to avoid any sticking.
Freezing
If you want to keep these treats longer, freezing is a great option. I carefully wrap each mini cheesecake in plastic wrap and then place them all together in a freezer-safe container or zip-top bag. They freeze well for up to 3 months. When I’m ready to enjoy one, I thaw it overnight in the fridge for the best texture.
Reheating
I don’t usually recommend reheating these cheesecakes since they’re best enjoyed chilled. However, if you do prefer them a little warmer, I gently warm a single cheesecake in the microwave for 10 to 15 seconds. Be careful not to overheat, or the creamy filling might start to separate. Room temperature is also a lovely way to serve them if you want to soften them slightly without any heat.
FAQs
Can I make these cheesecakes ahead of time?
Absolutely! I often prepare the Monster Cookie Cheesecakes Recipe a day in advance. After baking and allowing them to cool, I chill them overnight in the refrigerator. This resting time really helps the flavors develop and the texture firm up nicely.
Can I use crunchy peanut butter instead of creamy?
You can, but I prefer creamy peanut butter because it blends more evenly into the cookie base, giving a smoother texture. Using crunchy peanut butter will add bits of peanuts and extra crunch, which some people might enjoy but can affect the consistency a bit.
Are mini M&M’s necessary?
They’re not absolutely necessary, but I love how mini M&M’s add a colorful, festive look and a little extra sweetness. You can substitute them with mini chocolate chips, chopped candy bars, or even rainbow sprinkles depending on your preference or what you have on hand.
Can I double this recipe?
Definitely! This recipe scales well, so feel free to double the ingredients and bake in two muffin pans. Just keep an eye on the baking time since larger batches might require a few extra minutes in the oven.
What if I don’t have a muffin pan?
If you don’t have a muffin pan, you can use small ramekins or a mini cupcake pan if you have one. Just be sure to line them with liners or grease them well to prevent sticking. Alternatively, making it as one large cheesecake in a springform pan is an option I’ve tried and love too!
Conclusion
If you’re craving a dessert that’s bursting with flavor, texture, and a bit of fun, I can’t recommend this Monster Cookie Cheesecakes Recipe enough. It’s a delightful twist on classic favorites that always impresses, whether you’re feeding a crowd or indulging a sweet tooth at home. Give this recipe a try—you’ll love the way it brings smiles and happy taste buds to the table every single time.
Print
Monster Cookie Cheesecakes Recipe
- Prep Time: 10 minutes
- Cook Time: 22 minutes
- Total Time: 35 minutes plus chilling time
- Yield: 12 servings
- Category: Dessert
- Method: Baking
- Cuisine: American
- Diet: Gluten Free
Description
These Monster Cookie Cheesecakes combine the best of chewy peanut butter cookies and creamy cheesecake in a convenient, bite-sized muffin form. With a gluten-free cookie base packed with oats and peanut butter, topped with smooth vanilla cheesecake and colorful mini M&M's, these treats are perfect for parties, desserts, or anytime you crave a sweet, fun snack.
Ingredients
Cookie Base
- ½ cup creamy peanut butter
- ½ cup packed brown sugar
- 1 large egg
- 1 cup quick oats (certified gluten free if necessary)
Cheesecake Filling
- 8 oz cream cheese (1 250 gram package), room temperature
- ¼ cup granulated sugar
- 1 teaspoon vanilla extract
- 1 large egg
Topping
- ¼ cup mini M&M's
Instructions
- Preheat the oven: Preheat your oven to 350°F (175°C) and line a 12-cup muffin pan with paper liners to prepare for baking.
- Prepare cookie base: In a medium-sized bowl, thoroughly stir together the creamy peanut butter, packed brown sugar, egg, and quick oats until the mixture is completely combined into a sticky dough. Using about 1 tablespoon of the cookie dough per muffin liner, press it firmly into the bottom of each liner to form an even base.
- Bake cookie crusts: Place the muffin pan in the oven and bake the cookie bases for 5-7 minutes, or until the tops appear mostly dry. This pre-baking helps set the crust before adding the cheesecake layer.
- Make the cheesecake filling: In a separate bowl, beat the room-temperature cream cheese until smooth and creamy. Add the granulated sugar, vanilla extract, and egg, then continue beating until the mixture is completely smooth and well incorporated.
- Assemble cheesecakes: Remove the muffin pan from the oven and evenly divide the cheesecake batter among the 12 pre-baked crusts. Crumble any remaining cookie dough over the top of the cheesecake batter, then sprinkle mini M&M's on each for a colorful, fun finish.
- Final bake: Return the muffin pan to the oven and bake for 12-15 minutes, or until the cheesecake is just set and the cookie crumbs on top turn a light golden brown.
- Cool and chill: Carefully remove the cheesecakes from the oven and allow them to cool in the pan for 10 minutes before removing the liners. Refrigerate the cheesecakes for several hours to fully set before serving. Store leftovers in an airtight container in the refrigerator or freeze for up to 3 months.
Notes
- Use certified gluten-free oats to make this recipe gluten-free.
- Ensure cream cheese is at room temperature to achieve a smooth cheesecake filling.
- Mini M&M's add a festive touch, but you can substitute with other small candies or chocolate chips as desired.
- Allow cheesecakes to chill thoroughly to achieve the best texture before serving.
- Freezing leftovers helps preserve freshness and flavor for longer storage.


Leave a Reply