
I absolutely adore this Salted Caramel Apple Tart {Grain Free, Paleo} Recipe because it perfectly balances warm, cozy flavors with a healthy twist. The buttery grain free crust cradles juicy, spiced apples, all crowned with a luscious, dairy-free salted caramel sauce that I could eat by the spoonful. It’s the ultimate fall dessert that feels indulgent yet stays true to my paleo lifestyle. Whenever I make this tart, it immediately fills my kitchen with that inviting aroma of baked apples and caramel, instantly lifting everyone's spirits and making any occasion special.
Why You'll Love This Salted Caramel Apple Tart {Grain Free, Paleo} Recipe
When I first made this tart, I fell in love with how its flavor hits all the right notes without any guilt. The apples are tender and sweet, infused with warm spices like cinnamon and apple pie spice, while the salted caramel adds just the right touch of richness and a hint of saltiness that elevates the whole dessert. It’s that perfect balance between sweet and savory that keeps me coming back for more.
What makes this recipe even better for me is how simple it is to prepare. The crust comes together easily in a food processor, and chilling it while you make the caramel means the whole process feels seamless. You don't need to be a baking expert to nail this tart. Plus, since it’s grain free, paleo, and dairy free, I know I’m treating my body well without sacrificing any flavor. It’s a rare find to have a dessert that tastes this decadent and fits my dietary preferences.
I love serving this tart at family gatherings or holiday dinners. Everyone is always impressed by its gorgeous golden crust and gooey caramel topping. It feels fancy enough for special occasions but is comforting enough to enjoy on a cozy weeknight. The fact that it’s gluten and grain free means my friends with restrictions can enjoy it too, which makes sharing even sweeter.
Ingredients You'll Need
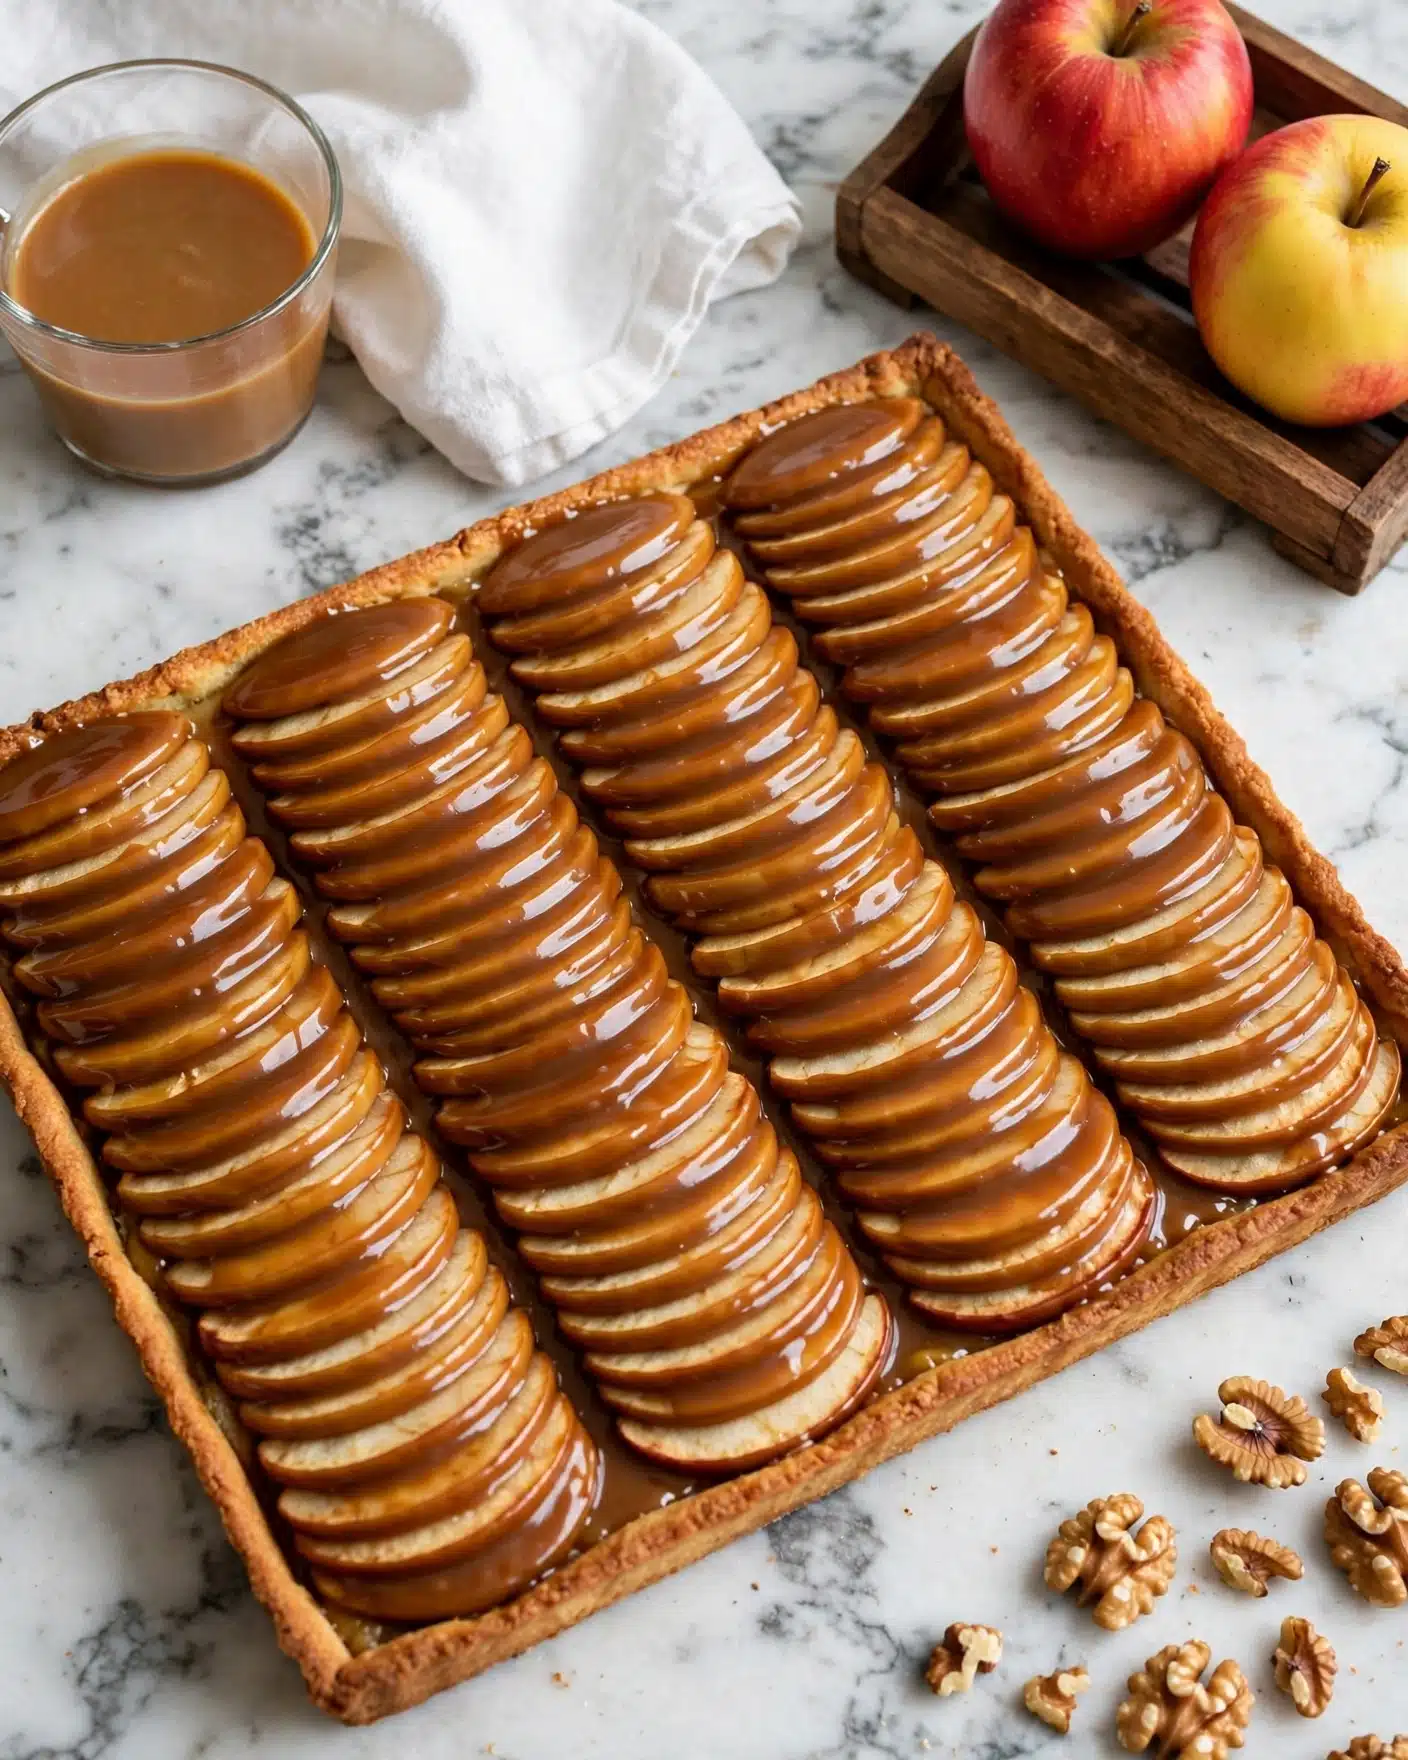
This recipe uses a handful of simple but essential ingredients that each play a key role in making this tart absolutely irresistible. From the almond flour that creates a tender, flaky crust to the coconut sugar adding natural sweetness, every item works together perfectly to deliver a rich taste and satisfying texture.
TIP : You'll find the full list of ingredients and measurements in the recipe card below
- Blanched almond flour: Provides a buttery, tender base that’s naturally grain free.
- Tapioca flour: Adds just enough stretch and lightness to the crust and filling.
- Coconut flour: Boosts fiber while keeping the crust flaky and rich.
- Sea salt: Enhances all the flavors, especially in the salted caramel.
- Pure maple or coconut sugar: A natural sweetener that caramelizes beautifully without overpowering.
- Palm oil shortening or grass-fed butter: Creates that luscious, flaky texture in the crust.
- Egg: Binds the crust ingredients perfectly without fuss.
- Pink lady apples: Crisp and tart apples that soften beautifully when baked.
- Lemon juice: Keeps the apples fresh and bright, preventing browning.
- Apple pie spice and cinnamon: Classic warm spices that bring comfort and depth.
- Full fat coconut milk or cream: Forms the base of the silky, dairy-free salted caramel sauce.
- Vanilla extract: Adds warmth and complexity to the caramel.
Directions
Step 1: In your food processor, combine the almond flour, tapioca flour, coconut flour, sea salt, and sugar. Add the palm oil shortening or butter, pulsing until the mixture looks like coarse crumbs. Then add the egg and pulse just enough for the dough to come together into a firm disk. Wrap it in plastic and chill for at least 30 minutes. This chilling step is crucial to make handling the dough easier.
Step 2: While the dough chills, start making the salted caramel. In a small saucepan, whisk together the full fat coconut milk or cream with the coconut sugar over medium heat. Once it comes to a boil, keep whisking and simmer for about 5 minutes until the mixture thickens to a deep caramel color—be careful not to burn it! Remove from heat, then stir in vanilla extract and sea salt. Set it aside to cool slightly.
Step 3: Prep your apples by peeling and thinly slicing them. Toss the slices in a bowl with lemon juice, tapioca flour, coconut sugar, apple pie spice, cinnamon, and a pinch of salt until everything is evenly coated. Cover and refrigerate until you're ready to assemble the tart.
Step 4: Preheat your oven to 375 degrees Fahrenheit. Take your dough out of the fridge and unwrap it. Flatten it a bit while still wrapped, then unroll and spread it evenly into a 9-inch round or 14 x 5-inch rectangular tart pan, pressing the dough up the sides. If the dough starts to soften too much as you work, pop it back in the fridge for a few minutes to firm up.
Step 5: Place the tart pan on a baking sheet and bake the crust for 7 to 8 minutes until the bottom just sets and may puff slightly. Remove from the oven and carefully arrange the apple mixture evenly inside the crust, keeping the apples level with the sides. Drizzle 2 to 3 tablespoons of the salted caramel sauce over the apples before returning the tart to the oven.
Step 6: Bake the assembled tart for 35 to 40 minutes until the apples soften and the crust turns a deep golden brown. About halfway through, check the tart and cover the edges with foil if they are browning too quickly. When done, remove from the oven and immediately drizzle at least 3 more tablespoons of caramel sauce over the top.
Step 7: Let the tart cool before slicing. I love serving it with a scoop of your favorite paleo-friendly ice cream or coconut whipped cream, plus any extra salted caramel you saved. This tart tastes incredible warm or at room temperature—either way, it’s a showstopper!
Servings and Timing
This recipe makes about 8 generous servings, perfect for sharing with family or friends. Prep time is roughly 30 minutes, with an additional 45 minutes of baking time, so you’re looking at about 1 hour and 15 minutes total from start to finish. Don’t forget to account for the 30 minutes of chilling the dough, which you can use to prepare the caramel and apple filling. The resting time after baking is essential for the tart to set properly and ensures every bite holds together luscious flavors and textures.
How to Serve This Salted Caramel Apple Tart {Grain Free, Paleo} Recipe
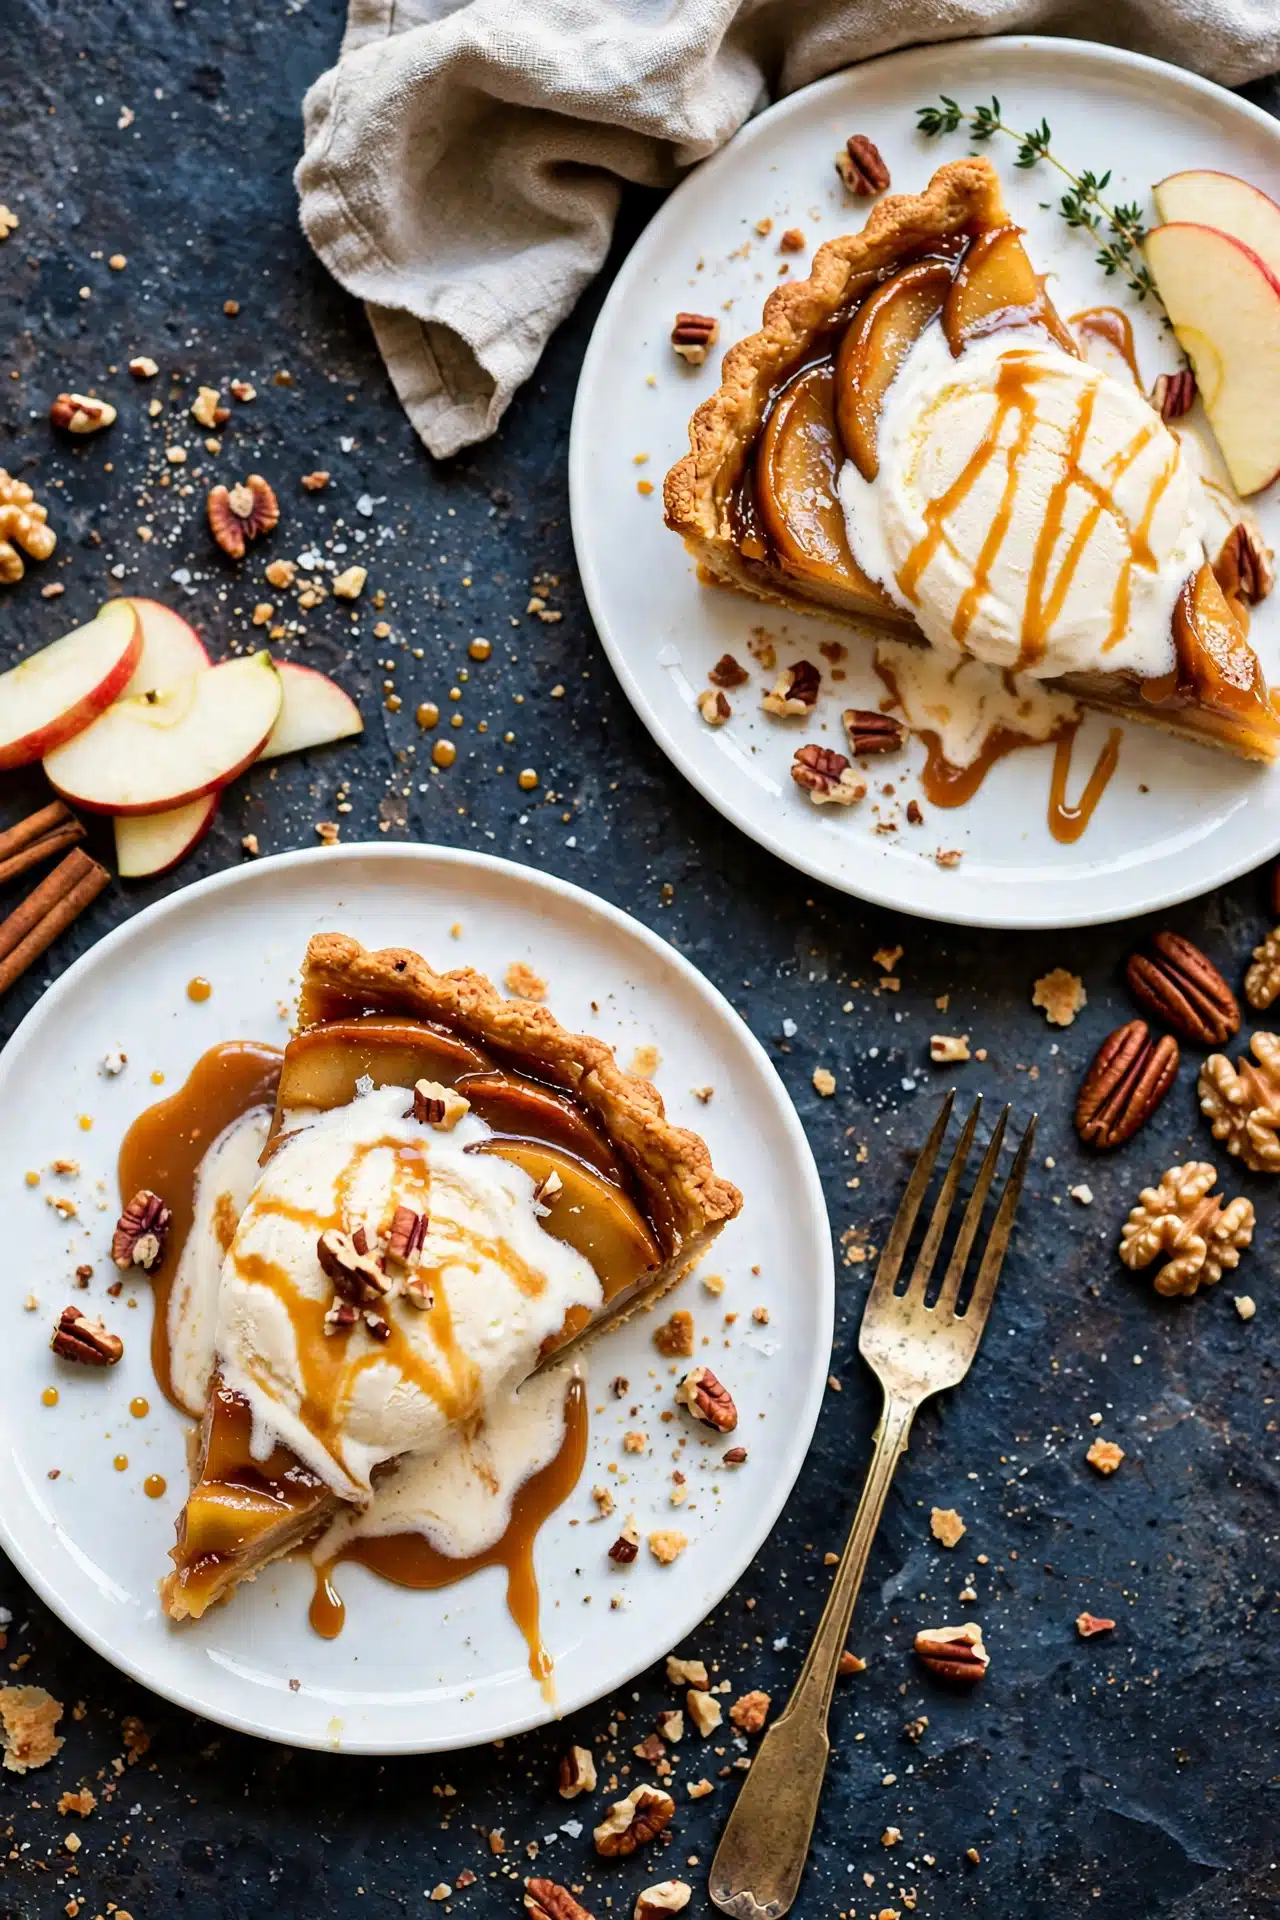
I love serving this tart slightly warm with a scoop of paleo-friendly vanilla ice cream or some homemade coconut whipped cream on the side. The creamy coldness contrasts beautifully with the warm caramel and tender apples, creating a perfect harmony in every bite. You could also sprinkle a few toasted pecans or walnuts on top for an added crunch and nutty flavor that complements the salted caramel.
For presentation, I like to drizzle a little extra salted caramel on the serving plate around each slice, adding a touch of elegance and extra indulgence. A dusting of cinnamon or a light sprinkle of coarse sea salt over the caramel can enhance the flavors and make each slice look irresistible. It’s perfect for holiday dinners, cozy fall gatherings, or any special occasion where you want a crowd-pleasing dessert.
This tart pairs wonderfully with a warm cup of chai tea or a glass of lightly oaked white wine, such as Chardonnay, if you prefer something wine-based. For a non-alcoholic option, an apple cinnamon spritzer or vanilla almond milk latte complements the flavors nicely. I usually serve it at room temperature or slightly warmed to bring out the full depth of the salted caramel and spiced apples—never frozen, as you want those fresh, tender textures to shine.
Variations
One of my favorite things about this Salted Caramel Apple Tart {Grain Free, Paleo} Recipe is how adaptable it is. If you want to make it vegan, simply swap the egg in the crust for a flax egg, and use coconut oil or vegan butter instead of palm shortening. The structure might be a bit different, but it still tastes fantastic.
If you prefer a different fruit, pears or peaches work beautifully in place of apples. Just adjust the baking time slightly depending on the fruit's texture and sweetness. You could also swap vanilla extract in the caramel for a splash of bourbon or rum for an adult twist that adds warmth and depth to the flavor.
For those who might not be strictly paleo but want a grain-free tart, adding a little gluten-free oat flour into the crust mix can create an extra crumbly texture. I’ve also experimented with baking the tart in small individual tart pans or even as hand pies if you want to serve cute, portable portions. The salted caramel sauce can be made thicker by using coconut cream instead of milk, giving a richer finish if desired.
Storage and Reheating
Storing Leftovers
I always store leftover tart slices in an airtight container in the refrigerator. They stay fresh for up to 4 days, which is perfect if you want to enjoy a treat throughout the week. Make sure to keep any extra salted caramel sauce in a separate small jar or container to drizzle fresh over slices when serving.
Freezing
This tart freezes well if you want to keep it longer. I usually slice the tart first, then individually wrap each slice tightly in plastic wrap and place them in a freezer-safe container or zip-top bag. Frozen slices keep well for up to 2 months. When you’re ready to eat, thaw the slices overnight in the fridge for best texture.
Reheating
To reheat, I gently warm slices in a low oven (about 300 degrees Fahrenheit) for 10 to 15 minutes to preserve the crust’s crispness and re-soften the apples. Avoid microwaving if you want to keep that lovely flaky texture, as the microwave can make the crust soggy. After warming, a fresh drizzle of salted caramel makes the tart taste just like it was freshly baked.
FAQs
Can I use other types of apples for this tart?
Absolutely! While pink lady apples are my favorite because of their perfect balance of tartness and sweetness, you can also use Granny Smith, Fuji, or Honeycrisp apples. Just keep in mind that tarter apples may require a touch more sugar to balance their flavor.
Is this recipe suitable for people with nut allergies?
Since the crust relies heavily on almond flour, this recipe is not suitable for those with nut allergies. However, for a nut-free crust, you might experiment with sunflower seed flour or cassava flour as a substitute, though the texture and flavor will be different.
Can I make the salted caramel sauce ahead of time?
Yes! The salted caramel sauce can be made up to a week in advance and refrigerated in a sealed jar. Just give it a good whisk and warm gently before drizzling it over the tart.
How do I prevent the crust edges from burning during baking?
Great question! About halfway through baking, cover the edges of the crust loosely with foil to shield them from over-browning. This keeps the crust perfectly golden without becoming too dark or bitter.
Can I prepare this tart dairy free?
Definitely. Just use palm oil shortening or coconut oil instead of butter in the crust and full fat coconut milk or cream for the salted caramel. This version still tastes rich and decadent without any dairy.
Conclusion
I truly believe this Salted Caramel Apple Tart {Grain Free, Paleo} Recipe is a standout dessert that brings warmth and comfort in every bite. It’s a wonderful way to enjoy classic fall flavors with wholesome ingredients and minimal fuss. I’m so excited for you to try it and make it your own—it’s one of those recipes that quickly becomes a cherished favorite in any kitchen!
Print
Salted Caramel Apple Tart {Grain Free, Paleo} Recipe
- Prep Time: 30 minutes
- Cook Time: 45 minutes
- Total Time: 1 hour 15 minutes
- Yield: 8 servings
- Category: Dessert
- Method: Baking
- Cuisine: Grain Free, Paleo
- Diet: Grain Free, Paleo, Gluten Free, Dairy Free
Description
This Salted Caramel Apple Tart is a luscious grain-free and paleo-friendly dessert perfect for fall. Featuring a buttery almond and coconut flour crust, thinly sliced Pink Lady apples spiced with cinnamon and apple pie spices, and drizzled with a rich dairy-free salted caramel sauce made from coconut milk and coconut sugar. It’s gluten-free, dairy-free, and sure to impress with its beautiful presentation and comforting flavors.
Ingredients
Crust:
- 1 cup blanched almond flour
- ½ cup tapioca flour
- 2 Tbsp coconut flour
- ¼ tsp sea salt
- 2 Tbsp pure maple sugar or organic coconut sugar
- 7 Tbsp palm oil shortening or grass-fed butter, or a combination of both
- 1 egg
Filling:
- 3 Pink Lady apples, peeled and sliced thin (about ⅛-¼ inch thick)
- 1 Tbsp lemon juice
- 1 Tbsp tapioca flour
- 3 Tbsp organic coconut sugar
- ½ Tbsp apple pie spice
- ½ tsp cinnamon
- Pinch of salt
Caramel:
- ⅔ cup full fat coconut milk (or coconut cream for thicker caramel)
- 3 ½ Tbsp coconut sugar
- 1 tsp pure vanilla extract
- ¼ tsp fine grain sea salt
Instructions
- Prepare the Dough/Crust: In a food processor, pulse the almond flour, tapioca flour, coconut flour, sea salt, and sugar with the palm shortening and/or butter until crumbly. Add the egg and pulse until a dough forms. Flatten the dough into a disk, wrap in plastic wrap, and chill in the refrigerator for 30 minutes to firm up.
- Prepare the Salted Caramel: In a small saucepan over medium heat, combine the coconut milk or cream with coconut sugar. Whisk continuously and bring to a boil. Continue whisking and cooking for about 5 minutes until the mixture thickens, reduces, and turns a deep caramel color. Remove from heat and stir in vanilla extract and sea salt. Set aside to cool slightly, whisk gently before using.
- Prepare the Apple Filling: In a mixing bowl, toss the thinly sliced apples with lemon juice, tapioca flour, coconut sugar, apple pie spice, cinnamon, and a pinch of salt. Mix thoroughly to coat all the apples evenly. Cover and refrigerate until ready to assemble. Preheat the oven to 375°F.
- Assemble the Tart: Remove the chilled dough and flatten it while still wrapped in plastic wrap. Unwrap and transfer it into a 9-inch round or 14x5-inch rectangular tart pan. Press the dough gently across the bottom and sides, patching any cracks if needed. Place the tart pan on a baking sheet and bake the crust for 7-8 minutes until just set and slightly puffed.
- Add Filling and Caramel: Remove the crust from the oven and evenly spread the apple mixture inside, keeping it level with the sides of the crust without overfilling. Drizzle 2-3 tablespoons of the salted caramel sauce over the apples.
- Bake the Tart: Return the tart to the oven and bake for 35-40 minutes until the apples are tender and the crust is golden brown. After about 20 minutes, cover the edges with foil to prevent burning.
- Finish and Serve: Remove the tart from the oven and immediately drizzle at least 3 more tablespoons of the salted caramel sauce over the apple filling. Allow the tart to cool before slicing. Serve with ice cream and extra caramel sauce if desired. Enjoy!
Notes
- The crust dough can be fragile; patch cracks as needed and chill again if it softens too much.
- Use Pink Lady apples for a tart, crisp flavor, or substitute with Honeycrisp or Granny Smith if preferred.
- The salted caramel can be made thicker by using coconut cream instead of coconut milk.
- To prevent the crust edges from burning during baking, tent with foil halfway through the baking time.
- Store leftover tart covered in the refrigerator; caramel will thicken when chilled.


Leave a Reply