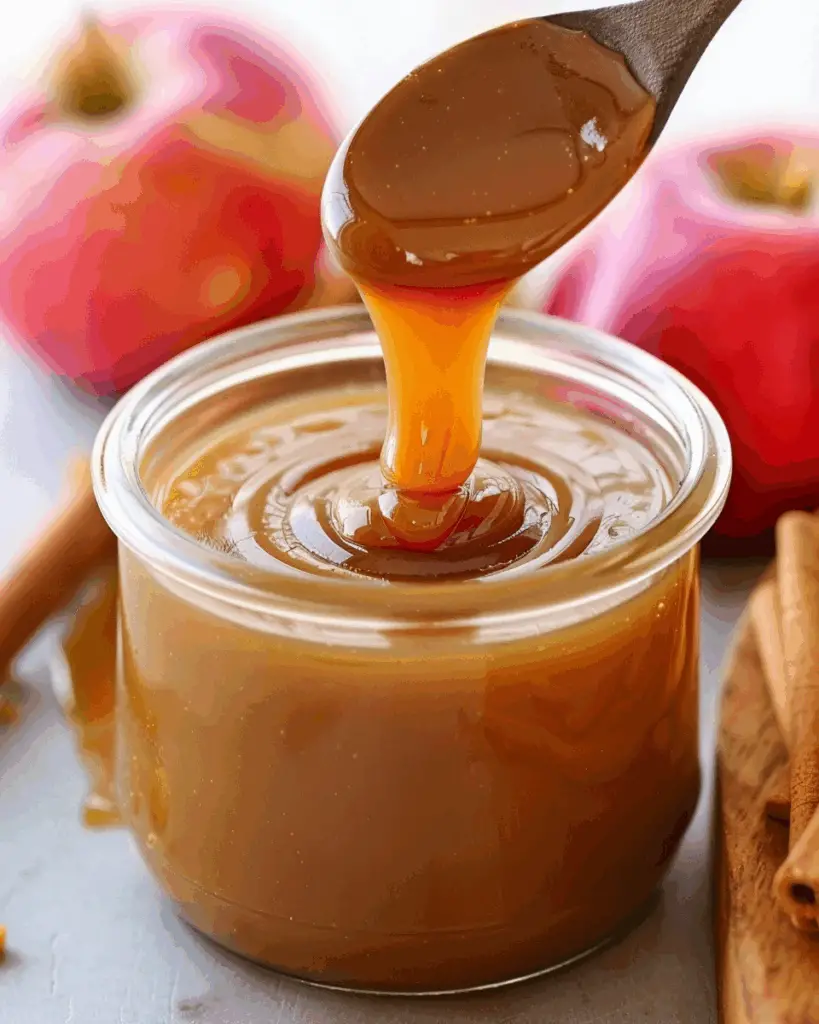
This is a rich, buttery caramel sauce with a lovely twist from apple cider and a touch of cinnamon. I use it as a topping on ice cream, drizzle it over warm desserts, or even dip apple slices into it — it’s comforting, creamy, and full of flavor.
Why I’ll Love This Recipe
I love this version of caramel sauce because the apple cider reduction adds depth and brightness, balancing the sweetness instead of letting it feel one‑dimensional. The cinnamon note brings a cozy warmth, and the texture is smooth and velvety. Every bite feels like autumn in a spoon.
Ingredients
(Here’s a tip: Check out the full list of ingredients and measurements in the recipe card below.)
2 cups apple cider
1 teaspoon ground cinnamon
1 cup (200 g) granulated sugar
6 tablespoons unsalted butter
⅓ cup (≈ 79 g) heavy whipping cream, warmed slightly
½ teaspoon vanilla extract
1 pinch kosher salt
Directions
In a small saucepan over medium‑high heat, combine the apple cider and cinnamon. Simmer for about 18–20 minutes, stirring occasionally, until it reduces down to roughly ¼ cup. Then set it aside.
In a separate medium heavy‑bottomed saucepan, spread the granulated sugar evenly over the bottom. Place it over medium‑low heat. Don’t stir immediately — allow the outer edges to begin melting.
As the sugar begins melting, gently tilt the pan or swirl it to help more sugar contact the heat. Once substantial portions have melted, you may begin gently stirring with a wooden spoon or heatproof silicone spatula to encourage uniform melting. Be patient.
Continue cooking (stirring gently) until the sugar turns a deep amber color, about 5–10 minutes. Watch carefully so it doesn’t burn.
Lower the heat to low. Carefully add the butter and stir constantly until it melts fully and integrates.
Gradually pour in the warmed heavy cream while stirring — the mixture will bubble up, so proceed cautiously.
Stir in the reduced apple cider and the vanilla extract until everything is well combined. Add the pinch of salt and stir again.
Keep cooking on low heat for another 5–10 minutes until the sauce is smooth and slightly thickened.
Remove from heat and let it cool. The sauce will continue to thicken as it cools. You can use it warm or cold.
Servings and timing
Prep time: 5 minutes
Cook time: 40 minutes
Total time: 45 minutes
Yield: about 24 tablespoons (i.e. around 1½ cups)
Serving size: 2 tablespoons
Variations
If I like a lighter version, I might use half‑and‑half instead of full heavy cream (though it won’t be quite as rich).
I sometimes experiment by adding a pinch of nutmeg or a dash of allspice along with the cinnamon for extra warmth.
For a nuttier twist, I stir in some finely chopped toasted nuts (like pecans or walnuts) right at the end.
Instead of apple cider, some versions use apple juice, though the flavor is milder.
If I want a saltier caramel, I can increase the pinch of salt (especially if using salted butter, adjust accordingly).
Storage/reheating
I let the sauce cool to room temperature, then I transfer it into an airtight container (I prefer glass jars). In the refrigerator it keeps for up to one week. To reheat, I either microwave it gently or warm it in a saucepan on low heat, stirring until smooth. If I want to store longer, I freeze it in small portions (so I can thaw only what I need). It can be frozen up to 3 months, but I always let it thaw at room temperature before reheating.
FAQs
What kind of apple cider should I use?
I usually use a spiced or unsweetened apple cider (if store‑bought) so I get good flavor without extra sweetness. If I only have plain cider, it works, but the apple flavor will be a bit more subtle.
Can I substitute apple juice for apple cider?
Yes — but the result will be less intense in apple flavor. The cider gives more character to the sauce.
Why do I warm the heavy cream before adding it?
Warming the cream slightly helps reduce the shock to the hot caramel, minimizing the chance of the sauce seizing or crystallizing.
My caramel got grainy — what went wrong?
That usually happens if the sugar crystallizes. To avoid that, I stir gently only after the edges begin to melt, keep the heat controlled (not too high), and make sure all sugar is melted smoothly. Sometimes brushing down the sides of the pan with a wet pastry brush helps prevent stray sugar crystals.
Can I can this sauce for long‑term storage?
I avoid canning because caramel sauces are tricky — their high sugar content and low acidity can pose food safety risks. Freezing in small containers is safer.
Conclusion
I find this apple cider caramel sauce to be a comforting, elegant twist on classic caramel. The reduction of cider brings brightness, the cinnamon adds warmth, and the texture is dreamy. Whether I drizzle it over ice cream, swirl it into cakes, or simply dip fruit in it, this sauce always adds something special.
I share with you a soft, fluffy, and tender roll recipe where pumpkin brings a subtle sweetness and moistness. These pumpkin dinner rolls are perfect alongside soups, stews, or a holiday roast — warm, fragrant, and with a golden crust.
Why You’ll Love This Recipe
I love how the pumpkin adds extra moisture and a delicate flavor without overpowering the roll. The texture stays soft for days, and they bake up beautifully golden on top. Plus, the recipe is straightforward — the kind of baking I enjoy because the results feel special but aren’t overly fussy.
Ingredients
(Here's a tip: Check out the full list of ingredients and measurements in the recipe card below.)
3 ½ to 4 cups all‑purpose flour
2 ¼ teaspoons (one packet) active dry yeast
¼ cup granulated sugar
½ teaspoon salt
½ teaspoon ground cinnamon (optional, for extra warmth)
½ cup pumpkin puree (not pumpkin pie filling)
½ cup warm milk (about 40 °C / 105‑110 °F)
3 tablespoons melted butter (plus extra for brushing)
1 large egg, at room temperature
Directions
In a bowl, stir together warm milk, pumpkin puree, melted butter, sugar, and the egg until well combined.
Sprinkle the yeast over the mixture and let it sit 5 to 10 minutes until foamy.
Add about 3 ½ cups of flour, salt, and optional cinnamon, mixing until a soft dough forms.
Knead (by hand or with a mixer and dough hook) for about 5–7 minutes, adding flour as needed, until the dough is smooth and pulls away from the sides of the bowl but is still slightly tacky.
Place the dough in a greased bowl, cover it, and let it rise in a warm spot until doubled (about 1 hour).
Punch down the dough gently. Divide it into 12–16 equal pieces (or more for smaller rolls). Shape each piece into a smooth ball.
Arrange the rolls in a greased baking pan, leaving space between them. Cover and let them rise again until puffy and nearly doubled (about 30 to 45 minutes).
Preheat oven to 190 °C (375 °F).
Bake for 15 to 20 minutes, until the tops are golden and the rolls sound hollow when tapped.
Remove from oven and brush the tops with melted butter. Let cool slightly before serving.
Servings and Timing
Makes: about 12 to 16 rolls (depending on size)
Rising times: first rise ~1 hour, second rise ~30–45 minutes
Baking time: 15‑20 minutes
Total time (including mixing, rising, baking): ~2 to 2½ hours
Variations
Sweet roll version: add 2 tablespoons of brown sugar and a pinch of nutmeg to the dough, and brush with honey butter after baking.
Savory version: omit cinnamon, and stir in 1 tablespoon of chopped fresh herbs (like rosemary or thyme) or ½ cup grated cheese.
Mini rolls: make 24–30 rolls instead of 12–16 for dinner‑party size buns.
Stuffed rolls: flatten each dough piece and place a small cube of cheese or a savory filling in the center before shaping.
Storage / Reheating
Store cooled rolls in an airtight container or resealable plastic bag at room temperature for up to 3 days. To freeze, wrap tightly and place in a freezer bag for up to 2 months. To reheat, wrap in foil and warm in a 160 °C (325 °F) oven for 10–15 minutes, or microwave briefly (covering with a damp paper towel) until warmed through.
FAQs
What kind of pumpkin should I use?
I always use pure pumpkin puree (canned or homemade), not the sweetened pumpkin pie filling. The pure version gives moisture and flavor without added sugar or spices.
Can I use instant yeast instead of active dry yeast?
Yes — if using instant yeast, you can mix it directly with the dry ingredients and skip the foaming step. The dough might rise a bit faster.
My dough seems too sticky. Should I add more flour?
Yes, you can add flour, but do so gradually (1 tablespoon at a time) to avoid making the rolls dense. You want just enough so the dough is manageable but still soft.
Why didn’t my rolls rise well?
Possible reasons: your yeast was old or inactive, your liquid was too hot (killing the yeast) or too cold, or your rising environment was too cool. Ensure the temperature is warm (but not hot) and that yeast is fresh.
Can I make the dough ahead and bake later?
Yes — prepare the dough through shaping, then cover and refrigerate overnight. Let it come to room temperature and rise again before baking.
Conclusion
I hope you enjoy making these pumpkin dinner rolls as much as I do. They bring a gentle sweetness and soft texture that elevate any meal. Once baked, they disappear fast — the perfect sign of a successful batch.
I bring together the cozy flavors of autumn in a single bowl — roasted butternut squash, maple‑roasted apples and chickpeas, crunchy nuts and seeds, tart cranberries, and a creamy vegan ranch — all over a bed of nutty farro.
Why You’ll Love This Recipe
I love this recipe because it’s hearty yet plant‑based, bursting with texture and flavor, and perfect for make‑ahead meals. The sweet and savory contrasts, the warmth of roasted squash, and the creaminess of the ranch make every bite satisfying. It’s flexible too: swap grains or nuts as needed.
ingredients
(Here’s a tip: Check out the full list of ingredients and measurements in the recipe card below.)
Roasted Butternut Squash
2 cups roasted butternut squash
Maple Roasted Chickpeas + Apples
2 medium Gala apples, sliced
1 (15 oz) can chickpeas, drained and rinsed
1 tablespoon extra virgin olive oil
1 cup pure maple syrup
1 teaspoon sea salt
1 teaspoon black pepper
1 teaspoon smoked paprika
1 teaspoon dried parsley
1 teaspoon dried oregano
1 teaspoon dried basil
½ teaspoon cumin
Pinch of red pepper flakes
Bowl Toppings / Assembly
2 cups cooked farro (about 1 cup dried)
A handful of pumpkin seeds
1 cup dried cranberries
1 cup chopped pecans, toasted
Shaved or grated dairy-free parmesan (optional)
Vegan Ranch Dressing
Vegan ranch dressing (to drizzle)
directions
Preheat oven to 400 °F (about 200 °C). Line a baking sheet with parchment.
On the baking sheet, arrange the sliced apples and the rinsed chickpeas in a single layer (grouped by type). Drizzle with olive oil. Sprinkle over salt, black pepper, smoked paprika, parsley, oregano, basil, cumin, red pepper flakes. Then drizzle or spoon on the maple syrup evenly.
Bake for 20‑25 minutes, until the chickpeas and apples are tender and slightly golden or charred. Remove and set aside.
Roast the butternut squash (if not already roasted) by cutting into cubes, tossing with a bit of oil, salt, and pepper, and roasting until tender and caramelized.
Cook the farro according to package instructions. Drain and set aside.
Prepare the vegan ranch dressing and chill until ready to serve.
To assemble: divide cooked farro into bowls. Arrange roasted butternut squash, the roasted apples + chickpeas, dried cranberries, pumpkin seeds, and toasted pecans side by side over the farro. Drizzle with vegan ranch. Top with shaved dairy‑free parmesan if using.
Servings and timing
Serves: 2
Prep time: about 15 minutes
Cook time: about 30 minutes
Total time: about 45 minutes
Variations
Use quinoa, brown rice, or basmati instead of farro (great for gluten-free).
Swap pecans for walnuts or almonds.
Add leafy greens (spinach, kale) underneath for extra veggies.
Use a different dried fruit—like raisins or chopped dried apricots—in place of cranberries.
Add grilled tofu or tempeh for extra protein.
Increase red pepper flakes or add cayenne for more heat.
storage/reheating
Store components separately in airtight containers in the refrigerator for 3–4 days. When ready to eat, reheat the squash, apples, chickpeas, and farro gently (microwave or oven) and then assemble. If the bowl is already dressed, eat within 1–2 days for best texture.
FAQs
### Can I make this bowl ahead of time?
Yes—I often prep the roasted squash, apples, chickpeas, cook the farro, and toast the nuts ahead. Then I just assemble when I want to serve.
### Can I use a different grain instead of farro?
Absolutely. I sometimes use quinoa, brown rice, or basmati rice—especially when I want a gluten‑free version.
### What if I don’t have vegan ranch dressing?
I’ll sometimes use store-bought vegan ranch or another creamy dressing I have on hand (like cashew dressing or tahini-based).
### How can I make this spicier?
I add more red pepper flakes to the apple‑chickpea roast or drizzle a bit of hot sauce before serving.
### How long does the fully assembled bowl last?
Once it’s dressed, I aim to eat it within 1–2 days. The textures soften over time, so it’s best fresh or soon after assembling.
Conclusion
I hope this Vegan Fall Harvest Farro Bowl becomes one of your favorite cozy meals. It’s nourishing, comforting, and full of seasonal flair. I look forward to hearing how you customize it and make it your own.
I created this creamy, savory butter bean dish inspired by the viral “Marry Me” chicken idea, but using beans for a vegetarian (or vegan) twist. It has a rich Tuscan‑style sauce with garlic, sun‑dried tomatoes, herbs, cream, and greens. It’s hearty enough to serve as a main or as a side.
Why You’ll Love This Recipe
I love this recipe because it’s:
Quick and easy — ready in about 15 minutes
Rich, comforting, and full of flavor
Versatile — I can make it dairy‑free or vegan when needed
Filling without being heavy — the beans add substance
A dish I’m proud to serve to guests
ingredients
(Here’s a tip: Check out the full list of ingredients and measurements in the recipe card below.)
For the Butter Beans Dish
2 (15‑oz) cans butter beans, drained and rinsed
2 tablespoons unsalted butter (or vegan butter for dairy‑free)
4 garlic cloves, minced
½ cup sun‑dried tomatoes, chopped
1 tablespoon tomato paste
2 tablespoons Tuscan “Marry Me” seasoning blend
1 teaspoon sea salt
1 cup heavy cream (or full‑fat coconut milk for vegan)
½ cup vegetable stock
3 tablespoons white cooking wine (or extra vegetable stock)
Juice of ½ a lemon
1 cup chopped kale (stems removed)
½ cup freshly grated Parmesan cheese (or dairy‑free alternative)
Extra grated Parmesan (or substitute) for garnish
Tuscan “Marry Me” Seasoning Blend
1 tablespoon smoked paprika
2 teaspoons dried parsley
2 teaspoons dried basil
2 teaspoons dried oregano
1 teaspoon dried thyme
1 teaspoon garlic powder
½ teaspoon dried rosemary
2 bay leaves
directions
Prepare the Tuscan seasoning blend: mix smoked paprika, parsley, basil, oregano, thyme, garlic powder, rosemary, and bay leaves in a small bowl.
Heat a medium skillet over medium heat and melt the butter.
Add the minced garlic, sauté for about 1 minute until fragrant. Then stir in the seasoning blend and salt until well combined.
Add the chopped sun‑dried tomatoes and the tomato paste, stirring until mixed in.
Lower the heat to medium‑low. Slowly pour in the heavy cream, vegetable stock, lemon juice, and white wine. Stir to combine. Let the mixture simmer gently for 1–2 minutes.
Whisk in the grated Parmesan until it melts and the sauce begins to thicken (about 2–3 minutes).
Add the chopped kale and stir to combine, then fold in the drained butter beans.
Simmer everything together for 5–6 minutes, until the beans are warmed and tender and the sauce has thickened.
Remove from heat. Serve with extra grated Parmesan (or substitute) on top, alongside your favorite sides (rice, bread, mashed potatoes, etc.).
Servings and timing
Prep time: 5 minutes
Cook time: 10 minutes
Total time: 15 minutes
Yields: 4 servings
Variations
I can swap butter for vegan butter and heavy cream for coconut milk or another plant‑based cream to make it fully dairy‑free/vegan.
I sometimes substitute or omit the white cooking wine (using extra vegetable stock instead) if I want a non‑alcoholic version.
I can use other greens instead of kale — spinach, collards, broccolini — whatever I have on hand.
If I don’t have sun‑dried tomatoes, I might use roasted tomatoes, tomato puree, or canned diced tomatoes (adjusting moisture).
Instead of butter beans, I can try white beans like cannellini or great northern beans (texture may vary, so I adjust cooking time).
storage/reheating
I store leftovers in a tightly sealed container in the refrigerator for up to 3‑4 days. To reheat, I gently warm on the stovetop or in the oven or microwave, adding a splash of cream or vegetable stock (or plant‑based milk) to re‑loosen the sauce and keep it creamy. Stir occasionally until heated through.
FAQs
How can I use dried beans instead of canned?
If I use dried beans, I soak them overnight (or use a quick soak method), then cook them until tender before adding them to this dish. That adds extra time but works fine.
Can I omit the wine entirely?
Yes — I can omit the white cooking wine and substitute extra vegetable stock. The flavor will be slightly different, but it still turns out delicious.
How do I adjust the consistency of the sauce?
If I want a thicker sauce, I allow it to simmer a bit longer to reduce. If I prefer it thinner, I add a bit more stock or cream until I reach my desired consistency.
Is this dish gluten‑free?
Yes. The dish is naturally gluten‑free as long as the vegetable stock I use is certified gluten‑free.
Can I add more vegetables?
Absolutely. I often toss in extra veggies like zucchini, mushrooms, or bell peppers. I just adjust cooking time so everything finishes together.
Conclusion
I’m excited every time I make these Tuscan “Marry Me” Butter Beans — they’re creamy, comforting, and full of flavor in just one pot. Whether I serve them as a hearty main or a rich side, they never disappoint. Give them a try, adapt them to your preferences, and enjoy!
I made a fun Halloween‑inspired treat: crisp rice cereal bars coated in marshmallow, topped with dark chocolate, and decorated with a white chocolate spider web.
Why I’ll Love This Recipe
I love how simple and festive this is — it’s basically a twist on classic rice cereal treats with a spooky design. It’s quick (just minutes in the microwave), kid‑friendly, and perfect for Halloween parties or seasonal snacking.
Ingredients
(Here's a tip: Check out the full list of ingredients and measurements in the recipe card below.)
4 tablespoons butter
1 bag (full bag) of marshmallows (I used Campfire® HallowMallows)
6 cups crisp rice cereal
8 ounces dark chocolate, melted (can be chocolate chips or candy melts)
4 ounces white chocolate, melted (can be white chocolate chips or candy melts)
Directions
In a large microwave‑safe bowl, combine the butter and marshmallows.
Microwave on high for 30 to 60 seconds until the marshmallows puff and melt, watching carefully so they don’t overflow.
Stir until the mixture is smooth and the butter is fully melted.
Add the crisp rice cereal and stir until all the cereal is coated.
Butter a 9×9‑inch baking dish, then pour in the cereal mixture and press it evenly into the dish.
Pour the melted dark chocolate over the top and spread with a spatula. Let it cool and set for several minutes.
Once set, cut the treats into squares.
Transfer the melted white chocolate into a zip‑top bag. Snip a very small corner of the bag, then pipe spider web designs onto each square.
Let the white chocolate set before serving.
Servings and timing
Yields 16 servings
Prep Time: 15 minutes
Total Time: 15 minutes
Variations
I can swap milk chocolate or semi‑sweet chocolate for the dark chocolate if I prefer something sweeter.
To make it allergy friendly, I might use dairy‑free butter and dairy‑free chocolate.
I could add mix‑ins such as sprinkles or mini candy pieces before pressing the cereal mixture into the pan.
For larger or thinner bars, I could use a 9×13‑inch pan instead of 9×9.
Storage/reheating
I store these in an airtight container at room temperature. They’ll stay good for several days. Reheating isn’t really needed — the texture is best fresh — but if the chocolate softens, I just let them sit at room temperature until firm again.
FAQs
How do I prevent the marshmallows from overflowing in the microwave?
I watch closely while heating and stop the microwave as soon as the marshmallows expand. Using a bowl larger than I think I need also helps avoid spills.
Can I melt the marshmallows on the stovetop instead?
Yes — I can melt the butter and marshmallows together over low heat, stirring constantly until smooth, then proceed with adding cereal.
What if my white chocolate is too thick to pipe a web?
I lightly reheat it in short bursts (10 seconds) or stir in a tiny bit of neutral oil (like vegetable oil) to thin it just enough to pipe.
Do I have to cut them right away?
It’s easier to cut before the chocolate hardens fully. Once the dark chocolate layer is firm, I cut into squares, then pipe on the white chocolate.
Can I double the recipe?
Yes, I simply double all the ingredients and use a larger pan (like 9×13) to accommodate the extra volume.
Conclusion
I enjoy making these Spider Web Cereal Treats because they’re fast, fun, and perfect for Halloween. The combination of crispy cereal, gooey marshmallow, chocolate, and decorative webs always delights family and guests. I hope you’ll try making them and make them your own with mix‑ins or chocolate swaps!
This is a rich and festive fudge that combines the warm spices of gingerbread with creamy marshmallows and white chocolate, plus crunchy walnuts. It’s cut into small squares and is perfect for holiday treats or gifting.
Why You’ll Love This Recipe
I love this fudge because it balances sweet, creamy, and crunchy textures — the marshmallows melt into a soft base, the white chocolate gives richness, and the walnuts add a satisfying bite. The gingerbread flavor gives it a cozy, seasonal twist that makes it special without being fussy.
ingredients
(Here’s a tip: Check out the full list of ingredients and measurements in the recipe card below.)
1 ½ cups granulated sugar
½ cup unsalted butter (1 stick)
1 (5‑ounce) can evaporated milk
1 (8‑ounce) package gingerbread marshmallows
1 ½ cups mini marshmallows
12 ounces chopped white chocolate
½ teaspoon vanilla extract
2 cups walnuts, coarsely chopped (divided use)
directions
Line a 9×13‑inch glass baking dish with foil, leaving an overhang for easy removal. Lightly spray with nonstick spray.
In a large saucepan over medium heat, combine the sugar, butter, evaporated milk, gingerbread marshmallows, and mini marshmallows. Stir continuously until the butter and marshmallows are melted.
Bring the mixture to a boil, then continue to boil and stir constantly for 5 minutes.
Remove from heat and immediately stir in the chopped white chocolate and vanilla extract. Stir until the white chocolate is fully melted and the mixture is smooth.
Stir in 1 ½ cups of the chopped walnuts into the fudge mixture.
Quickly spread the fudge into the prepared pan and immediately sprinkle the remaining ½ cup of walnuts over the top, pressing lightly to adhere.
Refrigerate for several hours or overnight until fully set.
Use the foil overhang to lift the fudge out of the pan, then cut into approximately 1‑inch squares.
Servings and timing
Yields: about 40 squares
Prep time: 5 minutes
Active cooking time: ~15 minutes (heating, melting, stirring)
Cooling / setting time: several hours or overnight
Variations
I can swap the walnuts for pecans or almonds if I prefer a different nut flavor.
I might use semi‑sweet chocolate instead of white chocolate for a more chocolatey base.
If I can’t find gingerbread marshmallows, I could use plain marshmallows plus a small amount of gingerbread flavoring or spices (cinnamon, ginger, nutmeg) to mimic the flavor.
For a nut‑free version, I’d omit the walnuts and maybe press some crushed cookies or toffee bits on top.
storage/reheating
Store the fudge in an airtight container in the refrigerator.
It stays fresh for about 1–2 weeks chilled.
For serving, remove it from the fridge about 10–20 minutes before eating to let it soften slightly.
You can freeze the fudge (well wrapped) for longer storage; thaw in the refrigerator before cutting and serving.
FAQs
What kind of marshmallows should I use if I can’t find gingerbread marshmallows?
I use regular marshmallows and then add a touch of ginger, cinnamon, and nutmeg (or gingerbread flavoring) to approximate the flavor. The texture stays the same.
Can I use milk chocolate instead of white chocolate?
Yes — using milk or semi‑sweet chocolate gives a different flavor profile, more chocolatey and less creamy, but it works well depending on your preference.
Why does the fudge sometimes turn out grainy?
If the sugar mixture isn’t boiling steadily or melting fully before stirring in the chocolate, or if it gets overheated, it can crystallize. I make sure to stir constantly, maintain a steady boil, and remove from heat promptly before adding chocolate.
Can I make it without nuts for nut allergies?
Yes — I simply omit the walnuts and optionally replace them with crunchy mix‑ins like cookie crumbs, crushed pretzels, or toffee bits if desired.
How long does it take to set completely?
Usually several hours in the refrigerator, but I often let it chill overnight to be sure it’s fully firm before cutting.
Conclusion
This Gingerbread Marshmallow Fudge with Walnuts is a festive, creamy, and crunchy treat that’s surprisingly easy to make. I enjoy how the gingerbread notes come through and how it holds up well for gifting or holiday dessert trays. Let me know if you’d like a version scaled down or adjusted — I’m happy to help!
This Beef Macaroni Soup, also known as Hearty Hamburger Soup, is the kind of comforting, cozy dish I turn to when the weather gets chilly or I need a quick, filling meal. It’s loaded with ground beef, tender macaroni, and a rich tomato broth that brings everything together. Whether I’m making it for my family or meal-prepping for the week, this soup always delivers.
Why You’ll Love This Recipe
I love how this recipe balances simple ingredients with big, satisfying flavors. It’s budget-friendly, easy to throw together in one pot, and totally customizable. Plus, it tastes even better the next day, making it ideal for leftovers. The tender pasta, hearty beef, and vegetables in a savory broth make every spoonful incredibly comforting.
Ingredients
(Here's a tip: Check out the full list of ingredients and measurements in the recipe card below.)
1 tablespoon olive oil
1 pound ground beef
1 small onion, chopped
2 cloves garlic, minced
1 cup carrots, diced
2 celery stalks, diced
1 teaspoon dried basil
1 teaspoon dried oregano
½ teaspoon salt
¼ teaspoon black pepper
1 (15-ounce) can diced tomatoes, with juice
1 (15-ounce) can tomato sauce
4 cups beef broth
1 cup elbow macaroni, uncooked
1 cup frozen peas or corn (optional)
Fresh parsley, chopped (for garnish, optional)
Directions
I start by heating olive oil in a large pot over medium heat.
I add the ground beef and cook it until browned, breaking it apart with a spoon as it cooks. I then drain the excess fat.
I stir in the onion, garlic, carrots, and celery. I cook them for about 5 minutes, until the vegetables start to soften.
I season the mixture with basil, oregano, salt, and pepper.
Next, I add the diced tomatoes (with juice), tomato sauce, and beef broth. I bring the mixture to a boil.
Once boiling, I reduce the heat and let it simmer for 10–15 minutes to allow the flavors to meld.
I stir in the uncooked elbow macaroni and cook for another 10 minutes, or until the pasta is tender.
If I’m using peas or corn, I stir them in during the last few minutes of cooking.
I taste and adjust the seasoning if needed, then serve hot with a sprinkle of fresh parsley.
Servings and timing
This recipe makes about 6 servings and takes approximately 35–40 minutes from start to finish. It’s a quick and hearty meal, perfect for busy weeknights.
Variations
Sometimes I switch things up depending on what I have in my kitchen. Instead of ground beef, I’ve used ground turkey or chicken. For a spicy version, I add a pinch of red pepper flakes. I also like swapping elbow macaroni with small shells or ditalini for a fun twist. And if I want extra veggies, I’ll throw in chopped spinach or zucchini near the end of cooking.
Storage/Reheating
I store leftovers in an airtight container in the fridge for up to 4 days. To reheat, I warm it gently on the stovetop or in the microwave, adding a splash of broth or water if the pasta has absorbed too much liquid. This soup also freezes well—just leave out the pasta and add it fresh when reheating.
FAQs
How do I prevent the pasta from getting mushy?
I cook the pasta just until al dente and avoid overcooking it. If I’m planning to store or freeze the soup, I sometimes cook the pasta separately and add it in when serving.
Can I use fresh tomatoes instead of canned?
Yes, I’ve used fresh tomatoes before. I just chop them finely and simmer a bit longer to let them break down and blend into the soup.
Is this soup gluten-free?
As-is, it’s not. But I make it gluten-free by using certified gluten-free pasta and double-checking the labels on my broth and other ingredients.
Can I make this in a slow cooker?
Yes, I brown the beef and sauté the vegetables first, then add everything (except the pasta) to the slow cooker and cook on low for 6–7 hours. I stir in the pasta during the last 20–30 minutes.
What can I serve with this soup?
I usually serve it with crusty bread, a simple green salad, or even grilled cheese sandwiches for an extra hearty meal.
Conclusion
This Beef Macaroni Soup is everything I want in a comforting bowl—rich, hearty, and full of flavor. It’s a go-to in my kitchen when I want something easy that satisfies everyone. Whether I make it for a family dinner or freeze it for later, it never disappoints.
This is a fun layered casserole that captures all the flavors of a Big Mac—juicy beef, tangy pickles and sauce, melty cheese—combined with crispy tater tots and fresh shredded lettuce on top.
Why You’ll Love This Recipe
I love how this dish takes familiar burger flavors and turns them into a comforting, hearty casserole. It’s an easy weeknight meal, and the crispy tots plus the creamy “special sauce” layer make it feel indulgent without being complicated. The layering means you get a bit of everything—meat, cheese, sauce, and crunch—in each bite.
ingredients
(Here’s a tip: Check out the full list of ingredients and measurements in the recipe card below.)
2 lb lean ground beef
1 cup yellow onion, finely chopped
1 ¼ cups Thousand Island (1000 Island) dressing, divided (use 1 cup in the beef mixture, reserve ¼ cup for topping)
¾ cup chopped dill pickles
3 tablespoon mayonnaise
2 tablespoon ketchup
2 teaspoon mustard
2 teaspoon onion powder
1 ½ teaspoon smoked paprika
1 teaspoon kosher salt
1 teaspoon black pepper
2 cups mild cheddar cheese, freshly shredded
32 oz (frozen) tater tots
1 ½ cups thinly shredded lettuce
2 teaspoon sesame seeds (optional, for garnish)
directions
Preheat the oven to 425 °F. Lightly grease a 9×13 inch baking dish.
In a 4‑ to 5‑quart skillet over medium‑high heat, brown the ground beef and chopped onion until the beef is no longer pink (about 6–8 minutes). Drain any excess fat.
Stir into the beef mixture: 1 cup of Thousand Island dressing, chopped pickles, mayonnaise, ketchup, mustard, onion powder, smoked paprika, salt, and black pepper. Mix until everything is fully combined.
Spread the beef mixture into the prepared baking dish in an even layer.
Sprinkle the shredded cheddar cheese evenly over the beef layer.
Place the frozen tater tots in a single layer on top of the cheese. Be careful not to overcrowd them; leave a little space for air to circulate, so they get crispy.
Bake uncovered for 25 to 30 minutes, or until the tater tots are golden brown.
Let the casserole rest a few minutes. Then spread the shredded lettuce on top of the tater tot layer.
Drizzle the remaining ¼ cup of Thousand Island dressing over the lettuce, sprinkle sesame seeds (if using), and serve hot.
For crispier tots, you can prebake them 10 minutes before layering them on top.
Swap in sweet pickle relish instead of chopped dill pickles if you prefer a milder tang.
Use sharp cheddar, Colby Jack, or even American cheese slices instead of mild cheddar for a different flavor twist.
If you want more vegetables, you could mix in diced bell pepper or a little shredded carrot into the beef layer.
For a lower‑fat version, use leaner beef or even ground turkey, and use a light or reduced‑fat mayonnaise/dressing.
storage/reheating
Store leftovers in an airtight container in the refrigerator for up to 3 days. To reheat, place portions in a 350 °F oven until warmed through, which helps keep the tater tots crispy. If the lettuce wilts when reheated, I prefer to add fresh shredded lettuce just before serving.
FAQs
What if I don’t have Thousand Island dressing?
I sometimes make a simple version by mixing equal parts ketchup and mayonnaise, with a splash of pickle juice and a pinch of onion powder, as a substitute.
Can I assemble this ahead of time?
Yes — you can prepare the beef mixture and grate the cheese ahead of time and keep covered in the refrigerator. Wait to layer the tater tots and bake until you're ready to serve for best texture.
Can I freeze this casserole?
I don’t recommend freezing the fully assembled version, because the tater tots may get soggy when thawed. Instead, freeze the cooked beef mixture separately for up to 2 months, then thaw and assemble fresh with tots and cheese when ready to bake.
Can I reduce the amount of tater tots or use another potato base?
Yes — you could use a smaller amount of tots, or slice potatoes thinly (like scalloped style) as a variation. Just be sure to adjust bake time so potatoes cook through.
Is there a vegetarian alternative?
You could replace the beef with a plant‑based ground “beef” alternative, or use lentils or seasoned crumbled tofu. The rest of the flavors—sauce, pickles, cheese, tots—should still shine through.
Conclusion
I hope this Big Mac Tater Tot Casserole becomes one of my go‑to comfort meals. It’s fun, flavorful, and hits all the notes of a burger night in an easy, bake‑and‑serve format. Let me know how yours turns out or if you try any of the variations!
Here’s a warm and comforting soup that feels like a hug in a bowl. I made this version to be simple, nourishing, and perfect for chilly evenings.
Why I’ll Love This Recipe
I love this soup because it’s full of gentle flavor, tender chicken, and soothing broth. It’s one of those meals I turn to when I want something comforting but not heavy. The vegetables add texture and taste, and the rice gives body without weighing things down. It’s easy to adapt, so I often tweak the herbs or swap vegetables depending on what I have.
ingredients
(Here’s a tip: Check out the full list of ingredients and measurements in the recipe card below.)
In a large soup pot or Dutch oven, heat the olive oil over medium heat.
Add the diced onion, carrots, and celery. Sauté until they begin to soften, about 5 minutes.
Stir in the garlic and cook for another 30 seconds, just until fragrant.
Pour in the chicken broth. Add the chicken pieces, thyme, oregano, bay leaf (if using), and a pinch of salt and pepper.
Bring the mixture up to a gentle boil, then reduce heat to a simmer. Cover and cook for about 10 minutes.
Stir in the rinsed rice. Cover again and simmer for 15 to 20 more minutes, until rice is tender and the chicken is cooked through (internal temperature 165 °F / 74 °C).
Remove the chicken to a cutting board and shred or dice it. Discard the bay leaf.
Return the chicken to the pot. Taste and adjust seasoning with salt and pepper.
Stir in the chopped parsley just before serving.
Servings and timing
Servings: about 6 bowls
Prep time: 10 minutes
Cook time: 30 minutes
Total time: 40 minutes
Variations
Use brown or wild rice: If I want a nuttier flavor, I substitute brown or wild rice—but I cook it separately (because they take much longer) and then stir into the finished soup.
Add vegetables: I sometimes toss in peas, corn, or zucchini near the end of cooking.
Creamy version: For a creamier texture, I stir in ½ cup of light cream or evaporated milk just before serving.
Herb swaps: I like to replace or supplement thyme and oregano with tarragon, basil, or rosemary depending on mood.
Leftover chicken: If I have cooked chicken already, I skip cooking raw chicken and just warm it through in the soup before serving.
storage/reheating
I let the soup cool to room temperature, then store it in an airtight container in the refrigerator for up to 3–4 days. Because the rice will absorb liquid over time, when reheating I add a splash of broth or water to bring back the right consistency. I reheat gently on the stove over low heat, stirring occasionally until warmed through.
If I want to freeze, I separate the rice (if possible) from the soup base and freeze them separately. The soup broth can be frozen for up to 2–3 months. When thawing, I reheat the broth first, then add freshly cooked rice to maintain texture.
FAQs
How do I prevent the rice from becoming mushy?
I try not to overcook the rice. If I expect leftovers, I sometimes cook the rice separately and only combine with the soup when serving. Also, using long‑grain rice instead of short‑grain helps maintain some firmness.
Can I use rotisserie or leftover chicken instead of cooking raw chicken?
Yes. I often use shredded rotisserie chicken: I skip cooking raw chicken, add the broth and vegetables first, then stir in the cooked chicken toward the end just to warm it through.
Can I make this in a slow cooker or Instant Pot?
Yes. For an Instant Pot, I’d sauté the vegetables using the sauté mode, then add broth, raw chicken, herbs, and rice, and cook on “soup” mode or high pressure for about 8 minutes, then do a quick release. For a slow cooker, I’d cook the chicken and vegetables on low for several hours, then add rice toward the end so it doesn’t overcook.
Is it okay to use leftover rice?
Yes. If I have leftover cooked rice, I add it just before serving and warm it through. Because it's already cooked, I don’t want it to overcook and become mushy.
Can I freeze this soup as-is (with rice inside)?
Freezing with rice included usually makes the rice very soft or mushy after thawing. I prefer to freeze the broth (and chicken) separately and add fresh rice when reheating.
Conclusion
I hope this cozy chicken and rice soup becomes one of my go‑to comfort meals. It’s simple to make, forgiving in variations, and satisfying even on chilly nights. I like how it warms the soul without being heavy. Let me know if you want a version with different grains or flavors—I’m happy to tweak it.
This chocolate fudge is creamy, rich, and incredibly easy to make. With just three ingredients, I can whip it up whenever a sweet craving strikes.
Why You’ll Love This Recipe
I love how simple and forgiving this fudge is — only a few steps, minimal fuss. It has a smooth, velvety texture and deep chocolate flavor, yet it doesn’t require tempering or candy‑making expertise. It’s perfect for gifts, parties, or just a quiet night with chocolate in the fridge. Because it’s made with sweetened condensed milk, it stays soft but holds its shape when chilled.
ingredients
(Here’s a tip: Check out the full list of ingredients and measurements in the recipe card below.)
2 cups semi‑sweet mini chocolate chips
14 ounces (1 can) sweetened condensed milk
1 teaspoon vanilla extract
directions
Prepare a 9 × 9‑inch square baking pan by lining it with parchment paper, leaving an overhang so I can lift out the fudge easily after chilling.
In a medium microwave‑safe bowl, combine the mini chocolate chips and the sweetened condensed milk.
Microwave the mixture for 1 minute. Then let it rest (stand) for 1 minute without stirring.
After that rest, stir vigorously until the chocolate is fully melted and smooth, and the mixture is thoroughly combined.
Stir in the vanilla extract immediately.
Pour or spread the chocolate mixture into the prepared pan, smoothing the top.
Cover the pan with plastic wrap and chill it in the refrigerator. Chill at least 1 hour; 2 hours is ideal for better firmness.
Once set, use the parchment overhang to lift the fudge from the pan. Score the top with a sharp knife if you like, then cut into squares.
Servings and timing
Servings: 24 pieces
Prep time: ~10 minutes
Chill / setting time: ~1 to 2 hours (part of the total time)
Total time (including chilling): ~3 hours 40 minutes
Variations
Use milk chocolate or dark chocolate chips instead of semi‑sweet, depending on your preference.
Add mix-ins like chopped nuts (pecans, walnuts), mini marshmallows, or crushed peppermint.
For a minty twist, I might add 2–3 drops of peppermint extract.
To make thicker fudge, I could double the recipe and use the same pan size—the pieces will be denser.
storage/reheating
Refrigerator: Store leftover fudge in an airtight container in the fridge. It stays good for up to two weeks.
Freezer: I can freeze fudge in an airtight container for up to three months.
This fudge is quite soft, so I always keep it chilled between servings. It doesn’t get much firmer in the freezer.
I don’t reheat fudge; I serve it straight from cold or slightly chilled.
FAQs
Why is my fudge not getting hard?
If my fudge remains too soft, it may be undercooked or not chilled long enough. I can return the mixture to the microwave (or a gentle double boiler) and heat it more, stirring constantly until the chocolate fully melts and blends well. Then I chill it longer until it sets properly.
Can I keep this fudge at room temperature?
Because this fudge is on the soft side, I don’t recommend leaving it at room temperature for long. It’s best stored in the refrigerator to maintain its structure and prevent it from getting overly soft or melty.
Can I freeze this fudge?
Yes — I freeze my fudge in an airtight container, and it keeps well for up to three months. When ready to eat, I let it thaw in the refrigerator before serving.
Can I double the recipe?
Absolutely. I often double it to make a thicker batch. I use the same pan, and the extra volume gives me denser, more substantial pieces. Just ensure my pan is large enough or use a bigger one.
Can I add nuts or other mix-ins?
Yes — I sometimes mix in chopped nuts (walnuts, pecans), mini marshmallows, or even bits of candy. I fold them into the melted mixture just before pouring into the pan so they stay evenly distributed.
Conclusion
This chocolate fudge has become a favorite in my kitchen because of its ease, versatility, and classic flavor. Whether I’m making it for holidays, gifts, or a cozy treat for myself, it never disappoints. I hope you try it soon — it might just become one of your go-to chocolate treats.
I love how this recipe turns ordinary chicken breasts into something elegant yet comforting. Tender chicken is filled with vibrant spinach, tart cranberries, and creamy brie, then seared and baked until juicy and flavorful.
Why You’ll Love This Recipe
The contrast of sweet‑tart cranberries with creamy brie and earthy spinach makes every bite interesting.
It looks fancy, but it’s straightforward to make.
It’s perfect for special occasions or when I just want something dinner‑worthy without too much fuss.
The leftovers (if any) reheat nicely.
ingredients
(Here’s a tip: Check out the full list of ingredients and measurements in the recipe card below.)
4 boneless, skinless chicken breasts (about 1.2 to 1.4 kg total)
2 tablespoons olive oil (divided)
2 cups fresh spinach, chopped (about 60–70 g)
½ cup dried cranberries (about 75 g)
4 oz (≈115 g) brie cheese, sliced or cut into thin strips
Prepare the filling: In a skillet over medium heat, warm 1 tablespoon olive oil. Add the onion and sauté until softened, about 3 minutes. Add the garlic and cook another minute until fragrant.
Add the chopped spinach and dried cranberries to the skillet. Stir until spinach wilts (1–2 minutes). Remove from heat and set aside.
Butterfly each chicken breast: use a sharp knife to slice horizontally, opening it like a book, but not cutting all the way through. You want a pocket.
Season inside each chicken breast with a pinch of salt, pepper, and a little thyme.
Into each chicken breast place one slice or strip of brie, then divide the spinach‑cranberry mixture evenly among them. Fold the breasts closed and secure with toothpicks or kitchen twine.
In the same skillet (or another ovenproof one), heat the remaining 1 tablespoon olive oil over medium‑high heat. Sear each stuffed chicken breast about 2–3 minutes per side until lightly browned.
If your skillet is ovenproof, place it in the oven. Otherwise, transfer the seared chicken to a baking dish. Bake for 20–25 minutes, until the internal temperature reaches 74 °C (165 °F) in the thickest part (away from the filling).
(Optional) While the chicken bakes, whisk together honey, balsamic vinegar, and Dijon mustard in a small bowl. Once the chicken is done, drizzle this glaze over the top.
Let the chicken rest for 5 minutes before removing toothpicks/twine and serving.
Servings and timing
Yields: 4 servings
Prep time: ~15 minutes
Cook time: ~25 minutes (plus searing time)
Total time: ~40 minutes
Variations
Swap brie with camembert or goat cheese for a different creamy profile.
Add chopped nuts (walnuts or pecans) into the filling for crunch.
Use fresh cranberries cooked with a little sugar instead of dried for a more tart, juicy version.
Add fresh herbs like chopped parsley or thyme into the stuffing for extra aroma.
storage/reheating
Storage: Store leftovers in an airtight container in the refrigerator for up to 3 days.
Freezing: You can freeze fully cooked portions for up to 2 months. Thaw overnight in the fridge before reheating.
Reheating: • Oven: Preheat to 150–160 °C, cover with foil, and heat for 10–15 minutes or until warmed through. • Microwave: Cover and heat in 1–2 minute intervals until hot (but be careful not to overcook). • Stovetop: Place in a skillet over low heat, cover, and turn occasionally until heated.
FAQs
How do I prevent the filling from leaking out?
I make sure not to overstuff and I secure the edges tightly with toothpicks or twine. Also, searing first helps “seal” the edges a bit before baking.
Can I use frozen spinach instead of fresh?
Yes — but thaw it fully and squeeze out as much moisture as possible, so the filling doesn’t make the chicken soggy.
What if I don’t have brie available?
You can use camembert, goat cheese, or even a mild soft cheese like mozzarella. The texture and flavor change a bit, but it works.
Can I prep this ahead of time?
Yes — you can stuff and secure the chicken breasts several hours ahead (or overnight). Keep them covered in the fridge, then sear and bake when ready.
How do I know when the chicken is done?
Use an instant‑read thermometer in the thickest part of the meat (not in the filling). It’s done at 74 °C (165 °F). The juices should run clear, and the meat should no longer look pink.
Conclusion
I hope you enjoy making and eating this Cranberry and Spinach Stuffed Chicken with Brie as much as I do. It’s elegant enough for entertaining yet simple enough for a cozy dinner. The flavors balance beautifully, and with leftovers that reheat well, it’s a winner in my kitchen.
Spanish Rice, also known as Mexican Rice, is a flavorful and vibrant side dish made with rice, tomatoes, and spices. It pairs beautifully with a variety of dishes like tacos, enchiladas, or grilled meats, and it’s simple enough to whip up on a busy weeknight.
Why You’ll Love This Recipe
I love how easy this recipe is to pull together using basic pantry staples. The rice turns out fluffy and full of flavor, thanks to the combination of tomato, garlic, onion, and spices. It’s versatile, satisfying, and always a crowd-pleaser at the dinner table. Plus, I can easily double the batch for meal prep or entertaining.
Ingredients
(Here's a tip: Check out the full list of ingredients and measurements in the recipe card below.)
1 cup long grain white rice
2 tablespoons vegetable oil
1 small onion, finely chopped
2 cloves garlic, minced
1 ½ cups chicken broth
1 cup canned diced tomatoes (with juices)
½ teaspoon ground cumin
½ teaspoon chili powder
¼ teaspoon salt
¼ teaspoon black pepper
2 tablespoons chopped fresh cilantro (optional, for garnish)
Directions
I start by heating the oil in a large skillet over medium heat.
Then I add the rice and cook, stirring often, until it’s golden brown—about 5 to 7 minutes.
I stir in the chopped onion and garlic, cooking for another 2 minutes until the onion softens.
I pour in the chicken broth and diced tomatoes with their juices, then stir in the cumin, chili powder, salt, and pepper.
I bring the mixture to a boil, then reduce the heat to low and cover.
I let it simmer for about 18–20 minutes, or until the rice is tender and the liquid is absorbed.
I remove the skillet from heat and let it sit, covered, for 5 minutes.
Before serving, I fluff the rice with a fork and garnish with chopped cilantro if I’m using it.
Servings and timing
This recipe makes about 4 servings. Prep Time: 10 minutes Cook Time: 25 minutes Total Time: 35 minutes
Variations
I sometimes add a pinch of smoked paprika for a deeper, smokier flavor.
For a spicier kick, I’ll mix in chopped jalapeños or a dash of hot sauce.
I’ve also stirred in frozen peas and carrots toward the end of cooking for extra texture and color.
If I want a vegetarian version, I just swap the chicken broth for vegetable broth.
Occasionally, I mix in cooked ground beef or shredded chicken to make it a complete one-pan meal.
Storage/Reheating
I store leftover Spanish Rice in an airtight container in the refrigerator for up to 4 days. To reheat, I sprinkle a bit of water over the rice and warm it in the microwave or on the stovetop over low heat, stirring occasionally to prevent sticking. If I’m freezing it, I let it cool completely first, then place it in a freezer-safe bag or container. It keeps well in the freezer for up to 2 months. I thaw it in the fridge overnight before reheating.
FAQs
How do I keep the rice from getting mushy?
I make sure not to overcook the rice and always let it sit covered for a few minutes after cooking. Using the correct rice-to-liquid ratio is key.
Can I use brown rice instead of white rice?
Yes, I can use brown rice, but I adjust the cooking time to about 40–45 minutes and may need a bit more liquid.
What’s the difference between Spanish rice and Mexican rice?
They’re often used interchangeably, but technically, Spanish rice might include saffron and have a more yellow hue, while Mexican rice uses tomatoes for color and flavor.
Can I make this in a rice cooker?
Yes, I toast the rice and aromatics in a pan first, then transfer everything to a rice cooker and cook as usual.
What can I serve with Spanish Rice?
I usually serve it with enchiladas, grilled chicken, tacos, or even just alongside a simple green salad for a quick meal.
Conclusion
Spanish Rice is one of those side dishes I find myself making over and over again. It’s comforting, flavorful, and incredibly easy to make. Whether I’m serving it as part of a big dinner spread or just enjoying it on its own, it always hits the spot.
I created this creamy no‑bake cheesecake with a buttery graham cracker crust and a swirl of apple butter. It’s silky, light, and perfect for when I want dessert without turning on the oven.
Why I’ll Love This Recipe
I love how the sweet and spiced apple butter cuts through the rich cream cheese filling. It’s easy to assemble, no baking required, and I can prepare it ahead of time. The texture is airy yet firm once chilled, and it makes a lovely dessert for gatherings or just a cozy night in.
Ingredients
(Here’s a tip: Check out the full list of ingredients and measurements in the recipe card below.)
Crust 2 cups (204 g) graham cracker crumbs ½ teaspoon cinnamon ½ cup (113 g) unsalted butter, melted
Filling 2 packages (8 oz each) cream cheese, softened (total 16 oz / ~454 g) 1 cup (200 g) granulated sugar 2 cups (476 g) heavy cream ¾ teaspoon fresh lemon juice ½ cup (120 g) apple butter
Directions
I start by spraying a 9‑inch springform pan with nonstick cooking spray.
In a medium bowl, I mix the graham cracker crumbs and cinnamon. Then I pour in the melted butter and stir until every crumb is coated.
I press that mixture firmly into the bottom and up the sides of the prepared springform pan. I chill it in the refrigerator while I make the filling.
In a large bowl, I beat the softened cream cheese and sugar on medium speed until smooth and creamy.
I add the heavy cream and lemon juice, then beat for 1 to 2 minutes until the mixture becomes fluffier.
I pour the cheesecake filling into the chilled crust, spreading it evenly.
I drop large dollops of apple butter over the top, then use a knife or offset spatula to gently swirl it into the filling (taking care not to scrape the crust).
I refrigerate the cheesecake until the filling is firm and cold, about 6 hours, or I sometimes leave it overnight.
When it’s set, I release it from the springform, slice, and serve.
Servings and timing
Prep time: about 15 minutes
Chill time: about 6 hours (or overnight)
Total time: ~6 hours 15 minutes
Servings: 12 slices
Variations
I sometimes use pumpkin butter instead of apple butter for a fall twist.
I’ve tried a ginger snap crust instead of graham cracker for more spice.
If I want more apple flavor, I lightly warm the apple butter so it’s easier to swirl more deeply into the filling.
I can add a dash of ground nutmeg or allspice to the apple butter swirl for extra warmth.
For a lighter version, I’ve replaced part of the heavy cream with whipped topping, but the texture is a bit softer.
Storage / Reheating
I store leftover cheesecake in an airtight container in the refrigerator for up to 3 days. If I want to freeze it, I place the cheesecake (uncovered) in the freezer for about an hour. Then I remove it from the pan (using a knife if needed), wrap it tightly in plastic wrap, then wrap or bag it again. It can be frozen up to 6 months. Before serving, I thaw it in the fridge overnight.
FAQs
How do I know when the cheesecake is fully set?
I check that the edges are firm while the center still has a slight jiggle. Once chilled, the center should hold its shape when I slice it.
Can I use store‑bought apple butter or do I need to make my own?
I’ve had great results using good quality store‑bought apple butter. The flavor just needs to be smooth and not too chunky.
What if my filling is too loose after chilling?
Sometimes I beat less or chill longer. Reducing whipping time when adding heavy cream or increasing chill time (overnight) helps it firm up.
Can I make this in advance?
Yes — I often make it the day before serving. The overnight chill helps the flavors meld and ensures the right texture.
Can I use another type of crust?
Absolutely. I’ve used crushed gingersnaps, shortbread cookies, or even a nut‑based crust. Just adjust the butter so it binds well.
Conclusion
I find this Apple Butter Cheesecake to be a reliable, elegant dessert that doesn’t require baking but still delivers big on flavor and texture. Whether I’m serving it at a gathering or enjoying it quietly at home, its creamy consistency and apple‑spiced swirl always impress. Let me know if you’d like a scaled version or help with any step!
I combine the crispiness of fried wonton wrappers with juicy, flavorful shredded chicken and fresh toppings to create a playful, handheld taco experience. These Chicken Wonton Tacos are perfect when I want something fun, quick to assemble, and utterly satisfying.
Why You’ll Love This Recipe
I love how these tacos bring together textures and flavors: the crunch of the wonton shell, the savory warmth of chicken, and the brightness of fresh toppings. They're perfect for parties, weeknight dinners, or as a fun twist on traditional tacos. The recipe is flexible, and I can tweak the chicken seasoning or toppings to suit my mood.
Ingredients
(Here's a tip: Check out the full list of ingredients and measurements in the recipe card below.)
12 wonton wrappers
2 cups cooked chicken, shredded (about 1 large chicken breast)
1 tablespoon vegetable oil
1 small onion, finely chopped (about ½ cup)
2 cloves garlic, minced
½ teaspoon ground cumin
½ teaspoon chili powder
¼ teaspoon smoked paprika
Salt and pepper, to taste
¼ cup sour cream
2 tablespoons mayonnaise
1 teaspoon lime juice (fresh)
1 cup shredded lettuce
½ cup diced tomato
¼ cup chopped cilantro
Lime wedges, for serving
Directions
Heat the vegetable oil in a skillet over medium heat. Add the chopped onion and cook until softened, about 3 minutes.
Stir in the minced garlic, cumin, chili powder, smoked paprika, salt, and pepper. Cook for 30 seconds until fragrant.
Add the shredded chicken to the skillet, stirring to coat well with the spices and onion mixture. Cook for 2–3 minutes until warmed through.
While the chicken warms, prepare the creamy sauce: in a small bowl, mix sour cream, mayonnaise, and lime juice until smooth.
In a separate nonstick or lightly greased skillet, fry each wonton wrapper one at a time. Flatten it gently and fry for about 30 seconds per side, or until golden brown and crispy. Remove to a paper towel–lined plate to drain.
To assemble, place a crisp wonton shell on a plate. Spoon a portion of the spiced shredded chicken into it. Top with a drizzle of the creamy sauce, then add shredded lettuce, diced tomato, and chopped cilantro.
Serve immediately with lime wedges on the side for squeezing over the tacos.
Servings and timing
Servings: 6 tacos (serves about 2–3 people)
Prep time: 10 minutes
Cook time: 10 minutes
Total time: 20 minutes
Variations
Spicy version: Add a pinch of cayenne pepper or chopped fresh jalapeño to the chicken mixture.
Cheesy twist: Sprinkle a little shredded cheddar or Monterey Jack cheese over the chicken before placing the toppings.
Vegetarian alternative: Replace the chicken with seasoned, sautéed mushrooms or black beans.
Asian-inspired: Add a dash of soy sauce or hoisin when cooking the chicken, and top with sliced green onions and sesame seeds.
storage/reheating
If I have leftover filling, I store it in an airtight container in the refrigerator for up to 3 days. To reheat, I warm the chicken gently in a skillet over low heat, adding a splash of water if needed for moisture. I don’t recommend storing assembled tacos, since the wonton shells will soften. I fry fresh shells when I’m ready to eat.
FAQs
What kind of chicken works best for this recipe?
I prefer to use a cooked, shredded chicken breast or thigh—leftovers or rotisserie chicken work beautifully.
Can I bake the wonton wrappers instead of frying?
Yes—I can lightly brush each wrapper with oil and bake at 400 °F (200 °C) for about 5–7 minutes, flipping halfway, until golden and crispy.
Is there a gluten‑free version?
I could use gluten‑free wrappers or tortillas instead of wonton wrappers. The seasoning and fillings remain the same.
Can I prep parts of this recipe ahead of time?
Yes. I can shred and season the chicken in advance and store it in the fridge. I also mix the sauce ahead of time. I fry the wonton shells just before serving so they stay crispy.
How can I adjust this recipe for more servings?
I scale up each ingredient proportionally (e.g. double the chicken, onions, spices) and fry more wonton shells. The method stays the same.
Conclusion
I always find making Chicken Wonton Tacos brings a burst of flavor and crunch to the dinner table. They’re quick, customizable, and fun to eat. Whether for a casual meal or a small gathering, they never disappoint—and I enjoy tweaking the flavors to suit what I’m craving.
I make this Beef and Vegetable Stir Fry when I want something fast, hearty, and full of flavor. It brings together thinly sliced tender beef, vibrant stir-fried vegetables, and a savory, umami-packed sauce. It’s ideal for weeknight dinners or prepping ahead for easy lunches.
Why You’ll Love This Recipe
I love this recipe because it's ready in just 30 minutes and gives me that classic takeout flavor with ingredients I can control. The beef turns out tender, the vegetables stay crisp, and the sauce is rich and flavorful without being too heavy. Plus, it’s incredibly flexible—perfect for customizing with whatever I have in the fridge.
Ingredients
(Here's a tip: Check out the full list of ingredients and measurements in the recipe card below.)
1 pound flank steak or sirloin, thinly sliced against the grain
1 tablespoon cornstarch
2 tablespoons soy sauce
1 teaspoon sesame oil
2 tablespoons vegetable oil, divided
1 cup broccoli florets
1 cup bell pepper, sliced (any color)
1 medium carrot, julienned or thinly sliced
1 cup snow peas or snap peas
3 garlic cloves, minced
1 teaspoon fresh ginger, grated
3 tablespoons oyster sauce
2 tablespoons soy sauce (for the sauce)
¼ cup beef broth or water
Cooked white rice or noodles, for serving
Directions
I start by combining the sliced beef with 1 tablespoon soy sauce, cornstarch, and sesame oil in a bowl. I let that sit while I prepare the veggies.
In a large skillet or wok over high heat, I heat 1 tablespoon vegetable oil and cook the beef for about 2–3 minutes until browned. Then I remove it and set it aside.
In the same pan, I add the remaining 1 tablespoon of oil and stir-fry the garlic and ginger for about 30 seconds until fragrant.
Next, I toss in the broccoli, bell pepper, carrot, and snow peas. I stir-fry for 3–4 minutes until they’re just tender but still have a nice crunch.
I return the beef to the pan and pour in the oyster sauce, remaining 2 tablespoons soy sauce, and beef broth. I stir everything together and cook for another 2–3 minutes until the sauce thickens slightly and coats everything nicely.
I serve it hot over a bed of rice or noodles.
Servings and timing
Servings: 4
Prep time: 15 minutes
Cook time: 15 minutes
Total time: 30 minutes
Variations
I sometimes use chicken, shrimp, or tofu instead of beef.
For more veggie variety, I add mushrooms, baby corn, or zucchini.
If I want a spicier version, I stir in some chili garlic sauce or sliced red chilies.
For a lower-carb option, I serve it over cauliflower rice or just eat it as-is.
storage/reheating
I store any leftovers in an airtight container in the fridge for up to 3 days. When reheating, I usually toss it in a skillet with a splash of broth or water to loosen up the sauce. If I’m short on time, the microwave works too—about 1–2 minutes on medium heat.
FAQs
What’s the best beef cut for stir fry?
I like using flank steak or sirloin because they stay tender when sliced thinly and cooked quickly over high heat.
Can I make this stir fry ahead of time?
Yes, I often prep the sauce and cut the vegetables in advance. I can also marinate the beef up to a day ahead.
Do I need a wok to make this?
No. A large, heavy-bottomed skillet works just fine if I don’t have a wok.
How do I keep the veggies from getting soggy?
I stir-fry them over high heat for just a few minutes so they stay bright and crisp-tender.
Can I freeze this dish?
I don’t usually freeze it because the vegetables lose their texture, but the cooked beef and sauce can be frozen and reheated later with fresh veggies.
Conclusion
I turn to this Beef and Vegetable Stir Fry when I want a fast, flavorful meal without a lot of fuss. It’s packed with protein and veggies, endlessly adaptable, and always satisfies that takeout craving with better-than-takeout freshness.
This Chipotle Ranch Grilled Chicken Burrito is a delicious fusion of smoky, creamy, and zesty flavors all wrapped up in a warm tortilla. I grill juicy marinated chicken, layer it with seasoned rice, black beans, cheese, and a generous drizzle of chipotle ranch sauce before grilling the burrito to golden perfection. It’s an easy-to-make meal that hits every craving—perfect for lunch, dinner, or even meal prep.
Why You’ll Love This Recipe
I love how this burrito combines bold flavors with wholesome ingredients. The grilled chicken is smoky and tender, the chipotle ranch adds just the right amount of heat and creaminess, and the combination of cheese, beans, and rice makes each bite satisfying. It’s also super customizable, so I can switch things up based on what I have in the fridge. Whether I’m feeding my family or prepping lunches for the week, this recipe never disappoints.
Ingredients
(Here's a tip: Check out the full list of ingredients and measurements in the recipe card below.)
1 ½ pounds boneless skinless chicken breasts
1 tablespoon olive oil
1 teaspoon smoked paprika
1 teaspoon garlic powder
½ teaspoon onion powder
½ teaspoon cumin
½ teaspoon salt
¼ teaspoon black pepper
4 large flour tortillas (10-inch)
1 cup cooked white or brown rice
1 cup canned black beans, drained and rinsed
1 cup shredded cheddar or Monterey Jack cheese
½ cup chipotle ranch dressing (store-bought or homemade)
½ cup shredded lettuce (optional)
½ cup diced tomatoes (optional)
Cooking spray or butter for grilling
Directions
In a bowl, I mix olive oil, smoked paprika, garlic powder, onion powder, cumin, salt, and pepper. I coat the chicken breasts in the marinade and let them sit for at least 15–20 minutes (or longer in the fridge if I have time).
I preheat a grill or grill pan over medium-high heat and grill the chicken for about 5–6 minutes per side, or until fully cooked and nicely charred. Then I let it rest for 5 minutes before slicing into strips.
I lay out each tortilla and add about ¼ cup of rice, ¼ cup black beans, grilled chicken strips, cheese, and chipotle ranch. I also like to add shredded lettuce and diced tomatoes for freshness.
I fold in the sides of the tortilla and roll it tightly into a burrito.
I heat a large skillet or pan over medium heat, spray it lightly with cooking spray or brush with butter, and grill each burrito seam-side down for 2–3 minutes per side until golden and crispy.
I remove from heat and let them cool slightly before slicing and serving.
Servings and timing
This recipe makes 4 large burritos. Prep time: 15 minutes Cook time: 15 minutes Total time: 30 minutes
Variations
I sometimes swap the grilled chicken for shredded rotisserie chicken tossed with chipotle ranch for a quicker version.
For a spicier kick, I add chopped jalapeños or extra chipotle peppers to the ranch.
I use Spanish rice instead of plain white or brown rice when I want more flavor.
For a vegetarian version, I skip the chicken and double up on beans and veggies like sautéed peppers and onions.
I occasionally add avocado slices or guacamole for a creamy twist.
Storage/reheating
To store, I wrap leftover burritos tightly in foil or plastic wrap and keep them in the fridge for up to 3 days. For longer storage, I freeze the burritos wrapped in foil and placed in a zip-top bag for up to 2 months.
To reheat, I thaw in the fridge overnight (if frozen), unwrap, and microwave for 1–2 minutes. Then I toast it in a skillet for 2–3 minutes per side to bring back the crispy exterior.
FAQs
How spicy is the chipotle ranch sauce?
The chipotle ranch has a mild to medium heat, depending on how many chipotle peppers are used. I adjust the spice level by adding more or less of the chipotle in adobo.
Can I make this burrito ahead of time?
Yes, I often prepare the burritos ahead and keep them in the fridge or freezer. They reheat well and make a great meal prep option.
What’s the best way to grill the burrito?
I grill the burrito in a skillet or panini press over medium heat. Pressing it down slightly helps create a crispy, golden crust.
Can I use corn tortillas instead of flour?
Corn tortillas tend to break when overstuffed or grilled. I prefer flour tortillas for this recipe, but smaller corn ones can work if I make mini burritos or tacos.
Is there a low-carb option?
For a low-carb version, I use a low-carb tortilla or wrap the filling in lettuce leaves. I also reduce or skip the rice and beans as needed.
Conclusion
This Chipotle Ranch Grilled Chicken Burrito is one of my go-to meals when I want something flavorful, filling, and easy to make. With just a few simple steps, I can whip up a burrito that rivals any takeout. Whether I’m making dinner for the family or prepping lunches for the week, this recipe always satisfies.
I absolutely adore these Brown Butter Iced Mocha Cinnamon Rolls Recipe because they combine everything I love about cozy mornings and indulgent treats. The rich brown butter and mocha flavors swirl together with sweet cinnamon, wrapped up in soft, fluffy dough that practically melts in your mouth. This recipe feels like a little luxurious escape packed with flavor, perfect to share with friends or savor with a strong cup of coffee. Each bite is a warm hug that I’m excited to share with anyone who loves a thoughtful, homemade pastry experience.
Why You'll Love This Brown Butter Iced Mocha Cinnamon Rolls Recipe
From the very first time I baked this recipe, I was hooked on the depth of flavors it delivers. The brown butter adds a nutty, caramel undertone that makes these cinnamon rolls stand out from your typical sweet bread. Pair that with the espresso powder in both the filling and icing, and you get a subtle mocha hint that adds complexity without overpowering the signature cinnamon goodness. Honestly, it tastes like a fancy café pastry but way better because you know exactly what’s in it—and it’s made with love.
What really won me over was how manageable it feels despite all the rich flavors. The dough comes together smoothly with simple mixing and kneading steps, and the rise times give you space to prep your filling and chill out without feeling rushed. Baking cinnamon rolls might seem intimidating, but this Brown Butter Iced Mocha Cinnamon Rolls Recipe breaks it down so it’s approachable for anyone wanting to try their hand at something that looks impressive but tastes even better.
I find this recipe perfect for special occasions like brunch gatherings, weekend breakfasts, or even just treating yourself on a slow Sunday morning. It’s not just a treat — it’s a moment, a little celebration to start the day right. Plus, the iced mocha buttercream makes for a beautiful glaze that feels extra special whenever you pull these rolls from the oven, warm and inviting. I just know you’ll want to keep this recipe close for those times when only something truly decadent will do.
Ingredients You'll Need
The beauty of this recipe is that it relies on simple, everyday ingredients that come together to build layers of flavor and texture. Each component—from the yeast to the brown sugar to the espresso powder—plays an essential role: providing structure, sweetness, spice, and that unique mocha twist that sets these rolls apart.
TIP : You'll find the full list of ingredients and measurements in the recipe card below
Warm Milk: This activates the yeast and helps create tender dough.
Active Dry Yeast: The key to getting those fluffy, risen rolls.
Brown Sugar: Adds sweetness and moisture to the dough and filling.
Salted Butter (room temperature): Produces a rich flavor and soft crumb in the rolls and filling.
Large Eggs: Help bind the dough and add richness.
All-Purpose Flour: Provides structure and chew without weighing the rolls down.
Kosher Salt: Balances the sweetness and enhances flavor complexity.
Cinnamon: The classic spice that fills these rolls with warmth.
Instant Espresso Powder: Gives the mocha notes signature to this recipe without bitterness.
Semi-Sweet or Dark Chocolate: Adds delightful bursts of chocolate inside the filling.
Cream Cheese: Creates a luscious, tangy icing that pairs beautifully with mocha and cinnamon.
Pure Maple Syrup: Adds natural sweetness and depth to the frosting.
Powdered Sugar: Thickens and sweetens the icing to the perfect consistency.
Vanilla Extract: Rounds out the icing with floral notes.
Espresso or Instant Espresso Powder (for icing): Amplifies the mocha flavor in the glaze.
Directions
Step 1: In the bowl of a stand mixer fitted with the dough hook, combine the warm milk, active dry yeast, and brown sugar. Let the mixture sit for 5 to 10 minutes until it becomes bubbly on top—this is how you know the yeast is alive and kicking.
Step 2: Add the room temperature butter, eggs, 3 ½ cups of flour, and kosher salt to the yeast mixture. Mix with the dough hook until the flour is fully incorporated, about 4 to 5 minutes. The dough should start pulling away from the sides of the bowl. If it’s still sticky, gradually add up to an additional ½ cup flour until you get a smooth, tacky dough that’s pleasant to handle.
Step 3: Cover the bowl tightly with plastic wrap. Leave it at room temperature for about 1 hour, or until the dough has doubled in size. This rising time is critical for achieving those soft, fluffy rolls.
Step 4: While the dough is rising, prepare your cinnamon mocha filling. In a bowl, mix together the brown sugar, granulated sugar, cinnamon, and instant espresso powder until evenly combined. Also, butter your 9×13 inch baking dish to prevent sticking and to help the rolls bake beautifully.
Step 5: Once risen, punch down the dough gently and turn it out onto a lightly floured surface. Roll it into a large rectangle about 12 by 18 inches. Spread the softened butter evenly over the dough, then sprinkle on the chocolate and the cinnamon sugar mixture. Starting with the long edge closest to you, roll the dough tightly into a log. Pinch the seam to seal it shut.
Step 6: Using a sharp knife, cut the log into 12 to 15 equal rolls. Place them cut side up into the prepared baking dish, leaving a little space between each. Cover the rolls again with plastic wrap and let them rise for an additional 15 to 20 minutes — this final proof helps ensure fluffiness.
Step 7: Preheat your oven to 350°F (175°C). Bake the rolls for 25 to 30 minutes, or until golden brown on top and cooked through. You’ll know they’re ready when they smell amazing and have that perfect golden hue.
Step 8: While the rolls bake, start your brown butter mocha icing. Melt the butter over medium heat in a small pot, stirring constantly until it turns a light brown and smells toasty, about 2 to 3 minutes. Remove from heat immediately to prevent burning.
Step 9: In a mixing bowl, whisk together the cream cheese and maple syrup until smooth. Slowly add the browned butter, espresso shot (or instant espresso powder dissolved in a little water), powdered sugar, vanilla extract, and a pinch of salt. Whisk until creamy and fully combined.
Step 10: When the rolls come out of the oven, allow them to cool just slightly for about 5 minutes. Then generously spread the brown butter mocha icing over the warm rolls so it melts into all the nooks and crannies, creating that irresistible gooey finish.
Step 11: Serve warm, grab a cup of your favorite coffee or tea, and enjoy every delicious bite of this Brown Butter Iced Mocha Cinnamon Rolls Recipe!
Servings and Timing
This recipe makes about 12 generous cinnamon rolls, perfect for sharing with a family or a small group of friends. You’ll need roughly 20 minutes of active prep time, plus 1 hour for the first rise and an additional 15 to 20 minutes for the second rise after shaping. The baking takes around 25 to 30 minutes, so the total time from start to finish will be about 2 hours and 30 minutes. The resting times really make the dough light and fluffy, so don’t rush them.
How to Serve This Brown Butter Iced Mocha Cinnamon Rolls Recipe
I love to serve these rolls warm right out of the oven, with that glossy, mocha-infused icing still soft and slowly melting into the layers. For a special brunch, I pair them with a simple fruit salad or a fresh berry compote to cut through the richness. For something heartier, scrambled eggs or a light smoked salmon platter make a lovely savory contrast.
Presentation makes a big difference here, too. I like to line a rustic wooden board with parchment paper and arrange the rolls in a cluster, letting the icing drip gently down the sides. A sprinkle of chopped toasted pecans or a dusting of cocoa powder adds an elegant touch without competing with the flavors. If you’re feeling fancy, a small drizzle of additional melted dark chocolate gives an irresistible finishing flourish.
When it comes to beverages, I’m a big fan of pairing these rolls with hot coffee or a creamy latte to complement the mocha notes. For tea lovers, a rich chai or smoky lapsang souchong offers a beautiful counterpoint. These rolls also shine at holiday gatherings or weekend parties, where they feel like a centerpiece worthy of celebration, served warm alongside mimosas or a smooth dessert wine for an indulgent twist.
Variations
One of my favorite things about this Brown Butter Iced Mocha Cinnamon Rolls Recipe is how fun it is to customize. If you want a dairy-free version, swapping the butter for coconut oil and using vegan cream cheese and a plant-based milk works really well—just be mindful the brown butter flavor shifts but still offers that rich nuttiness. For gluten-free, a blend of gluten-free flours designed for yeast baking will help you achieve a similar texture, though the dough will be more delicate.
If you want to play with flavors, try adding chopped nuts like walnuts or hazelnuts inside the filling for some crunch. For a fruit twist, swirling in some finely chopped dried cherries or cranberries pairs beautifully with the mocha and cinnamon. Alternatively, you can omit the espresso powder and swap the icing for a classic vanilla glaze for a more traditional take.
In terms of cooking methods, I’ve even tried baking these in a cast-iron skillet for a more rustic presentation, or rolling the dough thinner and making smaller rolls for bite-sized treats perfect for afternoon tea. Each variation keeps the spirit of the recipe but brings a fresh new angle to enjoy.
Storage and Reheating
Storing Leftovers
These cinnamon rolls keep beautifully in an airtight container at room temperature for up to 2 days, though you could also refrigerate them for up to 5 days. I recommend using plastic wrap or a tightly sealed container to prevent them from drying out. Keeping them at room temperature preserves the soft texture best, especially if you plan to enjoy them within a day or two.
Freezing
You absolutely can freeze these rolls either before baking or after. To freeze unbaked rolls, shape them and place them on a baking sheet lined with parchment paper, then freeze until solid before transferring to a freezer-safe bag or container. When ready, thaw overnight in the fridge and let rise before baking. For baked rolls, freeze cooled rolls wrapped tightly in plastic wrap and aluminum foil; they'll keep for 2 to 3 months. Thaw overnight and warm before serving to enjoy fresh flavors.
Reheating
For reheating, I prefer warming single portions in the microwave for about 20-30 seconds to soften the rolls and get the icing slightly melty again. Alternatively, warming them in a 350°F oven for 5 to 10 minutes revives that fresh-baked texture—just cover loosely with foil to avoid burning the icing. Avoid overcooking to keep the rolls soft, not dry or tough. You can add a splash of cream or butter on top before warming for extra indulgence.
FAQs
Can I make this recipe without a stand mixer?
Definitely! You can mix and knead the dough by hand. It just takes a bit more elbow grease—knead for about 8 to 10 minutes on a floured surface until the dough is smooth and elastic. Just be patient with the rising times to let the yeast do its magic.
What if I don’t have instant espresso powder?
If you don’t have instant espresso powder, using a shot of brewed espresso or a strong cup of coffee works perfectly for the icing. For the filling, brewed espresso can be brushed lightly on the dough before adding the cinnamon sugar mixture for a subtle mocha flavor.
Can I prepare the rolls the night before?
Yes! You can prepare the dough and shape the rolls, then refrigerate them covered overnight. The slow rise in the fridge will develop flavor even more. Just take them out about an hour before baking to come to room temperature, then bake as usual.
How do I know when the rolls are fully baked?
Look for a golden brown color on top and edges pulling slightly from the pan. You can insert a toothpick in the center of a roll; it should come out clean or with just a few moist crumbs, not wet dough. The aroma will also be rich and inviting.
Can I use a different type of chocolate?
Absolutely! Semi-sweet or dark chocolate works best for balance, but you can use milk chocolate for a sweeter option or even white chocolate for a fun twist. Just chop the chocolate finely so it distributes evenly without weighing down the dough.
Conclusion
I truly hope you enjoy making and savoring this Brown Butter Iced Mocha Cinnamon Rolls Recipe as much as I do. It’s one of those recipes that feels both special and completely doable, delivering a comforting, delicious treat you can proudly share with those you care about. Whether for a leisurely weekend breakfast or an unexpected gathering, these cinnamon rolls are guaranteed to bring warmth and joy to your table. Give it a try — I promise you won’t regret it!
I absolutely love sharing my passion for unique and flavorful dishes, and this Moroccan Stuffed Eggplant with Beef or Lamb Recipe has truly won my heart. It’s a vibrant, aromatic dish where tender roasted eggplants serve as a canvas for a richly spiced, juicy meat filling that feels both comforting and exotic at the same time. It’s such a satisfying meal that brings warmth and bold flavors to the table, making it one of my go-to recipes when I crave something special yet approachable.
Why You'll Love This Moroccan Stuffed Eggplant with Beef or Lamb Recipe
What really excites me about this Moroccan Stuffed Eggplant with Beef or Lamb Recipe is the incredible balance of spices – coriander, cumin, paprika, and just a pinch of cinnamon and cayenne. The flavor profile is complex but never overwhelming. Every bite bursts with warmth and subtle heat, combined with the earthiness of the eggplant and the richness of the meat. It’s like taking your taste buds on a short trip to Morocco from the comfort of your kitchen.
Another reason I keep coming back to this recipe is how surprisingly easy it is to prepare. The steps are straightforward: roasting the eggplant until soft while building a deliciously spiced savory topping on the stove. Although it sounds fancy, the recipe requires just simple, wholesome ingredients you likely have on hand or can easily find. Plus, the hands-on time is minimal, so it’s perfect for when I want something impressive but not too labor-intensive.
I love serving this dish for cozy dinners, whether it’s a casual midweek meal or a weekend treat for guests. It stands out beautifully as a centerpiece thanks to its vibrant colors and inviting aromas. There’s something about cutting into that soft eggplant and savoring the juicy, spiced beef or lamb that feels truly satisfying and celebratory. If you want to impress with minimal fuss, this recipe is the way to go.
Ingredients You'll Need
For this delicious Moroccan Stuffed Eggplant with Beef or Lamb Recipe, I use a handful of ingredients that come together to create the unique texture, color, and depth of flavor that makes this dish special. Every spice and fresh element plays a vital role in building layers of taste, while the eggplant itself provides a tender, smoky base.
TIP : You'll find the full list of ingredients and measurements in the recipe card below
Eggplants: I look for medium-sized eggplants about 17cm long which roast perfectly soft inside without collapsing.
Cooking salt: Essential for drawing out moisture and enhancing flavors, especially when prepping the eggplants.
Extra virgin olive oil: Adds richness and helps bind the spices into a paste for roasting and cooking the meat.
Lemon juice: I love how a splash of acidity brightens up the spices and lifts the overall dish.
Spices (coriander, paprika, cumin, all spice, garlic powder, ginger, turmeric, cinnamon, cayenne): This blend creates all those warm, earthy notes that define Moroccan cuisine.
Garlic and onion: Classic aromatics that build a savory base in the meat topping.
Beef or lamb mince: I prefer lean cuts for the best texture, but tried-and-true lamb adds extra depth of flavor.
Tomato paste: Concentrated umami that enriches the meat’s moisture and color.
Yogurt: A cooling dollop on top contrasts perfectly with the spices and savory meat.
Coriander/cilantro leaves and toasted pine nuts: I love these fresh and crunchy garnishes to finish off the dish with brightness and texture.
Directions
Step 1: Preheat your oven to 180°C (350°F) or 160°C if you have a fan oven. This sets the perfect temperature for roasting the eggplants evenly and slowly.
Step 2: Prepare the eggplants by cutting them in half lengthwise, then scoring the flesh in 2.5 cm diamond shapes. Rub the surface with salt, making sure some gets into the cuts, then place them face down in a colander for 30 minutes. This sweating step helps remove bitterness and excess moisture, giving them a better texture after roasting. After 30 minutes, gently squeeze the eggplants like a sponge and pat dry to remove any remaining water.
Step 3: While the eggplants are resting, mix together the chermoula spice blend: coriander, paprika, cumin, all spice, garlic powder, ginger, turmeric, cinnamon, and cayenne. Set aside 3 teaspoons of this mixture to add to the meat filling later. Then, mix the remaining spice blend with olive oil and lemon juice to form a flavorful paste.
Step 4: Place the eggplants cut side up on a baking tray and generously slather them with your spiced paste. Roast in the preheated oven for about 45 minutes or until the eggplants are tender and aromatic. The spices soak into the flesh as it softens, creating that signature Moroccan flavor.
Step 5: While the eggplants roast, heat olive oil in a nonstick skillet over medium-high heat. Cook the finely chopped onion and minced garlic for one minute just until fragrant. Turn the heat up to high, add your chosen meat, and cook thoroughly, breaking it up so no pink remains. Stir in the reserved spice mixture and salt, cooking for another minute to toast the spices with the meat. Add tomato paste, cook for a further minute, then stir in water and cook until the mixture is juicy but not watery – this should take about a minute.
Step 6: Once the eggplants are tender, remove them from the oven and spoon the spiced meat mixture generously over each half. Sprinkle roughly chopped coriander or parsley leaves, add a dollop of plain yogurt, and finish with toasted pine nuts. If you like, drizzle a little extra virgin olive oil on top for a glossy, rich finish.
Servings and Timing
This recipe makes 2 servings – perfect for a cozy dinner for two or for sharing with a close friend. The prep time is approximately 30 minutes, which mostly includes prepping the eggplants and making the spiced meat filling. Roasting the eggplants and cooking the meat will take about 45 minutes, so the total time you need from start to table is roughly 1 hour and 15 minutes. There’s no significant resting time required, but I find letting the dish cool slightly for 5 minutes helps the flavors meld and makes it easier to serve.
How to Serve This Moroccan Stuffed Eggplant with Beef or Lamb Recipe
When I serve this Moroccan Stuffed Eggplant with Beef or Lamb Recipe, I love pairing it with fresh, vibrant sides that complement the warm spices. A simple couscous salad tossed with chopped cucumbers, tomatoes, fresh herbs, and a zingy lemon dressing works beautifully. Alternatively, steaming or roasting some green beans or asparagus adds a fresh, crisp contrast to the soft eggplant and savory meat.
For garnishing, a sprinkle of extra chopped cilantro and a few more toasted pine nuts always elevate the presentation. I also enjoy serving it with a few extra dollops of creamy plain yogurt on the side to offer guests a cooling balance to the spicy richness. As far as beverages go, a light red wine like a Grenache or a fruity Moroccan mint tea is delightful alongside this dish, enhancing its exotic notes.
This dish shines best when served warm or at room temperature, letting those incredible spices linger without feeling too hot. It’s perfect for an intimate family dinner, a festive gathering, or even a special weekend meal when you want to impress without the fuss. I usually plate each stuffed eggplant half individually with a small salad bed underneath for an elegant look and the right portion size.
Variations
I sometimes like to switch up the protein depending on what I have available or my mood. While beef and lamb are traditional choices full of depth, chicken or turkey mince also work well if you prefer a lighter option. For a vegetarian spin, I swap out the meat for crumbled firm tofu or cooked lentils combined with the same spice mix, creating a hearty plant-based version that’s just as satisfying.
If you follow a gluten-free or low-carb diet, this recipe fits naturally since it’s focused on fresh vegetables and meat with no hidden gluten ingredients. For those avoiding dairy, simply omit the yogurt topping or replace it with a coconut-yogurt alternative, which adds a subtle creaminess without overpowering the spices.
I sometimes add a pinch of smoked paprika or a dash more cayenne if I’m craving a bit of extra heat. Another variation I enjoy is grilling the eggplants instead of roasting them for a subtly smoky flavor, which adds a new dimension and is perfect for summertime cooking. It’s fun to experiment and make the recipe truly your own.
Storage and Reheating
Storing Leftovers
Leftover Moroccan Stuffed Eggplant with Beef or Lamb keeps wonderfully in an airtight container in the refrigerator for up to 3 days. I recommend storing the eggplant and topping together to preserve moisture, but keep the yogurt separate if possible to avoid it becoming watery or breaking down.
Freezing
This dish can be frozen, though I suggest freezing it before adding fresh garnishes like yogurt and pine nuts. Wrap the stuffed eggplants tightly in freezer-safe containers or heavy-duty foil and freeze for up to 2 months. When ready to enjoy, thaw overnight in the fridge for best texture.
Reheating
To reheat, I prefer using an oven set to 160–170°C (320–340°F) for about 15–20 minutes to gently warm the dish without drying it out. Microwaving works in a pinch but risks making the eggplant mushy, so I avoid that. Add fresh yogurt and pine nuts after reheating for maximum flavor and texture.
FAQs
Can I use other types of meat besides beef or lamb?
Absolutely! Ground chicken, turkey, or even pork can be substituted in this recipe. Just adjust cooking times as needed and pick lean cuts to keep the filling juicy but not greasy.
Do I have to sweat the eggplants before roasting?
Sweating the eggplants helps remove bitterness and extra moisture, resulting in better roasted texture. However, if you’re short on time, you can skip this step and roast them directly; just expect a slightly softer and less concentrated flavor.
Is this recipe suitable for meal prepping?
Yes! It reheats beautifully and the spices tend to meld even more after sitting in the fridge. Just store leftovers separately from yogurt, and add fresh herbs and nuts at serving time for freshness.
Can I make this recipe vegan?
Definitely. Replace the beef or lamb with cooked lentils or crumbled tofu seasoned with the same spice blend. Swap yogurt with plain coconut or almond yogurt and skip the pine nuts if desired, or use toasted seeds for crunch.
What side dishes pair best with Moroccan Stuffed Eggplant?
I love serving it with simple salads, couscous, or roasted vegetables. Moroccan mint tea or a fruity red wine also complements it beautifully, balancing the spices and richness of the meat.
Conclusion
I really hope you give this Moroccan Stuffed Eggplant with Beef or Lamb Recipe a try because it’s one of those dishes I always find myself coming back to when I want something full of flavor but nicely balanced and comforting. It’s easy to prepare, visually stunning, and absolutely delicious – a true crowd-pleaser whether it’s a weeknight meal or a special occasion. Trust me, once you taste this, it’ll become one of your cherished recipes too!
I absolutely adore making and sharing my Spaghetti Bolognese Recipe because it perfectly balances rich, comforting flavors with a straightforward cooking process. This dish brings together tender ground beef, fragrant herbs, and a luscious tomato sauce, all tossed with spaghetti for a meal that feels like a warm hug on a plate. Whether it’s a busy weeknight or a casual dinner with friends, this recipe always earns a starring spot in my kitchen repertoire.
Why You'll Love This Spaghetti Bolognese Recipe
What makes this Spaghetti Bolognese Recipe so special to me is its remarkable depth of flavor. The combination of browned beef and slowly simmered tomatoes, enhanced with a splash of red wine and aromatic herbs like thyme and bay leaves, turns a simple pasta dish into something truly memorable. The subtle touch of Worcestershire sauce and a hint of sweetness from the sugar perfectly balances the savory notes, creating a sauce that’s rich without being overwhelming.
I also love how manageable the prep and cooking are. With relatively few ingredients, many of which you probably already have in your pantry, I find this recipe incredibly approachable. It’s one of those dishes that feels fancy but doesn’t demand hours of work or complicated steps – a real winner for busy weekdays or last-minute dinners. And if you want to take the flavor to the next level, a slow simmer option makes all the difference, tenderizing the meat beautifully and thickening the sauce to perfection.
Plus, it’s endlessly versatile. It’s a fantastic crowd-pleaser at family gatherings, yet still cozy enough for quiet nights in. Whether serving it with a simple green salad or a more formal spread, this recipe delivers comfort and confidence. It always feels like a special treat when I bring Spaghetti Bolognese to the table!
Ingredients You'll Need
These ingredients are wonderfully simple but essential, each contributing to the flavor, texture, or color that make this Spaghetti Bolognese Recipe so irresistible. From the rich beef mince and fragrant garlic to the luscious crushed tomatoes and subtle herbs, every component blends together harmoniously.
TIP : You'll find the full list of ingredients and measurements in the recipe card below
Olive oil: Provides a smooth base for sautéing the aromatics and beef, enhancing the sauce's richness.
Garlic cloves: Adds a fragrant punch that infuses the sauce with warmth.
Onion: Gives sweetness and body to the sauce, mellowing as it cooks.
Beef mince: The hearty core of the dish, offering robust flavor and satisfying texture; a mix with pork works beautifully too.
Dry red wine: Brings acidity and depth, perfectly balancing the meatiness.
Beef bouillon cubes: Amplify umami taste for a more robust sauce.
Crushed tomato: Forms the saucy, vibrant foundation with fresh tomato goodness.
Tomato paste: Concentrates tomato flavor, adding intensity and body.
White sugar: Cuts acidity to round out the flavor if the tomatoes are too sharp.
Worcestershire sauce: Adds subtle complexity with its tangy, savory notes.
Dried bay leaves and fresh thyme: Infuse the sauce with gentle herbal aromas.
Cooking salt and black pepper: Essential seasonings to balance and enhance all flavors.
Spaghetti: The classic pasta choice that carries the rich sauce so well.
Parmesan cheese and parsley (optional): Perfect garnishes for a touch of freshness and savory finish.
Directions
Step 1: Heat the olive oil in a large pot or a deep skillet over medium-high heat. Add the finely chopped onion and minced garlic, cooking them for about 3 minutes or until they turn light golden and soften. This aromatic base really sets the tone for the whole dish.
Step 2: Increase the heat to high and add the beef mince. Break it up as it cooks, stirring often, until the meat is browned all over. This step is crucial because it develops that rich, caramelized flavor in the sauce.
Step 3: Pour in the dry red wine and bring it to a gentle simmer. Let it cook for about 1 minute while scraping the bottom of the pot to lift all those tasty browned bits. This simmering lets the wine reduce slightly and burn off its alcohol edge.
Step 4: Add the crumbled beef bouillon, crushed tomato, tomato paste, sugar if using, Worcestershire sauce, bay leaves, thyme sprigs, salt, and pepper to the pot. Stir everything together well, then bring the sauce to a gentle simmer. Turn the heat down to medium so it simmers slowly without a lid, cooking for 20 to 30 minutes. Stir occasionally, and add water if the sauce thickens more than you like.
Step 5: For an extra special touch, I love the slow simmer method. Add three-quarters of a cup of water, cover the pot, and let it simmer very gently on low heat for 2 to 2.5 hours. Stir about every half hour. This slow cooking tenderizes the beef and concentrates flavors beautifully. Before serving, uncover and simmer an additional 20 minutes to thicken the sauce back to the right consistency.
Step 6: Taste the sauce and adjust the salt if needed. It’s important to get this seasoning just right before combining it with the pasta.
Step 7: To toss the sauce and spaghetti together, bring a large pot of salted water to a boil. Add the spaghetti and cook according to the packet instructions minus one minute so it’s slightly firm.
Step 8: Scoop out a mug of pasta water before draining the spaghetti. This starchy water will help your sauce cling perfectly to the noodles.
Step 9: Add the drained spaghetti directly into the bolognese sauce along with about a half cup of the reserved pasta water. Gently toss everything together over medium heat for 1 and a half to 2 minutes. The sauce will thicken slightly and beautifully coat each strand of pasta.
Step 10: Serve the spaghetti bolognese hot, garnished with freshly grated parmesan cheese and a sprinkle of finely chopped parsley if you like. Enjoy every comforting forkful!
Servings and Timing
This Spaghetti Bolognese Recipe yields about 5 generous servings, perfect for a family meal or sharing with friends. The prep time is just around 10 minutes, mainly to chop and prepare your ingredients. Cooking takes roughly 30 to 40 minutes if you take the quicker simmer route, while the slow simmer option will need about 2 to 2.5 hours plus a bit of extra finishing time. There is no resting time required, so you can dig in as soon as it’s ready. Plan ahead if you want that deeper flavor from slow cooking, but either way, it’s a relatively quick and incredibly satisfying meal.
How to Serve This Spaghetti Bolognese Recipe
When I serve this Spaghetti Bolognese Recipe, I like to offer simple sides that complement the hearty sauce without overpowering it. A crisp green salad dressed lightly with lemon vinaigrette provides a perfect fresh contrast, while some crusty garlic bread or a warm baguette is great for mopping up the delicious sauce. If I’m feeling indulgent, a side of roasted vegetables or steamed green beans works beautifully, adding color and texture to the plate.
Presentation-wise, I love serving the dish in wide bowls so the sauce shines over the noodles. Finishing with a generous sprinkle of parmesan cheese and some bright chopped parsley adds a delightful pop of flavor and color that makes the meal feel extra special. Pouring the sauce over after tossing rather than mixing it all together can create a rustic, inviting look that draws everyone to the table.
For beverages, a medium-bodied red wine like Sangiovese or Merlot pairs wonderfully, balancing the richness of the sauce. If you prefer non-alcoholic options, sparkling water with a squeeze of fresh lemon or a chilled iced tea with herbs feels refreshing alongside this comforting meal. I find this dish just right served hot and fresh from the stove, making it a perfect choice for weeknight dinners, casual gatherings, or holiday feasts where everyone’s craving hearty, familiar flavors.
Variations
One of the things I love about my Spaghetti Bolognese Recipe is how easily it can be adapted to suit different tastes and diets. If you’re looking for a lighter take, you could substitute the beef with ground turkey or chicken, which still delivers satisfying flavor with less fat. For a richer taste, try mixing beef with pork mince – it adds wonderful juiciness to the sauce. If you want a vegetarian or vegan option, lentils or plant-based mince can replace the meat wonderfully while still absorbing the sauce’s robust flavors.
For those who need to avoid gluten, using gluten-free spaghetti is a simple swap that keeps the dish just as enjoyable. You could also experiment with different herbs like oregano or rosemary if you want to add a slightly different aromatic profile. Some people enjoy adding a splash of cream or a knob of butter at the end for extra silkiness, though I personally prefer to keep the sauce classic and bright.
Cooking methods can vary too. While I typically make the sauce on the stovetop, using a slow cooker can be a great hands-off approach – just brown the meat and sauté the aromatics first, then combine everything and let it cook low and slow for several hours. This method gives that deep, melding flavor with minimal effort and perfect tenderness.
Storage and Reheating
Storing Leftovers
If you have any leftovers of this Spaghetti Bolognese Recipe, store them in airtight containers in the refrigerator. I recommend dividing the sauce and pasta if possible so you can reheat them more evenly later. Leftover sauce will keep well for up to 3 to 4 days, maintaining its flavor and texture beautifully when properly chilled.
Freezing
This bolognese freezes very well, making it a fantastic make-ahead meal. I usually freeze the sauce separately from the pasta in freezer-safe containers or heavy-duty zip-lock bags, removing as much air as possible. It keeps well for up to 3 months in the freezer. When you’re ready to eat it, thaw the sauce overnight in the fridge for best results.
Reheating
To reheat, gently warm the sauce on the stovetop over medium-low heat, stirring occasionally to prevent sticking and help it regain its thick texture. If reheating the pasta, adding a small splash of water or extra sauce helps restore moisture. Avoid microwaving without stirring as it can cause uneven heating and dryness. Recombining pasta and sauce on the stove for a couple of minutes is my favorite way to refresh leftovers and bring back that freshly cooked taste.
FAQs
Can I make this Spaghetti Bolognese Recipe without wine?
Absolutely! If you don’t want to use wine, you can easily substitute it with water, beef broth, or stock. The wine adds acidity and depth, but the sauce still turns out flavorful and delicious without it. Just be sure to scrape up those browned bits to keep the rich taste.
What type of meat works best for Bolognese sauce?
Traditional Bolognese often uses a mix of beef and pork mince because pork adds juiciness and a bit more flavor complexity. However, using just beef works perfectly well too. Ground turkey or chicken are lighter alternatives, and there are also fantastic plant-based options if you want a vegetarian twist.
How long should I simmer the sauce for optimal flavor?
Simmering for at least 20 to 30 minutes develops a lovely, well-rounded flavor. For a richer, more tender sauce, a slow simmer for 2 hours or longer is ideal but not mandatory. The longer cooking allows the flavors to meld and intensify beautifully.
Can I prepare this recipe in advance?
Yes! In fact, making this Spaghetti Bolognese Recipe a day ahead often enhances the flavors. Just store it in the refrigerator and reheat gently before serving. It’s also freezer-friendly, so preparing in bulk and freezing portions saves time on busy days.
What’s the best way to toss spaghetti with Bolognese sauce?
I recommend cooking the spaghetti just slightly underdone (one minute less than package instructions), reserving some pasta water, then tossing the pasta directly into the sauce with a little pasta water. Cooking together for a minute or two allows the sauce to cling perfectly, creating a cohesive, flavorful dish.
Conclusion
I truly hope you’ll give this Spaghetti Bolognese Recipe a try because it’s one of those timeless dishes that feels both hearty and special. It’s approachable, packed with flavor, and always brings people together around the table. Making it yourself means you can tailor it to your taste and enjoy the wonderful process of slow-simmered goodness. Trust me, once you taste it, this recipe will become a beloved favorite in your home, just like it is in mine!
I am absolutely thrilled to share this Chicken Pumpkin Risotto Recipe that quickly became one of my favorite go-to dishes whenever I want something hearty, creamy, and packed with cozy flavors. It’s a beautiful blend of tender chicken, luscious pumpkin puree, and that classic creamy risotto texture that just warms me right up. Every spoonful tastes like a little celebration of autumn, but honestly, it’s perfect all year round. If you're looking for a recipe that’s both comforting and surprisingly easy to make, this one will definitely make your cooking rotation.
Why You'll Love This Chicken Pumpkin Risotto Recipe
What I love most about this Chicken Pumpkin Risotto Recipe is the harmony of flavors it brings to the table. The pumpkin puree adds a subtle sweetness and vibrant color that makes the dish feel special without overpowering the rich, savory chicken and the creamy Parmesan finish. It’s like autumn in a bowl, but with enough savory balance to enjoy anytime. The aroma while it’s cooking alone gets me so excited—it fills the kitchen with inviting warmth.
Another thing that makes me keep coming back to this recipe is how approachable it is. Despite risotto’s reputation for being a bit fussy, this version is straightforward and doesn’t require constant hovering once you get the technique down. The gradual addition of warm broth and patience in stirring brings out the rice’s natural creaminess without stress. I also love how the chicken cooks perfectly tender and juicy right in the pan before joining the risotto. It all comes together in under an hour, making it a fantastic dinner option even on a weeknight.
Lastly, I find this dish perfect for a variety of occasions. Whether it’s a cozy family dinner, entertaining friends, or a weekend treat, it always impresses and comforts. It’s elegant enough to serve guests but familiar enough to feel like a warm hug on a chilly evening. This Chicken Pumpkin Risotto Recipe really stands out because it brings a luxurious texture and a hint of seasonal flair to a classic comfort food, and I can’t recommend it enough.
Ingredients You'll Need
These ingredients are simple yet essential, each playing a big role in creating the rich taste, smooth texture, and beautiful color of this risotto. From the creamy pumpkin puree to the hearty chicken and savory Parmesan, everything combines effortlessly.
TIP : You'll find the full list of ingredients and measurements in the recipe card below
Arborio rice: This starchy rice is the secret to creating that perfectly creamy risotto texture.
Chicken breasts: Diced and cooked to tender juiciness, they add a hearty protein element.
Pumpkin puree: Adds natural sweetness, creaminess, and a gorgeous orange hue.
Chicken broth: Warmed and added gradually, it infuses the rice with rich, savory flavor.
Onion: Diced and sautéed for a mild, aromatic base that complements the pumpkin.
Garlic: Minced garlic gives the dish a gentle depth and savory aroma.
Parmesan cheese: Grated and stirred in at the end for an irresistible cheesy finish.
Olive oil: Used for sautéing to bring out flavors without overpowering.
Salt and pepper: Essential seasonings to balance and enhance all the flavors.
Directions
Step 1: Begin by simmering the chicken broth over low heat in a separate pot. It’s important to keep it warm throughout the cooking process so the risotto cooks evenly and stays creamy.
Step 2: Heat one tablespoon of olive oil in a large skillet over medium heat. Add the diced chicken and cook for about 5 to 7 minutes until the pieces are no longer pink in the center. Once cooked, remove the chicken from the pan and set it aside—this lets us prepare the risotto base in the same pan without crowding.
Step 3: Add the remaining tablespoon of olive oil to the skillet. Toss in the diced onion and minced garlic, sautéing them over medium heat until they turn soft and fragrant, which should take around 3 to 4 minutes. This step builds a lovely flavor foundation for the risotto.
Step 4: Stir in the Arborio rice with the onions and garlic, and keep stirring for about a minute. This toasts the rice lightly, helping each grain to coat in the oil and develop a slightly nutty flavor instead of becoming mushy later.
Step 5: Start adding the warm chicken broth to the rice gradually—pour in half a cup at a time. Stir frequently, allowing the rice to absorb the liquid before adding more. This slow gradual process releases the rice’s starch, giving you that signature risotto creaminess.
Step 6: After about 15 minutes of continuing this addition and stirring, stir in the pumpkin puree and the cooked chicken. Keep adding the broth in small increments while stirring frequently until the rice becomes tender and the mixture turns creamy. This can take an additional 5 to 10 minutes, so be patient for the perfect texture.
Step 7: Remove the pan from heat and stir in the grated Parmesan cheese. This enriches the risotto with a salty, cheesy creaminess that truly finishes the dish.
Step 8: Taste your risotto and season with salt and pepper as needed. Serve the risotto immediately while it’s still creamy and warm to enjoy it at its best.
Step 9: Dig in and savor your comforting, creamy chicken pumpkin risotto—you’ve made something truly special!
Servings and Timing
This Chicken Pumpkin Risotto Recipe comfortably serves 4 people, making it perfect for a family dinner or small gathering. Prep time is roughly 10 minutes since the ingredients are straightforward and easy to measure. The bulk of the cooking takes about 35 minutes, mostly waiting while slowly adding broth and stirring the risotto to creamy perfection. Altogether, the total time from start to finish is approximately 45 minutes. Since risotto is best enjoyed fresh and hot, no resting or cooling time is needed—serve it right after cooking for maximum flavor and texture.
How to Serve This Chicken Pumpkin Risotto Recipe
I love pairing this Chicken Pumpkin Risotto Recipe with simple but tasty sides that complement its richness. A crisp green salad with tangy vinaigrette works beautifully to cut through the creaminess and add freshness. Roasted seasonal vegetables like Brussels sprouts or green beans also bring a nice contrast in texture and flavor. For a heartier meal, I sometimes serve it alongside sautéed mushrooms or even a slice of crusty bread to soak up any leftover sauce.
When it comes to garnishing, a sprinkle of extra Parmesan, a dash of freshly ground black pepper, or even a few fresh sage leaves on top can really elevate the presentation and add subtle flavor notes. The vibrant orange color from the pumpkin makes the plate pop, so I tend to use white or neutral-colored dishes to highlight the risotto’s inviting warmth.
As for drinks, I find a chilled glass of Pinot Grigio or a light Chardonnay pairs wonderfully with this dish, balancing the creamy texture with a clean, crisp taste. If you prefer something non-alcoholic, a sparkling apple cider or an herbal iced tea like chamomile fits the autumnal vibe just right. This risotto is versatile, so I enjoy serving it at relaxed dinner parties, cozy family meals, or even a special weekend lunch. It’s always best served warm and fresh from the stove, which keeps every bite indulgent and comforting.
Variations
I enjoy experimenting with this Chicken Pumpkin Risotto Recipe to suit different tastes or dietary needs. For instance, swapping out the chicken breasts for shredded rotisserie chicken makes the prep even quicker without sacrificing flavor. For a vegetarian spin, I replace the chicken broth with vegetable broth and omit the chicken entirely—sometimes adding sautéed mushrooms or roasted butternut squash to keep things hearty and satisfying.
If you’re following a gluten-free diet, this recipe is naturally safe since it uses rice and gluten-free broth, but always double-check your broth and Parmesan for any additives. Vegans can try substituting the Parmesan with nutritional yeast or a plant-based cheese alternative and use olive oil in place of butter if you decide to add it. I’ve also played with adding a pinch of nutmeg or cinnamon alongside the pumpkin puree to enhance the autumnal spices, which pairs wonderfully with the creamy textures.
Differently styled, you can try baking the risotto in an oven-safe dish after the broth is absorbed to lock in moisture and add a slightly caramelized top layer for contrast. Another fun twist is stirring in some finely chopped fresh herbs like sage or thyme at the end to brighten the flavors. These variations keep this recipe exciting and adaptable, so I often tweak it depending on my mood or what’s in my pantry.
Storage and Reheating
Storing Leftovers
If you happen to have leftovers, storing them properly is key to enjoying the risotto later without losing its wonderful texture. I recommend transferring any leftovers to an airtight container and refrigerating them within two hours of cooking. Stored this way, it keeps well for up to 3 days. Because risotto thickens as it cools, it’s best to consume leftovers sooner rather than later for the creamiest experience.
Freezing
Freezing chicken pumpkin risotto is possible but not my favorite option because freezing can affect the texture of the rice and the creaminess. However, if you need to freeze it, place the risotto in a freezer-safe, airtight container, leaving some room for expansion. It can stay frozen for up to 2 months. When you’re ready to enjoy it again, thaw it overnight in the refrigerator before reheating to avoid dryness or uneven warming.
Reheating
For the best results when reheating, I gently warm the risotto in a saucepan over low heat. Add a splash of chicken broth or water to help loosen the texture and stir frequently until it’s heated evenly and creamy again. Avoid microwaving unless you add extra liquid and stir halfway through, as microwaves tend to dry out risotto and make it dense. Reheating slowly on the stove helps restore that luscious, creamy consistency I love about this dish.
FAQs
Can I use fresh pumpkin instead of canned pumpkin puree?
Absolutely! If you have fresh pumpkin, you can roast and puree it yourself for the risotto. Just make sure to cook the pumpkin until it’s very soft before blending to achieve a smooth puree that will blend well with the rice. Using fresh pumpkin may add a slightly earthier flavor, which I think is delightful.
Is Arborio rice the only type of rice I can use?
Arborio is ideal because its high starch content creates the creamy texture that defines risotto. You can also experiment with other short-grain rice varieties like Carnaroli or Vialone Nano if available. Using long-grain rice or basmati won’t give you the same creaminess and can result in a less perfect risotto.
Can I make this dish ahead of time and reheat it?
You can prepare the risotto ahead, but keep in mind it’s best enjoyed fresh and creamy. If you do make it early, cool and refrigerate promptly, then reheat gently with added broth. It won’t be quite as fresh, but still delicious with proper reheating.
How can I make the risotto creamier?
Stirring frequently while gradually adding warm broth helps release the starch for creaminess. Adding a bit more Parmesan cheese or a small pat of butter at the end can also create an extra luscious texture that I adore.
What can I serve with this Chicken Pumpkin Risotto Recipe for a complete meal?
I often serve it with a fresh green salad, roasted vegetables, or a side of sautéed mushrooms. For drinks, a crisp white wine or sparkling apple cider complements the flavors perfectly. These additions help round out the meal into something truly memorable.
Conclusion
I hope you’re as excited as I am to try this Chicken Pumpkin Risotto Recipe. It’s one of those dishes that feels like a warm hug on a plate, perfect for sharing or savoring solo. The blend of creamy texture, comforting pumpkin, and tender chicken makes it such a satisfying meal that’s easier to make than you’d expect. Give it a go—you might just find it becomes a new favorite in your kitchen, just like it is in mine.
I made this pumpkin bread many times, and it’s always moist, rich, and flavorful. It doesn’t need icing because the texture and taste are so good on their own.
Why I’ll Love This Recipe
The addition of warmed milk at the end helps keep the bread extra moist and tender.
It uses simple pantry ingredients and comes together in just two bowls.
It balances sweetness, spice, and richness without being overly heavy.
It’s versatile — perfect for brunch, snack time, or dessert.
Ingredients
(Here’s a tip: Check out the full list of ingredients and measurements in the recipe card below.)
1 ⅔ cups all‑purpose flour
1 ¼ cups granulated sugar
1 cup pumpkin puree (plain, not pumpkin pie filling)
½ cup softened unsalted butter
½ cup warm milk
2 large eggs
2 teaspoons ground cinnamon
½ teaspoon baking powder
½ teaspoon baking soda
¼ teaspoon nutmeg
¼ teaspoon kosher salt (or ⅛ teaspoon table salt)
1 teaspoon vanilla extract
Directions
Preheat oven to 350 °F (175 °C).
Grease and flour a loaf pan or a round cake pan (or line with parchment as described below).
In one bowl, whisk together dry ingredients: flour, cinnamon, baking powder, baking soda, nutmeg, and salt.
In a separate bowl, cream together butter and sugar until fluffy (about 2 minutes).
Add eggs to the butter‑sugar mixture and mix until just combined.
Mix in pumpkin puree and vanilla extract.
Add the dry ingredient mixture to the wet ingredients and stir gently until incorporated.
Finally, whisk in the warm milk and fold until the batter is uniform.
Pour batter into the prepared pan.
Bake:
For a cake pan: 45–50 minutes, or until a toothpick in the center comes out clean (some crumbs are okay).
For a loaf pan: 50–55 minutes, checking with a toothpick for doneness.
Once baked, cool in pan 15 minutes. Then loosen edges and invert onto a plate (or lift out via parchment) and cool an additional 15 minutes.
Slice and enjoy.
Servings and timing
Prep time: 10 minutes
Bake time: 45 minutes (for cake) / up to 55 minutes (for loaf)
Total time: about 55 minutes
Makes about 8 slices
Variations
I sometimes fold in chopped nuts (walnuts or pecans) or chocolate chips for extra texture.
I could swap some of the all‑purpose flour for whole wheat flour (e.g. ¼ cup) to give it a heartier texture, though the crumb will be a bit denser.
I might use warm almond milk or another non‑dairy milk in place of dairy milk (though I haven’t tested this exactly).
I could spice it up with extra ginger, cloves, or a pinch of cardamom for more complexity.
Storage / Reheating
I leave the bread out on the counter the day I bake it, then store it covered in the refrigerator for up to one week.
To freeze: once cooled, wrap in parchment paper then plastic wrap. Place in a freezer‑safe bag and freeze up to 2 months. Thaw overnight in the refrigerator, then bring to room temperature before serving.
To reheat: I warm slices in a microwave for a few seconds or in a toaster oven until just warmed through.
FAQs
What if I don’t have warm milk?
I can still make it using milk at room temperature, but warming it slightly helps with the moist texture. If cold, the batter may be a little thicker and the final bread slightly less tender.
Can I make this as muffins instead of a loaf or cake?
Yes — I’d use the same temperature (350 °F / 175 °C) and start checking for doneness around half the time (about 20–25 minutes), depending on muffin size.
Can I use fresh pumpkin instead of canned puree?
Yes — I cook, blend, and strain the pumpkin to a smooth puree and use the same measurement in place of canned pumpkin. Be sure it’s not watery.
Can I substitute butter for oil?
I haven’t tested it extensively, but replacing some or all of the butter with neutral oil (like vegetable or canola) might change the richness and flavor. Butter gives a richer taste.
Is it okay if the top browns more than the inside is done?
Yes — ovens vary. If the top browns too much while the center isn’t done, I tent with foil in the last part of baking to prevent overbrowning.
Conclusion
I hope you enjoy baking and eating this pumpkin bread as much as I do. It’s simple, comforting, and yields a loaf (or cake) that’s moist and flavorful from the first slice to the last. Let me know if you try variations or have any questions!
This Coconut Chicken with a Zesty Bang Bang Sauce is a crispy, golden, and flavor-packed dish that combines sweet coconut-crusted chicken tenders with a creamy, spicy, and slightly sweet sauce. It’s a perfect balance of textures and tastes that hits all the right notes for dinner or even as a party appetizer. I love how simple it is to throw together while still tasting like something special.
Why You’ll Love This Recipe
I love this dish because it’s incredibly crispy on the outside while staying juicy and tender inside. The coconut adds a slightly sweet, nutty crunch that pairs perfectly with the bold bang bang sauce. It’s a fun twist on traditional fried chicken and is easy enough for a weeknight dinner but impressive enough for guests. Plus, the sauce is addictive—I end up dipping everything in it.
Ingredients
(Here's a tip: Check out the full list of ingredients and measurements in the recipe card below.)
For the Coconut Chicken:
1 ½ pounds chicken tenders or boneless chicken breasts cut into strips
1 cup all-purpose flour
½ teaspoon salt
½ teaspoon black pepper
2 large eggs
1 tablespoon water
1 cup panko breadcrumbs
1 cup sweetened shredded coconut
Vegetable oil, for frying
For the Zesty Bang Bang Sauce:
½ cup mayonnaise
2 tablespoons sweet chili sauce
1 tablespoon Sriracha (adjust to taste)
1 teaspoon honey
1 teaspoon rice vinegar
Directions
I start by patting the chicken dry with paper towels and setting it aside.
In one shallow bowl, I mix the flour with salt and pepper. In a second bowl, I beat the eggs with a tablespoon of water. In a third bowl, I combine the panko breadcrumbs and shredded coconut.
I dredge each chicken strip first in the flour mixture, then in the egg wash, and finally in the coconut-panko mixture, pressing gently to coat well.
I heat about ½ inch of vegetable oil in a large skillet over medium heat. Once hot, I fry the chicken in batches for 3–4 minutes per side, or until golden brown and cooked through. I transfer them to a paper towel-lined plate to drain.
While the chicken cooks, I whisk together the mayonnaise, sweet chili sauce, Sriracha, honey, and rice vinegar in a bowl until smooth.
I serve the crispy coconut chicken warm with the bang bang sauce drizzled on top or served on the side for dipping.
Servings and timing
This recipe makes about 4 servings. From start to finish, it takes roughly 30–35 minutes—about 15 minutes of prep and 15–20 minutes to cook, depending on batch size.
Variations
I sometimes switch things up by baking the chicken instead of frying it. I just place the breaded chicken on a baking sheet lined with parchment paper and spray it lightly with cooking spray. Then I bake at 400°F (200°C) for about 20–25 minutes, flipping halfway through, until golden and cooked through. For a gluten-free version, I use gluten-free flour and breadcrumbs. If I want to make it spicier, I add more Sriracha to the sauce or even a pinch of cayenne to the flour.
Storage/Reheating
If I have leftovers, I store the cooked chicken in an airtight container in the fridge for up to 3 days. The bang bang sauce also keeps well in the fridge for up to a week. To reheat the chicken, I prefer using the oven or air fryer so it stays crispy—about 10 minutes at 375°F (190°C) does the trick. I avoid microwaving if possible since it makes the coating soggy.
FAQs
How do I make the chicken extra crispy?
I make sure the oil is hot enough before frying (about 350°F) and press the coconut and panko mixture firmly onto the chicken. Also, frying in batches prevents overcrowding and keeps the oil temperature consistent.
Can I use unsweetened coconut instead of sweetened?
Yes, I can use unsweetened coconut if I prefer a less sweet flavor. It still gives a great crunch but with a more neutral taste.
Is there a dairy-free version of the bang bang sauce?
Definitely. I swap the mayonnaise with a dairy-free alternative like vegan mayo and keep the rest of the ingredients the same.
Can I make the sauce ahead of time?
Yes, I often make the sauce a day or two in advance. I just store it in the fridge in a sealed container and give it a good stir before using.
What should I serve with coconut chicken?
I like serving it with jasmine rice, a light salad, or roasted vegetables. It also pairs well with a simple slaw or even sweet potato fries for something fun.
Conclusion
This Coconut Chicken with Zesty Bang Bang Sauce is one of my favorite meals to whip up when I want something comforting, crispy, and full of flavor. The coconut crust brings a tropical twist, and that creamy, spicy sauce ties everything together beautifully. Whether I’m feeding the family or entertaining friends, this dish always disappears fast.
Juicy dumplings meet crisp vegetables in a savory garlic‑ginger soy glaze—all in one skillet. This Potsticker Stir Fry is ready in under 30 minutes and brings together the best of a dumpling dish and a vibrant stir fry.
Why You’ll Love This Recipe
I love this recipe because it’s fast, flavorful, and feels a little like takeout but healthier. Everything cooks in one pan, and the mix of textures—crispy dumpling edges, tender‑crisp vegetables, and a silky sauce—is so satisfying. It’s also super flexible: I can swap in different vegetables or proteins depending on what I have on hand.
Ingredients
(Here’s a tip: Check out the full list of ingredients and measurements in the recipe card below.)
3 green onions, sliced (white and green parts separated)
2 cloves garlic, minced
1 tablespoon fresh ginger, minced
⅓ cup low‑sodium soy sauce
2 tablespoons hoisin sauce
1 tablespoon rice vinegar
1 tablespoon honey or brown sugar
1 teaspoon chili flakes (optional, for heat)
1 tablespoon sesame seeds (for garnish)
Directions
Heat 1 tablespoon of the sesame oil in a large nonstick skillet or wok over medium‑high heat. Add the frozen potstickers, placing them flat side down, and cook for 2–3 minutes until their bottoms turn golden and crisp.
Add ¼ cup water to the skillet, cover, and steam for 5–6 minutes until the potstickers are cooked through. Remove them from the skillet and set aside.
In the same skillet, add the remaining 1 tablespoon sesame oil. Add the broccoli, carrots, and snow peas. Stir fry them for about 3–4 minutes, until the vegetables are tender but still crisp.
Add the minced garlic, minced ginger, and the white parts of the green onions. Sauté for about 1 minute until fragrant.
In a small bowl, whisk together the soy sauce, hoisin sauce, rice vinegar, honey (or brown sugar), and the chili flakes (if using). Pour that sauce into the skillet and toss to coat the vegetables evenly.
Return the potstickers to the skillet. Gently stir to combine everything, and let it simmer for about 2 minutes so the potstickers absorb some of the sauce.
Before serving, garnish with the green parts of the green onions and sprinkle the sesame seeds over the top.
Servings and timing
Serves: 4
Prep time: about 10 minutes
Cook time: about 20 minutes
Total time: about 30 minutes
Variations
Different dumplings: I like using chicken, shrimp, tofu, or veggie potstickers depending on my mood
Extra veggies: I toss in bell pepper, mushrooms, or zucchini when I want to bulk it up
Add noodles: Stir in cooked ramen, udon, or rice noodles for a heartier meal
Spicy version: I add a squirt of sriracha or extra chili flakes for a kick
Gluten‑free: I use gluten‑free potstickers and tamari instead of soy sauce
Storage/Reheating
I store leftovers in an airtight container in the fridge for up to 3 days. When reheating, I use a skillet over medium heat with a splash of water to loosen the sauce and keep the potstickers soft. The microwave works too in 1‑minute intervals, but I prefer the skillet for better texture.
FAQs
What type of potstickers work best?
I use chicken, tofu, shrimp, or vegetable potstickers. As long as they cook through by steaming, they all work beautifully.
Can I make this vegetarian?
Absolutely. I just use veggie or tofu dumplings and double-check the sauces to make sure they’re plant-based.
How do I avoid soggy potstickers?
I make sure to crisp them well before adding water to steam, and I don’t overcrowd the pan so they keep their texture.
Can I use fresh potstickers instead of frozen?
Yes. Fresh ones cook faster, so I reduce the steaming time and watch closely to avoid overcooking.
Is this freezer-friendly?
I freeze the cooked potstickers separately and reheat them in a skillet. The stir-fry mix is best fresh but can be frozen for short-term use.
Conclusion
This pork-free Potsticker Stir Fry is one of those dishes that I keep coming back to. It’s quick, colorful, and completely comforting with just the right amount of flavor and texture. I love that I can adjust the ingredients to suit what’s in my fridge, and still end up with a dinner that feels like a treat. Whether I’m cooking for myself or sharing with friends, this one always hits the spot.
Spooky stuffed bell peppers are a fun, festive twist on a classic comfort food. I love how these bell peppers transform into mini jack-o’-lanterns, making them perfect for Halloween or fall-themed dinners. They’re stuffed with a savory blend of meat, rice, and tomato sauce—wholesome, hearty, and full of flavor.
Why You’ll Love This Recipe
I love that this recipe is playful, filling, and easy to make. It’s a great way to get into the Halloween spirit while serving a nutritious meal. The carved faces make them fun for kids and adults alike, and the filling is comforting and satisfying. I also like how versatile this recipe is—I can switch up the filling or make it vegetarian if I want to. It’s perfect for weeknights, meal prep, or themed dinner parties.
Ingredients
(Here's a tip: Check out the full list of ingredients and measurements in the recipe card below.)
6 bell peppers (orange, red, or yellow work great for a Halloween look)
1 lb (450 g) ground beef or ground turkey
1 cup cooked white rice
1 small onion, finely chopped
2 cloves garlic, minced
1 ½ cups tomato sauce
1 tablespoon olive oil
1 teaspoon salt
½ teaspoon ground black pepper
1 teaspoon Italian seasoning (or taco seasoning, if preferred)
½ cup shredded mozzarella or cheddar cheese (optional, for topping)
Directions
I preheat the oven to 375°F (190°C).
I wash the bell peppers and slice off the tops, keeping them to use as “lids.” I remove the seeds and membranes from the insides.
Using a small paring knife, I carefully carve jack-o’-lantern faces into one side of each pepper.
In a large skillet, I heat the olive oil over medium heat. I sauté the chopped onion and garlic for 2–3 minutes until fragrant.
I add the ground beef or turkey and cook it until fully browned, breaking it apart with a spatula.
I stir in the cooked rice, tomato sauce, salt, pepper, and Italian seasoning. I let the mixture simmer for 5 minutes.
I spoon the meat mixture into the hollowed peppers until they’re fully stuffed.
I place the stuffed peppers upright in a baking dish and top each with its pepper lid.
I cover the dish with foil and bake for 30–35 minutes.
If I’m using cheese, I uncover the dish, sprinkle the cheese on top, and return it to the oven for an additional 5–10 minutes, until melted.
Servings and timing
This recipe makes 6 servings—1 stuffed pepper per person. Prep time: 20 minutes Cook time: 35–45 minutes Total time: Approximately 1 hour
Variations
I use quinoa instead of rice when I want a protein-packed option.
For a vegetarian version, I swap the meat for black beans, lentils, or a plant-based crumble.
I like to add diced mushrooms or zucchini to the filling for extra veggies.
I sometimes use taco seasoning and add corn and black beans for a Tex-Mex twist.
For a spicy kick, I stir in red pepper flakes or hot sauce to the filling.
storage/reheating
I store any leftover stuffed peppers in an airtight container in the refrigerator for up to 4 days. For reheating, I cover them with foil and bake at 350°F (175°C) for 15–20 minutes, or I microwave them individually for 2–3 minutes until heated through. They can also be frozen for up to 2 months—when ready to eat, I thaw them overnight in the fridge and reheat as usual.
FAQs
How do I keep the bell peppers from tipping over in the pan?
I slice a very thin layer off the bottom of each pepper to help them stand up straight without falling over in the dish.
Can I make these a day in advance?
Yes, I often prepare and stuff the peppers the night before. I store them in the fridge and bake them just before serving.
Should I pre-cook the peppers before stuffing?
No, I find that baking them filled softens the peppers just right while keeping their shape.
What’s the best way to carve the jack-o’-lantern faces?
I use a small, sharp knife or a pumpkin carving tool. Drawing the face with a food-safe marker before cutting helps guide me.
Can I use brown rice instead of white rice?
Absolutely. I’ve used brown rice plenty of times—it adds a slightly nuttier flavor and works just as well.
Conclusion
These spooky stuffed bell peppers are festive, filling, and full of flavor. I love making them in the fall, especially around Halloween, when I want something both comforting and fun. They’re easy to prepare, endlessly customizable, and always a crowd-pleaser. Whether I’m serving them to family or friends, they always bring smiles to the table.
I love making this Butternut Squash Apple Bake when I want something warm, cozy, and slightly sweet but not too heavy. The natural sweetness of the squash and apples melds beautifully with spices, and the bake is both comforting and simple to put together.
Why I’ll Love This Recipe
I’m drawn to this recipe because it uses everyday fruits and vegetables to create a dessert (or side) that feels luxurious without being fussy. The combination of tender squash and baked apples gives me texture contrasts, and the warm cinnamon‐nutmeg aroma fills my kitchen with comfort. It’s also great for cooler days when you want something homey but not overly rich.
ingredients
(Here’s a tip: Check out the full list of ingredients and measurements in the recipe card below.)
1 medium butternut squash (peeled, seeded, and cubed)
3 medium apples (cored and sliced)
¼ cup brown sugar
2 teaspoons cinnamon
½ teaspoon nutmeg
¼ cup butter, melted
½ cup chopped nuts (optional)
directions
Preheat my oven to 350 °F (175 °C).
Peel and cube the butternut squash. Slice the apples (I leave the skin on for extra texture).
In a large bowl, I combine the squash cubes, apple slices, brown sugar, cinnamon, nutmeg, and the melted butter. I toss everything until the squash and apples are evenly coated.
I transfer the mixture into a greased baking dish. If I’m using nuts, I sprinkle the chopped nuts over the top.
I bake for about 45 minutes, or until the squash is tender and the apples are cooked through.
I let it cool slightly before serving.
Servings and timing
Yields: 4 servings
Prep time: about 20 minutes
Cook time: about 45 minutes
Total time: around 1 hour 5 minutes
Variations
For a nut‑free version, I skip the nuts or replace them with breadcrumbs or crushed crackers for a crunchy topping.
I sometimes add dried cranberries or raisins for extra sweetness and chew.
For a savory twist, I experiment by adding fresh rosemary or crumbled goat cheese toward the end of baking.
storage/reheating
I store leftovers in an airtight container in the refrigerator for up to 3–4 days. To reheat, I warm it in the oven at low heat (about 300 °F / 150 °C) until heated through, or microwave individual portions until warm.
FAQs
What kind of apples work best?
I prefer apples that hold shape during baking, like Granny Smith or Honeycrisp (they bring a nice balance of tartness and sweetness).
Can I prep this ahead of time?
Yes. I sometimes do the peeling, cubing, and mixing ahead, store it in the baking dish covered in the fridge, and bake it when I’m ready. It may need a few extra minutes in the oven since it’s cold.
How do I adjust sweetness?
If I want it less sweet, I reduce the brown sugar amount or use a less sweet apple. If I want more sweetness, I can drizzle a little maple syrup or honey before serving.
Can I make it vegan?
Yes — I would substitute the butter with a plant‑based butter or coconut oil. And skip the nuts if there’s an allergy.
What to serve it with?
I like it warm on its own, or paired with a scoop of vanilla ice cream or whipped cream for dessert. It also works nicely as a side alongside roasted meats or a green salad.
Conclusion
This Butternut Squash Apple Bake is one of those dishes I turn to when I want something comforting, seasonal, and relatively effortless. It’s flexible enough for tweaks, delightful warm straight from the oven, and makes my kitchen smell like home. I hope you enjoy making (and eating) it as much as I do.
This Slap Ya Mama Pound Cake is a rich, buttery, Southern-style dessert that’s as nostalgic as it is delicious. With its dense, moist crumb and sweet vanilla flavor, it’s the kind of cake I love making for family gatherings, Sunday dinners, or just when I’m craving a good old-fashioned treat. The name may be playful, but the flavor is seriously satisfying.
Why You’ll Love This Recipe
I love how this pound cake comes together with pantry staples and delivers such a comforting, homemade flavor. It’s got the perfect texture—dense but soft—and a crisp, golden crust that gives way to a rich, melt-in-my-mouth center. It’s also incredibly versatile; I can serve it as-is, top it with fresh berries and whipped cream, or drizzle it with a simple glaze for extra sweetness. It holds up beautifully and gets even better the next day.
Ingredients
(Here's a tip: Check out the full list of ingredients and measurements in the recipe card below.)
3 cups all-purpose flour
3 cups granulated sugar
6 large eggs
1 cup whole milk
1 cup (2 sticks) unsalted butter, softened
½ cup vegetable shortening (like Crisco)
1 teaspoon baking powder
½ teaspoon salt
1 tablespoon vanilla extract
Directions
I start by preheating the oven to 325°F (163°C) and greasing a bundt or tube pan generously with butter and flour or non-stick spray.
In a large bowl, I cream together the softened butter, shortening, and sugar until the mixture is light and fluffy. This takes about 5 minutes with a hand or stand mixer.
I add the eggs one at a time, beating well after each addition to make sure they fully incorporate.
In another bowl, I whisk together the flour, baking powder, and salt.
I add the dry ingredients to the wet mixture alternately with the milk, starting and ending with the flour mixture. I mix just until combined after each addition.
I stir in the vanilla extract, making sure everything is evenly blended.
I pour the batter into the prepared pan and smooth the top.
I bake the cake for 1 hour and 15 to 25 minutes, or until a toothpick inserted into the center comes out clean.
Once baked, I let the cake cool in the pan for 10 minutes, then invert it onto a wire rack to cool completely.
Servings and timing
This recipe serves about 12–14 people, depending on the size of the slices. It takes roughly 20 minutes to prepare and 1 hour and 25 minutes to bake, so I usually allow a total of about 2 hours including cooling time before serving.
Variations
Sometimes I like to switch things up by adding a teaspoon of almond extract along with the vanilla for a slightly nutty flavor. I’ve also folded in a cup of chopped pecans or mini chocolate chips for texture. When I want an extra sweet touch, I drizzle a vanilla glaze over the cooled cake made with powdered sugar, milk, and a splash of vanilla.
Storage/reheating
To store, I wrap the cooled cake tightly in plastic wrap or place it in an airtight container. It keeps well at room temperature for up to 4 days. If I want it to last longer, I refrigerate it for up to a week or freeze it for up to 3 months. When I’m ready to enjoy it again, I let it come to room temperature or warm slices in the microwave for 10–15 seconds.
FAQs
How do I know when the pound cake is done baking?
I check by inserting a toothpick into the center of the cake. If it comes out clean or with just a few crumbs, it’s done.
Can I use margarine instead of butter?
I prefer using real butter for the best flavor and texture, but margarine can work in a pinch. Just make sure it’s not a spread with added water content.
Why did my pound cake fall in the middle?
Overmixing the batter or underbaking the cake can cause it to sink. I mix just until combined and always check the doneness before removing it from the oven.
Can I make this pound cake in loaf pans instead of a bundt pan?
Yes, I divide the batter between two standard loaf pans and reduce the baking time to around 55–65 minutes.
Do I need to sift the flour?
I don’t usually sift the flour for this recipe, but if I want a slightly lighter texture, sifting can help incorporate more air into the batter.
Conclusion
This Slap Ya Mama Pound Cake is everything I want in a homemade dessert—simple, flavorful, and full of Southern charm. It’s perfect for any occasion and always leaves people asking for the recipe. Once I tried it, it quickly became a staple in my kitchen.
This is an easy, no‑bake trifle that layers pumpkin cheesecake filling, whipped cream, and angel food cake to make a showy, fall‑flavored dessert.
Why I’ll Love This Recipe
I love recipes that look elegant but are simple to assemble. This trifle gives me creamy cheesecake flavor, light whipped cream, and soft cake—all without turning on the oven. The pumpkin and warm spices make it perfect for autumn gatherings or holidays.
ingredients
(Here’s a tip: Check out the full list of ingredients and measurements in the recipe card below.)
For the trifle base
22 ounces angel food cake (cut into pieces)
Whipped cream
1 pint heavy whipping cream
½ cup powdered sugar
½ teaspoon vanilla extract
Pumpkin cheesecake layer
16 ounces cream cheese (softened)
15 ounces pure pumpkin puree (not pumpkin pie filling)
¾ cup brown sugar
2 teaspoons vanilla extract
3 teaspoons pumpkin pie spice (plus extra for dusting)
directions
In a mixing bowl (or stand mixer), whip the heavy whipping cream with powdered sugar and ½ teaspoon vanilla extract until stiff peaks form. Set aside a portion for layering.
In another bowl, beat the cream cheese until smooth and light.
Add the pumpkin puree, brown sugar, vanilla extract, and pumpkin pie spice to the cream cheese. Continue beating until everything is fully combined.
Gently fold in one third of the whipped cream into the pumpkin‑cheesecake mixture to lighten it.
Cut the angel food cake into bite‑sized pieces.
In your trifle dish (or clear glass bowl), layer as follows: a. One third of the cake pieces b. One third of the pumpkin cheesecake mixture c. One third of the remaining whipped cream
Repeat the layering two more times (cake, pumpkin cheesecake, whipped cream), ending with the whipped cream layer on top.
Sprinkle a little extra pumpkin pie spice over the top as garnish (optional).
Refrigerate until ready to serve. The trifle tastes best if chilled for at least 2 hours.
Servings and timing
Makes about 16 servings
Prep time: ~ 15 minutes
No baking required
Chill time: at least 2 hours
Variations
Instead of angel food cake, I sometimes use pound cake or a vanilla sponge.
For a spicier twist, I increase the pumpkin pie spice or add a pinch of ground ginger or cloves.
To lighten it further, I could incorporate more whipped cream into the cheesecake layer.
I also like adding a layer of crumbled gingersnap cookies or graham crackers for extra texture.
storage/reheating
I store the assembled trifle in the refrigerator, covered, for up to 1 day. If I want to prepare ahead, I might make the components (cake, pumpkin cheesecake, whipped cream) separately and assemble just before serving (those can last up to 3 days refrigerated). Whipped cream is best when made fresh or a day before. There is no reheating — serve cold.
FAQs
What kind of pumpkin should I use?
I always use pure pumpkin puree, not pumpkin pie filling (which has added sugar and spices).
Can I use a different cake instead of angel food cake?
Yes — angel food gives a light texture, but pound cake, sponge cake, or even crumbled cookies work well.
Can I make this ahead of time?
Yes. The full trifle can be made and refrigerated (covered) for 1 day. For more advance prep, make the components separately and assemble closer to serving.
How do I avoid the trifle becoming soggy?
I make sure the cake pieces aren’t too damp, and I try not to over‑soak them. Also, folding only part of the whipped cream into the cheesecake helps keep structure.
Can I reduce the sugar or make a lighter version?
Yes, I sometimes use less brown sugar or use lower‑fat cream cheese. But doing so may change the richness and texture slightly.
Conclusion
I find this Pumpkin Cheesecake Trifle to be a perfect dessert when I want something impressive but stress‑free. The layers balance richness, lightness, and fall flavor. Whether for a family dinner, holiday, or potluck, it’s become one of my go‑to desserts in pumpkin season.
I love having a jar of this homemade hot chocolate mix on hand. It’s made from pantry staples and lets me enjoy rich, creamy hot cocoa in just minutes.
Why You’ll Love This Recipe
I’ll tell you — this mix is convenient, customizable, and makes a perfectly smooth, cozy cup of hot chocolate every time. It stores well, so I can make a big batch and use it all winter.
Ingredients
(Here’s a tip: Check out the full list of ingredients and measurements in the recipe card below.)
3 cups dry milk powder (whole or nonfat)
3 cups powdered sugar
1 cup unsweetened cocoa powder (or Dutch‑process)
½ cup powdered vanilla-flavored coffee creamer
¼ teaspoon salt
Directions
In a large bowl, I combine the dry milk powder, powdered sugar, cocoa powder, powdered coffee creamer, and salt.
I whisk everything together until it’s evenly mixed and there are no lumps.
I store the dry mix in an airtight container; it stays good up to about 3 months in a cool, dry place.
To make a cup of hot chocolate: I put ⅓ cup of the mix into a mug and stir in 1½ cups of hot milk (or non‑dairy milk).
Optionally, I top with whipped cream or marshmallows before serving.
Servings and timing
Yield: about 20 servings
Prep time: about 5 minutes
Total time: 5 minutes
Variations
For a richer flavor, I sometimes use half regular cocoa and half “special dark” cocoa.
I can add 1½ cups of finely chopped chocolate or chocolate chips when making the drink to make it even more indulgent.
A pinch of cinnamon, nutmeg, or a drop of peppermint or hazelnut extract can give a fun twist.
For a dairy‑free version, I swap the dry milk powder with a plant‑based milk powder and make sure the creamer is nondairy.
Storage / Reheating
I keep the dry mix sealed in an airtight container and store it in a cool, dry cupboard for up to 3 months.
For leftover prepared hot chocolate, I refrigerate it (once cooled) and drink within 3–4 days.
To reheat, I warm it gently on the stove (stirring) rather than letting it boil, to keep it creamy and avoid scorching.
FAQs
What if I don’t have powdered milk?
I could try substituting a finely powdered nondairy milk (like oat milk powder) or making the mix fresh each time using cocoa, sugar, and milk — but it may not be as smooth or shelf‑stable.
Can I use a different creamer flavor or none at all?
Yes — using a different creamer flavor will change the final taste, which can be fun. Leaving out the creamer is possible, but the mix might be less creamy.
How do I adjust sweetness or chocolate strength?
I simply reduce or increase the powdered sugar or cocoa powder in the mix until it matches my preferred balance.
Can I use water instead of milk when making a cup?
I prefer milk or non‑dairy milk because it gives better creaminess. Using hot water is possible in a pinch, but the result isn’t as rich.
Does this mix clump over time?
It can if moisture gets in. To prevent that, I always use a dry spoon, seal the container tightly, and store it away from humidity.
Conclusion
I find this hot chocolate mix to be a staple in my kitchen — it’s fast, flexible, and comforting. Whether I keep it for everyday enjoyment or gift jars to friends, I know I’ll always have a delicious cup of cocoa ready in minutes.
I present a festive and flavorful salmon dish featuring a tangy-sweet cranberry miso glaze that beautifully complements rich, buttery salmon. This fusion of East and West is elegant enough for special occasions yet simple enough for a weeknight.
Why You’ll Love This Recipe
I fell in love with this recipe for so many reasons:
It combines unexpected flavors — tart cranberries, savory miso, and honey — to create a glaze that’s vibrant yet balanced.
The salmon stays moist and rich, and the glaze adds a glossy, beautiful finish.
It feels festive and special, perfect for holidays or dinner parties.
It’s surprisingly doable — minimal steps, common ingredients, and big flavor payoff.
Leftover glaze can be used on vegetables, grains, or even drizzled over rice bowls.
Ingredients
(Here’s a tip: Check out the full list of ingredients and measurements in the recipe card below.)
4 salmon fillets (about 6 oz / ~170 g each)
1 cup fresh or frozen cranberries
2 tablespoons white miso paste
2 tablespoons soy sauce (or tamari for gluten‑free)
3 tablespoons honey or maple syrup
1 tablespoon rice vinegar (or apple cider vinegar)
2 cloves garlic, minced
1 teaspoon grated fresh ginger (optional)
1 teaspoon sesame oil
¼ cup water
1 tablespoon olive oil (for searing)
Garnishes: sesame seeds, fresh chives or thyme
Directions
Prepare the glaze In a medium saucepan, combine cranberries, miso paste, soy sauce, honey (or maple syrup), rice vinegar, minced garlic, optional grated ginger, sesame oil, and water. Bring to a simmer over medium heat. Cook for about 10–12 minutes, stirring occasionally, until the cranberries burst and the sauce thickens. If the miso is clumpy, whisk to smooth it out.
Cook the salmon Option 1: Skillet
Pat the salmon fillets dry.
Heat the olive oil in a skillet over medium-high heat.
Place salmon fillets skin-side down and sear for about 4 minutes.
Flip the fillets and cook another 3–4 minutes until the salmon is mostly cooked.
Brush the top with the cranberry miso glaze and cook about 1 more minute to let the glaze adhere and warm through.
Option 2: Oven
Preheat the oven to 400 °F (≈ 200 °C).
Line a baking sheet with parchment.
Place the salmon fillets on the sheet.
Brush them with some of the glaze.
Bake for 12–15 minutes, applying additional glaze halfway through for extra flavor and shine.
Glaze & garnish Spoon extra glaze over the cooked salmon fillets. Then sprinkle with sesame seeds and fresh chives or thyme for brightness and texture.
Serve immediately Pair with grains (rice, quinoa, wild rice) or roasted vegetables to round out the meal.
Servings and timing
Yield: 4 servings
Total time: Approximately 35 minutes (about 15 minutes prep + 20 minutes cooking)
Variations
Use pomegranate arils instead of cranberries for a similar tart-sweet effect.
Replace honey with brown sugar or maple syrup for a slightly different sweetness profile.
Add a pinch of red pepper flakes or a dab of chili paste for heat.
Use the glaze on chicken, shrimp, or tofu as an alternate protein.
Garnish with orange zest or pomegranate seeds for extra festive flair.
Storage / Reheating
Fridge: Store glazed salmon in an airtight container for up to 3 days.
Freezer: Freeze salmon without glaze for up to 2 months; prepare fresh glaze when ready to serve.
Reheating: Warm in the oven at 300 °F (≈ 150 °C) for about 10 minutes, covered with foil to retain moisture. Then spoon fresh glaze over before serving.
FAQs
What if I don’t have white miso paste?
I can use yellow miso or red miso; just reduce the amount slightly since these are stronger. The flavor will shift a bit, but the dish will still be delicious.
Can I make the glaze ahead of time?
Yes — I often make the glaze a day ahead. I store it in a jar in the fridge, and then gently reheat it before brushing it onto the salmon.
Is frozen salmon okay to use?
Absolutely. I thaw it fully, pat it dry to remove excess moisture, and then proceed with the recipe as usual.
Can I grill the salmon instead of skillet or oven?
Yes — I grill it and brush the glaze on during the last 2 minutes of cooking so it doesn’t burn from direct flame.
Can this dish be made gluten-free or dairy-free?
Yes — it’s naturally dairy-free. To make it gluten-free, I use tamari (or a gluten-free soy sauce) instead of regular soy sauce.
Conclusion
I love how the tangy cranberries, savory miso, and sweet honey come together in this glazed salmon dish. It feels elegant and festive but doesn’t demand complicated techniques. Whether I’m serving it at a holiday dinner or treating myself on a weeknight, this recipe delivers on both flavor and presentation.
Here’s a cozy, fall‑inspired muffin that I love making at home. These muffins combine a spiced pumpkin batter with a tangy cream cheese swirl—soft, moist, and irresistible.
Why You’ll Love This Recipe
I fall in love every time I bake these muffins because:
They come together in about 30–40 minutes—perfect when I want a treat without spending all afternoon in the kitchen.
The flavor reminds me of the Starbucks version, at a fraction of the cost and with fresher ingredients.
The cream cheese center gives a delightful contrast to the spiced pumpkin, so each bite has a surprise.
Most ingredients are pantry staples, so I rarely need a special shopping trip.
They make my kitchen smell like autumn with cinnamon, nutmeg, and ginger wafting through the air.
ingredients
(Here’s a tip: Check out the full list of ingredients and measurements in the recipe card below.)
For the pumpkin batter:
1½ cups all‑purpose flour
¾ cup granulated sugar
1 teaspoon baking powder
1 teaspoon baking soda
1 teaspoon pumpkin pie spice blend
¼ teaspoon salt
1½ cups pumpkin puree
1 large egg
¼ cup melted butter
1 teaspoon vanilla extract
For the cream cheese center:
4 oz (about 113 g) cream cheese, softened
2 tablespoons granulated sugar
1 teaspoon all‑purpose flour
1 teaspoon milk
½ teaspoon vanilla extract
directions
Preheat the oven to 350 °F (175 °C). Grease a muffin tin or line it with paper liners.
In a large bowl, whisk together the flour, sugar, baking powder, baking soda, pumpkin pie spice, and salt until well mixed.
In another bowl, combine the pumpkin puree, egg, melted butter (cooled slightly), and vanilla extract. Whisk until smooth.
Pour the wet mixture into the dry ingredients and stir gently just until combined. Don’t overmix—the batter should have a few streaks of flour still visible.
Fill each muffin cup about ¾ full with the batter (a scoop or spoon works well).
In a small bowl, beat together the softened cream cheese, sugar, flour, milk, and vanilla extract until creamy and smooth.
Transfer the cream cheese filling into a piping bag or a small Ziploc bag with the tip cut off. Insert the tip into the center of each muffin and squeeze in about 1 tablespoon of the cream cheese filling. As you fill, gently pull the tip up toward the surface.
Bake in the preheated oven for 15–20 minutes, or until a toothpick inserted into the part of a muffin without the filling comes out clean.
Remove the muffins from the oven and let them cool in the pan briefly. Then transfer them out to finish cooling slightly before serving—be careful, the cream cheese center stays hot right out of the oven.
Servings and timing
Servings: About 4 muffins (you can scale up for a full muffin tin batch)
Preparation time: ~11 minutes
Cook time: ~24 minutes
Total time: ~35 minutes
If you make a larger batch (e.g. 12 muffins), the times remain about the same; just watch that toothpick test carefully.
Variations
If you don’t have pumpkin pie spice, mix ½ teaspoon cinnamon, ¼ teaspoon nutmeg, ⅛ teaspoon ginger, and a pinch of cloves.
Instead of melted butter, you can use the same amount of vegetable oil or melted coconut oil (texture slightly changes).
Substitute up to half the all‑purpose flour with whole wheat flour for a heartier version.
Use a 1:1 gluten‑free flour blend to make them gluten-free.
If you don’t want a cream cheese center, you can omit it and make plain pumpkin muffins—they’re still tasty.
storage/reheating
Room temperature: Store in an airtight container for up to 3 days.
Refrigerator: Because of the cream cheese, they keep better in the fridge—up to 1 week.
Freezer: Wrap each muffin individually and freeze for up to 3 months. Thaw at room temperature for an hour or microwave for 30–45 seconds. For that fresh‑baked feel, warm them in a 300 °F oven for 5–10 minutes after thawing.
FAQs
How do I prevent the muffins from sinking?
I avoid opening the oven door during the first 15 minutes. Also, I make sure my leavening (baking powder/soda) is fresh and that I don’t overmix the batter.
Can I double the recipe?
Yes—I often double it to fill a 12‑cup muffin tin. The baking time is about the same; just check doneness with a toothpick in a non‑filling part.
What if my cream cheese filling is lumpy?
I always let the cream cheese come to room temperature and beat it thoroughly with the sugar, flour, milk, and vanilla until smooth before piping.
Can I use canned pumpkin pie filling instead of pumpkin puree?
No—pie filling already has sugar and spices added, which will throw off the balance. Use plain pumpkin puree for best results.
How do I know when the muffins are done?
Insert a toothpick into the muffin part (avoiding the cream cheese center). If it comes out clean or with a few crumbs, they’re done.
Conclusion
I hope you enjoy making these Fluffy Copycat Starbucks Pumpkin Cream Cheese Muffins as much as I do. The blend of spiced pumpkin batter and creamy cheese center feels indulgent without being overwhelming. Perfect for cozy mornings or sharing with friends over a cup of coffee. Let me know if you’d like a version for a full 12‑cup batch or any other twist!
A comforting pot roast infused with the rich, savory flavors of French onion soup — this dish combines tender, slow-braised beef with deeply caramelized onions, herbs, garlic, and melty cheese. I love pairing it with toasted bread for the full French onion experience. It’s cozy, satisfying, and absolutely packed with flavor.
Why You’ll Love This Recipe
I’m a huge fan of meals that warm both the kitchen and the soul — and this French Onion Pot Roast does exactly that. The onions caramelize low and slow until they’re sweet and jammy, creating a deeply flavorful base. From there, the roast braises until melt-in-your-mouth tender, and I like to finish it with bubbling cheese under the broiler. Whether I’m making this for a weekend dinner or prepping it ahead for a special gathering, it always delivers. Plus, it smells amazing as it cooks.
ingredients
(Here's a tip: Check out the full list of ingredients and measurements in the recipe card below.)
3 pounds chuck roast
Fine sea salt, to taste
Fresh ground black pepper, to taste
2 tablespoons avocado oil (or other neutral cooking oil)
2 tablespoons unsalted butter
3 large yellow onions, thinly sliced (about 6–7 cups)
4 cloves garlic, minced
3 cups beef broth (low sodium or beef stock)
2 tablespoons Worcestershire sauce
2 bay leaves
2 teaspoons dried thyme
1 teaspoon dried oregano
2 tablespoons cornstarch
4 tablespoons water (for slurry)
Optional Cheese Topping: 2 cups provolone or Gruyère, shredded
Serve With: fresh parsley, chopped; thick slices of baguette or crusty French bread, toasted
directions
I start by patting the chuck roast dry with paper towels, then seasoning it generously with salt and pepper on all sides.
In a Dutch oven over medium-high heat, I heat the avocado oil and sear the roast on all sides for about 4–5 minutes per side, until it’s nicely browned. Then I remove it and set it aside.
I reduce the heat to medium-low, add butter, and once it melts, I add the sliced onions. I cook them slowly, stirring occasionally, for at least 30–45 minutes until they’re caramelized and soft.
In the last 30 seconds of the onion cooking, I stir in the garlic until it’s fragrant.
I raise the heat to medium-high and add beef broth, Worcestershire sauce, bay leaves, thyme, and oregano. I bring it all to a simmer, then taste and adjust the seasoning.
I return the roast and any juices to the pot and bring it back to a gentle simmer.
Then I reduce the heat to low, cover the pot, and let it simmer gently on the stovetop — or I transfer it to a 300°F oven — for 3½ to 4 hours, until the beef is fork-tender. If the liquid reduces too much, I add a splash of broth or water.
Once the beef is tender, I remove the roast and discard the bay leaves. I whisk the cornstarch and water together, then whisk it slowly into the liquid to thicken it over 1–2 minutes.
I return the roast to the pot and use two forks to shred the beef into the sauce, stirring gently to mix it all together.
For the finishing touch, I sprinkle the shredded cheese on top and place it under the broiler for 2–5 minutes, watching closely until the cheese is melted and bubbly.
I garnish with chopped parsley and serve it hot with toasted baguette slices.
Servings and timing
Yield: 8 servings
Prep Time: 30 minutes
Cook Time: 4 hours 30 minutes
Total Time: 5 hours
Variations
I like switching things up from time to time. Here are a few tweaks I make depending on what I have on hand:
I sometimes swap out part of the beef broth for red wine to add richness and depth.
For the cheese, I use Gruyère when I want that classic French onion flavor or provolone for a smooth melt. Mixing cheeses also works beautifully.
When I want a lower-carb option, I skip the bread and serve it with roasted vegetables instead.
I’ve also made it in a slow cooker — after caramelizing the onions, everything goes into the cooker on low for 8 hours.
storage/reheating
Leftovers keep beautifully. I refrigerate them in an airtight container for up to 4 days and reheat gently on the stovetop or in the microwave.
If I want to freeze it, I let the pot roast cool completely (without adding cheese) and store it in a freezer-safe container for up to 3 months. I thaw it overnight in the fridge before reheating, and then I add the cheese topping fresh before serving.
To reheat with cheese, I sometimes place it back under the broiler just like the first time.
FAQs
How do I know when the onions are properly caramelized?
I look for a deep golden-brown color and soft, jammy texture. It usually takes 30–45 minutes over low heat, and I stir often to prevent burning.
Can I make this in a slow cooker?
Yes, after searing the meat and caramelizing the onions, I transfer everything to a slow cooker and cook on low for 8–9 hours or until the meat is tender.
What’s the best cut of meat for this recipe?
Chuck roast works best — it becomes incredibly tender after long, slow cooking and has enough fat to stay juicy and flavorful.
Can I skip the cheese topping?
Absolutely. I like the cheesy finish, but the roast is still full of flavor without it. If I’m watching calories or keeping it dairy-free, I leave it off.
What can I serve with this pot roast?
Toasted baguette slices are my favorite, but I also serve it with mashed potatoes, polenta, or even over egg noodles for a hearty meal.
Conclusion
This French Onion Pot Roast is a true comfort food classic — deeply savory, rich, and incredibly satisfying. Whether I’m hosting guests or just feeding the family, it never fails to impress. The combo of tender beef, sweet caramelized onions, and melted cheese brings French onion soup vibes to a whole new level. It’s worth every minute of slow cooking.
This roast turkey recipe delivers a juicy, golden bird infused with fresh herbs, citrus, and a rich layer of buttery flavor. Perfect for holidays or any special gathering, I love how the aromatic vegetables and herb butter transform the turkey into a tender, flavorful centerpiece. Whether it’s Thanksgiving or a family dinner, this recipe never fails to impress.
Why You’ll Love This Recipe
I love that this roast turkey brings together simple ingredients for outstanding flavor. The herb butter melts under the skin, keeping the meat moist while creating a crispy, golden crust. The mix of orange, lemon, and fresh herbs infuses the meat with subtle, zesty notes. Plus, stuffing the cavity with vegetables and citrus adds both flavor and moisture while making the whole kitchen smell amazing. It’s a show-stopping dish that feels like a celebration.
Ingredients
(Here's a tip: Check out the full list of ingredients and measurements in the recipe card below.)
Butter (softened, cubed) – amount as needed
Fresh herbs (e.g. thyme, rosemary, parsley) – to taste
Salt and pepper
Carrots, celery, onion – roughly chopped
Orange and lemon (quartered)
Bay leaves
Whole turkey (size per your gathering)
Directions
I start by removing the packaging from the turkey and checking the cavity for any giblets or packaging. Then I let it come to room temperature.
In a bowl, I mix the softened butter with chopped herbs, salt, and pepper.
I roughly chop the carrots, celery, onion, orange, and lemon for stuffing.
After patting the turkey dry with paper towels, I season the cavity with salt and pepper, then stuff it loosely with the chopped vegetables, citrus, herbs, and bay leaves.
Gently lifting the skin over the breast and thighs, I tuck in some of the herb butter, then slather the rest all over the outside of the turkey.
I tie the legs with butcher’s twine and tuck the wing tips under the body, placing the bird on a rack in a roasting pan.
Before roasting, I tent the turkey loosely with foil to prevent over-browning.
I roast the turkey until the internal temperature reaches a safe 165°F (74°C) in the thickest part of the thigh, following a general guide of about 13–15 minutes per pound.
During the last stage of roasting, I remove the foil to help the skin crisp up.
After cooking, I let the turkey rest for 25–30 minutes before carving so the juices can redistribute.
Servings and timing
This recipe yields one whole roast turkey, with serving sizes depending on the weight of the bird. A 12–14 pound turkey typically serves 10–12 people.
Prep Time: 20 minutes
Cook Time: 2½ to 4 hours (depending on turkey size)
Total Time: 3 to 5 hours (including resting time)
Variations
I sometimes swap in different herbs depending on what’s fresh—sage or tarragon work beautifully. If I’m cooking for a smaller group, I adapt this recipe to just a turkey breast and adjust cooking time accordingly. Occasionally, I’ll also add apple or garlic to the cavity for extra depth of flavor. The herb butter can be made with garlic or even a splash of white wine for a twist.
storage/reheating
After the meal, I store leftover turkey in airtight containers in the fridge for up to 4 days. I slice the meat off the bone for easier reheating. To reheat, I place slices in a baking dish with a splash of broth and cover with foil. Warming it in the oven at 300°F (150°C) keeps it moist. Turkey also freezes well for up to 2–3 months—just make sure it’s cooled completely before packing.
FAQs
How do I know when the turkey is fully cooked?
I use a meat thermometer and insert it into the thickest part of the thigh without touching bone. It should read 165°F (74°C). That’s my go-to method for perfect results.
Can I prepare the herb butter ahead of time?
Absolutely. I often mix the herb butter a day in advance and keep it refrigerated. Just let it soften at room temperature before applying it under the skin.
What if my turkey starts browning too quickly?
I keep the turkey loosely tented with foil for most of the roasting time. If it browns too fast, I re-cover it. I only remove the foil toward the end to crisp the skin.
Do I need to baste the turkey while it cooks?
I don’t find basting essential with this recipe since the herb butter under the skin keeps it moist, but I sometimes baste once or twice for added flavor and shine.
Can I use dried herbs instead of fresh?
Yes, but I prefer fresh herbs for this recipe. If I’m using dried, I reduce the quantity to about one-third since dried herbs are more concentrated in flavor.
Conclusion
This roast turkey with herb butter, citrus, and vegetables is everything I want in a holiday centerpiece—tender, flavorful, and truly unforgettable. With a little prep and simple ingredients, I get a stunning bird every time. Whether it’s for Thanksgiving or another special occasion, this recipe always brings people together around the table.
A moist, warmly spiced pumpkin loaf topped with a rich cream cheese frosting and a sprinkle of toasted pecans—this cozy treat brings all the flavors of fall in every bite. With a tender crumb and creamy topping, it’s the kind of recipe I love to share during the cooler months or anytime I'm craving a comforting homemade dessert.
Why You’ll Love This Recipe
I always find this pumpkin loaf incredibly satisfying. It’s easy to make, and the warm spices fill my kitchen with that classic fall aroma. The texture stays perfectly moist thanks to the pumpkin puree and a combination of butter and oil. The cream cheese frosting adds a luxurious finish, and if I want a little crunch, I sprinkle chopped pecans on top. It's ideal for gatherings, holidays, or simply enjoying a slice with coffee on a crisp morning.
Ingredients
(Here's a tip: Check out the full list of ingredients and measurements in the recipe card below.)
2 ¼ cups all-purpose flour
¾ cup light brown sugar
¾ cup granulated sugar
2 teaspoons baking powder
1 teaspoon baking soda
½ teaspoon fine sea salt
4 teaspoons pumpkin pie spice
15 ounces pure pumpkin puree
8 tablespoons unsalted butter, melted
½ cup vegetable oil + 1 tablespoon
3 large eggs, room temperature
1 teaspoon vanilla extract
8 ounces cream cheese, full fat, cut into pieces
4 tablespoons unsalted butter, softened
2 teaspoons vanilla bean paste
¾ teaspoon fine sea salt
4 cups powdered sugar, sifted
4 tablespoons heavy cream, room temperature
1 cup pecans, toasted & chopped (optional garnish)
Directions
I preheat my oven to 350 °F (≈175 °C), then spray two 8½″ × 4½″ loaf pans with cooking spray and line them with parchment paper.
In a medium bowl, I whisk together the flour, both sugars, baking powder, baking soda, salt, and pumpkin pie spice.
In a large bowl, I whisk the pumpkin puree with melted butter, vegetable oil, eggs, and vanilla extract.
I gently fold the dry ingredients into the wet mixture just until combined, being careful not to overmix.
Then I divide the batter between the pans, smoothing the tops.
I bake the loaves for 55 to 65 minutes, checking around 50 minutes. If the tops start to brown too quickly, I tent them with foil. The loaves are done when they spring back when touched and a toothpick comes out clean.
After baking, I let them cool in the pans for 15 minutes before transferring to a wire rack to cool completely.
For the frosting, I beat the cream cheese and softened butter until creamy, then mix in the vanilla bean paste and salt.
With the mixer on low, I gradually add the powdered sugar, then the cream one tablespoon at a time until the frosting is smooth and spreadable.
Once the loaves are completely cool, I spread the frosting evenly and sprinkle with chopped pecans if I want an extra touch.
Servings and timing
This recipe makes two loaves, which I slice into about 10 servings each—perfect for 20 people total. It takes roughly 20 minutes to prep, 55 to 65 minutes to bake, and I always allow time for cooling and frosting. So in total, I plan for around 70 minutes, plus extra cooling time.
Variations
When I want to change things up, I sometimes fold in ¾ cup of chocolate chips or chopped nuts into the batter before baking. For a more intense flavor, I’ve swapped the vanilla extract with maple extract or added a bit of orange zest. And when I’m baking for someone avoiding nuts, I simply leave off the pecans. This recipe is also great with a light glaze instead of full frosting if I want a less rich finish.
storage/reheating
I store the frosted loaves in the refrigerator in an airtight container for up to 5 to 7 days. When I freeze the loaves (before frosting), I let them cool fully, wrap them in plastic wrap, then foil, and they keep well for up to 8 weeks. When I’m ready to serve, I thaw them completely before frosting. If I want a warm slice, I microwave it for about 10–15 seconds, just enough to soften the texture without melting the frosting.
FAQs
How do I know when the pumpkin loaves are fully baked?
I test the center with a toothpick—if it comes out clean and the tops spring back when touched, they’re done. It usually takes 55 to 65 minutes.
Can I make this recipe into muffins?
Yes, I’ve made this batter into muffins by filling a muffin tin about ¾ full. I bake them at 350 °F for 20–25 minutes, or until a toothpick comes out clean.
What can I use instead of vanilla bean paste?
When I don’t have vanilla bean paste, I use the same amount of vanilla extract. The flavor won’t be quite as deep, but it still works beautifully.
Can I make this recipe dairy-free?
To make it dairy-free, I’ve swapped the butter for plant-based butter and used a dairy-free cream cheese alternative. Just be sure the substitutions are room temperature before mixing.
Is it okay to frost the loaf while still warm?
I always let the loaves cool completely before frosting. If they’re too warm, the frosting melts and becomes runny.
Conclusion
This spiced pumpkin loaf with cream cheese frosting is one of my favorite seasonal bakes. It’s simple to make, full of flavor, and perfect for sharing. Whether I serve it at a fall brunch, bring it to a holiday gathering, or just enjoy a slice with coffee, it never lasts long in my kitchen.
This protein-rich cottage cheese clafoutis is a light, creamy, and satisfying dish that’s low in carbs and naturally gluten-free. I love how the cottage cheese makes it both nourishing and indulgent, while the berries bring a pop of sweetness and color. It's the kind of treat I can enjoy for breakfast or dessert without any guilt.
Why You’ll Love This Recipe
I find this recipe perfect for days when I want something sweet yet wholesome. It’s high in protein thanks to the cottage cheese and eggs, low in carbs for a balanced bite, and completely gluten-free. The creamy, custard-like texture pairs beautifully with bursts of juicy berries. Plus, it’s easy to whip together and versatile enough to fit various diets.
Ingredients
(Here's a tip: Check out the full list of ingredients and measurements in the recipe card below.)
2 cups full‑fat cottage cheese
4 large eggs
4 tablespoon sweetener (erythritol, monk fruit, or your choice)
1 teaspoon vanilla extract
2 tablespoon cornstarch (or keto alternative such as almond + coconut flour mix)
1½ cups berries (fresh or frozen)
1 teaspoon lemon zest (optional)
Directions
I start by preheating my oven to 350°F (175°C) and greasing an 8×8 or 9×9 inch baking dish, or lining it with parchment.
I blend the cottage cheese in a blender until it’s completely smooth and free of lumps.
Then I add the eggs, sweetener, vanilla extract, cornstarch (or flour alternative), and lemon zest (if I’m using it), and blend everything again until it’s well combined.
I pour the creamy batter into the prepared baking dish and spread it out evenly.
I bake it for 10–15 minutes, just until the edges begin to set while the center stays soft and jiggly.
I remove the dish from the oven and scatter the berries evenly across the partially baked batter.
Then I return it to the oven and bake for another 30–35 minutes, until the top turns golden and the center is slightly jiggly.
I let it cool for at least 10 minutes before slicing. It’s delicious warm or at room temperature.
Servings and timing
This recipe makes 9 servings. It takes about 5 minutes to prep and 40 minutes total time including baking. Each serving has approximately 95 calories, 7 grams of carbs, and 8 grams of protein — a great macro balance for a light breakfast or dessert.
Variations
I like switching up the berries depending on what’s in season—raspberries, blueberries, or chopped strawberries all work beautifully. For a fall twist, I’ve also tried sliced apples or pears with a sprinkle of cinnamon. And when I want a more keto-friendly version, I replace the cornstarch with a mix of almond flour, coconut flour, and a pinch of xanthan gum.
Storage/Reheating
I store leftovers in an airtight container in the fridge for up to 4–5 days. If I’m planning to keep it longer, I wrap individual slices and freeze them for up to 3 months. When I’m ready to eat, I reheat it gently in the microwave or oven until just warmed through.
FAQs
What is clafoutis and how is this version different?
Clafoutis is a traditional French custard-like dessert, usually made with flour, eggs, sugar, and fruit. This version skips the flour and uses cottage cheese for extra protein and creaminess, making it both gluten-free and low-carb.
Can I use frozen berries?
Yes, I often use frozen berries, but I always thaw and drain them first to prevent extra moisture from making the clafoutis watery.
Can I make this dairy-free?
While the cottage cheese is central to the recipe, a thick dairy-free yogurt or blended silken tofu might work, though I haven’t personally tried it. The texture may differ slightly.
Do I need to use sweetener, or can I use sugar?
I typically use a low-carb sweetener like erythritol or monk fruit, but regular sugar works too if you’re not watching carbs. Just keep the measurement the same.
How do I know when it’s done baking?
I look for a golden top and a center that still has a slight jiggle. It firms up more as it cools, so I avoid overbaking to keep it creamy.
Conclusion
This cottage cheese clafoutis has become a staple in my kitchen for good reason. It’s easy, healthy, and completely satisfying. Whether I enjoy it warm with a dollop of yogurt in the morning or as a light dessert in the evening, it always hits the spot. Plus, with all the possible variations, I never get bored of it.
This copycat Popeyes Cajun Rice recipe brings the bold, spicy flavors of the fast-food favorite right into my kitchen. Packed with savory meat, tender rice, and classic Cajun spices, it's a comforting and filling dish I love serving as a side or even as a main meal.
Why I Love This Recipe
I love how easy it is to recreate the classic taste of Popeyes Cajun Rice at home with simple pantry ingredients. It’s hearty, budget-friendly, and incredibly versatile. Whether I serve it with fried chicken, grilled veggies, or just enjoy a bowl on its own, it hits the spot every time. The spicy, savory flavor with a hint of smokiness from the paprika and cayenne is addictively good, and I can adjust the heat level to fit any mood.
Ingredients
(Here's a tip: Check out the full list of ingredients and measurements in the recipe card below.)
2 cups long grain white rice
4 cups chicken broth (or water + bouillon)
1 tablespoon vegetable oil or butter
1 small onion, finely chopped
1 green bell pepper, finely diced
2 cloves garlic, minced
½ lb (≈ 225 g) ground beef (or a mix of ground beef & chicken)
1 teaspoon paprika
½ teaspoon cayenne pepper (adjust to taste)
½ teaspoon onion powder
½ teaspoon garlic powder
½ teaspoon dried thyme
½ teaspoon dried oregano
Salt and black pepper, to taste
2 tablespoons tomato paste (optional, for color & depth)
Chopped parsley (for garnish, optional)
Directions
I rinse the rice under cold water until the water runs mostly clear, then drain it well.
In a large pot or Dutch oven, I heat the oil over medium heat. I add the chopped onion and bell pepper and sauté them until they’re soft, about 3–4 minutes.
I stir in the minced garlic and let it cook for about 30 seconds until fragrant.
I add the ground beef (or meat mix) and cook it while breaking it up with a spoon until it’s browned and fully cooked.
If I’m using tomato paste, I stir it in now and cook it for another minute.
I mix in the paprika, cayenne, onion powder, garlic powder, thyme, and oregano to coat the meat and vegetables in all that spicy seasoning.
I add the drained rice and stir it well so it gets evenly mixed and coated.
Then, I pour in the chicken broth, give it a gentle stir, and bring it to a boil.
Once boiling, I reduce the heat to low, cover the pot, and let it simmer for 18–20 minutes (or until the rice is tender and the liquid is absorbed).
I turn off the heat and let the rice sit covered for 5 minutes, then fluff it with a fork.
I taste and adjust the seasoning with more salt, pepper, or cayenne if needed. A sprinkle of chopped parsley at the end adds a nice touch before serving.
Servings and timing
This recipe makes about 4 to 6 servings.
Prep time: 10 minutes
Cook time: 20 minutes
Total time: 30 minutes
Variations
I sometimes swap the ground beef with ground turkey or chicken for a lighter version.
For a vegetarian take, I skip the meat and add more veggies like celery and mushrooms.
When I want an extra kick, I increase the cayenne or add a splash of hot sauce.
A dash of turmeric or extra paprika brings out a deeper color if I want a more vibrant rice dish.
Adding a bay leaf during simmering gives it a more rounded, herby depth.
Storage/Reheating
Leftovers keep well in the fridge for up to 4 days. I store them in an airtight container. When reheating, I add a splash of water or broth to loosen up the rice and warm it up on the stovetop or in the microwave. I find it tastes just as good — if not better — the next day.
FAQs
How spicy is this Cajun rice?
It has a moderate kick, but I can always adjust the cayenne pepper to suit my spice tolerance. I usually start with less and add more if needed.
Can I make this rice ahead of time?
Yes, it’s a great make-ahead dish. I often make it the day before and reheat it with a bit of broth to freshen it up.
What kind of meat works best?
Ground beef gives the most traditional flavor, but I’ve also used a beef and chicken mix or even ground turkey with great results.
Can I use brown rice instead of white?
Yes, but I adjust the liquid and cook time accordingly. Brown rice takes longer and needs more liquid to cook through.
Is this rice gluten-free?
If I use gluten-free bouillon or broth and check all spice blends for additives, then yes, this dish is gluten-free.
Conclusion
This homemade Popeyes Cajun Rice copycat has become one of my favorite go-to side dishes. It’s hearty, full of bold Cajun flavor, and easy to whip up in under 30 minutes. Whether I serve it with fried chicken or enjoy it solo, it always hits the spot. I love how customizable it is, and it’s a great way to bring those fast-food flavors home with a healthier twist.
A one-pot fusion of taco flavors and classic spaghetti — this dish brings together seasoned ground beef, a tomato-chili base, and tender pasta, all cooked together and topped off with melted cheese and a sprinkle of fresh cilantro. It’s comforting, quick, and full of bold Tex-Mex flavor.
Why You’ll Love This Recipe
I love how this taco spaghetti checks all the boxes: it’s fast, easy, hearty, and made in just one pot — which means fewer dishes to clean. It’s a weeknight hero that gives me all the satisfaction of tacos with the comfort of cheesy pasta. Plus, it’s easy to customize with different proteins, spice levels, or pasta shapes.
ingredients
(Here's a tip: Check out the full list of ingredients and measurements in the recipe card below.)
2 tablespoons olive oil
½ large sweet onion, diced
1½ pounds ground beef
1 (1-ounce) packet taco seasoning
1 tablespoon Worcestershire sauce
1 tablespoon minced roasted garlic
1 tablespoon tomato paste
3 cups beef broth
1 (15-ounce) can diced tomatoes, drained
1 (4-ounce) can green chilis, drained
8 ounces uncooked spaghetti noodles (half of a 16-oz box)
2 cups Mexican blend shredded cheese
Chopped cilantro, for garnish
directions
I start by heating olive oil in a large heavy-bottom pot or Dutch oven over medium heat. Then I sauté the diced onion until it becomes translucent.
Next, I add the ground beef, breaking it apart as it cooks. After about 4–5 minutes, once it’s browned, I drain any excess grease.
I stir in the taco seasoning, Worcestershire sauce, garlic, and tomato paste, coating the meat well with all the flavor.
Then I pour in the beef broth, diced tomatoes, and green chilis, stirring everything to combine, and bring it all to a gentle simmer.
I add the spaghetti — usually breaking it in half — and press it down so it’s submerged in the liquid.
I let it simmer uncovered, stirring now and then, until the pasta is tender and the sauce has reduced a bit — around 10 minutes. If it looks too thick, I just add a splash more broth.
Off the heat, I stir in the shredded cheese until it melts and turns creamy.
Finally, I garnish with chopped cilantro and serve hot.
Servings and timing
Yield: 4 servings
Prep Time: 10 minutes
Cook Time: 15 minutes
Total Time: 25 minutes
Variations
I like switching it up depending on what I have. Sometimes I use ground turkey or chicken instead of beef for a lighter option. If I want to save time, I’ll use a can of Rotel instead of separate diced tomatoes and green chilis. And while spaghetti works great, I’ve also tried it with penne and rotini — both soak up the flavor beautifully.
storage/reheating
Leftovers keep well, and I always try to make enough for lunch the next day. I let everything cool before storing it in an airtight container in the fridge for up to 3 days. For longer storage, I freeze it in a labeled, freezer-safe container for up to 3 months.
To reheat, I warm it gently in a skillet over medium heat, stirring until it’s heated through. If I’m in a rush, I microwave individual portions for about 3 minutes on high, then let it stand for a minute before digging in.
FAQs
How spicy is taco spaghetti?
It has a mild to medium spice level, depending on the taco seasoning and green chilis used. If I want more heat, I add a dash of hot sauce or extra chilis.
Can I use a different type of cheese?
Absolutely. While I usually go for a Mexican blend, I’ve also used cheddar, Monterey Jack, or even a spicy pepper jack — all melt beautifully into the dish.
Is this recipe freezer-friendly?
Yes, I freeze it in portions once it’s cooled. It reheats really well, making it great for meal prep or future weeknight dinners.
What pasta works best if I don’t have spaghetti?
I’ve made it with penne, rotini, and even macaroni. As long as the pasta can hold up in the sauce and cooks in about the same time, it’ll work fine.
Can I make it vegetarian?
Yes, I’ve swapped the ground beef for plant-based crumbles or even black beans, and used vegetable broth instead of beef broth. Still tastes amazing.
Conclusion
Taco spaghetti brings all the fun and flavor of tacos into a cheesy, hearty pasta dish that’s ready in just 25 minutes. It’s comforting, customizable, and made in one pot — what more could I ask for? Whether I’m cooking for the family or prepping meals ahead, this one’s always a winner.
A crunchy honeycomb (also known as cinder toffee or sponge toffee) candy coated in smooth, rich chocolate is a nostalgic treat I love to make during the holidays or for special homemade gifts. The caramelized sugar base paired with airy texture and crisp snap makes every bite irresistible. Dipped in melted chocolate and optionally topped with a drizzle or sprinkles, it’s as beautiful as it is delicious.
Why You’ll Love This Recipe
I love how this candy brings together the fun of a science experiment with the delicious reward of a sweet treat. The baking soda creates that iconic bubbly texture, giving each bite a light, crunchy feel. I also appreciate how easy it is to customize with different types of chocolate or festive toppings. It’s no-bake, visually impressive, and makes a great addition to holiday cookie boxes or party trays.
ingredients
(Here's a tip: Check out the full list of ingredients and measurements in the recipe card below.)
1½ cups granulated sugar
½ cup water
⅓ cup light corn syrup
3 tablespoons honey
4 teaspoons baking soda
1 pound chocolate almond bark or chocolate melts
White chocolate melts (optional, for drizzle)
Sprinkles (optional)
directions
I start by lining a 9×13 baking dish with parchment paper, leaving some overhang to help lift the candy out later.
In a heavy-bottomed pot, I combine sugar, water, corn syrup, and honey, stirring gently to mix.
I cook the mixture over medium-high heat without stirring until it reaches about 300°F (hard-crack stage) and turns a light caramel color.
Once off the heat, I quickly stir in the baking soda. It foams and expands rapidly, so I move fast.
I pour the foamy mixture into the prepared dish without spreading it—letting it expand naturally.
I let the candy cool and harden completely for about an hour.
Once set, I lift it out and break it into bite-sized pieces.
I melt the chocolate almond bark in 30-second microwave intervals, stirring until smooth.
Then, I dip each piece of honeycomb into the melted chocolate and let any excess drip off.
I place the dipped pieces on parchment, adding sprinkles or a white chocolate drizzle if I feel fancy.
Finally, I let the chocolate coating set completely before serving or storing.
Servings and timing
Yield: 16 servings
Prep time: 5 minutes
Cook time: 15 minutes
Total time: About 1 hour 20 minutes (including cooling and setting)
Variations
I sometimes skip the chocolate coating for a more classic, crunchy honeycomb flavor. When I’m in the mood for something richer, I go for dark chocolate or a swirl of white and milk chocolate together. If I need a vegan option, I swap out the honey for more corn syrup or a plant-based alternative and use vegan chocolate. It’s also fun to add seasonal sprinkles to match the occasion.
storage/reheating
I keep the finished candy in an airtight container at room temperature for up to 5 days, though I find the texture is best within the first day or two. I never refrigerate it, since that can add unwanted moisture and soften the crunch. There’s no reheating needed—just grab a piece and enjoy.
FAQs
What’s the best way to break the honeycomb without crushing it?
I like to lift the whole slab out of the pan using the parchment and use my hands or the back of a spoon to gently tap it into pieces. A serrated knife can help if I want cleaner cuts.
Can I make this without a candy thermometer?
Yes, I watch the color closely. When the sugar mix turns a light caramel shade, I remove it from heat. It’s important not to let it get too dark, or it might taste burnt.
Why didn’t my candy foam up properly?
This usually happens if I don’t mix the baking soda quickly or thoroughly enough. Also, using fresh baking soda helps ensure a strong reaction.
Can I use other types of sugar or syrup?
I’ve had the best results with granulated sugar and light corn syrup. Dark corn syrup can make it taste more molasses-like, which is fine if that’s the flavor I want.
Can I freeze chocolate-covered honeycomb?
I wouldn’t recommend freezing it. The moisture from thawing can ruin the crisp texture and make the candy sticky or soggy.
Conclusion
This chocolate-covered honeycomb candy is one of those treats that looks fancy but comes together with just a few pantry ingredients and some basic technique. I love how dramatic it looks once dipped and drizzled, and how it always gets rave reviews whenever I share it. Whether for a holiday gift or a cozy weekend project, it’s a recipe I come back to again and again.
A smooth and luscious dessert, this creamy vanilla custard is made from simple ingredients like milk, egg yolks, and sugar, gently thickened with cornflour and flavored with a touch of vanilla. It’s a classic that works perfectly on its own or as a luxurious base for fruit, pies, or other treats.
Why You’ll Love This Recipe
I love how this vanilla custard comes together so easily with ingredients I usually have on hand. The texture is silky-smooth, the flavor is rich yet light, and the aroma of vanilla fills the kitchen as it cooks. I can serve it warm for a cozy dessert or chilled for a refreshing treat. It’s also incredibly versatile—great as a sauce or a dessert in itself. Whether I’m spooning it over fresh berries or pairing it with cake, it never fails to impress.
Ingredients
(Here's a tip: Check out the full list of ingredients and measurements in the recipe card below.)
500 ml whole milk
3 large egg yolks
50 g caster sugar
1 tablespoon cornflour (cornstarch)
1 teaspoon vanilla extract
Pinch of salt
Directions
I start by heating the milk in a saucepan over medium heat until it's hot but not boiling.
While that warms, I whisk together the egg yolks, sugar, cornflour, and a pinch of salt in a bowl until it's smooth.
To temper the eggs, I slowly add a few tablespoons of the hot milk into the egg mixture, whisking constantly to avoid scrambling the yolks.
Then I pour this mixture back into the saucepan with the rest of the milk.
I cook it on low heat, stirring non-stop, until the custard thickens and coats the back of a spoon.
Off the heat, I stir in the vanilla extract.
For that perfect silky finish, I strain the custard through a fine sieve into a clean bowl.
I let it cool down, then either serve it warm or chill it, making sure to cover the surface so a skin doesn’t form.
Servings and timing
This recipe makes about 4 to 6 servings, depending on how generous I feel. Prep Time: 10 minutes Cook Time: 10 minutes Total Time: 20 minutes (plus extra chilling time if serving cold)
Variations
I sometimes swap out part of the milk for cream to make the custard extra rich.
For a twist, I infuse the milk with a split vanilla bean instead of extract—just remember to strain out the pod.
Adding a touch of citrus zest can give it a bright note, especially when I’m serving it with fruit.
A pinch of nutmeg or cinnamon adds a warm spice if I’m making it for the holidays.
For a dairy-free version, I use unsweetened almond or oat milk, though the texture is slightly lighter.
storage/reheating
I store any leftover custard in an airtight container in the fridge for up to 3 days. To prevent a skin from forming, I press plastic wrap directly onto the surface. When I want to reheat it, I gently warm it on the stove over low heat, stirring constantly. If it thickens too much, I just whisk in a splash of milk to loosen it up.
FAQs
How do I prevent my custard from curdling?
I make sure to cook it gently over low heat and temper the eggs properly. Stirring constantly and never letting it boil is key.
Can I freeze vanilla custard?
I don’t recommend freezing it—custard tends to separate and become grainy once thawed, losing that smooth texture I love.
Why is my custard lumpy?
That usually means the eggs cooked too quickly. Straining it helps fix minor lumps, but constant stirring and gentle heat prevent them in the first place.
Can I make it ahead of time?
Absolutely. I often make it a day ahead, cover it well, and chill it. I give it a good stir before serving.
Is this the same as pastry cream?
It’s similar, but pastry cream usually uses more thickener and butter, and is often firmer. This custard is more pourable—perfect for desserts or sauce.
Conclusion
This creamy vanilla custard is one of those timeless recipes I keep coming back to. It’s elegant in its simplicity and delivers comforting flavor with every spoonful. Whether I serve it warm, cold, or dressed up with fruit or pastries, it’s always a favorite.
Crispy baked salmon bites tossed in a creamy, sweet-and-spicy bang bang sauce—this dish delivers on flavor, texture, and versatility. Whether I serve it as an appetizer or over a bowl of fluffy rice, it always hits the spot. The sauce clings beautifully to the golden salmon cubes, creating a perfect bite every time.
Why You’ll Love This Recipe
I love how this recipe turns simple salmon into something unforgettable with minimal effort. The salmon bakes up crispy without deep frying, and the bang bang sauce strikes the perfect balance between creamy, tangy, sweet, and spicy. It’s great for a quick weeknight meal, a fun appetizer for guests, or even meal prep. Plus, I can tweak the heat and sweetness to suit my mood.
Ingredients
(Here's a tip: Check out the full list of ingredients and measurements in the recipe card below.)
For serving/garnish: cooked rice (Jasmine or Basmati), sliced green onions, thinly sliced red chili pepper, sesame seeds
Directions
I start by preheating the oven to 425 °F (≈ 220 °C) and lining a large baking sheet with parchment paper.
Then I pat the salmon dry with paper towels and cut it into 1‑inch cubes, placing them in a bowl.
I drizzle the olive oil over the salmon cubes and toss gently to coat them.
Next, I sprinkle on the cornstarch and Cajun seasoning, tossing again until the pieces are evenly coated.
I arrange the salmon bites in a single layer on the prepared baking sheet, leaving space between them.
I bake the salmon for 10–12 minutes, then switch to broil for another ~5 minutes, until the coating turns golden and the salmon flakes easily.
While the salmon cooks, I whisk together the mayonnaise, Thai sweet chili sauce, sriracha, and lime juice until smooth to make the sauce.
Once the salmon is ready, I transfer the hot bites to a clean bowl and pour half of the sauce over, tossing gently to coat.
To serve, I scoop cooked rice into bowls, top with the salmon bites, garnish with green onions, red chili slices, sesame seeds, and drizzle on extra sauce as desired.
Servings and timing
This recipe makes 4 servings. Prep Time: 10 minutes Cook Time: 15 minutes Total Time: 25 minutes
Variations
I sometimes use an air fryer to cook the salmon at 400 °F for 8–10 minutes—perfect when I want to skip the oven.
For a lighter sauce, I swap half the mayo with Greek yogurt.
If I’m not in the mood for too much heat, I reduce or skip the sriracha.
When I don’t have Cajun seasoning, I mix paprika, garlic powder, onion powder, and a pinch of cayenne pepper.
I’ve even added these bites to tacos or lettuce wraps for a fun twist.
Storage/Reheating
I store leftovers in airtight containers in the fridge for up to 2 days, though the coating softens over time. To reheat, I use an air fryer at around 350 °F for 2–4 minutes, or a 350 °F oven for about 5 minutes. I avoid the microwave to keep the texture intact. The bang bang sauce can be made ahead of time and stored in the fridge for up to 3 days—I just give it a good stir before using. If needed, I freeze cooked salmon bites in a single layer first, then transfer to a container or bag. They’ll keep for up to 1 month, though the texture does change slightly.
FAQs
What kind of salmon works best for this recipe?
I like to use fresh, skinless salmon fillets, but frozen (thawed) salmon works too as long as I pat it dry before cooking.
Can I make this dish ahead of time?
I wouldn’t fully assemble it ahead, but I often prep the sauce and cut the salmon in advance. I just wait to bake and toss everything together fresh for the best texture.
Is this recipe spicy?
The heat level is moderate. If I want it milder, I cut back on the sriracha—or skip it entirely. The sweet chili sauce still gives it great flavor.
What can I use instead of mayonnaise?
For a lighter or tangier option, I sometimes use half Greek yogurt, or even all Greek yogurt, though the texture gets a bit thinner.
Can I make this low-carb?
Yes—I skip the rice and serve the salmon bites over cauliflower rice or a fresh salad to keep it low-carb. The sauce and salmon are naturally low in carbs.
Conclusion
These bang bang salmon bites are a go-to when I want bold flavor with little fuss. The contrast between the crispy salmon and creamy, spicy sauce is addictive, and I love how customizable it is. Whether I’m feeding guests or treating myself on a weeknight, this dish always delivers.
These fluffy buttermilk pancakes are everything I want in a breakfast classic—light, tender, golden on the outside, and irresistibly delicious. With simple ingredients and an easy-to-follow method, I can whip up a batch in no time for a cozy morning treat. Whether I’m making them for a lazy weekend breakfast or a quick weekday delight, this recipe never fails to deliver that homemade comfort I crave.
Why You’ll Love This Recipe
I love how this pancake recipe strikes the perfect balance between airy texture and rich flavor. The buttermilk brings a subtle tang that pairs beautifully with the sweet syrup, while the batter stays soft and fluffy without being overly heavy. Resting the batter for just a few minutes works like magic, giving me picture-perfect pancakes every time. Plus, it’s an incredibly forgiving recipe—even if I’m not a morning person, I can make these with ease.
Ingredients
(Here's a tip: Check out the full list of ingredients and measurements in the recipe card below.)
2 cups all‑purpose flour
2 teaspoons baking powder
1 teaspoon baking soda
½ teaspoon salt
2 tablespoons granulated sugar
2 cups buttermilk
2 large eggs, lightly beaten
1 teaspoon vanilla extract (optional)
Directions
I start by whisking together the flour, baking powder, baking soda, salt, and sugar in a large bowl.
Next, I whisk in the buttermilk, eggs, and vanilla extract just until combined—it’s totally fine if the batter has a few lumps.
I let the batter rest for 10 minutes to help the texture develop.
While the batter rests, I heat a large skillet or griddle over medium heat.
I grease the surface with nonstick spray, butter, or oil—whatever I have on hand.
Using a ladle, I pour about ⅓ to ½ cup of batter for each pancake onto the hot surface.
I flip the pancakes once small bubbles form on the surface and the edges look set, then cook the other side until golden brown.
I serve them warm with butter and syrup—pure comfort on a plate.
Servings and timing
This recipe makes about 12 pancakes. I typically prepare everything in just 15 minutes and cook them in around 7 minutes, giving me a total of 22 minutes from start to finish. It’s ideal when I need something satisfying but quick.
Variations
I sometimes toss fresh blueberries or sliced bananas into the batter before cooking for a fruity twist.
For a slightly nuttier flavor, I swap out ¼ cup of the flour for whole wheat flour.
I’ve even added a handful of mini chocolate chips for a kid-friendly version that’s always a hit.
If I want extra richness, I replace half the buttermilk with sour cream.
storage/reheating
When I have leftovers, I store them in an airtight container in the fridge for up to 3 days. For longer storage, I freeze the pancakes with parchment paper between each one and keep them in a freezer-safe bag for up to 2 months.
To reheat, I pop them in the microwave for about 20–30 seconds or warm them in a toaster for a crispier edge. They taste just as great the next day!
FAQs
How do I know when to flip the pancakes?
I look for small bubbles forming on the surface and check that the edges look slightly dry. That’s my signal to flip for perfectly golden results.
Can I make this recipe without buttermilk?
Yes, when I don’t have buttermilk, I mix 2 cups of milk with 2 tablespoons of lemon juice or vinegar and let it sit for 5–10 minutes as a substitute.
What if my pancakes are turning out too flat?
Flat pancakes usually mean the batter was overmixed. I mix just until the ingredients come together and let the batter rest for better lift.
Can I make the batter ahead of time?
I prefer to make the batter fresh, but I’ve made it a few hours in advance and kept it covered in the fridge. Just a quick stir before cooking does the trick.
What’s the best way to keep pancakes warm while cooking a batch?
I keep my oven at 200°F and place cooked pancakes on a baking sheet inside to stay warm until I’m ready to serve everything at once.
Conclusion
This fluffy buttermilk pancake recipe has earned a permanent spot in my breakfast routine. It's reliable, delicious, and endlessly adaptable. Whether I’m making them for a big family brunch or a quiet morning treat, they always turn out beautifully. Once I tasted how light and tender they are, I stopped reaching for boxed mixes altogether.